Page 194 of 444
Engine Coolant Temperature Gage
United States
~~
Canadian
This gage shows the engine coolant temperature.
If the gage pointer moves into the red area, your
engine
is too hot!
It means that your engine coolant has overheated. If you
have been operating your vehicle under normal driving
conditions, you should pull
off the road, stop your
vehicle and turn
off the engine as soon as possible.
In “Problems on the Road,” this manual
shows what to
do. See “Engine Overheating”
in the Index.
Engine Temperature Warning Light
b This light will come on
when your engine gets
too
hot.
v
If this light comes on, it means that your engine coolant
has overheated. If
you have been operating your vehicle
under normal driving conditions, you should pull
off the
road, stop your vehicle and turn off the engine
as soon
as possible.
In “Problems on the Road,” this manual shows what
to
do. See “Engine Overheating” in the Index.
2-92
ProCarManuals.com
Page 271 of 444

Making Turns
NOTICE:
Making very sharp turns while trailering could
cause the trailer to come in contact with the vehicle. Your vehicle could
be damaged. Avoid
making very sharp turns while trailering.
When you’re turning with a trailer, make wider turns
than normal. Do this
so your trailer won’t strike soft
shoulders, curbs, road signs, trees or other objects.
Avoid jerky or sudden maneuvers. Signal well
in advance.
Turn Signals When Towing a Trailer
When you tow a trailer, your vehicle has to have
extra wiring.
The arrows on your instrument panel will flash
whenever
you signal a turn or lane change. Properly
hooked up, the trailer lamps will also flash, telling other
drivers you’re about to turn, change lanes or stop. When
towing a trailer, the arrows on your instrument
panel will flash for turns even if the bulbs on the trailer
are burned
out. Thus, you may think drivers behind you
are seeing your signal when they are not. It’s important
to check occasionally to be sure the trailer bulbs are
still working.
Driving On Grades
Reduce speed and shift to a lower gear before you start
down a long or steep downgrade.
If you don’t shift
down, you might have to use your brakes
so much that
they would get hot and no longer work well.
On a long uphill grade, shift down and reduce your
speed to around
45 mph (70 km/h) to reduce the
possibility of engine and transaxle overheating.
If
you are towing a trailer that weighs more than
1,000 lbs. (450 kg), you may prefer to drive in
THIRD
(3) instead of AUTOMATIC OVERDRIVE (D)
(or, as you need to, a lower gear). This will minimize
heat build-up and extend the life of your transaxle.
4-39
ProCarManuals.com
Page 275 of 444
Section 5 Problems on the Road
Here you’ll find what to do about some problems that can occur on the road.
5-2
5-2
5-3
5-7
5- 13
5-24 Hazard Warning
Flashers
Other Warning Devices
Jump Starting Towing Your Vehicle
Engine Overheating If a Tire Goes Flat
5-24 Air Inflator (Option)
5-24 Changing a Flat Tire
5-34 Compact Spare Tire
5-35 If You’re Stuck: In Sand,
Mud, Ice or Snow
ProCarManuals.com
Page 287 of 444

Engine Overheating
You will find a coolant temperature gage on your
vehicle’s instrument panel. See “Engine Coolant
Temperature Gage” in the Index. You also have a low
coolant level light on your instrument panel. See “LOW
Coolant Light” in the Index.
Overheated Engine Protection
Operating Mode
Should an overheated engine condition exist, an
overheat protection mode which alternates firing groups
of three cylinders helps prevent engine damage. In this
mode, you will notice a significant loss in power and
engine performance. The
low coolant light may come on
and the temperature gage will indicate an overheat
condition exists. This emergency operating mode allows
your vehicle to be driven to a safe place in an
emergency. Towing a trailer in the overheat protection
mode should be avoided.
1 NOTICE:
After driving in the overheated engine protection
operating mode, to avoid engine damage, allow
the engine to cool before attempting any repair.
The engine oil will be severely degraded. Repair
the cause of coolant loss and change the oil. See
“Engine Oil, When to Change” in the Index.
ProCarManuals.com
Page 291 of 444
The coolant level should be at or above the
FULL COLD mark.
If it isn’t,
you may have a leak in the radiator hoses,
heater hoses, radiator, water pump or somewhere else in
the cooling system.
’ A CAUTION:
Heater and radiator hoses, and other engine
parts, can be
very hot. Don’t touch them. If you
do, you can be burned.
Don’t run the engine if there is a leak.
If you run
the engine,
it could lose all coolant. That could
cause an engine fire, and you could be burned.
Get any leak fixed before you drive the vehicle.
~
NOTICE:
Engine damage from running your engine
without coolant isn’t covered by your warranty.
If there seems to be no leak, with the engine on, check to
see if the electric engine cooling fans are running.
If the
engine
is overheating, both fans should be running. If
they aren’t, your vehicle needs service.
5-17
ProCarManuals.com
Page 331 of 444

Engine Coolant
The cooling s stem in your vehicle is filled with
DEX-COOL engine coolant. This coolant is designed
to remain in your vehicle for
5 years or 150,000 miles
(240 000 lunb whichever occurs first, if you add only
DEX-COOL extended life coolant.
J
The following explains your cooling system and how
to add coolant when it is low. If you have a problem
with engine overheating, see “Engine Overheating” in
the Index.
A 50/50 mixture of water and DEX-COOL@
coolant will:
Give freezing protection down to -34°F (-37°C).
0 Give boiling protection up to 265 OF (1 29 O C).
Protect against rust and corrosion.
Help keep the proper engine temperature.
Let the warning lights and gages work as
they should.
NOTICE:
When adding coolant, it is important that you
use only
DEX-COOL@ (silicate-free) coolant.
If coolant other than DEX-COOL is added to
the system, premature engine, heater core or
radiator corrosion may result. In addition, the
engine coolant will require change sooner
-- at
30,000 miles (50 000 km) or 24 months,
whichever occurs
first. Damage caused by the
use of coolant other than DEX-COOL@ is not
covered by your new vehicle warranty.
6-21
ProCarManuals.com
Page 334 of 444
1 Add coolant mixture at the recovery tank, but be careful
~ not to spill it.
~
You can be burned if you spill coolant on hot
engine parts. Coolant contains ethylene glycol,
and
it will burn if the engine parts are hot
enough. Don’t spill coolant on
a hot engine.
_- -
When you replace your radiator pressure cap, a GM cap
is recommended.
Radiator Pressure Cap
NOTICE:
Your radiator cap is a 15 psi (105 kPa)
pressure-type cap and must be tightly installed to
prevent coolant loss and possible engine damage
from overheating. Be
sure the arrows on the cap
line up with the overflow tube on the radiator
filler neck.
Thermostat
Engine coolant temperature is controlled by a thermostat
in the engine coolant system. The thermostat
stops the
flow of coolant through the radiator until the coolant
reaches a preset temperature.
When you replace your thermostat, a
GM thermostat
is recommended.
1 6-24
I I
ProCarManuals.com
Page 349 of 444

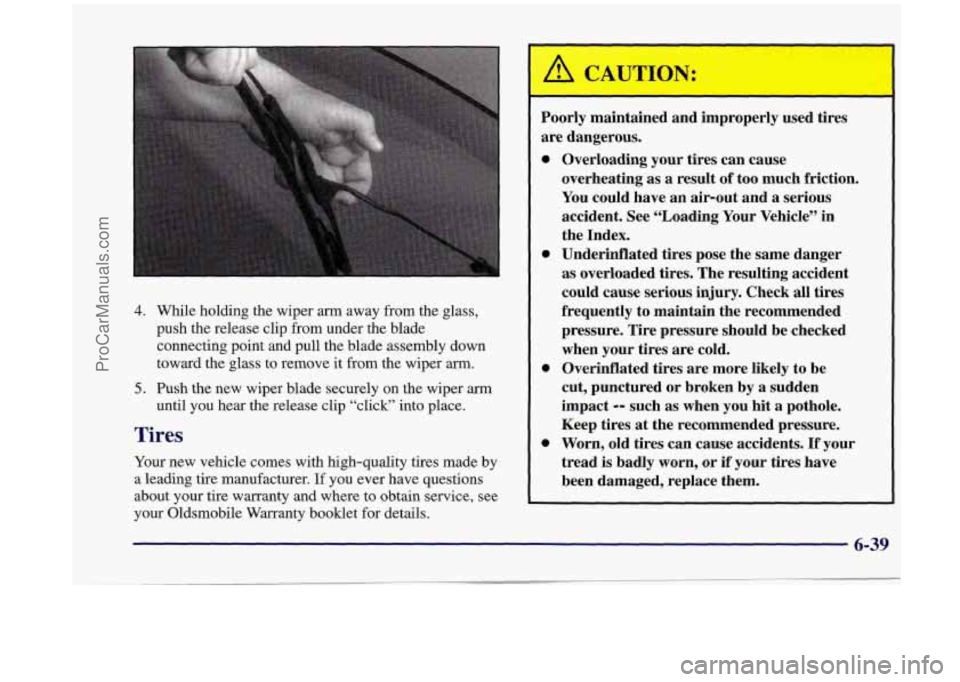
4. While holding the wiper arm away from the glass,
push the release clip from under the blade
connecting point and pull the blade assembly down
toward the glass to remove it from the wiper
arm.
5. Push the new wiper blade securely on the wiper arm
until you hear the release clip “click” into place.
Tires
Your new vehicle comes with high-quality tires made by
a leading tire manufacturer.
If you ever have questions
about your tire warranty and where to obtain service, see
your Oldsmobile Warranty booklet for details.
Poorly maintained and improperly used tires
are dangerous.
0
Overloading your tires can cause
overheating
as a result of too much friction.
You could have an air-out and a serious
accident. See “Loading Your Vehicle” in
the Index.
Underinflated tires pose the same danger
as overloaded tires. The resulting accident
could cause serious injury. Check all tires
frequently to maintain the recommended
pressure. Tire pressure should be checked
when your tires are cold.
Overinflated tires are more likely to be
cut, punctured or broken by a sudden
impact
-- such as when you hit a pothole.
Keep tires
at the recommended pressure.
Worn, old tires can cause accidents.
If your
tread is badly worn, or
if your tires have
been damaged, replace them.
6-39
ProCarManuals.com