1998 NISSAN SENTRA Ecu
[x] Cancel search: EcuPage 136 of 216
When towing your vehicle, U.S States, Cana-
dian Provinces and local regulations for tow-
ing must be followed. Incorrect towing equip-
ment could damage your vehicle. Towing
instructions are available from an authorized
NISSAN dealer. Local service operators are
generally familiar with the applicable laws
and procedures for towing. To assure proper
towing and to prevent accidental damage to
your vehicle, NISSAN recommends having a
service operator tow your vehicle. It is advis-
able to have the service operator carefully
read the following precautions.
WARNING
cNever ride in a vehicle that is being
towed.
cNever get under your vehicle after it
has been lifted by a tow truck.
CAUTION
cWhen towing, make sure that the
transmission, axles, steering system
and powertrain are in working con-
dition. If any unit is damaged, dollies
must be used.
cWhen towing with the front wheels
on the ground:Turn the ignition key to the OFF
position and secure the steering
wheel in a straight ahead position
with a rope or similar device. Never
place the ignition key in the LOCK
position. This will result in damage
to the steering lock mechanism.
Move the gearshift lever to the N
(Neutral) position.
On automatic transmission models,
to move the shift lever to the N (Neu-
tral) position turn the ignition key to
the ACC position.
After moving the shift lever to the N
(Neutral) position, be sure to turn the
ignition key to the OFF position.
cWhen towing with the rear wheels on
the ground, release the parking
brake.
On automatic transmission models,
to move the shift lever to the N (Neu-
tral) position, turn the ignition key to
the ACC position. After moving the
shift lever to the Neutral position, be
sure to turn the ignition key to the
OFF position.
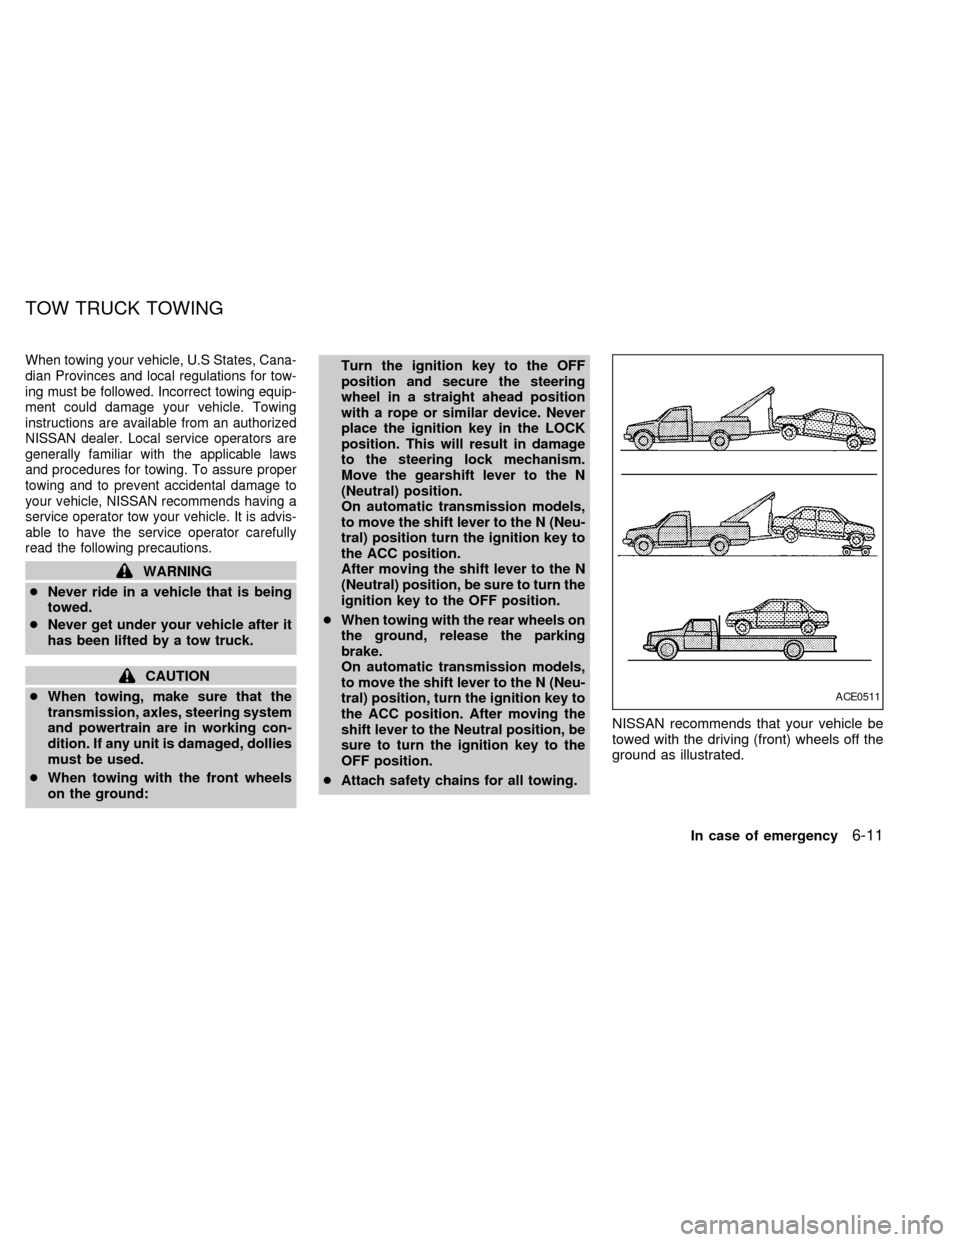
cAttach safety chains for all towing.NISSAN recommends that your vehicle be
towed with the driving (front) wheels off the
ground as illustrated.
ACE0511
TOW TRUCK TOWING
In case of emergency6-11
ZX
Page 145 of 216
When performing any inspection or mainte-
nance work on your vehicle, always take
care to prevent serious accidental injury to
yourself or damage to the vehicle. The
following are general precautions which
should be closely observed.
WARNING
cPark the vehicle on a level surface,
apply the parking brake securely and
block the wheels to prevent the ve-
hicle from moving. For a manual
transmission, move the gearshift
control lever to N (Neutral). For an
automatic transmission, move the
shift lever to P (Park).
cBe sure the ignition key is OFF when
performing any parts replacement or
repairs.
cBe sure to turn the ignition key to the
OFF or LOCK position. When the
ignition key is in the ON or ACC
position, the cooling fan may start to
operate suddenly even when the en-
gine is not running.cIf you must work with the engine
running, keep your hands, clothing,
hair and tools away from moving
fans, belts and any other moving
parts.
cIt is advisable to remove ties and any
jewelry, such as rings, watches, etc.,
before working on your vehicle.
cIf you must run the engine in an
enclosed space such as a garage, be
sure there is proper ventilation for
exhaust gases.
cNever get under the vehicle while it
is supported by only a jack. If it is
necessary to work under the vehicle,
support it with safety stands.
cKeep smoking materials, flame and
sparks away from fuel and battery.
cOn gasoline engine models with the
Multiport Fuel Injection (MFI) sys-
tem, the fuel filter or fuel lines
should be serviced by an authorized
NISSAN dealer because the fuel
lines are under high pressure even
when the engine is off.
CAUTION
cDo not work under the hood while
the engine is hot. Turn the engine off
and wait until it cools down.
cNever connect or disconnect either
the battery or any transistorized
component connector while the igni-
tion is ON.
c
Avoid contact with used motor oil.
Improperly disposed motor oil and/or
other vehicle fluids can hurt the en-
vironment. Always conform to local
regulations for disposal of vehicle
fluid.
This ``Do-it-yourself'' section gives instruc-
tions regarding only those items which are
relatively easy for an owner to perform.
You should be aware that incomplete or
improper servicing may result in operating
difficulties or excessive emissions, and
could affect your warranty coverage.If in
doubt about any servicing, have it done
by an authorized NISSAN dealer.
MAINTENANCE
PRECAUTIONS
8-2Do-it-yourself
ZX
Page 150 of 216

1. Move the heater or air conditioner tem-
perature control dial to the maximum hot
position.
2. Open the radiator drain plug. Open the
drain plug on the engine block.3. Open the radiator cap to drain the cool-
ant.
4. Flush the cooling system by running
fresh water through the radiator.
5. Close the drain plugs on the radiator and
the engine block securely.
6. See the ``Technical and consumer infor-
mation'' section for cooling system ca-
pacity. Fill the radiator slowly with the
proper mixture of coolant and water. Fill
the reservoir tank up to the MAX level.
7. Open and close the air release plug(s) to
release air. Then fill the radiator again
and install the radiator cap.
8.
Start the engine, and warm it up until it
reaches normal operating temperature.
Then race the engine two or three times
under no load. Watch the engine coolant
temperature gauge for signs of overheating.
ADI0632
ADI0615
Do-it-yourself8-7
ZX
Page 153 of 216
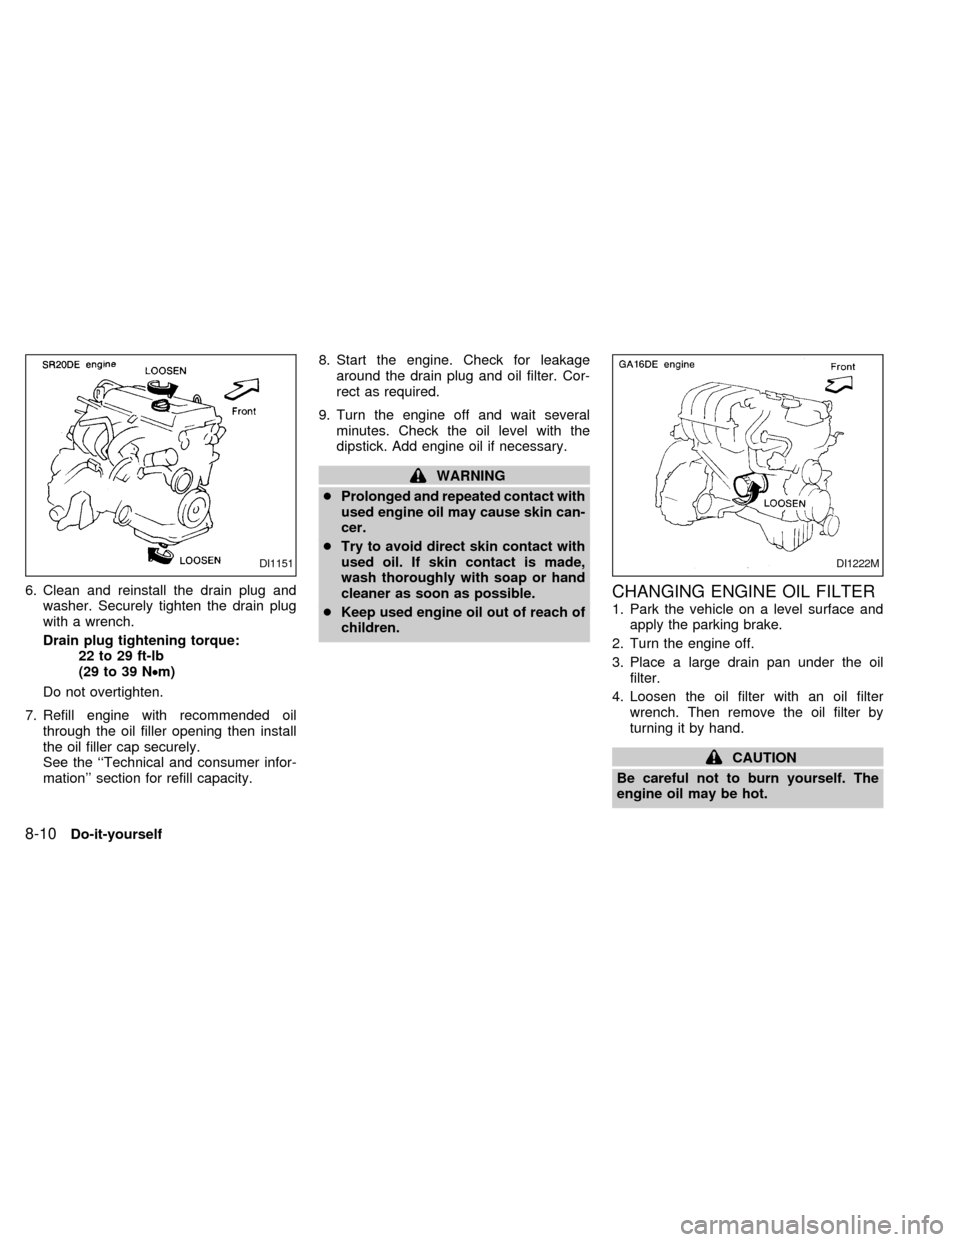
6. Clean and reinstall the drain plug and
washer. Securely tighten the drain plug
with a wrench.
Drain plug tightening torque:
22 to 29 ft-lb
(29 to 39 N²m)
Do not overtighten.
7. Refill engine with recommended oil
through the oil filler opening then install
the oil filler cap securely.
See the ``Technical and consumer infor-
mation'' section for refill capacity.8. Start the engine. Check for leakage
around the drain plug and oil filter. Cor-
rect as required.
9. Turn the engine off and wait several
minutes. Check the oil level with the
dipstick. Add engine oil if necessary.
WARNING
cProlonged and repeated contact with
used engine oil may cause skin can-
cer.
cTry to avoid direct skin contact with
used oil. If skin contact is made,
wash thoroughly with soap or hand
cleaner as soon as possible.
cKeep used engine oil out of reach of
children.
CHANGING ENGINE OIL FILTER
1. Park the vehicle on a level surface and
apply the parking brake.
2. Turn the engine off.
3. Place a large drain pan under the oil
filter.
4. Loosen the oil filter with an oil filter
wrench. Then remove the oil filter by
turning it by hand.
CAUTION
Be careful not to burn yourself. The
engine oil may be hot.
DI1151DI1222M
8-10Do-it-yourself
ZX
Page 158 of 216
Canada Only
Add fluid when the low washer fluid warning
light comes on. Add a washer solvent to the
water for better cleaning. In the winter sea-
son, add a windshield washer antifreeze.
Follow the manufacturer's instructions for
the mixture ratio.
CAUTION
Do not substitute engine antifreeze
coolant for windshield washer solution.
This may result in damage to the paint.cKeep the battery surface clean and dry.
Any corrosion should be washed off with
a solution of baking soda and water.
cMake certain the terminal connections
are clean and securely tightened.
cIf the vehicle is not to be used for 30 days
or longer, disconnect the negative (þ)
battery terminal cable to prevent dis-
charge.
WARNING
cDo not expose the battery to flames
or electrical sparks. Hydrogen gas
generated by battery action is explo-
sive. Do not allow battery fluid to
contact your skin, eyes, fabrics, or
painted surfaces. After touching a
battery or battery cap, do not touch
or rub your eyes. Thoroughly wash
your hands. If the acid contacts your
eyes, skin or clothing, immediately
flush with water for at least 15 min-
utes and seek medical attention.
cWhen working on or near a battery,
always wear suitable eye protection
and remove all jewelry.
cKeep the battery out of the reach of
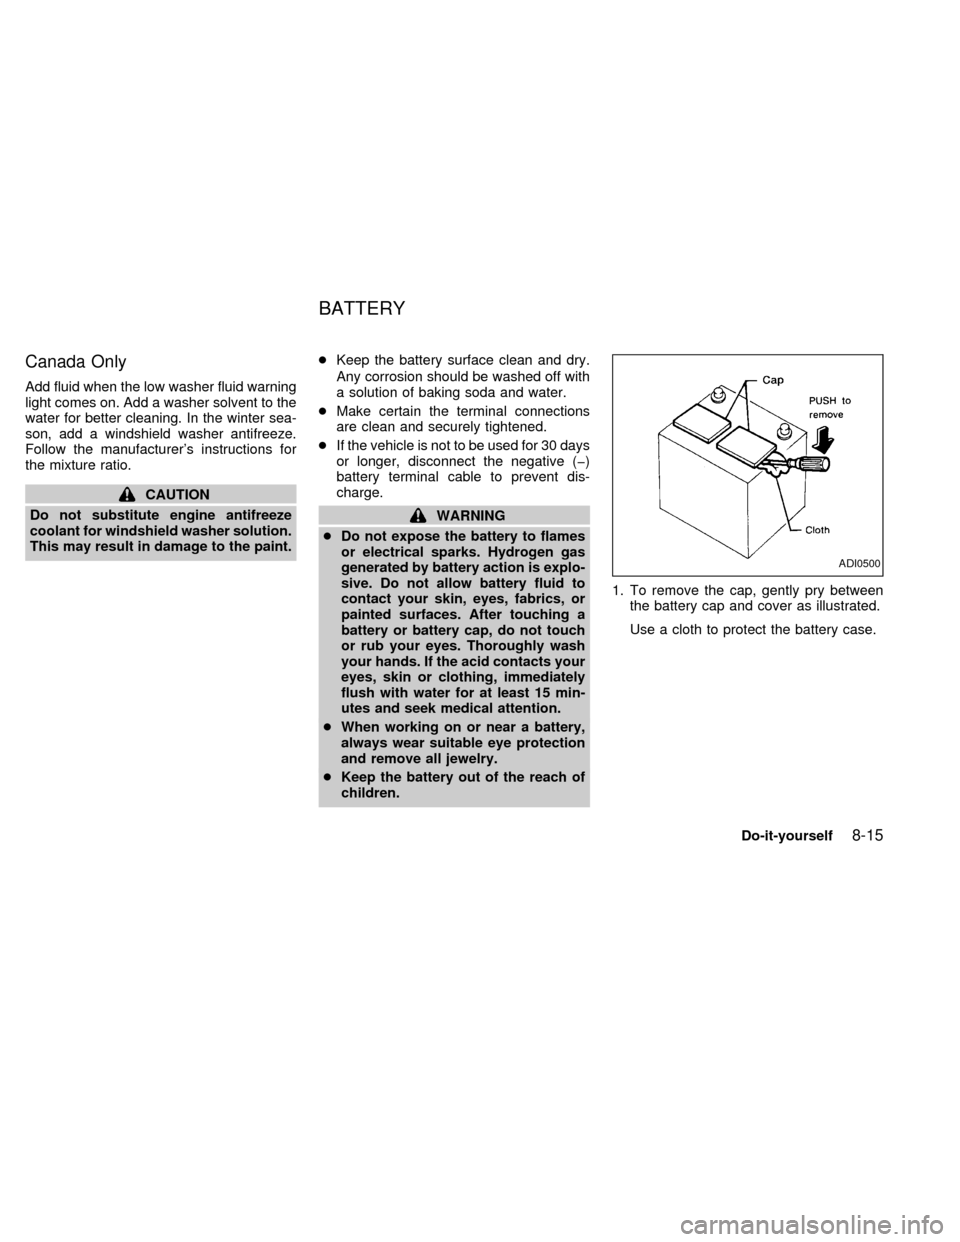
children.1. To remove the cap, gently pry between
the battery cap and cover as illustrated.
Use a cloth to protect the battery case.
ADI0500
BATTERY
Do-it-yourself8-15
ZX
Page 161 of 216
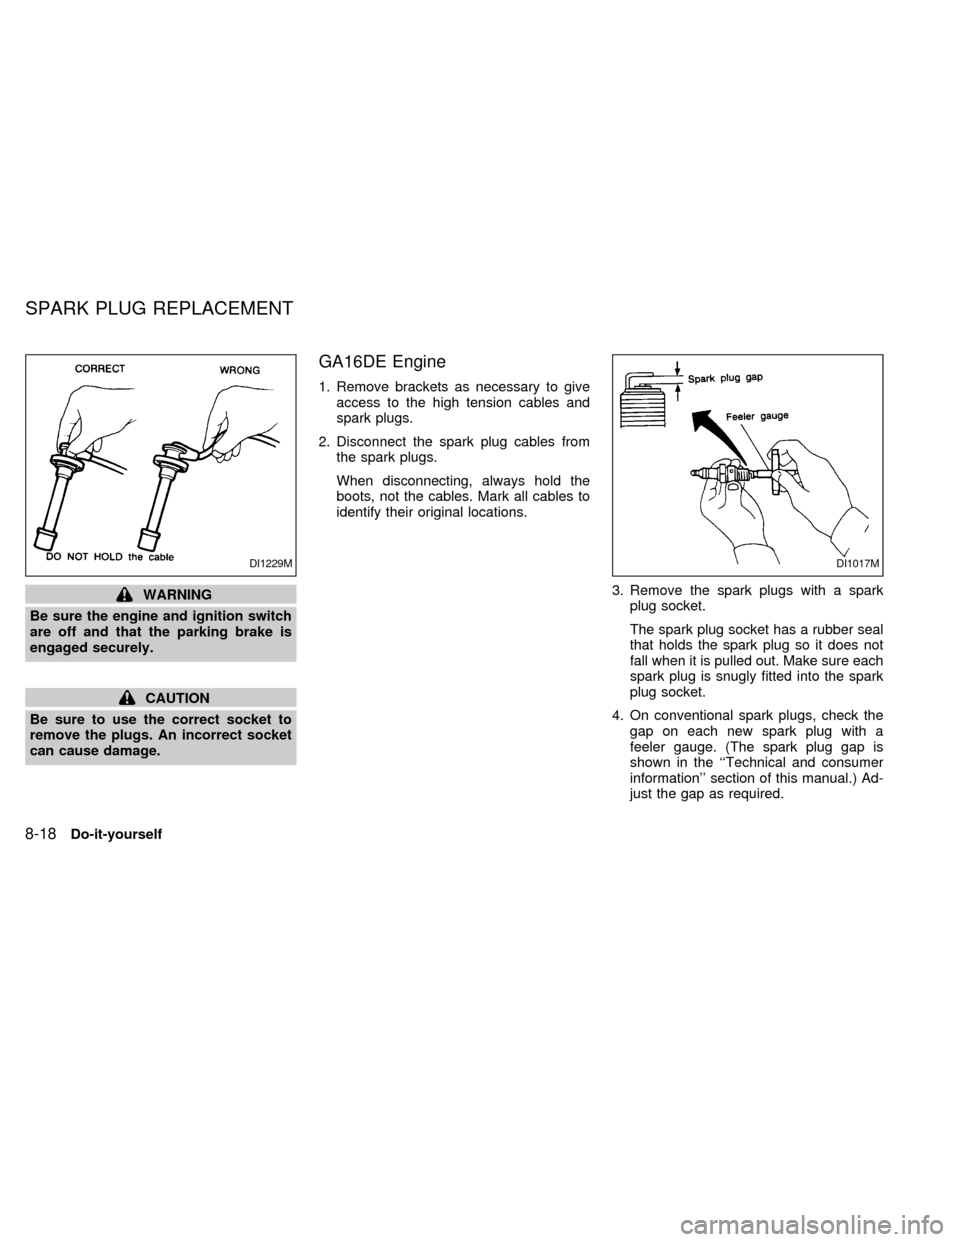
WARNING
Be sure the engine and ignition switch
are off and that the parking brake is
engaged securely.
CAUTION
Be sure to use the correct socket to
remove the plugs. An incorrect socket
can cause damage.
GA16DE Engine
1. Remove brackets as necessary to give
access to the high tension cables and
spark plugs.
2. Disconnect the spark plug cables from
the spark plugs.
When disconnecting, always hold the
boots, not the cables. Mark all cables to
identify their original locations.
3. Remove the spark plugs with a spark
plug socket.
The spark plug socket has a rubber seal
that holds the spark plug so it does not
fall when it is pulled out. Make sure each
spark plug is snugly fitted into the spark
plug socket.
4. On conventional spark plugs, check the
gap on each new spark plug with a
feeler gauge. (The spark plug gap is
shown in the ``Technical and consumer
information'' section of this manual.) Ad-
just the gap as required.
DI1229MDI1017M
SPARK PLUG REPLACEMENT
8-18Do-it-yourself
ZX
Page 176 of 216

Summer tires
NISSAN specifies summer tires on some
models to provide superior performance on
dry roads. Summer tire performance is sub-
stantially reduced in snow and ice. Summer
tires do not have the tire traction rating
``M&S'' on the tire sidewall.
If you plan to operate your vehicle in snowy
or icy conditions, NISSAN recommends the
use of ``SNOW'' tires or ``ALL SEASON''
tires on all four wheels.
Snow tires
If snow tires are needed, it is necessary to
select tires equivalent in size and load rating
to the original equipment tires. If you do not,
it can adversely affect the safety and han-
dling of your vehicle.
Generally, snow tires have lower speed
ratings than factory equipped tires and may
not match the potential maximum vehicle
speed. Never exceed the maximum speed
rating of the tire.
If you plan to operate your vehicle in snowy
or icy conditions, NISSAN recommends the
use of ``SNOW'' tires or ``ALL SEASON''
tires on all four wheels.
For additional traction on icy roads, studdedtires may be used. However, some U.S.
States and Canadian Provinces prohibit
their use. Check local, state and provincial
laws before installing studded tires. Skid
and traction capabilities of studded snow
tires on wet or dry surfaces may be poorer
than that of non-studded snow tires.
Tire chains
Use of tire chains may be prohibited accord-
ing to location. Check the local laws before
installing tire chains. When installing tire
chains, make sure they are of proper size
for the tires on your vehicle and are installed
according to the chain manufacturer's sug-
gestions.Use only SAE class ªSº chains.
Other types may damage your vehicle. Use
chain tensioners when recommended by
the tire chain manufacturer to ensure a tight
fit. Loose end links of the tire chain must be
secured or removed to prevent the possibil-
ity of whipping action damage to the fenders
or underbody. If possible, avoid fully loading
your vehicle when using tire chains. In ad-
dition, drive at a reduced speed. Otherwise,
your vehicle may be damaged and/or ve-
hicle handling and performance may be
adversely affected.
Never install tire chains on a T-type spare
tire. Do not use tire chains on dry roads.
Tire rotation
NISSAN recommends rotating the tires
every 7,500 miles (12,000 km).
See ``Flat tire'' in the ``In case of emergency''
section for tire replacing procedures.
As soon as possible, tighten the wheel
nuts to the specified torque with a nut
tightening torque:
72 to 87 ft-lb (98 to 118 Nzm)
The wheel nuts must be kept tightened to
specifications at all times. It is recom-
mended that wheel nuts be tightened to
specification at each tire rotation interval.
ADI0656
Do-it-yourself8-33
ZX
Page 182 of 216

check for any loose wheel nuts. Tighten if
necessary.
Tire rotation* ÐTires should be rotated
every 7,500 miles (12,000 km).
Wheel alignment and balance ÐIf the
vehicle should pull to either side while driv-
ing on a straight and level road, or if you
detect uneven or abnormal tire wear, there
may be a need for a wheel alignment.
If the steering wheel or seat vibrates at
normal highway speeds, wheel balancing
may be needed.
Windshield wiper blades* ÐCheck for
cracks or wear if they do not wipe properly.
Doors and hood ÐCheck that all doors
and the hood operate properly. Also ensure
that all latches lock securely. Lubricate
hinges, latches, rollers and links if neces-
sary. Make sure the secondary latch keeps
the hood from opening when the primary
latch is released.
When driving in areas that use road salt or
other corrosive materials, check lubrication
frequently.
Lights* ÐMake sure the headlights, stop
lights, tail lights, turn signal lights, and otherlights are all operating properly and installed
securely. Also check headlight aim.
INSIDE THE VEHICLE
The maintenance items listed here should
be checked on a regular basis, such as
when performing periodic maintenance,
cleaning the vehicle, etc.
Additional information on the following
items with an ``*'' is found in the ``Do-it-
yourself'' section of this manual.
Warning lights and chimes ÐMake sure
all warning lights and chimes are operating
properly.
Windshield wiper and washer* ÐCheck
that the wipers and washer operate properly
and that the wipers do not streak.
Windshield defroster ÐCheck that the air
comes out of the defroster outlets properly
and in sufficient quantity when operating the
heater or air conditioner.
Steering wheel ÐCheck for changes in
the steering conditions, such as excessive
freeplay, hard steering or strange noises.
Seats ÐCheck seat position controls such
as seat adjusters, seatback recliner, etc. toensure they operate smoothly and all
latches lock securely in every position.
Check that the head restraints move up and
down smoothly and the locks hold securely
in all latched positions.
Seat belts ÐCheck that all parts of the seat
belt system (For example buckles, anchors,
adjusters and retractors) operate properly
and smoothly, and are installed securely.
Check the belt webbing for cuts, fraying,
wear or damage.
Accelerator pedal ÐCheck the pedal for
smooth operation and make sure the pedal
does not catch or require uneven effort.
Keep the floor mat away from the pedal.
Clutch pedal* ÐMake sure the pedal
operates smoothly and check that it has the
proper free travel.
Brakes ÐCheck that the brakes do not pull
the vehicle to one side when applied.
Brake pedal* ÐCheck the pedal for
smooth operation and make sure it has the
proper distance under it when depressed
fully. Check the brake booster function. Be
certain to keep the floor mat away from the
pedal.
Maintenance
9-3
ZX