1998 NISSAN SENTRA coolant
[x] Cancel search: coolantPage 149 of 216

If the cooling system frequently requires
coolant, have it checked by an autho-
rized NISSAN dealer.
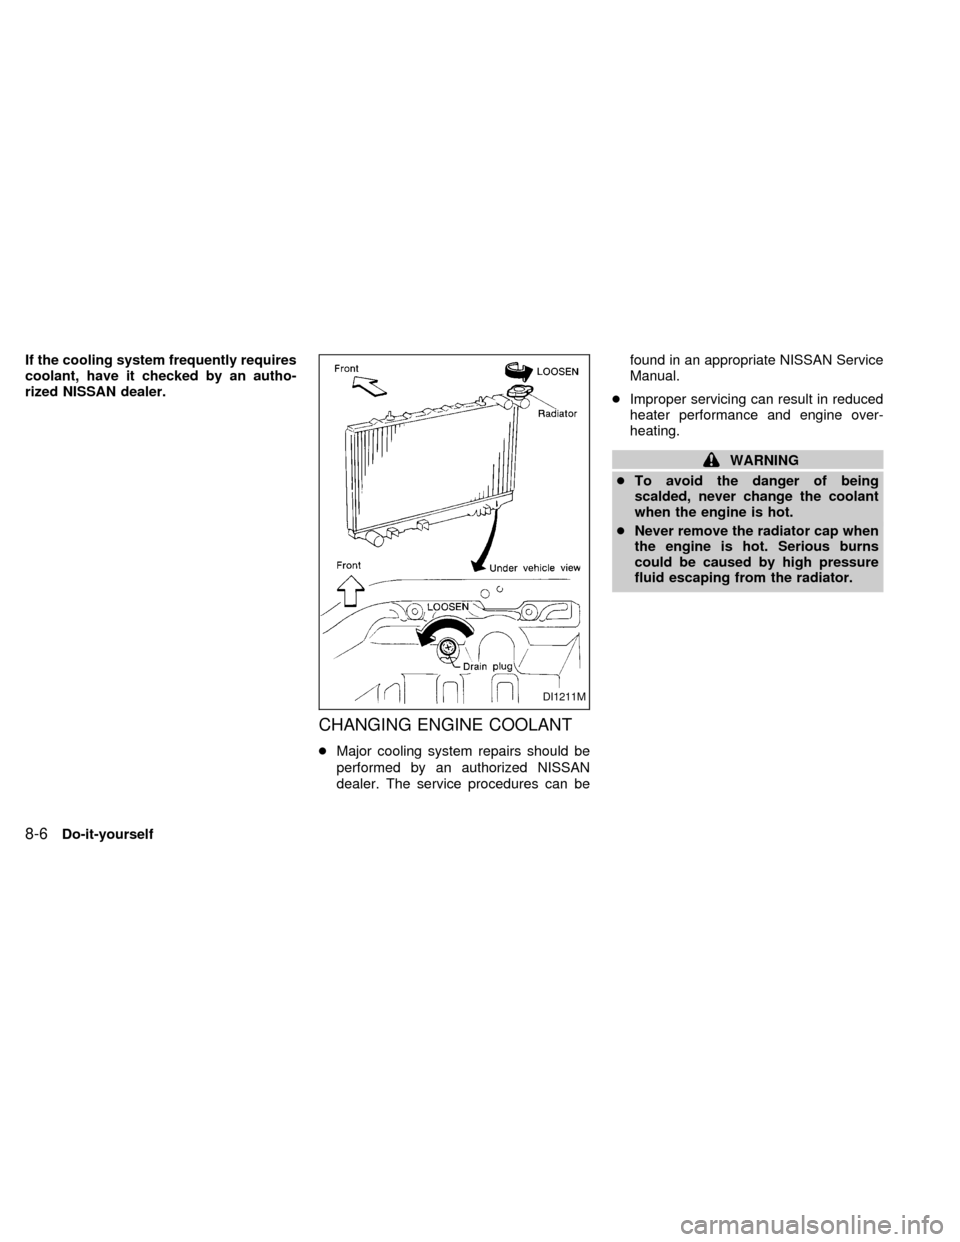
CHANGING ENGINE COOLANT
cMajor cooling system repairs should be
performed by an authorized NISSAN
dealer. The service procedures can befound in an appropriate NISSAN Service
Manual.
cImproper servicing can result in reduced
heater performance and engine over-
heating.
WARNING
cTo avoid the danger of being
scalded, never change the coolant
when the engine is hot.
cNever remove the radiator cap when
the engine is hot. Serious burns
could be caused by high pressure
fluid escaping from the radiator.
DI1211M
8-6Do-it-yourself
ZX
Page 150 of 216

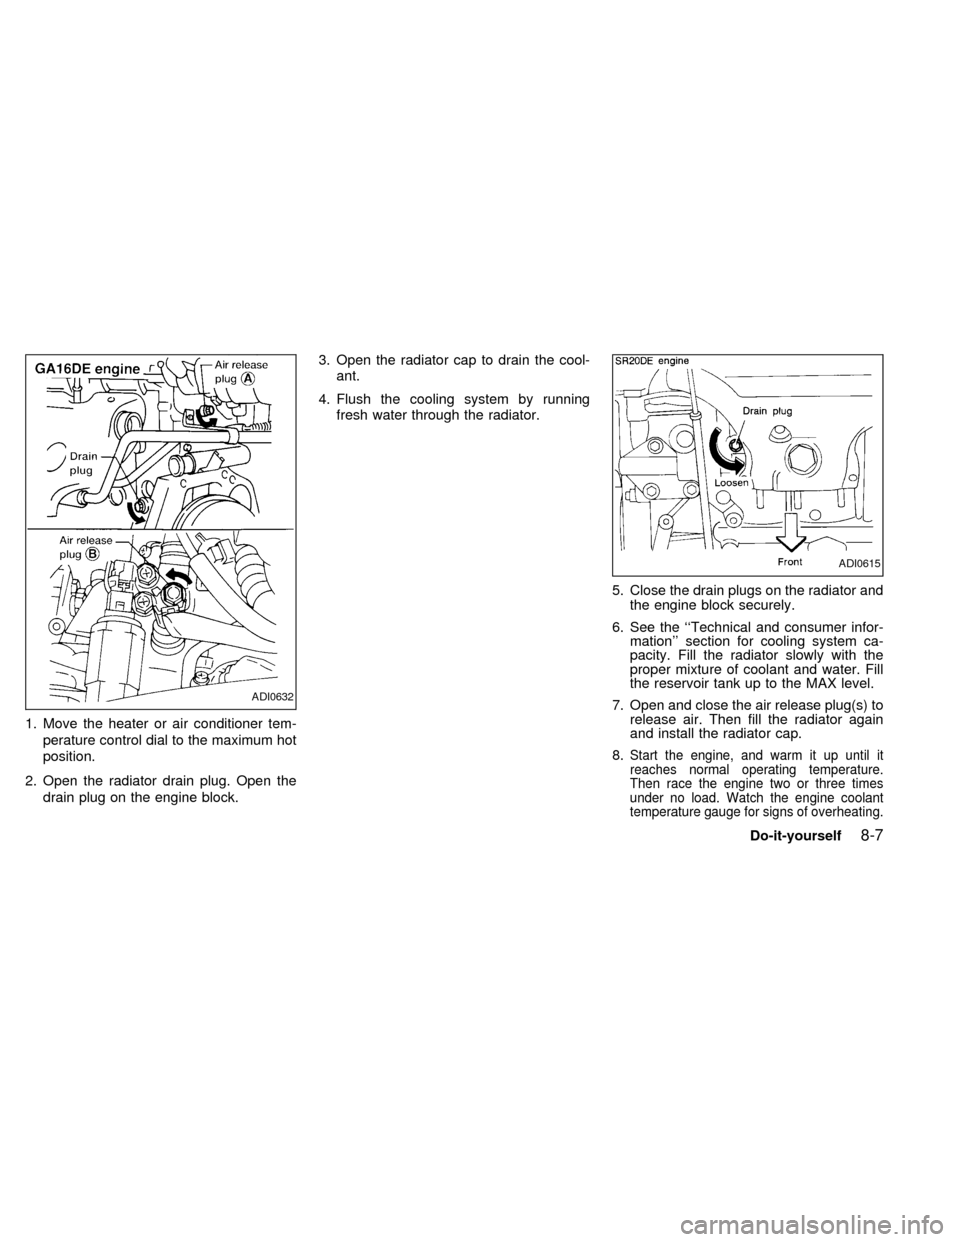
1. Move the heater or air conditioner tem-
perature control dial to the maximum hot
position.
2. Open the radiator drain plug. Open the
drain plug on the engine block.3. Open the radiator cap to drain the cool-
ant.
4. Flush the cooling system by running
fresh water through the radiator.
5. Close the drain plugs on the radiator and
the engine block securely.
6. See the ``Technical and consumer infor-
mation'' section for cooling system ca-
pacity. Fill the radiator slowly with the
proper mixture of coolant and water. Fill
the reservoir tank up to the MAX level.
7. Open and close the air release plug(s) to
release air. Then fill the radiator again
and install the radiator cap.
8.
Start the engine, and warm it up until it
reaches normal operating temperature.
Then race the engine two or three times
under no load. Watch the engine coolant
temperature gauge for signs of overheating.
ADI0632
ADI0615
Do-it-yourself8-7
ZX
Page 158 of 216

Canada Only
Add fluid when the low washer fluid warning
light comes on. Add a washer solvent to the
water for better cleaning. In the winter sea-
son, add a windshield washer antifreeze.
Follow the manufacturer's instructions for
the mixture ratio.
CAUTION
Do not substitute engine antifreeze
coolant for windshield washer solution.
This may result in damage to the paint.cKeep the battery surface clean and dry.
Any corrosion should be washed off with
a solution of baking soda and water.
cMake certain the terminal connections
are clean and securely tightened.
cIf the vehicle is not to be used for 30 days
or longer, disconnect the negative (þ)
battery terminal cable to prevent dis-
charge.
WARNING
cDo not expose the battery to flames
or electrical sparks. Hydrogen gas
generated by battery action is explo-
sive. Do not allow battery fluid to
contact your skin, eyes, fabrics, or
painted surfaces. After touching a
battery or battery cap, do not touch
or rub your eyes. Thoroughly wash
your hands. If the acid contacts your
eyes, skin or clothing, immediately
flush with water for at least 15 min-
utes and seek medical attention.
cWhen working on or near a battery,
always wear suitable eye protection
and remove all jewelry.
cKeep the battery out of the reach of
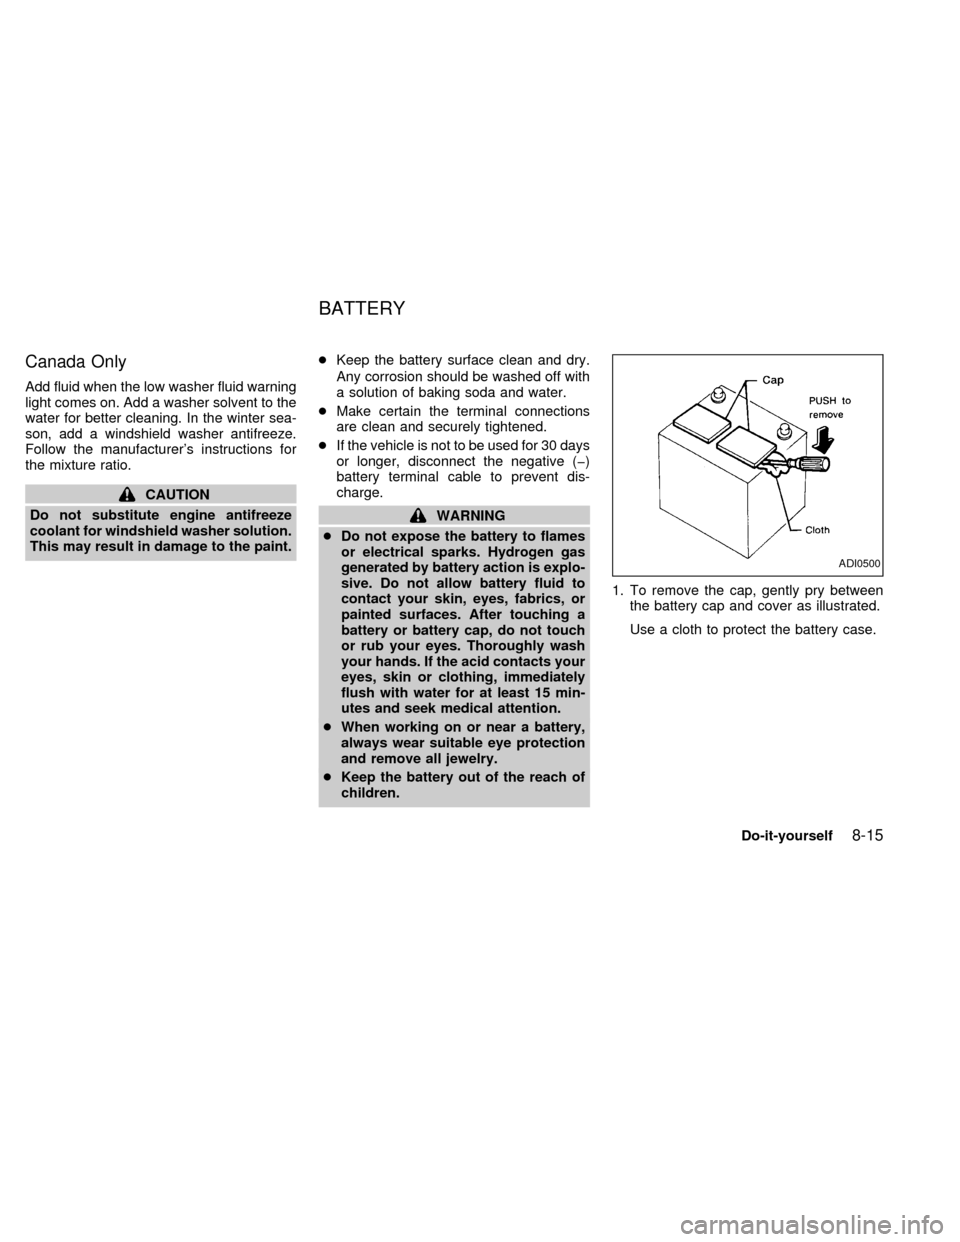
children.1. To remove the cap, gently pry between
the battery cap and cover as illustrated.
Use a cloth to protect the battery case.
ADI0500
BATTERY
Do-it-yourself8-15
ZX
Page 168 of 216

HEADLIGHTS
The headlight is a semi-sealed beam type
which uses a replaceable headlight (halo-
gen) bulb. A bulb can be replaced from
inside the engine compartment without re-
moving the headlight assembly.
CAUTION
cHigh pressure halogen gas is sealed
inside the halogen bulb. The bulb
may break if the glass envelope is
scratched or the bulb is dropped.
cWhen handling the bulb, do not
touch the glass envelope.
Removing the headlight bulb
1. Open the engine hood.
2. Disconnect the negative (-) battery cable.
3.
If removing the right-hand (passenger
side) headlight bulb, it is necessary to first
reposition the engine coolant reservoir.
4. Disconnect the electrical connector from
the rear end of the bulb.
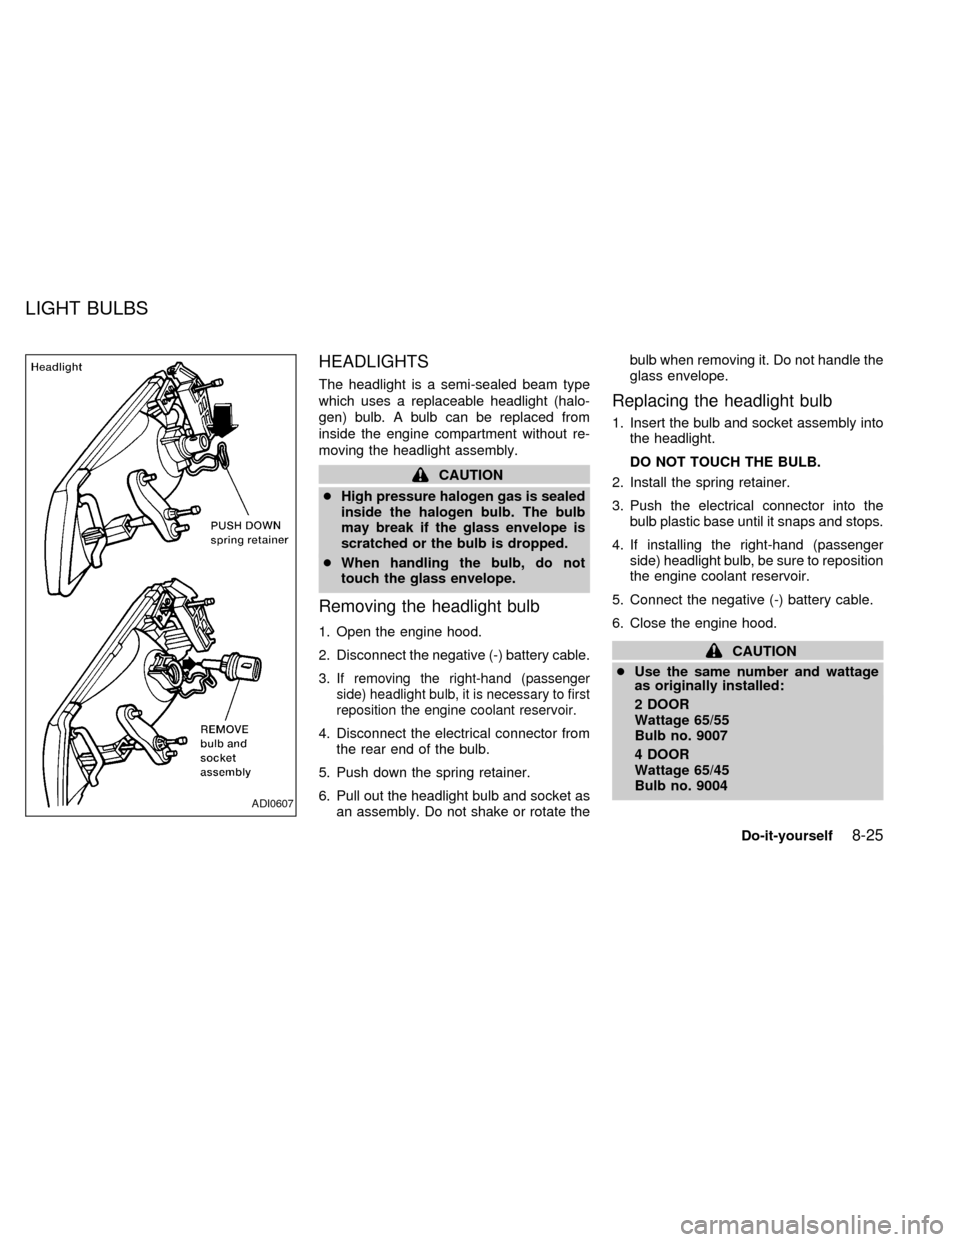
5. Push down the spring retainer.
6. Pull out the headlight bulb and socket as
an assembly. Do not shake or rotate thebulb when removing it. Do not handle the
glass envelope.
Replacing the headlight bulb
1. Insert the bulb and socket assembly into
the headlight.
DO NOT TOUCH THE BULB.
2. Install the spring retainer.
3. Push the electrical connector into the
bulb plastic base until it snaps and stops.
4. If installing the right-hand (passenger
side) headlight bulb, be sure to reposition
the engine coolant reservoir.
5. Connect the negative (-) battery cable.
6. Close the engine hood.
CAUTION
cUse the same number and wattage
as originally installed:
2 DOOR
Wattage 65/55
Bulb no. 9007
4 DOOR
Wattage 65/45
Bulb no. 9004
ADI0607
LIGHT BULBS
Do-it-yourself8-25
ZX
Page 183 of 216

Parking brake* ÐCheck that the lever has
the proper travel and confirm that your
vehicle is held securely on a fairly steep hill
with only the parking brake applied.
Automatic transmission ``Park'' mecha-
nism ÐOn a fairly steep hill check that your
vehicle is held securely with the selector
lever in the P (Park) position without apply-
ing any brakes.
UNDER THE HOOD AND VEHICLE
The maintenance items listed here should
be checked periodically, such as each time
you check the engine oil or refuel.
Additional information on the following
items with an ``*'' is found in the ``Do-it-
yourself'' section of this manual.
Windshield washer fluid* ÐCheck for
adequate fluid in the tank.
Engine coolant level* ÐCheck the cool-
ant level when the engine is cold.
Radiator and hoses ÐCheck the front of
the radiator and clean off any dirt, insects,
leaves, etc., that may have accumulated.
Make sure the hoses have no cracks, de-
formation, rot or loose connections.Brake and (if so equipped) clutch fluid
level's* ÐMake sure the brake and clutch
fluid levels are between the MIN and MAX
lines on each reservoir.
Battery* ÐCheck the fluid level in each
cell.
Engine drive belts* ÐMake sure the drive
belts are not frayed, worn, cracked or oily.
Engine oil level* ÐCheck the level after
parking the vehicle on a level surface, with
the engine off. Wait a few minutes for the oil
to drain back into the oil pan.
Power steering fluid level* and lines Ð
Check the level when the fluid is cold, with
the engine off. Check the lines for proper
attachment, leaks, cracks, etc.
Automatic transmission fluid level* Ð
Check the level after putting the selector
lever in P (Park) with the engine idling at
operating temperature.
Exhaust system ÐMake sure there are no
cracks, holes, loose joints or supports. If the
sound of the exhaust seems unusual or
there is a smell of exhaust fumes, immedi-
ately have the exhaust system inspected by
an authorized NISSAN dealer. (See thecarbon monoxide warning in the ``Starting
and driving'' section of this manual.)
Underbody ÐThe underbody is frequently
exposed to corrosive substances such as
those used on icy roads or to control dust. It
is very important to remove these sub-
stances, from the underbody, otherwise rust
may form on the floor pan, frame, fuel lines
and exhaust system. At the end of winter,
the underbody should be thoroughly flushed
with plain water, especially those areas
where mud and dirt may have accumulate.
See the ``Appearance and care'' section of
this manual.
Fluid leaks ÐCheck under the vehicle for
fuel, oil, water or other fluid leaks after the
vehicle has been parked for awhile. Water
dripping from the air conditioner after use is
normal. If you should notice any leaks or if
gasoline fumes are evident, check for the
cause and have it corrected immediately by
an authorized NISSAN dealer.
9-4Maintenance
ZX
Page 185 of 216
![NISSAN SENTRA 1998 B14 / 4.G Owners Manual Schedule One
Abbreviations: R = Replace I = Inspect. Correct or replace if necessary. [ ]: At the mileage intervals only
MAINTENANCE OPERATIONMAINTENANCE INTERVAL
Perform at number of miles,
kilometer NISSAN SENTRA 1998 B14 / 4.G Owners Manual Schedule One
Abbreviations: R = Replace I = Inspect. Correct or replace if necessary. [ ]: At the mileage intervals only
MAINTENANCE OPERATIONMAINTENANCE INTERVAL
Perform at number of miles,
kilometer](/manual-img/5/611/w960_611-184.png)
Schedule One
Abbreviations: R = Replace I = Inspect. Correct or replace if necessary. [ ]: At the mileage intervals only
MAINTENANCE OPERATIONMAINTENANCE INTERVAL
Perform at number of miles,
kilometers or months,
whichever comes first.Miles ý 1,000 3.75 7.5 11.25 15 18.75 22.5 26.25 30 33.75 37.5 41.25 45 48.75 52.5 56.25 60
(km ý 1,000) (6) (12) (18) (24) (30) (36) (42) (48) (54) (60) (66) (72) (78) (84) (90) (96)
Months 3 6 9 12 15 18 21 24 27 30 33 36 39 42 45 48
Emission control system maintenance
Drive belts See NOTE (1).I*
Air cleaner filter See NOTE (2). [R] [R]
Idle rpm (GA16DE engine)I* I*
EVAP vapor linesI* I*
Fuel linesI* I*
Fuel filter See NOTE (3)*.
Engine coolant See NOTE (4).R*
Engine oilRRRRRRRRRRRRRRRR
Engine oil filter (Use Nissan PREMIUM type or equivalent)RRRRRRRRRRRRRRRR
Spark plugs (GA16DE engine)[R] [R]
(SR20DE engine) (PLATINUM-TIPPED type) See NOTE (5).[R]
Intake & exhaust valve clearance (GA16DE engine) See NOTE (6)*.
NOTE: (1) After 60,000 miles (96,000 km) or 48 months, inspect every 15,000 miles (24,000 km) or 12 months.
(2) If operating mainly in dusty conditions, more frequent maintenance may be required.
(3) If vehicle is operated under extremely adverse weather conditions or in areas where ambient temperatures are either extremely low or extremely
high, the filters might become clogged. In such an event, replace them immediately.
(4) After 60,000 miles (96,000 km) or 48 months, replace every 30,000 miles (48,000 km) or 24 months.
(5) Original equipment platinum-tipped plugs should be replaced at 60,000 miles (96,000 km). Conventional spark plugs can be used but should be
replaced at 30,000 miles (48,000 km) intervals. (See ``Technical and consumer Information'' section for details.)
(6) If valve noise increases, inspect valve clearance.
* Maintenance items and intervals with an ``*'' are recommended by NISSAN for reliable vehicle operation. The owner need not perform such
maintenance in order to maintain the emission warranty or manufacturer recall liability. Other maintenance items and intervals are required.
9-6Maintenance
ZX
Page 187 of 216
![NISSAN SENTRA 1998 B14 / 4.G Owners Manual Schedule Two
Abbreviations: R = Replace I = Inspect. Correct or replace if necessary. [ ]: At the mileage intervals only
MAINTENANCE OPERATIONMAINTENANCE INTERVAL
Perform at number of miles,
kilometer NISSAN SENTRA 1998 B14 / 4.G Owners Manual Schedule Two
Abbreviations: R = Replace I = Inspect. Correct or replace if necessary. [ ]: At the mileage intervals only
MAINTENANCE OPERATIONMAINTENANCE INTERVAL
Perform at number of miles,
kilometer](/manual-img/5/611/w960_611-186.png)
Schedule Two
Abbreviations: R = Replace I = Inspect. Correct or replace if necessary. [ ]: At the mileage intervals only
MAINTENANCE OPERATIONMAINTENANCE INTERVAL
Perform at number of miles,
kilometers or months, whichever comes first.Miles ý 1,000 7.5 15 22.5 30 37.5 45 52.5 60
(km ý 1,000) (12) (24) (36) (48) (60) (72) (84) (96)
Months 6 12 18 24 30 36 42 48
Emission control system maintenance
Drive belts See NOTE (1).I*
Air cleaner filter[R] [R]
Idle rpm (GA16DE engine)I* I*
EVAP vapor linesI* I*
Fuel linesI* I*
Fuel filter See NOTE (2)*.
Engine coolant See NOTE (3)*.R*
Engine oilRRRRRRRR
Engine oil filter (Use Nissan PREMIUM type or equivalent)RRRRRRRR
Spark plugs (GA16DE engine)[R] [R]
(SR20DE engine) (PLATINUM-TIPPED type) See NOTE (4)*.[R]
Intake & exhaust valve clearance (GA16DE engine) See NOTE (5).
NOTE: (1) After 60,000 miles (96,000 km) or 48 months, inspect every 15,000 miles (24,000 km) or 12 months.
(2) If vehicle is operated under extremely adverse weather conditions or in areas where outside temperatures are either extremely low or extremely high, the
filters might become clogged. In such an event, replace them immediately.
(3) After 60,000 miles (96,000 km) or 48 months, replace every 30,000 miles (48,000 km) or 24 months.
(4) Original equipment platinum-tipped plugs should be replaced at 60,000 miles (96,000 km). Conventional spark plugs can be used but should be replaced
at 30,000 miles (48,000 km) intervals. (See ``Technical and consumer information'' section for details.)
(5) If valve noise increases, inspect valve clearance.
* Maintenance items and intervals with an ``*'' are recommended by NISSAN for reliable vehicle operation. The owner need not perform such maintenance
in order to maintain the emission warranty or manufacturer recall liability. Other maintenance items and intervals are required.
9-8Maintenance
ZX
Page 189 of 216

Additional information on the following
items with an ``*'' is found in the ``Do-it-
yourself'' section of this manual.
Emission control system
maintenance
Drive belts* ÐCheck drive belts for wear,
fraying or cracking and also for proper tension.
Replace any damaged drive belts.
Air cleaner filter ÐUnder normal driving
conditions, the air cleaner filter should be
replaced in accordance with the maintenance
schedule. However, driving the vehicle in
dusty areas may cause rapid clogging of the
element. Consequently, the element may
have to be replaced more frequently.
EVAP vapor lines ÐCheck vapor lines
and connections for leaks, looseness or
deterioration. If leaks are found, replace
them.
Fuel lines ÐCheck the fuel hoses, piping
and connections for leaks, looseness or
deterioration. Replace any damaged parts.
Fuel filter ÐIf the vehicle is operated under
extremely adverse weather conditions or in
areas where ambient temperatures are ei-
ther extremely low or extremely high, thefilter might become clogged. In such an
event, replace the filter immediately.
Engine coolant* ÐDrain and flush the
cooling system.
Engine oil & oil filter* ÐUnder normal
driving conditions, the engine oil and oil filter
should be replaced in accordance with the
maintenance schedule. However, under se-
vere driving conditions, they may have to be
replaced more frequently.
Spark plugs* ÐReplace with new plugs
having the correct heat range.
Intake & exhaust valve clearance Ð
Check and adjust the valve clearance.
Chassis and body maintenance
Brake lines & cables ÐCheck the brake
lines and hoses (including brake booster
vacuum hoses, connections & check valve)
and parking brake cables for proper attach-
ment, leaks, cracks, chafing, abrasion, de-
terioration, etc.
Brake pads, discs, drums & linings Ð
Check these and the other brake compo-
nents for wear, deterioration and leaks. Un-
der severe driving conditions, they may have
to be inspected more frequently.
Manual & automatic transmission fluid*
ÐCheck the fluid level and visually inspect
for signs of leakage. Under severe driving
conditions, the fluid should be replaced at
the specified interval.
Steering gear & linkage, axle & suspen-
sion parts, and drive shaft boots Ð
Check for damage, looseness and leakage
of oil or grease. Under severe driving con-
ditions, inspection should be performed
more frequently.
Exhaust system ÐVisually check the ex-
haust pipes, muffler, and hangers for proper
attachment, leaks, cracks, chafing, abra-
sion, deterioration, etc. Under severe
driving conditions, inspection should be per-
formed more frequently.
Supplemental air bag system ÐCheck
the supplemental air bag system compo-
nents for proper attachment, damage, de-
formities, cracks, rust, etc. Work around and
on the supplemental air bag system should
be done by an authorized NISSAN dealer.
EXPLANATION OF
MAINTENANCE ITEMS
9-10Maintenance
ZX