1998 NISSAN PICK-UP wheel bolts
[x] Cancel search: wheel boltsPage 1120 of 1659
CAUTION:
Do not run engine when only one wheel (rear) is off the
ground.
Preparation for Disassembly
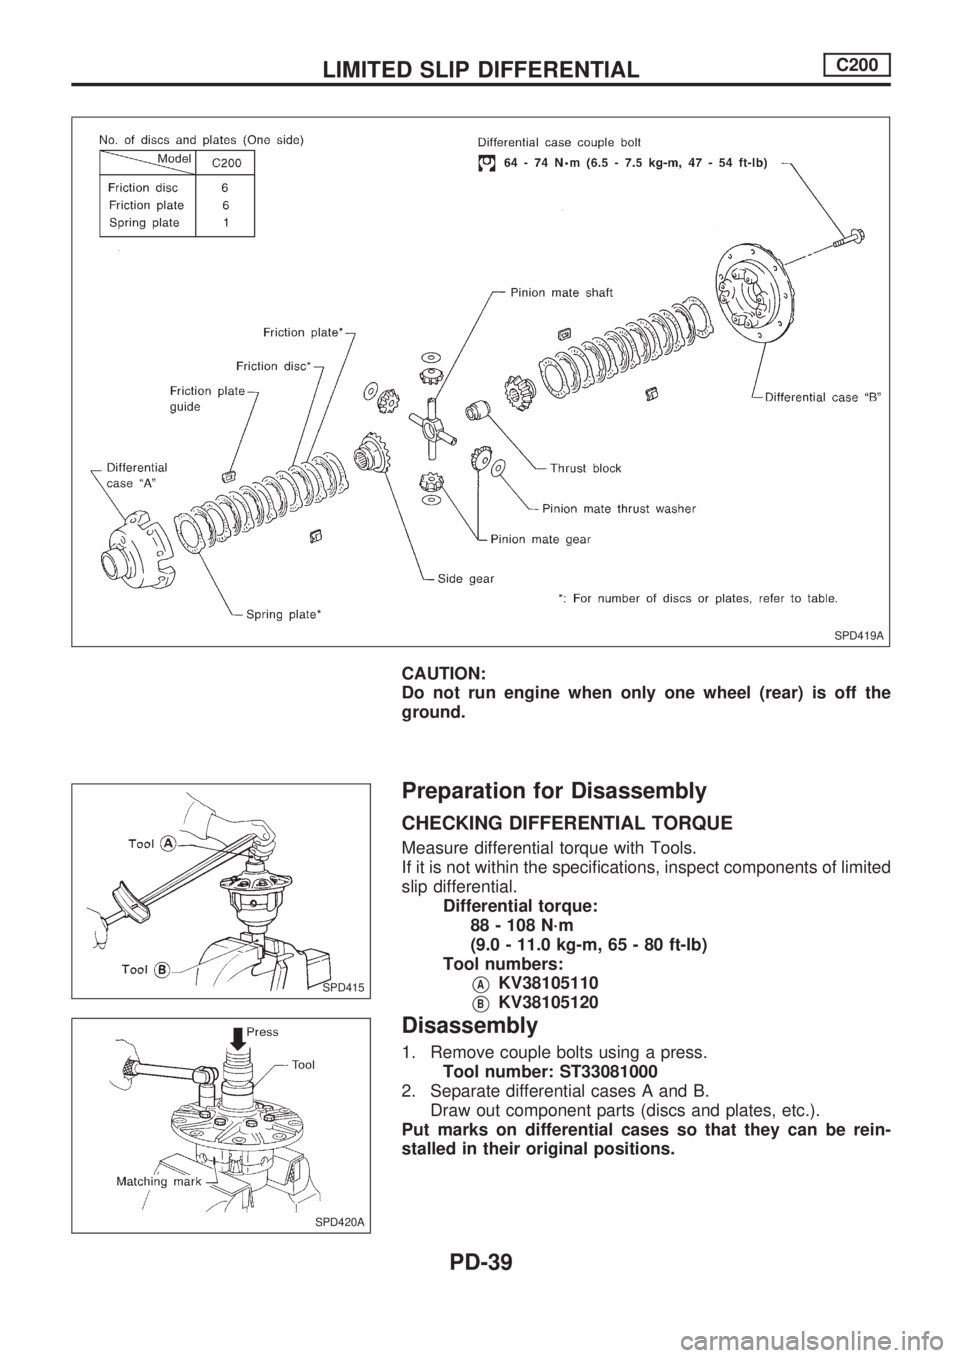
CHECKING DIFFERENTIAL TORQUE
Measure differential torque with Tools.
If it is not within the specifications, inspect components of limited
slip differential.
Differential torque:
88 - 108 N´m
(9.0 - 11.0 kg-m, 65 - 80 ft-lb)
Tool numbers:
VAKV38105110
VBKV38105120
Disassembly
1. Remove couple bolts using a press.
Tool number: ST33081000
2. Separate differential cases A and B.
Draw out component parts (discs and plates, etc.).
Put marks on differential cases so that they can be rein-
stalled in their original positions.
SPD419A
SPD415
SPD420A
LIMITED SLIP DIFFERENTIALC200
PD-39
Page 1142 of 1659
CAUTION:
Do not run engine when only one wheel (rear) is off the
ground.
Preparation for Disassembly
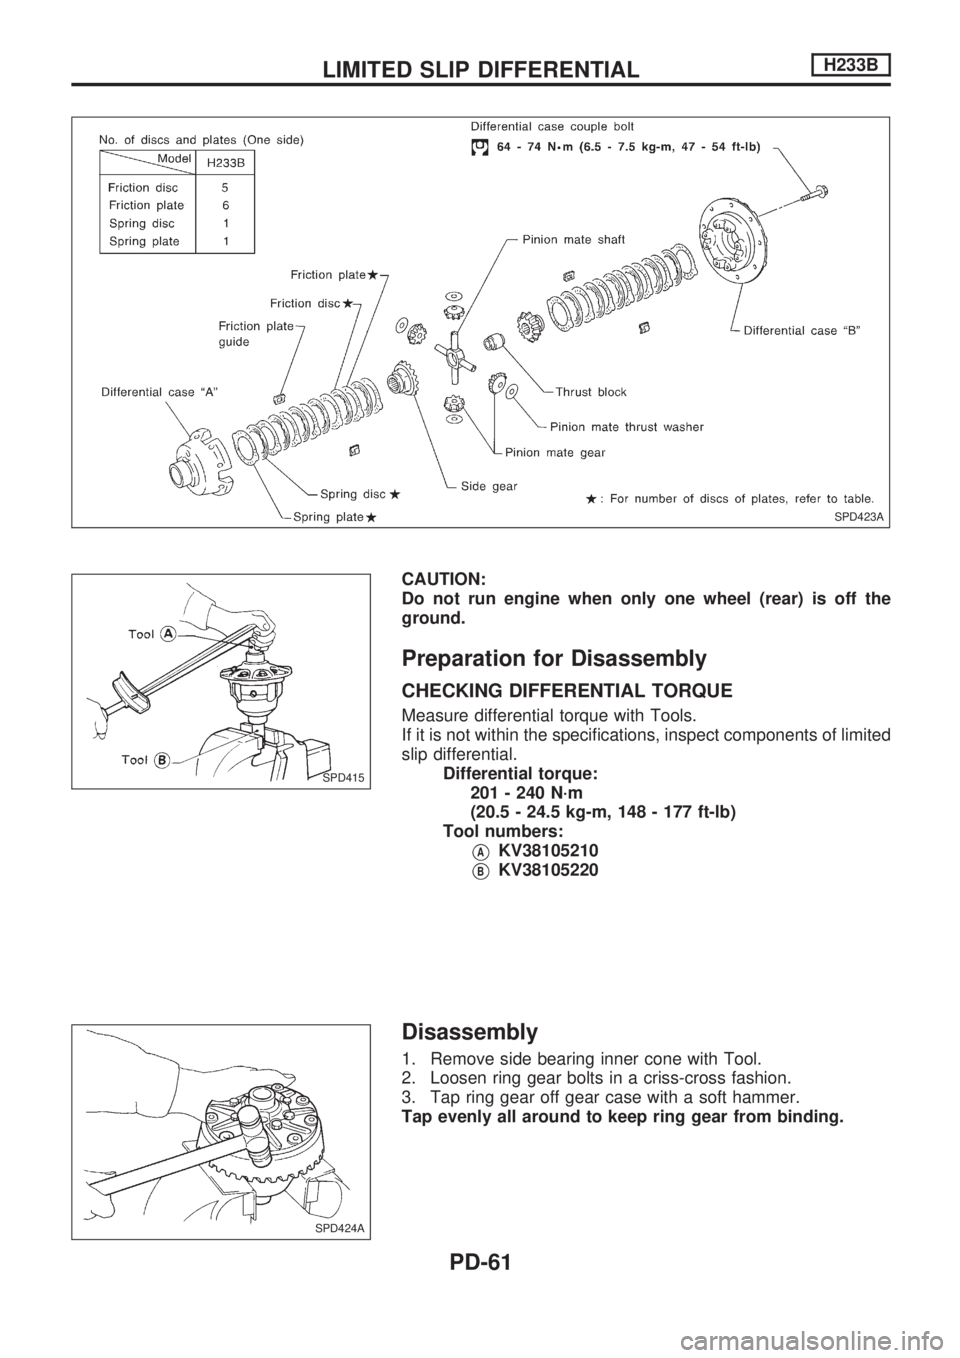
CHECKING DIFFERENTIAL TORQUE
Measure differential torque with Tools.
If it is not within the specifications, inspect components of limited
slip differential.
Differential torque:
201 - 240 N´m
(20.5 - 24.5 kg-m, 148 - 177 ft-lb)
Tool numbers:
VAKV38105210
VBKV38105220
Disassembly
1. Remove side bearing inner cone with Tool.
2. Loosen ring gear bolts in a criss-cross fashion.
3. Tap ring gear off gear case with a soft hammer.
Tap evenly all around to keep ring gear from binding.
SPD423A
SPD415
SPD424A
LIMITED SLIP DIFFERENTIALH233B
PD-61
Page 1169 of 1659
Precautions for SRS ``AIR BAG'' Service
lDo not use a circuit tester to check SRS circuits unless instructed to in this Service Manual.
lBefore servicing the SRS, turn ignition switch ``OFF'', disconnect both battery cables and wait for at least
3 minutes.
For approximately 3 minutes after the cables are removed, it is still possible for the air bag to deploy.
Therefore, do not work on any SRS connectors or wires until at least 3 minutes have passed.
lFor 2WD models, do not separate diagnosis sensor unit from steering wheel.
lFor 4WD models, diagnosis sensor unit must always be installed with their arrow marks ``S'' pointing
towards the front of the vehicle for proper operation. Also check diagnosis sensor unit for cracks,
deformities or rust before installation and replace as required.
lThe spiral cable must be aligned with the neutral position since its rotations are limited. Do not attempt
to turn steering wheel or column after removal of steering gear.
lHandle air bag module carefully. Always place it with the pad side facing upward.
lConduct self-diagnosis to check entire SRS for proper function after replacing any components.
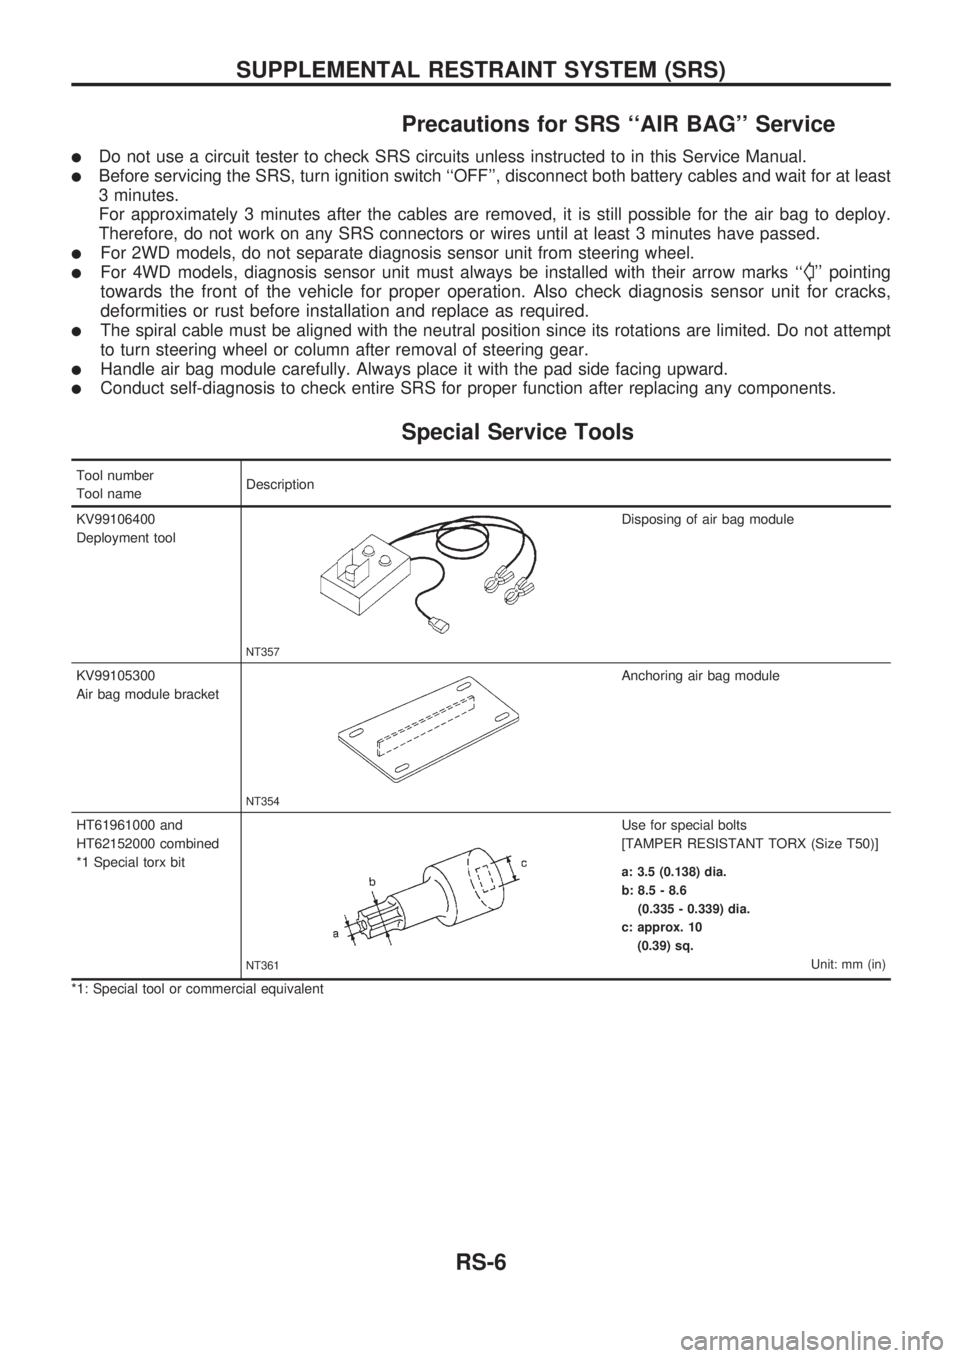
Special Service Tools
Tool number
Tool nameDescription
KV99106400
Deployment tool
NT357
Disposing of air bag module
KV99105300
Air bag module bracket
NT354
Anchoring air bag module
HT61961000 and
HT62152000 combined
*1 Special torx bit
NT361
Use for special bolts
[TAMPER RESISTANT TORX (Size T50)]
a: 3.5 (0.138) dia.
b: 8.5 - 8.6
(0.335 - 0.339) dia.
c: approx. 10
(0.39) sq.
Unit: mm (in)
*1: Special tool or commercial equivalent
SUPPLEMENTAL RESTRAINT SYSTEM (SRS)
RS-6
Page 1172 of 1659
Maintenance Items
CAUTION:
Do not use a circuit tester to check SRS circuit.
1. Check ``AIR BAG'' warning lamp operation.
After turning ignition key to ``ON'' position, ``AIR BAG'' warn-
ing lamp illuminates. The ``AIR BAG'' warning lamp will turn
off after about 7 seconds if no malfunction is detected.
If any of the following air bag warning lamp conditions occur,
immediately check the air bag system. Refer to RS-28 (4WD
models), RS-19 (2WD models) for details.
lThe warning lamp does not illuminate when the ignition
switch is turned ``ON''.
lThe warning lamp does not turn off about 7 seconds after the
ignition switch is turned ``ON''.
lThe warning lamp blinks about 7 seconds after the ignition
switch is turned ``ON''.
2. Visually check SRS components.
(1) Diagnosis sensor unit
lCheck diagnosis sensor unit and bracket for dents, cracks or
deformities.
lCheck connectors for damage, and terminals for deformities.
(2) Air bag module and steering wheel
lRemove air bag module from steering wheel. Check harness
cover and connectors for damage, terminals for deformities,
and harness for binding.
lInstall driver side air bag module to steering wheel to check
fit and alignment with the wheel.
lCheck steering wheel for excessive free play.
(3) Spiral cable
lCheck spiral cable for dents, cracks, or deformities.
lCheck connectors and protective tape for damage.
lCheck steering wheel for noise, binding or heavy operation.
(4) Main harness and air bag harness
lCheck connectors for poor connections, damage, and termi-
nals for deformities.
lCheck harnesses for binding, chafing or cut.
CAUTION:
Replace previously used special bolts and ground bolt with
new ones.
SRS296
SUPPLEMENTAL RESTRAINT SYSTEM (SRS)
RS-9
Page 1175 of 1659
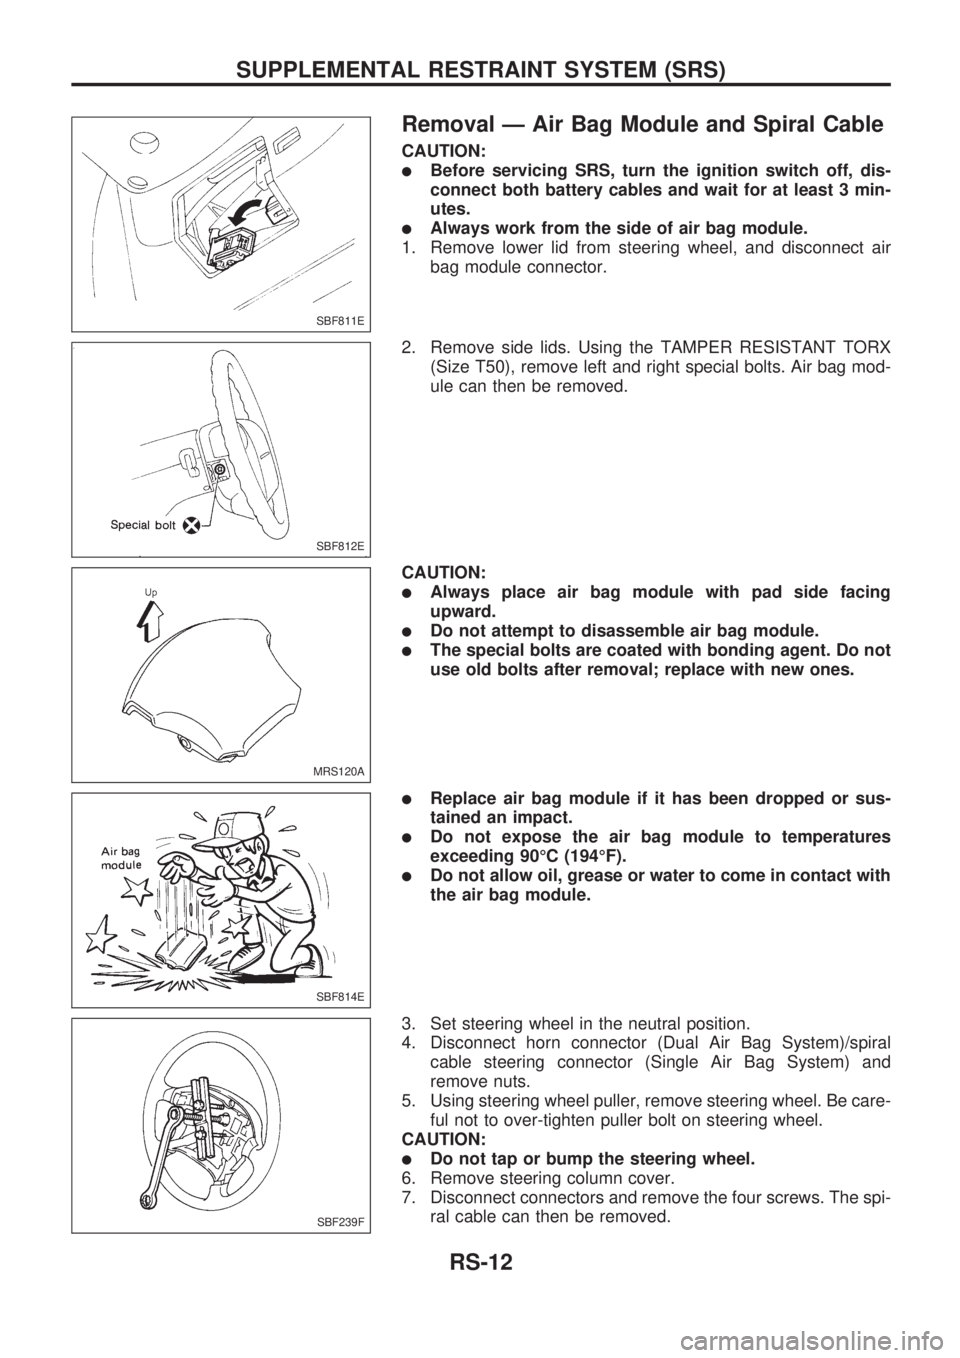
Removal Ð Air Bag Module and Spiral Cable
CAUTION:
lBefore servicing SRS, turn the ignition switch off, dis-
connect both battery cables and wait for at least 3 min-
utes.
lAlways work from the side of air bag module.
1. Remove lower lid from steering wheel, and disconnect air
bag module connector.
2. Remove side lids. Using the TAMPER RESISTANT TORX
(Size T50), remove left and right special bolts. Air bag mod-
ule can then be removed.
CAUTION:
lAlways place air bag module with pad side facing
upward.
lDo not attempt to disassemble air bag module.
lThe special bolts are coated with bonding agent. Do not
use old bolts after removal; replace with new ones.
lReplace air bag module if it has been dropped or sus-
tained an impact.
lDo not expose the air bag module to temperatures
exceeding 90ÉC (194ÉF).
lDo not allow oil, grease or water to come in contact with
the air bag module.
3. Set steering wheel in the neutral position.
4. Disconnect horn connector (Dual Air Bag System)/spiral
cable steering connector (Single Air Bag System) and
remove nuts.
5. Using steering wheel puller, remove steering wheel. Be care-
ful not to over-tighten puller bolt on steering wheel.
CAUTION:
lDo not tap or bump the steering wheel.
6. Remove steering column cover.
7. Disconnect connectors and remove the four screws. The spi-
ral cable can then be removed.
SBF811E
SBF812E
MRS120A
SBF814E
SBF239F
SUPPLEMENTAL RESTRAINT SYSTEM (SRS)
RS-12
Page 1177 of 1659

7. Position air bag module and tighten with new special bolts.
8. Connect air bag module connector.
9. Install all lids.
10. Conduct self-diagnosis to ensure entire SRS operates prop-
erly. (Use CONSULT or warning lamp check.)
Before performing self-diagnosis, connect both battery
cables.
11. Turn steering wheel to the left end and then to the right end
fully to make sure that spiral cable is set in the neutral posi-
tion.
If air bag warning lamp blinks or stays ON (at the user mode),
it shows the spiral cable may be snapped due to its improper
position. Perform self-diagnosis again (use CONSULT or
warning lamp). If a malfunction is detected, replace the spi-
ral cable with a new one.
Disposal of Air Bag Module
lBefore disposing of air bag modules or vehicles equipped with such a system, deploy the system. If such
a system has already been deployed due to an accident, dispose of as indicated in ``DISPOSING OF
AIR BAG MODULE'' (RS-16).
lWhen deploying the air bag module, always use the Special Service Tool; Deployment tool KV99106400.
lWhen deploying the air bag module stand at least 5 m (16 ft) away from the deployment component.
lWhen deploying the air bag module, a fairly loud noise is made, followed by smoke being released. The
smoke is not poisonous, however, be careful not to inhale smoke since it irritates throat and can cause
choking.
lAlways activate one air bag module at a time.
lDue to heat, leave air bag module unattended for more than 30 minutes after deployment.
lBe sure to wear gloves when handling a deployed air bag module.
lNever apply water to a deployed air bag module.
lWash your hands clean after finishing work.
lPlace the vehicle outdoors with an open space of at least 6 m (20 ft) on all sides when deploying the
air bag module while mounted in vehicle.
lUse a voltmeter to make sure the vehicle battery is fully charged.
lDo not dispose of the air bag module un-deployed.
CHECKING DEPLOYMENT TOOL
Connecting to battery
CAUTION:
The battery must show voltage of 9.6V or more.
Remove the battery from the vehicle and place it on dry wood
blocks approximately 5 m (16 ft) away from the vehicle.
lWait 10 to 12 minutes after the vehicle battery is discon-
nected before proceeding.
lConnect red clip of deployment tool to battery positive termi-
nal and black clip to negative terminal.
Make sure the polarity is correct. The right side lamp in the
tool, marked ``deployment tool power'', should glow with a
green light. If the right side lamp glows red, reverse the
connections to the battery.
SBF812EA
SRS005-B
SUPPLEMENTAL RESTRAINT SYSTEM (SRS)
Installation Ð Air Bag Module and Spiral
Cable (Cont'd)
RS-14
Page 1184 of 1659
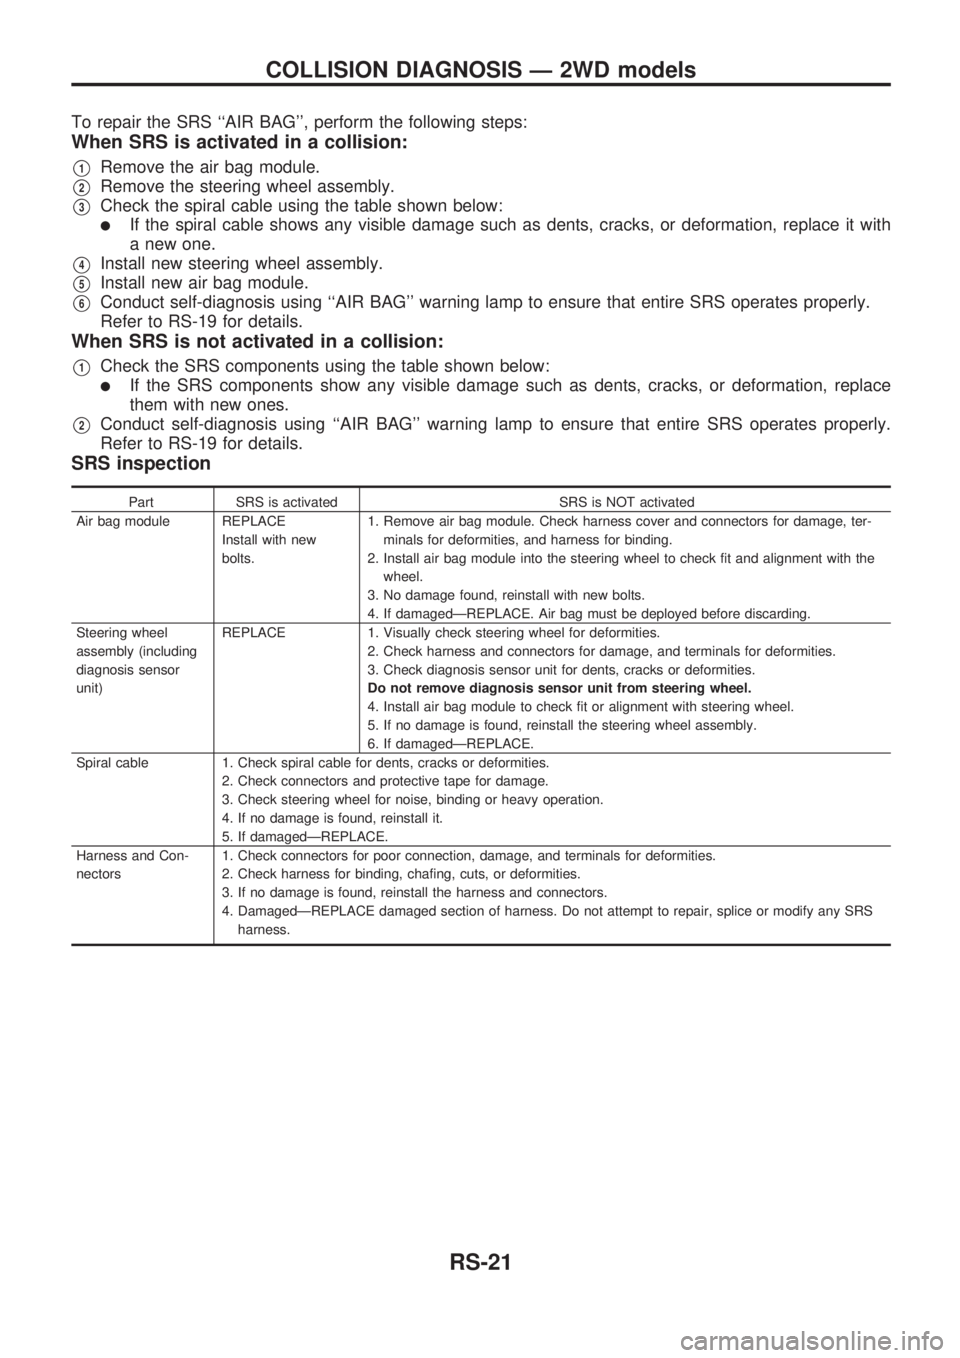
To repair the SRS ``AIR BAG'', perform the following steps:
When SRS is activated in a collision:
V1Remove the air bag module.
V2Remove the steering wheel assembly.
V3Check the spiral cable using the table shown below:
lIf the spiral cable shows any visible damage such as dents, cracks, or deformation, replace it with
a new one.
V4Install new steering wheel assembly.
V5Install new air bag module.
V6Conduct self-diagnosis using ``AIR BAG'' warning lamp to ensure that entire SRS operates properly.
Refer to RS-19 for details.
When SRS is not activated in a collision:
V1Check the SRS components using the table shown below:
lIf the SRS components show any visible damage such as dents, cracks, or deformation, replace
them with new ones.
V2Conduct self-diagnosis using ``AIR BAG'' warning lamp to ensure that entire SRS operates properly.
Refer to RS-19 for details.
SRS inspection
Part SRS is activated SRS is NOT activated
Air bag module REPLACE
Install with new
bolts.1. Remove air bag module. Check harness cover and connectors for damage, ter-
minals for deformities, and harness for binding.
2. Install air bag module into the steering wheel to check fit and alignment with the
wheel.
3. No damage found, reinstall with new bolts.
4. If damagedÐREPLACE. Air bag must be deployed before discarding.
Steering wheel
assembly (including
diagnosis sensor
unit)REPLACE 1. Visually check steering wheel for deformities.
2. Check harness and connectors for damage, and terminals for deformities.
3. Check diagnosis sensor unit for dents, cracks or deformities.
Do not remove diagnosis sensor unit from steering wheel.
4. Install air bag module to check fit or alignment with steering wheel.
5. If no damage is found, reinstall the steering wheel assembly.
6. If damagedÐREPLACE.
Spiral cable 1. Check spiral cable for dents, cracks or deformities.
2. Check connectors and protective tape for damage.
3. Check steering wheel for noise, binding or heavy operation.
4. If no damage is found, reinstall it.
5. If damagedÐREPLACE.
Harness and Con-
nectors1. Check connectors for poor connection, damage, and terminals for deformities.
2. Check harness for binding, chafing, cuts, or deformities.
3. If no damage is found, reinstall the harness and connectors.
4. DamagedÐREPLACE damaged section of harness. Do not attempt to repair, splice or modify any SRS
harness.
COLLISION DIAGNOSIS Ð 2WD models
RS-21
Page 1205 of 1659

FOR FRONTAL COLLISION
To repair the SRS for a frontal collision, perform the following steps.
When SRS is activated in a collision:
V1Replace the diagnosis sensor unit.
V2Remove the air bag module.
V3Check the SRS components using the table shown below:
lReplace any SRS components showing visible signs of damage (dents, cracks, deformation).
V4Install new air bag module.
V5Conduct self-diagnosis using CONSULT, and ``AIR BAG'' warning lamp. Refer to ``Self-diagnosis'' for
details (RS-28). Ensure entire SRS operates properly.
When SRS is not activated in a collision:
V1Check the SRS components using the table shown below:
lReplace any SRS components showing visible signs of damage (dents, cracks, deformation).
V2Conduct self-diagnosis using CONSULT, and ``AIR BAG'' warning lamp. Refer to ``Self-diagnosis'' for
details (RS-28). Ensure entire SRS operates properly.
SRS inspection
Part SRS is activated SRS is NOT activated
Air bag module REPLACE
Install air bag mod-
ule with new bolts.1. Remove air bag module. Check harness cover and connectors for damage, ter-
minals for deformities, and harness for binding.
2. Install driver air bag module into the steering wheel to check fit and alignment
with the wheel.
3. No damage found, reinstall with new bolts.
4. If damagedÐREPLACE. Air bag must be deployed before discarding.
Diagnosis sensor
unitREPLACE
Install diagnosis sen-
sor unit with new
bolts.1. Check case and bracket for dents, cracks or deformities.
2. Check connectors for damage, and terminals for deformities.
3. If no damage is found, reinstall with new bolts.
4. If damagedÐREPLACE. Install diagnosis sensor unit with new bolts.
Steering wheel 1. Visually check steering wheel for deformities.
2. Check harness (built into steering wheel) and connectors for damage, and terminals for deformities.
3. Install air bag module to check fit or alignment with steering wheel.
4. Check steering wheel for excessive free play.
5. If no damage is found, reinstall.
6. If damagedÐREPLACE.
Spiral cable 1. Visually check spiral cable and combination switch for damage.
2. Check connectors, lead wires and protective tape for damage.
3. Check steering wheel for noise, binding or heavy operation.
4. If no damage is found, reinstall it.
5. If damagedÐREPLACE.
Harness and Con-
nectors1. Check connectors for poor connection, damage, and terminals for deformities.
2. Check harness for binding, chafing, cuts, or deformities.
3. If no damage is found, reinstall harness and connectors.
4. DamagedÐREPLACE damaged section of harness. Do not attempt to repair, splice or modify any SRS
harness.
COLLISION DIAGNOSIS Ð 4WD models
RS-42