Page 46 of 249

2 Instruments and controlsInstrument panel ....................................................... 2-2
Meters and gauges ................................................... 2-3
Compass and outside temperature display
(if so equipped) ......................................................... 2-6
Warning/indicator lights and buzzers ........................ 2-9
Security system ....................................................... 2-14
Windshield wiper and washer switch ...................... 2-15
Rear window wiper and washer switch................... 2-16
Rear window and outside mirror
defogger switch ....................................................... 2-16
Headlight and turn signal switch ............................. 2-17
Front fog light switch ............................................... 2-19
Hazard warning flasher switch ................................ 2-19
Horn......................................................................... 2-20Heated seats (if so equipped) ................................. 2-20
Power socket........................................................... 2-21
Cigarette lighter and ashtrays ................................. 2-22
Storage .................................................................... 2-23
Windows .................................................................. 2-30
Sunroof (if so equipped) ......................................... 2-32
Clock ....................................................................... 2-33
Interior light ............................................................. 2-34
Personal light .......................................................... 2-35
Vanity mirror light .................................................... 2-35
Integrated HomeLink
transmitter
(if so equipped) ....................................................... 2-35
Z
01.1.31/R50-D
X
Page 47 of 249

Driver's supplemental air bag (P.1-9)
Cruise control
set switch
(P.5-16)
Outside mirror remote control
(P.3-14) Headlight/dimmer/turn signal switch (P.2-17)
Front fog light switch (P.2-19)Meter/gauge (P.2-3)
Windshield wiper/washer switch (P.2-15)
Hazard warning flasher switch (P.2-19)
Center ventilator (P.4-2)
Heater/air conditioner control (P.4-3)Compass/outside air temperature display (P.2-5)
Passenger supplemental air bag (P.1-9)
Side ventilator (P.4-2)
Glove box (P.2-25)
Cigarette lighter (P.2-22)
Radio/CD player (P.4-14)/clock (P.2-33)
Rear window wiper/washer switch (P.2-16)
Rear window/outside mirror defroster switch (P.2-16)Ignition switch/steering lock (P.5-6)Heated seat switch (P.2-20)
Tilting steering wheel adjust lever (P.3-13)Hood release handle (P.3-8)Fuse box cover (P.8-21)
Coin tray (P.2-23) Theft warning light (P.2-14) Cruise control main switch (P.5-16)
Instrument brightness control
(P.2-18)
SIC0682
See the page indicated in parentheses for operating details.
INSTRUMENT PANEL2-2
Instruments and controls
Z
01.1.31/R50-D
X
Page 78 of 249
The shade will open automatically when the
sunroof is opened. However, it must be closed
manually.IIn an accident you could be thrown
from the vehicle through an open
sunroof. Always use seat belts and
child restraints.
IDo not allow anyone to stand up or
extend any portion of their body out
of the opening while the vehicle is in
motion or while the sunroof is
closing.IRemove water drops, snow, ice or
sand from the sunroof before open-
ing.
IDo not place any heavy object on the
sunroof or surrounding area.
If the sunroof does not closeHave your NISSAN dealer check and repair
the sunroof.
The digital clock displays time when the igni-
tion key is in ACC or ON.
If the power supply is disconnected, the
clock will not indicate the correct time.
Readjust the time.
ADJUSTING THE TIMEDepressing the CLOCK and theor
buttons together will set hours. De-
pressing the CLOCK and
or
buttons together will set minutes.
SIC0884
CLOCK
Instruments and controls
2-33
Z
01.1.31/R50-D
X
Page 79 of 249

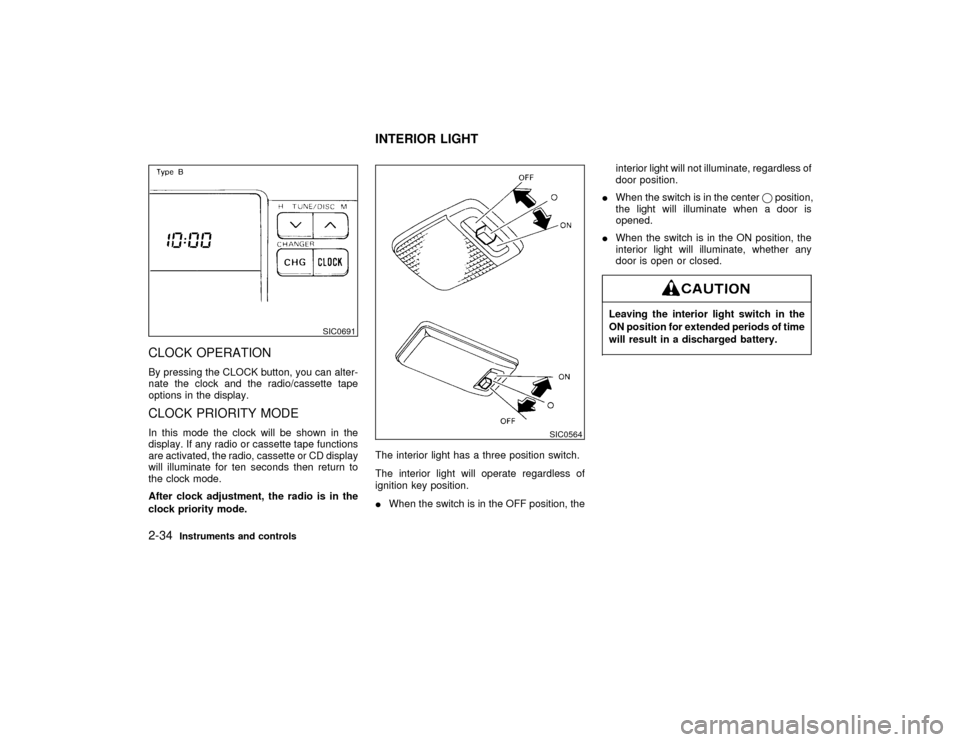
CLOCK OPERATIONBy pressing the CLOCK button, you can alter-
nate the clock and the radio/cassette tape
options in the display.CLOCK PRIORITY MODEIn this mode the clock will be shown in the
display. If any radio or cassette tape functions
are activated, the radio, cassette or CD display
will illuminate for ten seconds then return to
the clock mode.
After clock adjustment, the radio is in the
clock priority mode.The interior light has a three position switch.
The interior light will operate regardless of
ignition key position.
IWhen the switch is in the OFF position, theinterior light will not illuminate, regardless of
door position.
IWhen the switch is in the centerqposition,
the light will illuminate when a door is
opened.
IWhen the switch is in the ON position, the
interior light will illuminate, whether any
door is open or closed.
Leaving the interior light switch in the
ON position for extended periods of time
will result in a discharged battery.
SIC0691
SIC0564
INTERIOR LIGHT
2-34
Instruments and controls
Z
01.1.31/R50-D
X
Page 94 of 249
KEY OPERATION1. Turn the key counterclockwise to unlock the
back door.
2. Pull the opener handle to open the back
door.
3. To lock the back door, push it down firmly
and turn the key clockwise.IAlways check the back door has been
closed securely to prevent it from
opening while driving.IDo not drive with the back door open.
This could allow dangerous exhaust
gases to be drawn into the vehicle.
See ªPrecautions when starting and
drivingº in the ª5. Starting and driv-
ingº section for exhaust gas.
When opening the back door, first open the
spare tire carrier in the sequence shown in the
illustration above. Then insert the stopper into
the hole to secure the carrier in the open
position.IBe certain that there is adequate area
to allow the carrier to open fully.
IOpen and close the spare tire carrier
slowly.
SPA0462
SPA0385
BACK DOOR SPARE TIRE CARRIER
Pre-driving checks and adjustments
3-9
Z
01.1.31/R50-D
X
Page 95 of 249
IBefore driving, be certain that the
spare tire carrier is firmly closed and
latched.
IFailure to do so may injure pedestri-
ans or damage the vehicle.To open the rear window, turn the key fully
clockwise and pull the opener handle. To
close, lower and push the rear window down
securely.
Do not drive with the rear window open.
This could allow dangerous exhaust
gases to be drawn into the vehicle. See
ªPrecautions when starting and drivingº
in the ª5. Starting and drivingº section
for exhaust gas.
Do not open the rear window unless the
wiper is in the stowed position.
SPA0386
SPA0338
REAR WINDOW
3-10
Pre-driving checks and adjustments
Z
01.1.31/R50-D
X
Page 96 of 249

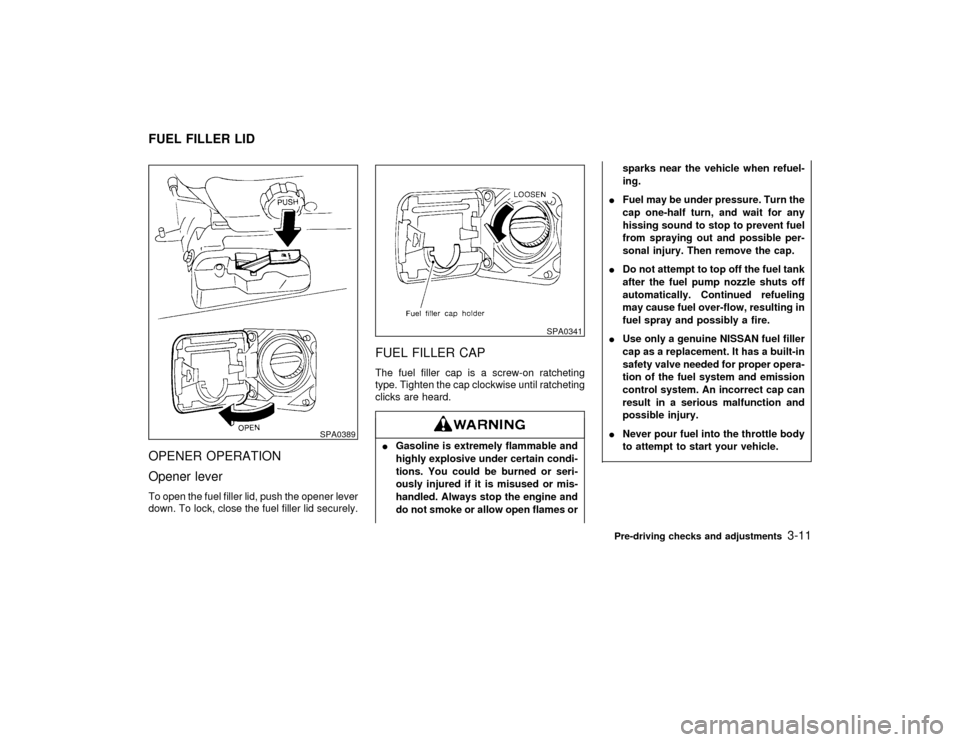
OPENER OPERATION
Opener leverTo open the fuel filler lid, push the opener lever
down. To lock, close the fuel filler lid securely.
FUEL FILLER CAPThe fuel filler cap is a screw-on ratcheting
type. Tighten the cap clockwise until ratcheting
clicks are heard.IGasoline is extremely flammable and
highly explosive under certain condi-
tions. You could be burned or seri-
ously injured if it is misused or mis-
handled. Always stop the engine and
do not smoke or allow open flames orsparks near the vehicle when refuel-
ing.
IFuel may be under pressure. Turn the
cap one-half turn, and wait for any
hissing sound to stop to prevent fuel
from spraying out and possible per-
sonal injury. Then remove the cap.
IDo not attempt to top off the fuel tank
after the fuel pump nozzle shuts off
automatically. Continued refueling
may cause fuel over-flow, resulting in
fuel spray and possibly a fire.
IUse only a genuine NISSAN fuel filler
cap as a replacement. It has a built-in
safety valve needed for proper opera-
tion of the fuel system and emission
control system. An incorrect cap can
result in a serious malfunction and
possible injury.
INever pour fuel into the throttle body
to attempt to start your vehicle.
SPA0389
SPA0341
FUEL FILLER LID
Pre-driving checks and adjustments
3-11
Z
01.1.31/R50-D
X
Page 116 of 249

FM-AM RADIO WITH CASSETTE
PLAYER
Audio main operationPower/Volume control:
Turn the ignition key to ACC or ON, then push
the Power/Volume control knob. The mode
(radio or cassette) which was playing immedi-
ately before the system was turned off re-
sumes playing. When no cassette is loaded,
the radio comes on. Pushing the
Power/Volume button again turns the system
off.
Turn the Power/Volume control knob to adjust
the volume.
Adjusting tone quality and speaker
balance:
To adjust BASS×TREB×FADER×BAL (Bass,
Treble, Fader, Balance), press the AUDIO
button until the desired mode (BAS, TRE, FAD
or BAL) appears in the display.
Press the
or
button to adjust Bass
(BAS) and Treble (TRE) to the desired level.
Use the
or
button to adjust Fader
or Balance modes. Fader adjusts the sound
level between the front and rear speakers and
Balance (BAL) adjusts the sound level be-
tween the right and left speakers.After 10 seconds, the radio or cassette tape
display reappears. Once the sound quality is
set to the desired level, press the AUDIO
button repeatedly until the radio or cassette
tape display appears.
Clock operation:
Pressing the CLOCK button alternates the
clock and the radio/cassette tape options in
the display.
Radio/Cassette tape priority mode:In this mode, the radio station illuminates in the
display during radio operation. During cassette
tape operation, TAPE illuminates in the dis-
play.FM-AM radio operation
FM-AM band select:
Pushing the FM×AM band select button will
change the band FM on AM.
The FM stereo indicator, ST illuminates during
FM stereo reception. When the stereo broad-
cast signal is weak, the radio automatically
changes from stereo to monaural reception.
SAA0260
Heater, air conditioner and audio systems
4-15
Z
01.1.31/R50-D
X