1998 NISSAN MAXIMA fuel
[x] Cancel search: fuelPage 155 of 231

TemperatureA temperature increase will accelerate the rate
of corrosion to those parts which are not well
ventilated.Air pollutionIndustrial pollution, the presence of salt in the
air in coastal areas, or heavy road salt use will
accelerate the corrosion process. Road salt
will also accelerate the disintegration of paint
surfaces.TO PROTECT YOUR VEHICLE
FROM CORROSION:IWash and wax your vehicle often to keep
the vehicle clean.
IAlways check for minor damage to the paint
and repair it as soon as possible.
IKeep drain holes at the bottom of the doors
open to avoid water accumulation.
ICheck the underbody for accumulation of
sand, dirt or salt. If present, wash with water
as soon as possible.
INEVER remove dirt, sand or other
debris from the passenger compart-
ment by washing it out with a hose.
Remove dirt with a vacuum cleaner or
broom.
INever allow water or other liquids to
come in contact with electronic com-
ponents inside the vehicle as this
may damage them.Chemicals used for road surface de-icing are
extremely corrosive. They accelerate corro-
sion and deterioration of underbody compo-
nents such as the exhaust system, fuel and
brake lines, brake cables, floor pan and fend-
ers.
In winter, the underbody must be cleaned
periodically.
For additional protection against rust and cor-
rosion, which may be required in some areas,
consult your local NISSAN dealer.
7-6
Appearance and care
Z
01.1.31/A32-D
X
Page 157 of 231
When performing any inspection or mainte-
nance work on your vehicle, always take care
to prevent serious accidental injury to yourself
or damage to the vehicle. The following are
general precautions which should be closely
observed.IPark the vehicle on a level surface,
apply the parking brake securely and
block the wheels to prevent the ve-
hicle from moving. For a manual
transmission, move the shift lever to
N (Neutral) position. For an automatic
transmission, move the selector lever
to P (Park) position.
IBe sure the ignition key is OFF or
LOCK when performing any parts re-
placement or repairs.
IYour vehicle is equipped with an au-
tomatic engine cooling fan. It may
come on at any time without warning,
even if the ignition key is in the OFF
position and the engine is not run-
ning. To avoid injury, always discon-
nect the negative battery cable before
working near the fan.IIf you must work with the engine
running, keep your hands, clothing,
hair and tools away from moving
fans, belts and any other moving
parts.
IIt is advisable to remove necktie and
any jewelry, such as rings, watches,
etc. before working on your vehicle.
IAlways wear eye protection when-
ever you work on your vehicle.
IIf you must run the engine in an
enclosed space such as a garage, be
sure there is proper ventilation for
exhaust gases.
INever get under the vehicle while it is
supported only by a jack. If it is nec-
essary to work under the vehicle,
support it with safety stands.
IKeep smoking materials, flame and
sparks away from fuel and the bat-
tery.
IOn gasoline engine models with the
Multiport Fuel Injection (MFI) System,
the fuel filter or fuel lines should be
serviced by a NISSAN dealer becausethe fuel lines are under high pressure
even when the engine is off.
IDo not work under the hood while the
engine is hot. Turn off the engine and
wait until it cools down.
INever connect or disconnect either
the battery or any transistorized com-
ponent connector while the ignition
key is on.
INever leave the engine or the auto-
matic transmission related compo-
nent harness connector discon-
nected while the ignition key is on.
IAvoid direct contact with used engine
oil. Improperly disposed motor oil
and/or other vehicle fluids can hurt
the environment. Always conform to
local regulations for disposal of ve-
hicle fluid.This ª8. Do-it-yourselfº section gives instruc-
tions regarding only those items which are
relatively easy for an owner to perform.
MAINTENANCE PRECAUTIONS8-2
Do-it-yourself
Z
01.1.31/A32-D
X
Page 162 of 231

5. See ªCapacities and recommended
fuel/lubricantsº in the ª10. Technical and
consumer informationº section for cooling
system capacity. Fill the radiator slowly with
the proper mixture of coolant and water. Fill
the reservoir tank up to the MAX level. Then
install the radiator cap.
6. Start the engine, and warm it up until the
radiator fan operates. Then race the engine
two or three times under no load. Watch the
coolant temperature gauge for signs of
overheating.
7. Stop the engine. After it completely cools
down, refill the radiator up to the filler
opening. Fill the reservoir tank up to the
MAX level.
8. Check the radiator drain plug and the drain
plug on the engine block for any sign of
leakage.
SDI0138
Do-it-yourself
8-7
Z
01.1.31/A32-D
X
Page 164 of 231
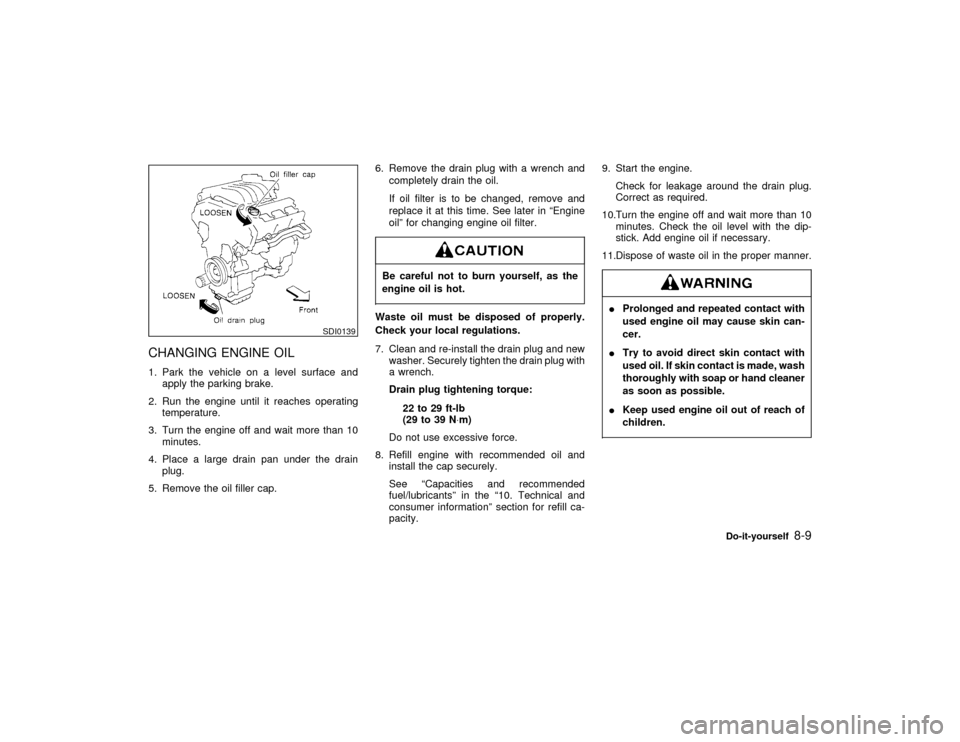
CHANGING ENGINE OIL1. Park the vehicle on a level surface and
apply the parking brake.
2. Run the engine until it reaches operating
temperature.
3. Turn the engine off and wait more than 10
minutes.
4. Place a large drain pan under the drain
plug.
5. Remove the oil filler cap.6. Remove the drain plug with a wrench and
completely drain the oil.
If oil filter is to be changed, remove and
replace it at this time. See later in ªEngine
oilº for changing engine oil filter.
Be careful not to burn yourself, as the
engine oil is hot.Waste oil must be disposed of properly.
Check your local regulations.
7. Clean and re-install the drain plug and new
washer. Securely tighten the drain plug with
a wrench.
Drain plug tightening torque:
22 to 29 ft-lb
(29 to 39 N×m)
Do not use excessive force.
8. Refill engine with recommended oil and
install the cap securely.
See ªCapacities and recommended
fuel/lubricantsº in the ª10. Technical and
consumer informationº section for refill ca-
pacity.9. Start the engine.
Check for leakage around the drain plug.
Correct as required.
10.Turn the engine off and wait more than 10
minutes. Check the oil level with the dip-
stick. Add engine oil if necessary.
11.Dispose of waste oil in the proper manner.
IProlonged and repeated contact with
used engine oil may cause skin can-
cer.
ITry to avoid direct skin contact with
used oil. If skin contact is made, wash
thoroughly with soap or hand cleaner
as soon as possible.
IKeep used engine oil out of reach of
children.
SDI0139
Do-it-yourself
8-9
Z
01.1.31/A32-D
X
Page 173 of 231
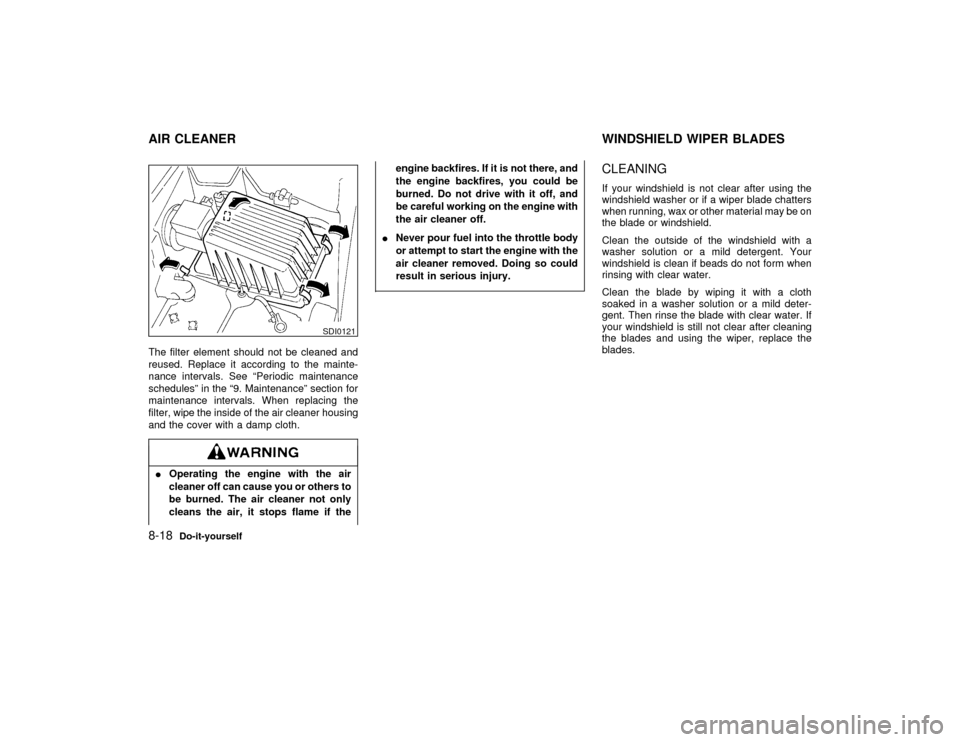
The filter element should not be cleaned and
reused. Replace it according to the mainte-
nance intervals. See ªPeriodic maintenance
schedulesº in the ª9. Maintenanceº section for
maintenance intervals. When replacing the
filter, wipe the inside of the air cleaner housing
and the cover with a damp cloth.IOperating the engine with the air
cleaner off can cause you or others to
be burned. The air cleaner not only
cleans the air, it stops flame if theengine backfires. If it is not there, and
the engine backfires, you could be
burned. Do not drive with it off, and
be careful working on the engine with
the air cleaner off.
INever pour fuel into the throttle body
or attempt to start the engine with the
air cleaner removed. Doing so could
result in serious injury.
CLEANINGIf your windshield is not clear after using the
windshield washer or if a wiper blade chatters
when running, wax or other material may be on
the blade or windshield.
Clean the outside of the windshield with a
washer solution or a mild detergent. Your
windshield is clean if beads do not form when
rinsing with clear water.
Clean the blade by wiping it with a cloth
soaked in a washer solution or a mild deter-
gent. Then rinse the blade with clear water. If
your windshield is still not clear after cleaning
the blades and using the wiper, replace the
blades.
SDI0121
AIR CLEANER WINDSHIELD WIPER BLADES8-18
Do-it-yourself
Z
01.1.31/A32-D
X
Page 195 of 231
Seats:Check seat position controls such as
seat adjusters, seatback recliner, etc. to en-
sure they operate smoothly and that all latches
lock securely in every position. Check that the
head restraints move up and down smoothly
and that the locks (if equipped) hold securely
in all latched positions.
Seat belts:Check that all parts of the seat belt
system (for example, buckles, anchors, adjust-
ers and retractors) operate properly and
smoothly, and are installed securely. Check
the belt webbing for cuts, fraying, wear or
damage.
Accelerator pedal:Check the pedal for
smooth operation and make sure the pedal
does not catch or require uneven effort. Keep
the floor mats away from the pedal.
Clutch pedal*:Make sure the pedal operates
smoothly and check that it has the proper free
play.
Brakes:Check that the brakes do not pull the
vehicle to one side when applied.
Brake pedal and booster*:Check the pedal
for smooth operation and make sure it has the
proper distance under it when depressed fully.
Check the brake booster function. Be sure tokeep floor mats away from the pedal.
Parking brake*:Check that the lever has the
proper travel and make sure that the vehicle is
held securely on a fairly steep hill when only
the parking brake is applied.
Automatic transaxle P (Park) position
mechanism:Check that the brake pedal must
be depressed for the selector lever to be
moved from the P (Park) position. On a fairly
steep hill check that the vehicle is held se-
curely with the selector lever in the P (Park)
position without applying any brakes.
Under the hood and the vehicleThe maintenance items listed here should be
checked periodically (for example, each time
you check the engine oil or refuel).
Windshield washer fluid*:Check that there
is adequate fluid in the tank.
Engine coolant level*:Check the coolant
level when the engine is cold.
Radiator and hoses:Check the front of the
radiator and clean off any dirt, insects, leaves,
etc., that may have accumulated. Make sure
the hoses have no cracks, deformation, dete-
rioration or loose connections.Brake and clutch fluid levels*:Make sure
that the brake and clutch fluid levels are be-
tween the MAX and MIN lines on the reservoir.
Battery*:Check the fluid level in each cell. It
should be between the MAX and MIN lines.
Engine drive belts*:Make sure that no belt is
frayed, worn, cracked or oily.
Engine oil level*:Check the level on the
dipstick after parking the vehicle on a level
spot and turning off the engine. Be sure to wait
a few minutes to allow the oil to drain back into
the sump.
Power steering fluid level* and lines:Check
the level in the reservoir tank with the engine
off. Check the lines for proper attachment,
leaks, cracks, etc.
Automatic transaxle fluid level*:Check the
level on the dipstick after putting the selector
lever in P (Park) position with the engine idling.
Exhaust system:Make sure there are no
loose supports, cracks or holes. If the sound of
the exhaust seems unusual or there is a smell
of exhaust fumes, immediately locate the
trouble and correct it.
9-4
Maintenance
Z
01.1.31/A32-D
X
Page 196 of 231

(See ªPrecautions when starting and drivingº
in the ª5. Starting and drivingº section for
exhaust gas (carbon monoxide).)
Underbody:The underbody is frequently ex-
posed to corrosive substances such as those
used on icy roads or to control dust. It is very
important to remove these substances, other-
wise rust will form on the floor pan, frame, fuel
lines and around the exhaust system. At the
end of winter, the underbody should be thor-
oughly flushed with plain water, being careful
to clean those areas where mud and dirt may
accumulate. For additional information, see
ªCleaning exteriorº in the ª7. Appearance and
careº section.
Fluid leaks:Check under the vehicle for fuel,
oil, water or other fluid leaks after the vehicle
has been parked for a while. Water dripping
from the air conditioner after use is normal. If
you should notice any leaks or if gasoline
fumes are evident, check for the cause and
have it corrected immediately.To ensure smooth, trouble-free, safe and eco-
nomical driving, NISSAN provides two differ-
ent maintenance schedules that may be used,
depending upon the conditions in which you
usually drive. These schedules contain both
distance and time intervals, up to 60,000 miles
(96,000 km)/48 months. For most people, the
odometer reading will indicate when service is
needed. However, if you drive very little, your
vehicle should be serviced at the regular time
intervals shown in the schedule.After 60,000
miles (96,000 km) or 48 months, continue
the periodic maintenance at the same
mileage/time intervals.
SCHEDULE 1Follow Periodic Maintenance Schedule 1 if
your driving habits frequently include one or
more of the following driving conditions:
Irepeated short trips of less than 5 miles
(8 km).
Irepeated short trips of less than 10 miles
(16 km) with outside temperatures re-
maining below freezing.
Ioperating in hot weather in stop-and-go
rush hour traffic.
Iextensive idling and/or low speed driv-
ing for long distances, such as police,taxi or door-to-door delivery use.
Idriving in dusty conditions.
Idriving on rough, muddy, or salt spread
roads.
Itowing a trailer, using a camper or a
car-top carrier.
SCHEDULE 2Follow Periodic Maintenance Schedule 2 if
none of the driving conditions shown in Sched-
ule 1 apply to your driving habits.
PERIODIC MAINTENANCE
SCHEDULES
Maintenance
9-5
Z
01.1.31/A32-D
X
Page 197 of 231

SCHEDULE 1Abbreviations: R = Replace I = Inspect. Correct or replace if necessary. [ ]: At the mileage intervals onlyMAINTENANCE OPERATIONMAINTENANCE INTERVAL
Perform at number of miles,
kilometers or months, which-
ever comes first.Miles x 1,000 3.75 7.5 11.25 15 18.75 22.5 26.25 30 33.75 37.5 41.25 45 48.75 52.5 56.25 60
(km x 1,000) (6) (12) (18) (24) (30) (36) (42) (48) (54) (60) (66) (72) (78) (84) (90) (96)
Months 3 6 9 12 15 18 21 24 27 30 33 36 39 42 45 48Emission control system maintenanceDrive belts See NOTE (1)I*
Air cleaner filter See NOTE (2) [R] [R]
EVAP vapor linesI* I*
Fuel linesI* I*
Fuel filter See NOTE (3)*
Engine coolant See NOTE (4)R*
Engine oilRRRRRRRRRRRRRRRR
Engine oil filter (Use part No. 15208-31U00 or equivalent)RRRRRRRRRRRRRRRR
Spark plugs (Use PLATINUM-TIPPED type)[R]
Intake & exhaust valve clearance See NOTE (5)NOTE: (1) After 60,000 miles (96,000 km) or 48 months, inspect every 15,000 miles (24,000 km) or 12 months.
(2) If operating mainly in dusty conditions, more frequent maintenance may be required.
(3) If vehicle is operated under extremely adverse weather conditions or in areas where ambient temperatures are either
extremely low or extremely high, the filters might become clogged. In such an event, replace them immediately.
(4) After 60,000 miles (96,000 km) or 48 months, replace every 30,000 miles (48,000 km) or 24 months.
(5) If valve noise increases, inspect valve clearance.
(6) Maintenance items and intervals with ª*º are recommended by NISSAN for reliable vehicle operation. The owner need not
perform such maintenance in order to maintain the emission warranty or manufacturer recall liability. Other maintenance
items and intervals are required.9-6
Maintenance
Z
01.1.31/A32-D
X