1998 NISSAN FRONTIER length
[x] Cancel search: lengthPage 32 of 224
SEAT BELT EXTENDERS
If, because of body size or driving position,
it is not possible to properly fit the lap-
shoulder belt and fasten it, an extender is
available which is compatible with the in-
stalled seat belts. The extender adds ap-
proximately 8 inches (200 mm) of length
and may be used for either the driver or right
passenger seating position. See an autho-
rized NISSAN dealer for assistance if the
extender is required.
WARNING
cOnly NISSAN belt extenders, made
by the same company which made
the original equipment belts, should
be used with NISSAN belts.
cPersons who can use the standard
seat belt should not use an extender.
Such unnecessary use could result
in serious personal injury in the
event of an accident.
SEAT BELT MAINTENANCE
cTo clean the seat belt webbings,apply
a mild soap solution or any solution rec-
ommended for cleaning upholstery or
carpets. Then brush, wipe with a cloth
and allow it to dry in the shade. Do not
allow the seat belts to retract until they
are completely dry.
cIf dirt builds up in the shoulder belt
guideof the seat belt anchors, the seat
belts may retract slowly. Wipe the shoul-
der belt guide with a clean, dry cloth.
c
Periodically check to see that the seat
belt and the metal components,such
as buckles, tongues, retractors, flexible
wires and anchors, work properly. If loose
parts, deterioration, cuts or other damage
on the webbing is found, the entire seat
belt assembly should be replaced.
WARNING
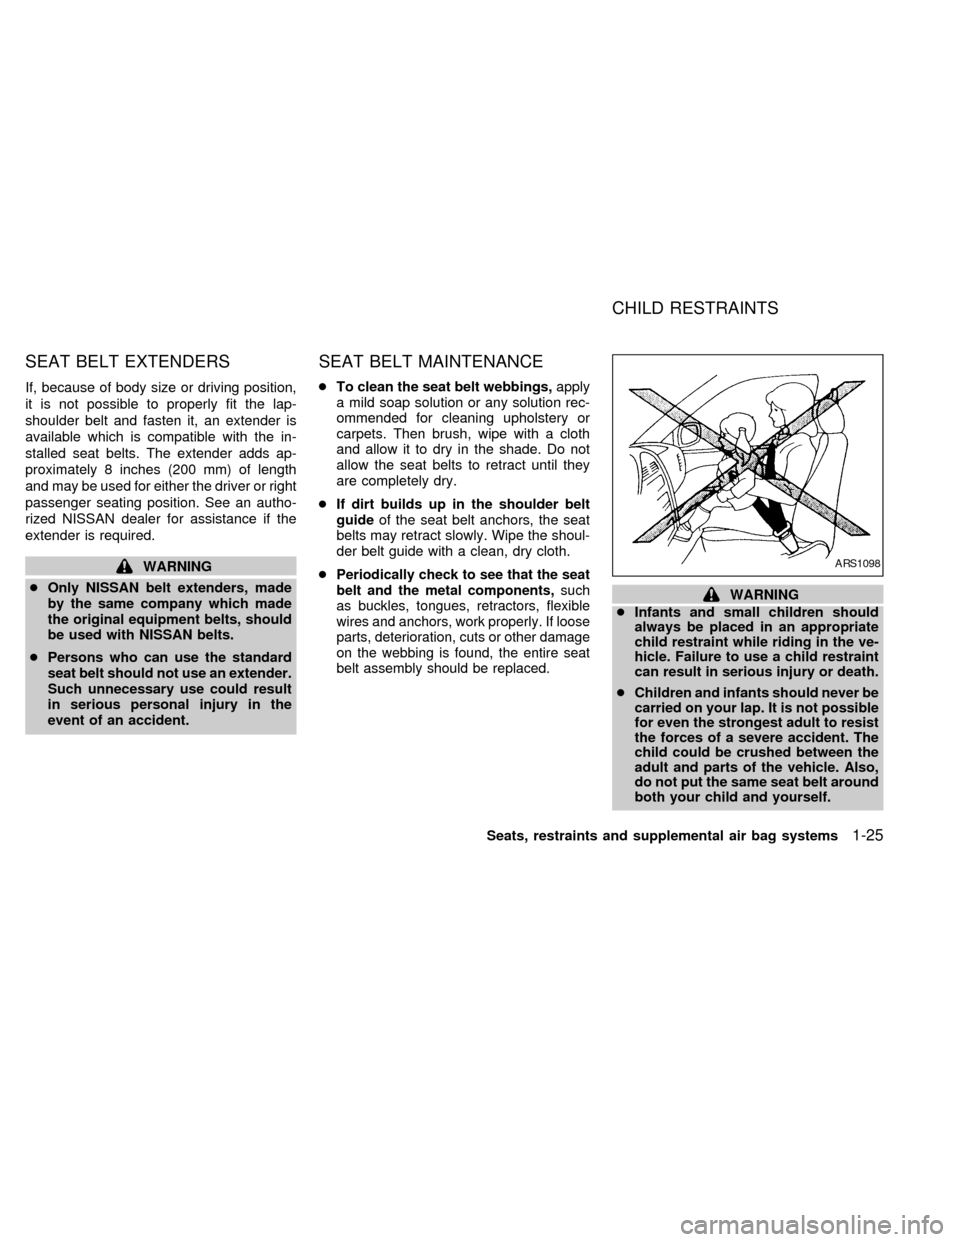
cInfants and small children should
always be placed in an appropriate
child restraint while riding in the ve-
hicle. Failure to use a child restraint
can result in serious injury or death.
cChildren and infants should never be
carried on your lap. It is not possible
for even the strongest adult to resist
the forces of a severe accident. The
child could be crushed between the
adult and parts of the vehicle. Also,
do not put the same seat belt around
both your child and yourself.
ARS1098
CHILD RESTRAINTS
Seats, restraints and supplemental air bag systems1-25
ZX
Page 40 of 224
TOP STRAP CHILD RESTRAINT
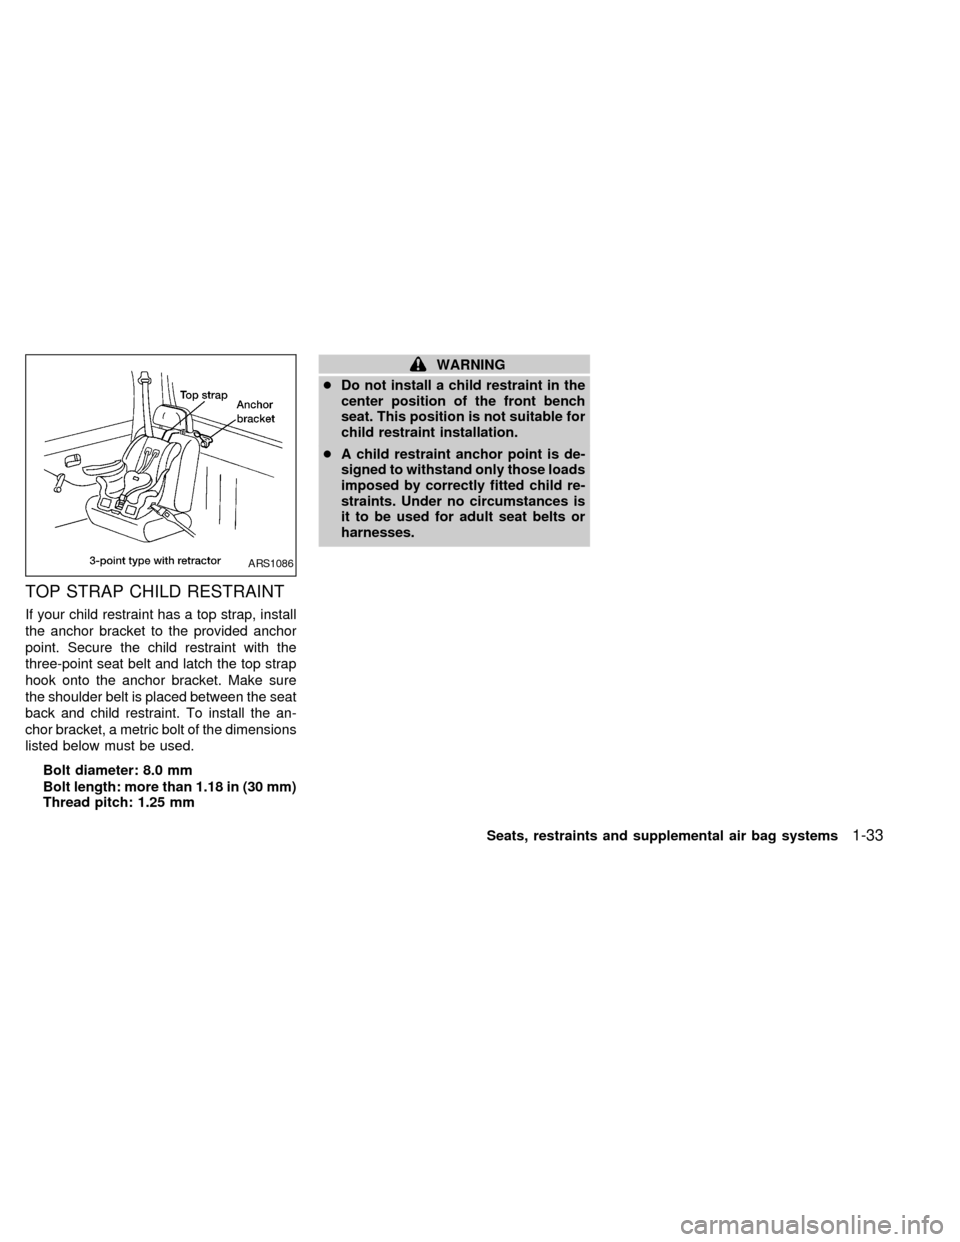
If your child restraint has a top strap, install
the anchor bracket to the provided anchor
point. Secure the child restraint with the
three-point seat belt and latch the top strap
hook onto the anchor bracket. Make sure
the shoulder belt is placed between the seat
back and child restraint. To install the an-
chor bracket, a metric bolt of the dimensions
listed below must be used.
Bolt diameter: 8.0 mm
Bolt length: more than 1.18 in (30 mm)
Thread pitch: 1.25 mm
WARNING
cDo not install a child restraint in the
center position of the front bench
seat. This position is not suitable for
child restraint installation.
cA child restraint anchor point is de-
signed to withstand only those loads
imposed by correctly fitted child re-
straints. Under no circumstances is
it to be used for adult seat belts or
harnesses.
ARS1086
Seats, restraints and supplemental air bag systems1-33
ZX
Page 92 of 224
display reappears. Once the sound quality
is set to the desired level, press the AUDIO
button repeatedly until the radio or cassette
tape display appears.
CASSETTE TAPE OPERATION
Turn the ignition key to ACC or ON and
carefully insert a cassette tape into the tape
door. The cassette tape automatically pulls
into the player.
The word TAPE and moving digital squares
illuminate on the right side of the display
window. If the radio is already operating it
automatically turns off and the cassette tape
begins to play.
CAUTION
Do not force the cassette tape into the
tape door. This could cause player
damage.
The cassette tape automatically changes
directions to play the other side when the
first side is complete. At this time, the mov-
ing digital squares illuminate on the left side
of the display window.
Precautions on cassette player op-
erations
cTo maintain good quality sound, NIS-
SAN recommends using cassette tapes
of 60 minutes or shorter in length.
cCassette tapes should be removed
from the player when not in use. Store
cassettes in their protective cases
and away from direct sunlight, heat,
moisture and magnetic sources.
cDirect sunlight can cause the cassette
to become deformed. The use of de-
formed cassettes may cause the cas-
sette to jam in the player.
cDo not use cassettes with labels
which are peeling and loose. If used,
the label could jam in the player.
cIf a cassette has loose tape, insert a
pencil through one of the cassette
hubs and rewind the tape firmly
around the hubs. Loose tape may
cause tape jamming and wavering
sound quality.
cOver a period of time, the playback
head, capstan and pinch roller may
collect a tape coating residue as thetape is played. This residue accumu-
lation can cause weak or wavering
sound, and should be removed peri-
odically with a head cleaning tape. If
the residue is not removed periodi-
cally, the player may need to be dis-
assembled for cleaning.
Fast forwarding or rewinding the
tape
Push either theorbutton for
the desired direction.
The FF or REW symbol illuminates in the
display.
To stop the FF or REW function, press the
oragain, or thebutton.
Automatic Program Search (APS)
fast forwarding or APS rewinding
the tape
Push either theorbutton
while the cassette tape is playing. The tape
runs quickly, stops, then plays the next
selection from the beginning. Either the FF
or REW symbol flashes in the display while
searching for the selection.
Heater, air conditioner and audio systems
4-13
ZX
Page 97 of 224
Adjusting tone quality and speaker
balance
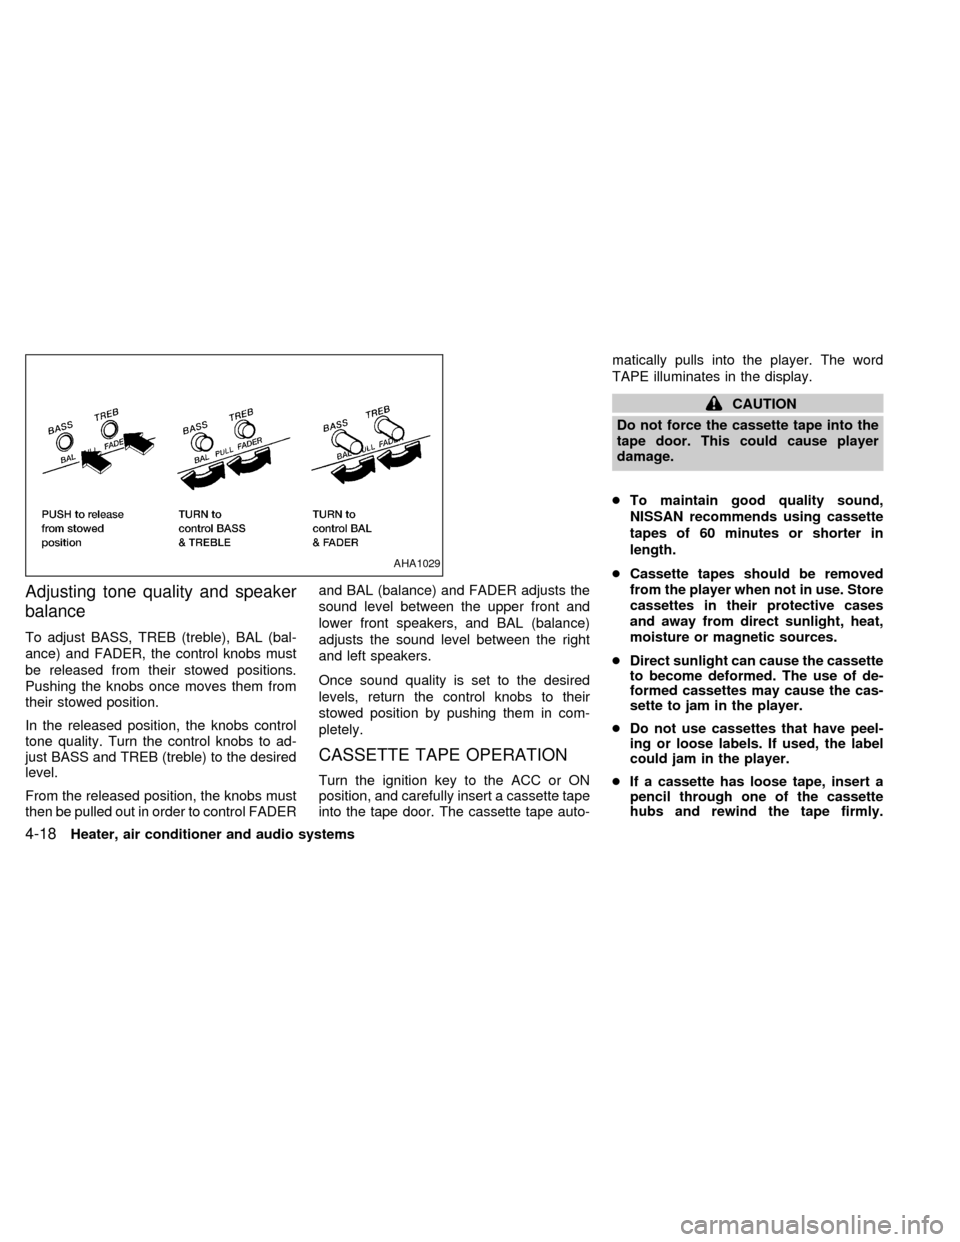
To adjust BASS, TREB (treble), BAL (bal-
ance) and FADER, the control knobs must
be released from their stowed positions.
Pushing the knobs once moves them from
their stowed position.
In the released position, the knobs control
tone quality. Turn the control knobs to ad-
just BASS and TREB (treble) to the desired
level.
From the released position, the knobs must
then be pulled out in order to control FADERand BAL (balance) and FADER adjusts the
sound level between the upper front and
lower front speakers, and BAL (balance)
adjusts the sound level between the right
and left speakers.
Once sound quality is set to the desired
levels, return the control knobs to their
stowed position by pushing them in com-
pletely.
CASSETTE TAPE OPERATION
Turn the ignition key to the ACC or ON
position, and carefully insert a cassette tape
into the tape door. The cassette tape auto-matically pulls into the player. The word
TAPE illuminates in the display.
CAUTION
Do not force the cassette tape into the
tape door. This could cause player
damage.
cTo maintain good quality sound,
NISSAN recommends using cassette
tapes of 60 minutes or shorter in
length.
cCassette tapes should be removed
from the player when not in use. Store
cassettes in their protective cases
and away from direct sunlight, heat,
moisture or magnetic sources.
cDirect sunlight can cause the cassette
to become deformed. The use of de-
formed cassettes may cause the cas-
sette to jam in the player.
cDo not use cassettes that have peel-
ing or loose labels. If used, the label
could jam in the player.
cIf a cassette has loose tape, insert a
pencil through one of the cassette
hubs and rewind the tape firmly.
AHA1029
4-18Heater, air conditioner and audio systems
ZX
Page 103 of 224
WARNING
Do not leave children, unreliable
adults, or pets alone in your vehicle.
They could accidentally injure them-
selves or others through inadvertent
operation of the vehicle. Also, on hot,
sunny days, temperatures in a closed
vehicle could quickly become high
enough to cause severe or possibly
fatal injuries to people or animals.
EXHAUST GAS (carbon monoxide)
WARNING
Do not breathe exhaust gases; they
contain colorless and odorless carbon
monoxide. Carbon monoxide is a dan-
gerous gas, and can cause uncon-
sciousness or death.
cIf you suspect that exhaust fumes
are entering the vehicle, drive with
all windows fully open, and have the
vehicle inspected immediately.
cDo not run the engine in closed
spaces such as a garage.cDo not park the vehicle with the
engine running for any extended
length of time.
c
If a special body, camper, or other
equipment is added for recreational
or other usage, follow the manufac-
turer's recommendation to prevent
carbon monoxide entry into the ve-
hicle. Do not occupy these areas
while the engine is running even if the
vehicle is parked. (Some recreational
vehicle appliances such as stoves,
refrigerators, heaters, etc. may also
generate carbon monoxide.)
cThe exhaust system and body
should be inspected by a qualified
mechanic whenever:
a. The vehicle is raised for service.
b. You suspect that exhaust fumes
are entering into the passenger
compartment.
c. You notice a change in the sound
of the exhaust system.
d.
You have had an accident involv-
ing damage to the exhaust system,
underbody, or rear of the vehicle.
THREE-WAY CATALYST
The three-way catalyst is an emission control
device installed in the exhaust system. Ex-
haust gases in the converter are burned at
high temperatures to help reduce pollutants.
WARNING
cThe exhaust gas and the exhaust
system are very hot. Keep people or
flammable materials away from the
exhaust pipe.
cDo not stop or park the vehicle over
flammable materials such as dry
grass, waste paper or rags. They
may ignite and cause a fire.
CAUTION
cDo not use leaded gasoline. Depos-
its from leaded gasoline will seri-
ously reduce the three-way cata-
lyst's ability to help reduce exhaust
pollutants.
cKeep your engine tuned up. Malfunc-
tions in the ignition, fuel injection, or
electrical systems can cause over-
rich fuel flow into the converter,
causing it to overheat. Do not keep
PRECAUTIONS WHEN
STARTING AND DRIVING
5-2Starting and driving
ZX
Page 198 of 224

Model KA24DE
Type Gasoline, 4-cycle
Cylinder arrangement 4-cylinder in-line
Bore ý Stroke in (mm) 3.504 ý 3.780 (89.0 ý 96.0)
Displacement cu in (cm
3) 145.78 (2,389)
Firing order 1-3-4-2
Idle speed rpm
See the ``Emission Control
Label'' on the underside of the hood. Ignition timing degree (BTDC)
at idle speed degree/rpm
CO percentage at idle speed [No air] %
Spark plug BKR5E-11 (Standard) FR5AP-10
BKR6E-11 (Cold) or FR6AP-10
BKR7E-11 (Cold) FR7AP-10
Spark plug gap in (mm) 0.039 to 0.043 (1.0 to 1.1)
Camshaft operation Timing chain
Generator belt size
Width ý Length in (mm) 0.429 ý 35.63 (10.9 ý 905)
The spark ignition system of this ve-
hicle meets all requirements of the
Canadian Interference Ð Causing
Equipment Regulations.
ENGINE
Technical and consumer information10-9
ZX
Page 200 of 224

Unit: in (mm)
4x2 4x4
Regular Cab King Cab Regular Cab King Cab
Overall length*1 184.3 (4,681.2) 196.1 (4,980.9) 184.3 (4,681.2) 196.1 (4,980.9)
Overall width 66.5 (1,689.1) 66.5 (1,689.1) 71.9 (1,826.3) 71.9 (1,826.3)
Overall heightSTD 62.5 (1,588.0),
XE 62.8 (1,595.1)62.6 (1,590.0) 66.1 (1,678.9) 65.9 (1,673.9)
Front tread 54.9 (1,394.5) 54.9 (1,394.5) 60.0 (1,524.0) 60.0 (1,524.0)
Rear tread 54.7 (1,389.4) 54.7 (1,389.4) 59.3 (1,506.2) 59.3 (1,506.2)
Wheelbase 104.3 (2,649.2) 116.1 (2,948.9) 104.3 (2,649.2) 116.1 (2,948.9)
Gross vehicle weight rating
lb (kg)
See the ``F.M.V.S.S. certification label'' on the driver side lock pillar. Gross axle weight rating
Front lb (kg)
Rear lb (kg)
*1: On step bumper equipped models, the bumper adds 6.6 in (168 mm) to the overall length.
DIMENSIONS AND WEIGHTS
Technical and consumer information10-11
ZX
Page 212 of 224

prevent load shift while driving.
cBe certain your outside mirrors conform
to all federal, state or local regulations. If
not, install any mirrors required for towing
before driving the vehicle.
Trailer towing tips
In order to gain skill and an understanding
of the vehicle's behavior, you should prac-
tice turning, stopping and backing up in an
area which is free from traffic. Steering,
stability and braking performance will be
somewhat different than under normal driv-
ing conditions.
cAlways secure items in the trailer to
prevent load shift while driving.
c
Avoid abrupt starts, acceleration or stops.
cAvoid sharp turns or lane changes.
cAlways drive your vehicle at a moderate
speed.
cAlways block the wheels on both vehicle
and trailer when parking. Parking on a
slope is not recommended; however, if
you must do so, and if your vehicle is
equipped with automatic transmission,
first block the wheels and apply the park-ing brake, and then move the transmis-
sion shift selector lever into the P (Park)
position. If you move the shift lever to the
P (Park) position before blocking the
wheels and applying the parking brake,
transmission damage could occur.
cWhen going down a hill, shift into a lower
gear and use the engine braking effect.
When ascending a long grade, downshift
the transmission to a lower gear and
reduce speed to reduce chances of en-
gine overloading and/or overheating.
However, for long steep grades, do not
stay in 1st or 2nd gear when driving
above 35 MPH (56 km/h).
cIf the engine coolant rises to an ex-
tremely high temperature when the air
conditioning system is on, turn off the air
conditioner. Coolant heat can be addi-
tionally vented by opening the windows,
switching the fan control to high and
setting the temperature control to the
HOT position.
cTrailer towing requires more fuel than
normal circumstances.
cAvoid towing a trailer for your vehicle's
first 500 miles (805 km).cHave your vehicle serviced more often
than at intervals specified in the recom-
mended Maintenance Schedule.
cWhen making a turn, your trailer wheels
will be closer to the inside of the turn than
your vehicle wheels. To compensate for
this, make a larger than normal turning
radius during the turn.
cCrosswinds and rough roads adversely
affect vehicle/trailer handling, possibly
causing vehicle sway. When being
passed by larger vehicles, be prepared
for possible changes in crosswinds that
could affect vehicle handling. If swaying
does occur, firmly grip the steering
wheel, steer straight ahead, and immedi-
ately (but gradually) reduce vehicle
speed. This combination helps to stabi-
lize the vehicle. Never increase speed.
cBe careful when passing other vehicles.
Passing while towing a trailer requires
considerably more distance than normal
passing. Remember the length of the
trailer must also pass the other vehicle
before you can safely change lanes.
cTo maintain engine braking efficiency
and electrical charging performance, do
Technical and consumer information
10-23
ZX