1998 NISSAN ALTIMA key
[x] Cancel search: keyPage 117 of 217
Suggested maximum speed in each
gear
Downshift to a lower gear if the engine is not
running smoothly, or if you need to accelerate.
Do not exceed the maximum suggested
speed (shown below) in any gear. For level
road driving, use the highest gear sug-
gested for that speed. Always observe
posted speed limits, and drive according to
the road conditions, which will ensure safe
operation. Do not over-rev the engine when
shifting to a lower gear as it may cause
engine damage or loss of vehicle control.
GEAR MPH (km/h)
1st 30 (50)
2nd 60 (95)
3rd 90 (145)
4th þ
5th þ1. Apply the parking brake.
2.Automatic transmission:
Move the shift selector lever to P (Park)
or N (Neutral). (P is recommended.)The shift selector lever cannot be
moved out of P (Park) and into any of
the other gear positions if the ignition
key is turned to OFF or if the key is
removed.
The starter is designed not to operate
if the shift selector lever is in any of
the driving positions.
Manual transmission:
Move the shift selector lever to N (Neu-
tral), and depress the clutch pedal to the
floor while cranking the engine.
The starter is designed not to operate
unless the clutch pedal is fully de-
pressed.
3. Crank the enginewith your foot off the
accelerator pedalby turning the ignition
key to START. Release the key when the
engine starts. If the engine starts, but
fails to run, repeat the above procedure.
Ð If the engine is very hard to start in
extremely cold or hot weather, de-
press and hold the accelerator pedalto help start the engine.
Ð In the summer, when restarting the
engine within 30 minutes after it has
been stopped, keep the accelerator
pedal fully depressed while starting.
CAUTION
Do not operate the starter for more than
15 seconds at a time. If the engine does
not
start, turn the key off and wait 10
seconds before cranking again, other-
wise the starter could be damaged.
4.Warm-up
Allow the engine to idle for at least 30
seconds after starting. Drive at moderate
speed for a short distance first, especially
in cold weather.
STARTING THE ENGINE
5-10Starting and driving
ZX
Page 122 of 217
WARNING
Do not park the vehicle over flammable
materials such as dry grass, waste pa-
per or rags. They may ignite and cause
a fire.
1. Firmly apply the parking brake.
2.Manual transmission models:
Place the shift lever in the R (Reverse)
position. When parking on an uphill
grade, place the shift lever in 1 (First)
gear.Automatic transmission models:
Move the gearshift lever to the P (Park)
position.
WARNING
Safe parking procedures require that
both the parking brake be set and the
transmission placed into P (Park) posi-
tion (automatic) or in the appropriate
gear (manual). Failure to do so could
cause the vehicle to move unexpect-
edly or roll away and result in an acci-
dent. Make sure the shift lever has beenpushed as far forward as it can go and
cannot be moved without depressing
the button at the end of the lever.
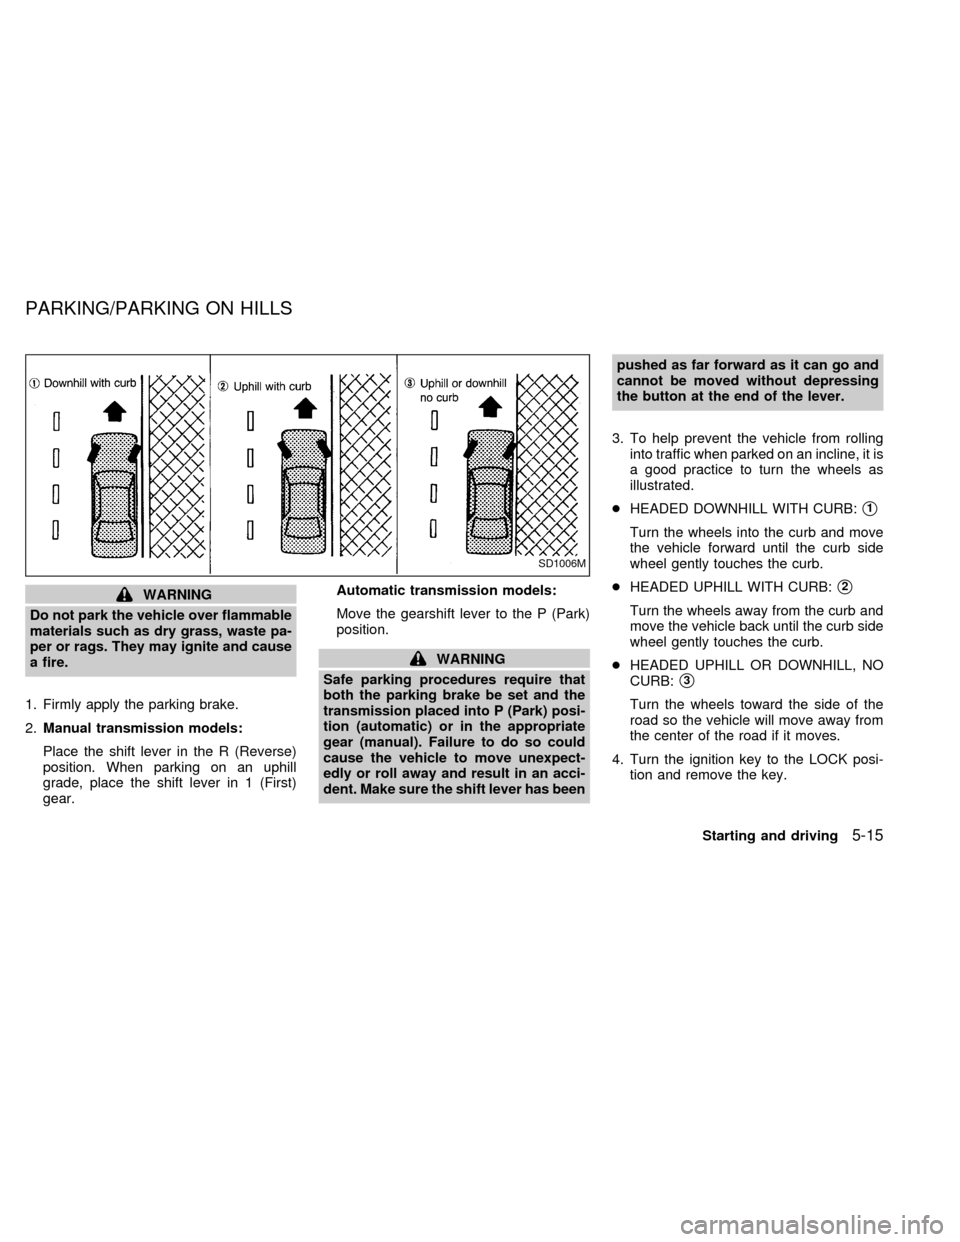
3. To help prevent the vehicle from rolling
into traffic when parked on an incline, it is
a good practice to turn the wheels as
illustrated.
cHEADED DOWNHILL WITH CURB:
s1
Turn the wheels into the curb and move
the vehicle forward until the curb side
wheel gently touches the curb.
cHEADED UPHILL WITH CURB:
s2
Turn the wheels away from the curb and
move the vehicle back until the curb side
wheel gently touches the curb.
cHEADED UPHILL OR DOWNHILL, NO
CURB:
s3
Turn the wheels toward the side of the
road so the vehicle will move away from
the center of the road if it moves.
4. Turn the ignition key to the LOCK posi-
tion and remove the key.
SD1006M
PARKING/PARKING ON HILLS
Starting and driving5-15
ZX
Page 125 of 217
while driving, take the vehicle to an autho-
rized NISSAN dealer for repair.
WARNING
The anti-lock brake system is a sophis-
ticated device, but it cannot prevent
accidents resulting from careless or
dangerous driving techniques. It can
help maintain vehicle control during
braking on slippery surfaces, but re-
member that the stopping distance on
slippery surfaces will be longer than on
normal surfaces, even with the anti-
lock system. Stopping distances may
also be longer on rough, gravel or
snow covered roads, or if you are using
tire chains. Always maintain a safe dis-
tance from the vehicle in front of you.
Ultimately, the responsibility for safety
of self and others rests in the hands of
the driver.
Tire type and condition of tires may
also affect braking effectiveness.
cWhen replacing tires, install the
specified size of tire on all 4 wheels.cWhen installing a spare tire, make
sure it is the proper size and type as
specified on the tire placard. For tire
placard location information, refer to
ªTire placardº in the Owner's Manual
index.
Refer to ``Wheels and Tires'' in the
``Do-it-yourself'' section of this manual.
Freeing a frozen door lock
To prevent a door lock from freezing, apply
de-icer or glycerin through the key hole. If
the lock becomes frozen, heat the key be-
fore inserting it into the key hole.
Anti-freeze
In the winter when it is anticipated that the
temperature will drop below 32ÉF (0ÉC),
check the anti-freeze (ethylene glycol base)
to assure proper winter protection. For de-
tails, see ``Engine cooling system'' in the
``Do-it-yourself'' section.
Battery
If the battery is not fully charged during
extremely cold weather conditions, the bat-
tery fluid may freeze and damage the bat-
tery. To maintain maximum efficiency, the
battery should be checked regularly. For
details, see ``Battery'' in the ``Do-it-yourself ''
section.
Draining of coolant
If the vehicle is to be left outside without
anti-freeze, drain the cooling system by
opening the drain valves located under the
radiator and on the engine block. Refill
COLD WEATHER DRIVING
5-18Starting and driving
ZX
Page 135 of 217
Always follow the instructions below.
Failure to do so could result in damage
to the charging system and cause per-
sonal injury.
1. If the booster battery is in another ve-
hicle, position the two vehicles to bring
their batteries into close proximity to
each other.
Do not allow the two vehicles to
touch.
2.
Apply the parking brake. Move the shift
selector lever to N (Neutral) (manual trans-
mission) or to P (Park) (automatic trans-
mission). Switch off all unncessary electri-cal systems (lights, heater, air conditioner,
etc.).
3. Remove vent caps on the battery (if so
equipped). Cover the battery with an old
cloth to reduce explosion hazard.
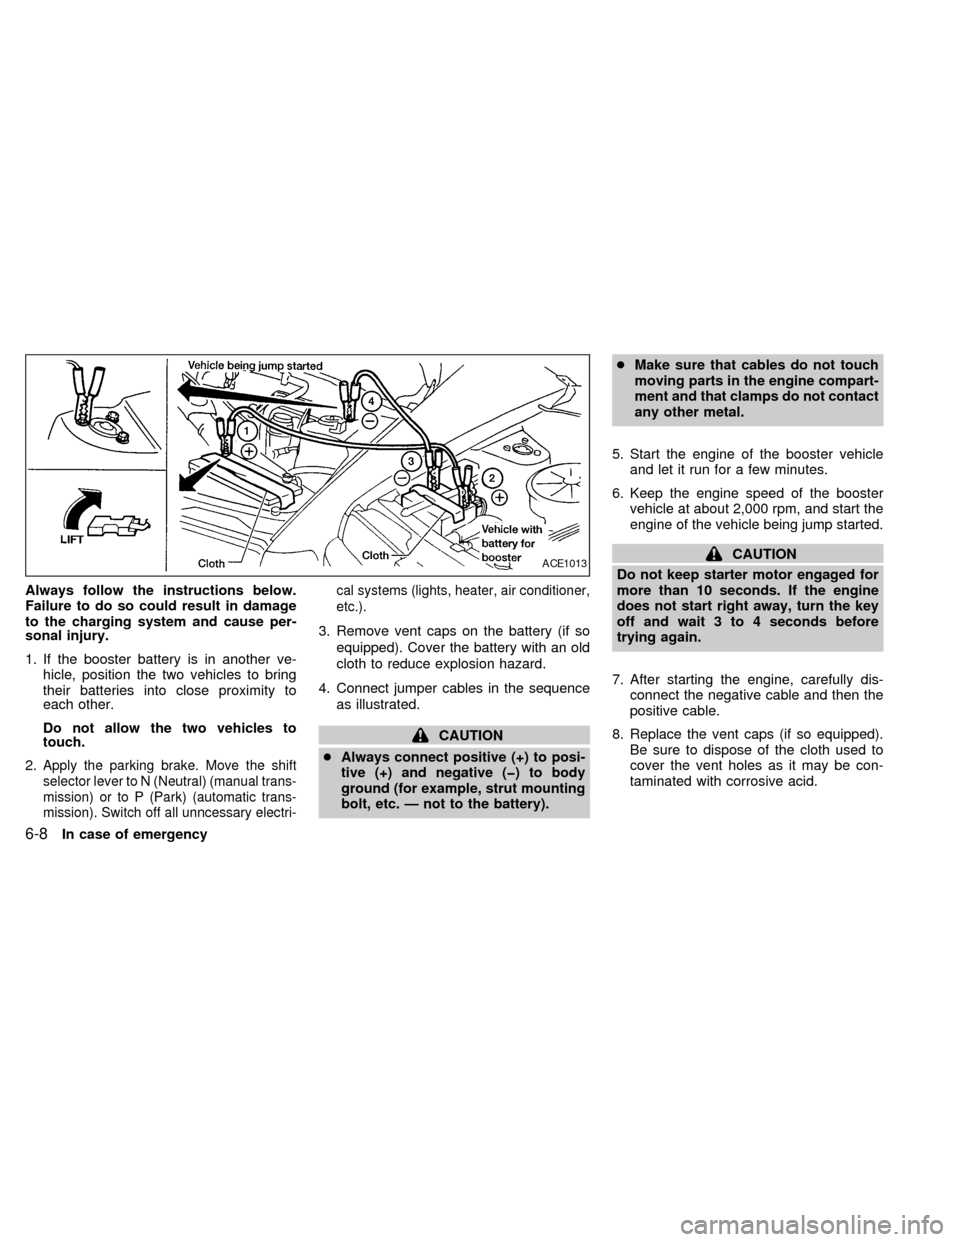
4. Connect jumper cables in the sequence
as illustrated.
CAUTION
cAlways connect positive (+) to posi-
tive (+) and negative (þ) to body
ground (for example, strut mounting
bolt, etc. Ð not to the battery).cMake sure that cables do not touch
moving parts in the engine compart-
ment and that clamps do not contact
any other metal.
5. Start the engine of the booster vehicle
and let it run for a few minutes.
6. Keep the engine speed of the booster
vehicle at about 2,000 rpm, and start the
engine of the vehicle being jump started.
CAUTION
Do not keep starter motor engaged for
more than 10 seconds. If the engine
does not start right away, turn the key
off and wait 3 to 4 seconds before
trying again.
7. After starting the engine, carefully dis-
connect the negative cable and then the
positive cable.
8. Replace the vent caps (if so equipped).
Be sure to dispose of the cloth used to
cover the vent holes as it may be con-
taminated with corrosive acid.ACE1013
6-8In case of emergency
ZX
Page 137 of 217
WARNING
Be careful not to allow your hands, hair,
jewelry or clothing to come into contact
with, or to get caught in, the running
fan, belts, or fan motor.
The fan motor can start at any time
when the coolant temperature is high.
7. After the engine cools down, check the
coolant level in the reservoir tank with the
engine running. Add coolant to the res-
ervoir tank if necessary. Have your ve-
hicle repaired at an authorized NISSAN
dealer.When towing your vehicle, U.S. States,
Canadian Provinces and local regulations
for towing must be followed. Incorrect tow-
ing equipment could damage your vehicle.
Towing instructions are available from an
authorized NISSAN dealer. Local service
operators will generally be familiar with the
applicable laws and procedures for towing.
To assure proper towing and to prevent
accidental damage to your vehicle, NISSAN
recommends that you have a service opera-
tor tow your vehicle. It is advisable to have
the service operator carefully read the fol-
lowing precautions:
WARNING
cNever ride in a vehicle that is being
towed.
cNever get under your vehicle after it
has been lifted by a tow truck.
CAUTION
cWhen towing, make sure that the
transmission, axles, steering system
and powertrain are in working con-
dition. If any unit is damaged, dollies
must be used.cWhen towing with the front wheels
on the ground:
Turn the ignition key to the OFF
position and secure the steering
wheel in a straight-ahead position
with a rope or similar device. Never
place the ignition key in the LOCK
position. This will result in damage
to the steering lock mechanism.
Move the gearshift lever to the Neu-
tral (N position).
On automatic transmission models,
to move the shift lever to the Neutral
position, turn the ignition key to the
ACC position. After moving the shift
lever to the Neutral position, be sure
to turn the ignition key to the OFF
position.
c
When towing with the rear wheels on
the ground, release the parking brake.
On automatic transmission models,
to move the shift lever to the Neutral
position, turn the ignition key to the
ACC position. After moving the shift
lever to the Neutral position, be sure
to turn the ignition key to the OFF
position.
cAttach safety chains for all towing.
TOW TRUCK TOWING
6-10In case of emergency
ZX
Page 147 of 217
When performing any inspection or mainte-
nance work on your vehicle, always take
care to prevent serious accidental injury to
yourself or damage to the vehicle. The
following are general precautions which
should be closely observed.
WARNING
cPark the vehicle on a level surface,
apply the parking brake securely and
block the wheels to prevent the ve-
hicle from moving. For a manual
transmission, move the shift lever to
Neutral. For an automatic transmis-
sion, move the shift lever to P (Park).
cBe sure the ignition key is OFF when
performing any parts replacement or
repairs.
cYour vehicle is equipped with an
automatic engine cooling fan. It may
come on at any time without warn-
ing, even if the ignition key is in the
OFF position and the engine is not
running. To avoid injury, always dis-
connect the negative battery cable
before working near the fan.c
If you must work with the engine run-
ning, keep your hands, clothing, hair
and tools away from moving fans,
belts and any other moving parts.
cIt is advisable to remove ties and any
jewelry, such as rings, watches, etc.
before working on your vehicle.
cAlways wear eye protection when-
ever you work on your vehicle.
cIf you must run the engine in an
enclosed space such as a garage, be
sure there is proper ventilation for
exhaust gases.
cNever get under the vehicle while it
is supported only by a jack. If it is
necessary to work under the vehicle,
support it with safety stands.
c
Keep smoking materials, flame and
sparks away from fuel and the battery.
cOn gasoline engine models with the
Multiport Fuel Injection (MFI) sys-
tem, the fuel filter or fuel lines
should be serviced by a NISSAN
dealer because the fuel lines are
under high pressure even when the
engine is off.
CAUTION
cDo not work under the hood while
the engine is hot. Turn off the engine
and wait until it cools down.
cNever connect or disconnect either
the battery or any transistorized
component connector while the igni-
tion is ON.
cNever leave the engine or the auto-
matic transmission related compo-
nent harness connector discon-
nected while the ignition is on.
c
Avoid contact with used engine oil.
Improperly disposed motor oil and/or
other vehicle fluids can hurt the en-
vironment. Always conform to local
regulations for disposal of vehicle
fluid.
This ``Do-it-yourself'' section gives instruc-
tions regarding only those items which are
relatively easy for an owner to perform.
You should be aware that incomplete or
improper servicing may result in operating
difficulties or excessive emissions, and
could affect your warranty coverage.If in
doubt about any servicing, have it done
by an authorized NISSAN dealer.
MAINTENANCE
PRECAUTIONS
8-2Do-it-yourself
ZX
Page 159 of 217
WARNING
Be sure the ignition key is OFF. The
engine could rotate unexpectedly.
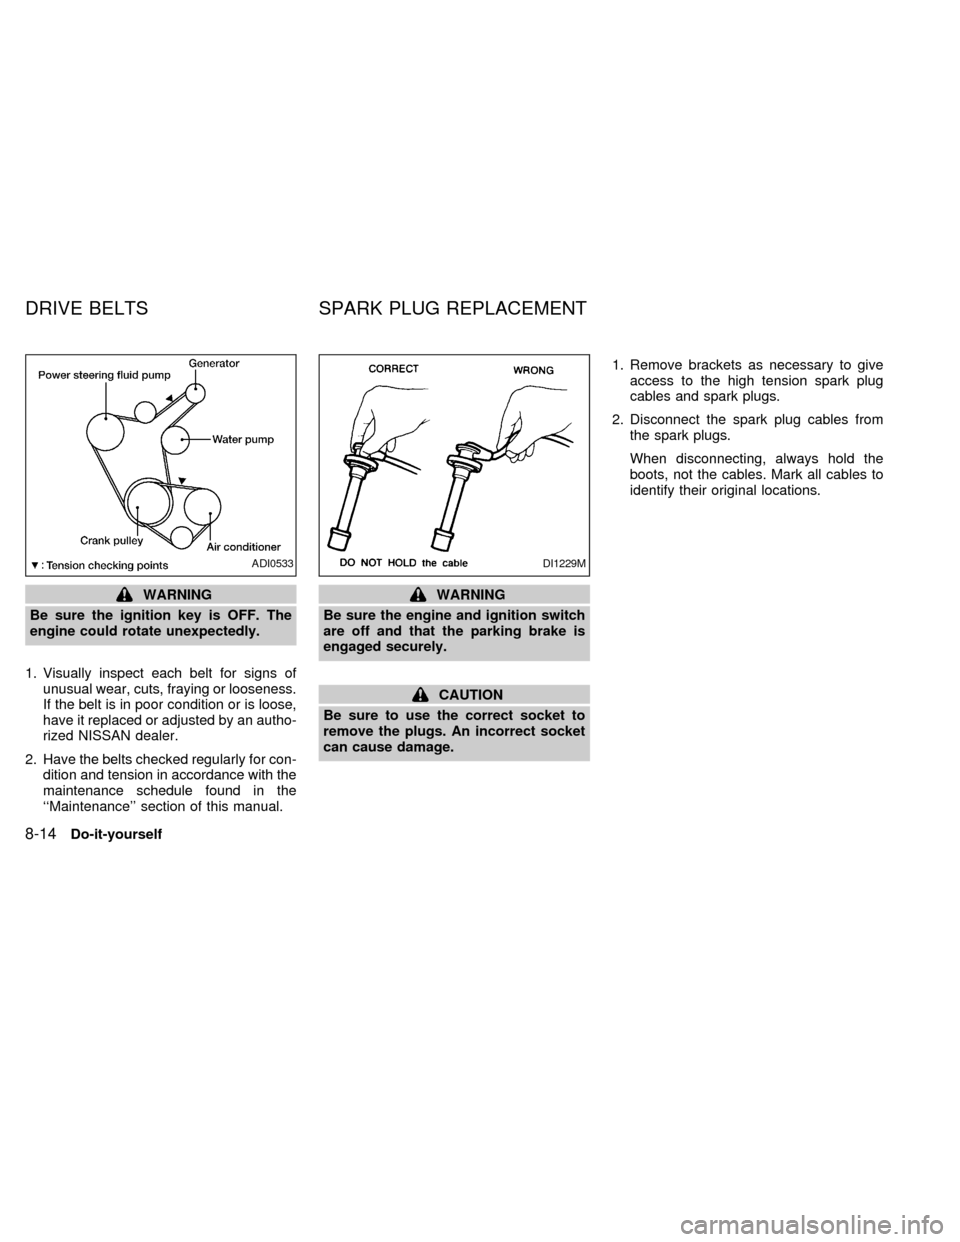
1. Visually inspect each belt for signs of
unusual wear, cuts, fraying or looseness.
If the belt is in poor condition or is loose,
have it replaced or adjusted by an autho-
rized NISSAN dealer.
2. Have the belts checked regularly for con-
dition and tension in accordance with the
maintenance schedule found in the
``Maintenance'' section of this manual.WARNING
Be sure the engine and ignition switch
are off and that the parking brake is
engaged securely.
CAUTION
Be sure to use the correct socket to
remove the plugs. An incorrect socket
can cause damage.1. Remove brackets as necessary to give
access to the high tension spark plug
cables and spark plugs.
2. Disconnect the spark plug cables from
the spark plugs.
When disconnecting, always hold the
boots, not the cables. Mark all cables to
identify their original locations.
ADI0533DI1229M
DRIVE BELTS SPARK PLUG REPLACEMENT
8-14Do-it-yourself
ZX
Page 212 of 217

H
Hazard warning flasher switch .................. 2-14
Head restraints ............................................ 1-5
Headlight aiming adjustment ..................... 8-22
Headlight and turn signal switch ............... 2-12
Headlights .................................................. 8-21
Heater
Heater and air conditioner controls ........ 4-3
Heater and air conditioner (manual)....... 4-3
Heater operation ..................................... 4-4
Heater operation .......................................... 4-4
Hood release ............................................... 3-8
I
Ignition switch .............................................. 5-4
Important vehicle information label.......... 10-11
Increasing fuel economy............................ 5-14
Indicator lights and chimes (See warning/
indicator lights and chimes) ......................... 2-5
Inside mirror ............................................... 3-13
Instrument brightness control .................... 2-13
Interior light ................................................ 2-21
J
Jack
Screw type .............................................. 6-2
Jump starting ...................................... 6-7, 8-13K
Key ............................................................... 3-2
Keyless entry system (See multi-remote
control system) ............................................ 3-4
L
Labels
Air conditioner specification label ....... 10-12
Emission control information label...... 10-12
Engine serial number ......................... 10-11
F.M.V.S.S. certification label .............. 10-11
Vehicle identification number (VIN)
plate .................................................... 10-10
Warning labels (for SRS) ..................... 1-12
License plate
Installing the license plate .................. 10-13
Light
Air bag warning light ............ 1-10, 1-12, 2-6
Bulb check/instrument panel .................. 2-5
Bulb replacement.................................. 8-24
Charge warning light .............................. 2-5
Front fog light switch ............................ 2-14
Headlight aiming adjustment ................ 8-22
Headlight and turn signal switch .......... 2-12
Headlights ............................................. 8-21
Interior light ........................................... 2-21
Light bulbs ............................................ 8-21
Low washer fluid warning light ............... 2-6
Spotlights (See map light) .................... 2-22Trunk light ............................................. 2-22
Warning/indicator lights and chimes ...... 2-5
Lock
Child safety rear door lock ..................... 3-4
Door locks............................................... 3-2
Fuel filler lid lock opener lever ............. 3-11
Glove box lock ........................................ 3-9
Power door lock...................................... 3-3
Trunk lid lock opener lever ..................... 3-9
M
Maintenance
General maintenance ............................. 9-2
Inside the vehicle.................................... 9-3
Maintenance precautions ....................... 8-2
Outside the vehicle ................................. 9-2
Periodic maintenance schedules ............ 9-5
Seat belt maintenance.......................... 1-22
Malfunction indicator light ............................ 2-8
Manual antenna ......................................... 4-26
Manual front seat adjustment ...................... 1-3
Map light .................................................... 2-22
Meters and gauges ...................................... 2-2
Mirror
Inside mirror.......................................... 3-13
Outside mirror control ........................... 3-13
Vanity mirror ......................................... 3-14
Multi-remote control system ........................ 3-4
11-3
ZX