1998 NISSAN ALTIMA heater
[x] Cancel search: heaterPage 103 of 217
tions. (for example: 7 in the display indi-
cates that the
button has been
pushed seven times to skip forward through
seven selections).
When thebutton is pushed, the se-
lection being played starts again from the
beginning. Push the
button several
times to rewind several selections. Each
time the
button is pushed, the tape
rewinds back one additional selection. The
number of selections skipped appears in the
display window as a negative number (for
example:27 in the display indicates that the
button has been pushed seven times
to rewind back through seven selections).
Either theorilluminates in the
display when theorbutton is
pushed.
The system searches for the blank intervals
between selections. If there is a blank inter-
val within one selection or there is no inter-
val between selections, the system may not
stop in the desired or expected location.
PROG (Program) button
Push thebutton to change the tape
side while the tape is being played.
The cassette tape automatically changesdirections to play the other side when the
first side is complete.
Dolby NR (noise reduction)
Push thebutton for Dolby NR encoded
tapes to reduce high frequency tape noise.
The
indicator illuminates in the display.
Dolby NR is manufactured under license
from Dolby Laboratories Licensing Corpora-
tion. DOLBY NR and the double-D symbol
are trademarks of Dolby Laboratories Li-
censing Corporation.
Metal or chrome tape usage
The cassette player is automatically set to
high performance play when playing a metal
or chrome cassette tape.
TAPE EJECT button
Push thebutton to eject the cassette
tape.
Precautions on cassette player op-
eration
cTo maintain good quality sound,
NISSAN recommends using cassette
tapes of 60 minutes or shorter in
length.cCassette tapes should be removed
from the player when not in use. Store
cassettes in their protective cases
and away from direct sunlight, heat,
moisture or magnetic sources.
cDirect sunlight can cause the cassette
to become deformed. The use of de-
formed cassettes may cause the cas-
sette to jam in the player.
cDo not use cassettes that have peel-
ing or loose labels. If used, the label
could jam in the player.
cIf a cassette has loose tape, insert a
pencil through one of the cassette
hubs and rewind the tape firmly.
Loose tape may cause jamming and
wavering sound quality.
cOver a period of time, the playback
head, capstan and pinch roller may
collect a tape coating residue as the
tape is played. This residue accumu-
lation can cause a weak or wavering
sound and should be removed peri-
odically with a head cleaning tape. If
the residue is not removed periodi-
cally, the player may need to be dis-
assembled for cleaning.
4-24Heater, air conditioner and audio systems
ZX
Page 104 of 217
COMPACT DISC (CD) PLAYER
OPERATION
Turn the ignition key to the ACC or ON
position, and carefully insert the compact
disc into the slot with the label side up. The
compact disc is automatically pulled into the
slot and starts to play.
If the radio or cassette tape is already
operating, it automatically turns off and the
compact disc begins to play.
CAUTION
Do not force the compact disc into the
slot. This could damage the player.
CD button
When thebutton is pushed with the
compact disc loaded and the tape or the
radio playing, the tape or radio turns off and
compact disc starts to play. Push the
button again to stop compact disc play.
FF (fast forward) REW (rewind)
buttons
When theorbutton is pushed
while the compact disc is playing, the com-pact disc plays at an increased speed while
fast forwarding or rewinding. When the but-
ton is released, the compact disc returns to
normal play speed.
Automatic Program Search (APS)
APS FF, APS REW buttons
When thebutton is pushed while the
compact disc is playing, the selection fol-
lowing the present one starts to play from
the beginning. Push the
button sev-
eral times to skip several selections. Each
time the button is pushed, the CD advances
one additional selection. The number ap-
pears in the display window. (When the last
selection on the compact disc is skipped,
the first selection is played.)
When the
button is pushed, the se-
lection being played returns to the begin-
ning. Push the
button several times
to skip back several selections. Each time
the button is pushed, the CD moves back
one selection.
PROG (program) button
When thebutton is pushed while the
compact disc is playing, the play pattern
changes as follows.
ALL:All selections are played repeatedly in
sequence.
1.The current selection is repeated.
RANDOM:Selections are played at ran-
dom, not following the sequence on the
compact disc. The same program may be
repeated twice.
Blank(no symbol): All selections are played
in sequence, and the compact disc stops
when the last selection is finished.
When a new compact disc is inserted,
the play pattern automatically changes
to ALL.
CD EJECT button
When thebutton is pushed with a com-
pact disc loaded, the compact disc ejects.
When the
button is pushed while the
compact disc is playing, the compact disc
ejects and the system turns off.
Heater, air conditioner and audio systems
4-25
ZX
Page 105 of 217
If the compact disc ejects and is not
removed within 10 seconds, it is pulled
back into the slot.
CD (DISC) indicator light
This light comes on when a compact disc is
loaded into the player.
CAUTION
cDuring cold weather or rainy days,
the player may malfunction due to
the humidity. If this occurs, remove
the CD and dehumidify or ventilate
the player completely.
cThe player may skip while driving on
rough roads.
cThe CD player sometimes cannot
function when the compartment tem-
perature is extremely high. Decrease
the temperature before use.
cDo not expose the CD to direct sun-
light.
Power antenna (if so equipped)
The power antenna automatically extends
when the radio is turned on, and retracts
when the radio is turned off. If the radio is
left on, the antenna retracts and extends
with the ignition key OFF-ON operation.
CAUTION
cBefore turning the radio on, make
sure that there is no one near the
antenna outlet and there is enough
space for it to extend.
cTo prevent damage, be sure that an-
tenna is fully retracted before the
vehicle enters an automated car
wash.
cDirt and other foreign matter on the
power antenna rod may interrupt its
operation. Clean the rod periodically
with a damp cloth. This type of
cleaning is especially important dur-
ing the winter seasons in areas
where road salt and other chemicals
may be spread on road surfaces and
splashed onto the antenna rod.
Manual antenna
The manual antenna cannot be shortened,
but can be removed. When you need to
remove the antenna, turn its base counter-
clockwise.
ANTENNA
4-26Heater, air conditioner and audio systems
ZX
Page 106 of 217
Microphone installed model
If equipped with a genuine cellular phone,
your NISSAN features a non-directional
microphone in the steering column cover,
so it is not necessary to look at or speak
directly into the microphone when calling.
To do so could detract from the driving
operation and cause an accident. See the
manual for car phone operation.
Pre-wired and antenna for phone
installed model
Some models are pre-wired to accept the
genuine NISSAN cellular phone. In addition,
the same model has the phone antenna
built into the rear glass window.
When installing a CB, ham radio or car
phone in your NISSAN, be sure to observe
the following cautions, otherwise the new
equipment may adversely affect the MFI
(Multiport Fuel Injection) system and other
electronic parts.
CAUTION
cKeep the antenna as far as possible
away from the Engine Control Mod-
ule.
cAlso keep the antenna wire more
than 8 inches (20 cm) away from the
MFI harness. Do not route the an-
tenna wire next to any harness.
cAdjust the antenna standing-wave
ratio as recommended by the manu-
facturer.
cConnect the ground wire from the
CB radio chassis to the body.
cFor details, consult an authorized
NISSAN dealer.
CB RADIO OR CAR PHONE
Heater, air conditioner and audio systems4-27
ZX
Page 107 of 217

MEMO
4-28Heater, air conditioner and audio systems
ZX
Page 127 of 217
cAllow more stopping distance under
these conditions. Braking should be
started sooner than on dry pavement.
cAllow greater following distances on
slippery roads.
cWatch for slippery spots (glare ice).
These may appear on an otherwise
clear road in shaded areas. If a patch
of ice is seen ahead, brake before
reaching it. Try not to brake while
actually on the ice, and avoid any
sudden steering maneuvers.
cDo not use the cruise control on
slippery roads.
cSnow can trap dangerous exhaust
gases under your vehicle. Keep
snow clear of the exhaust pipe and
from around your vehicle.
Engine block heater (if so equipped)
An engine block heater to assist extreme
cold temperature starting is available
through an authorized NISSAN dealer.
WARNING
Do not use your heater with an un-
grounded electrical system or two-
pronged (cheater) adapters. You can be
injured by an electrical shock if you use
an ungrounded connection.
5-20Starting and driving
ZX
Page 135 of 217
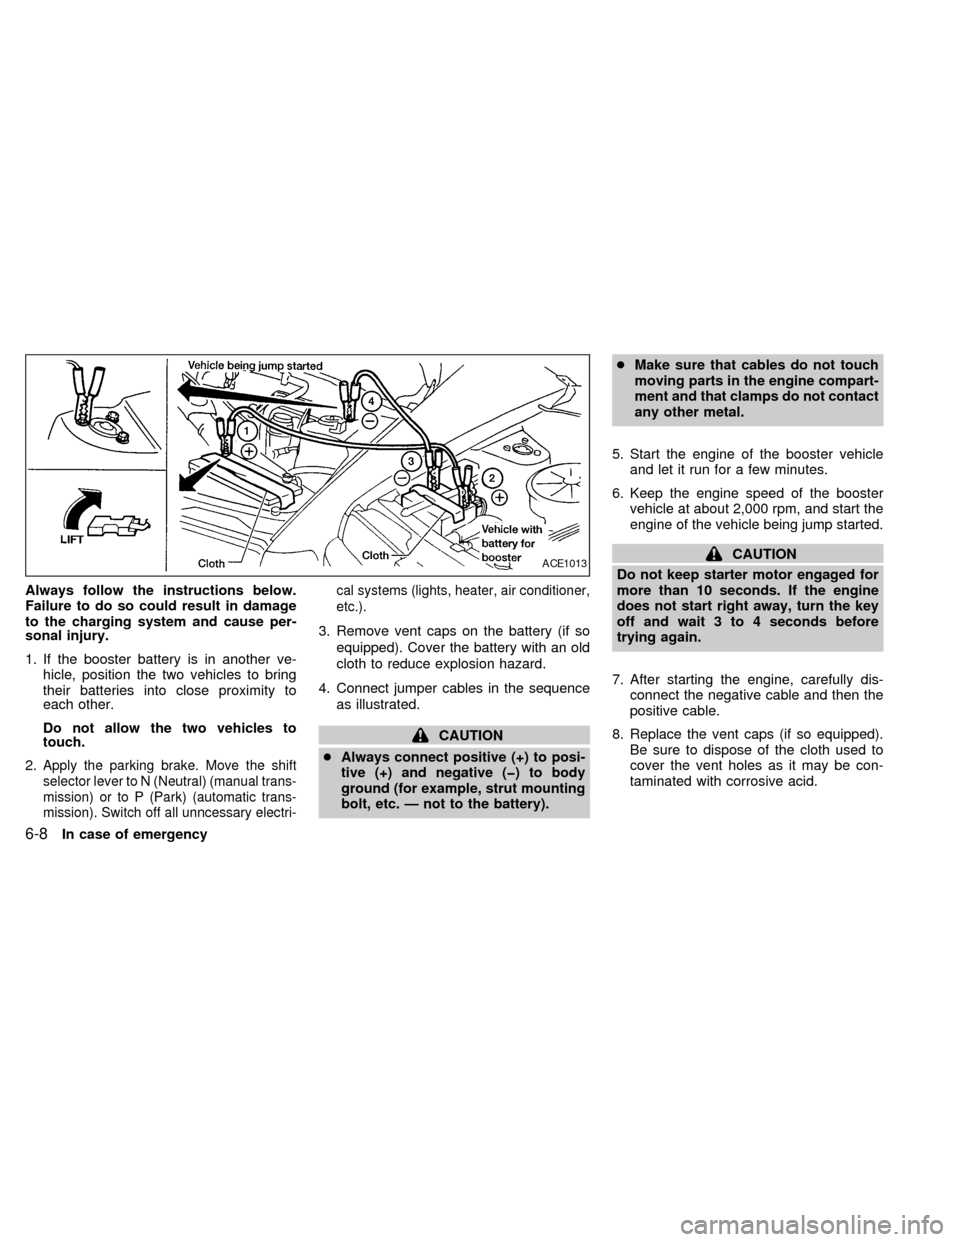
Always follow the instructions below.
Failure to do so could result in damage
to the charging system and cause per-
sonal injury.
1. If the booster battery is in another ve-
hicle, position the two vehicles to bring
their batteries into close proximity to
each other.
Do not allow the two vehicles to
touch.
2.
Apply the parking brake. Move the shift
selector lever to N (Neutral) (manual trans-
mission) or to P (Park) (automatic trans-
mission). Switch off all unncessary electri-cal systems (lights, heater, air conditioner,
etc.).
3. Remove vent caps on the battery (if so
equipped). Cover the battery with an old
cloth to reduce explosion hazard.
4. Connect jumper cables in the sequence
as illustrated.
CAUTION
cAlways connect positive (+) to posi-
tive (+) and negative (þ) to body
ground (for example, strut mounting
bolt, etc. Ð not to the battery).cMake sure that cables do not touch
moving parts in the engine compart-
ment and that clamps do not contact
any other metal.
5. Start the engine of the booster vehicle
and let it run for a few minutes.
6. Keep the engine speed of the booster
vehicle at about 2,000 rpm, and start the
engine of the vehicle being jump started.
CAUTION
Do not keep starter motor engaged for
more than 10 seconds. If the engine
does not start right away, turn the key
off and wait 3 to 4 seconds before
trying again.
7. After starting the engine, carefully dis-
connect the negative cable and then the
positive cable.
8. Replace the vent caps (if so equipped).
Be sure to dispose of the cloth used to
cover the vent holes as it may be con-
taminated with corrosive acid.ACE1013
6-8In case of emergency
ZX
Page 136 of 217
CAUTION
cAutomatic transmission models can-
not be push started. This may cause
transmission damage.
cThree way catalyst equipped models
should not be started by pushing
since the three way catalyst may be
damaged.
cNever try to start the vehicle by tow-
ing it; when the engine starts, the
forward surge could cause the ve-
hicle to collide with the tow vehicle.If your vehicle is overheating (indicated by
an extremely high temperature gauge read-
ing), or if you feel a lack of engine power,
detect abnormal noise, etc., take the follow-
ing steps.
WARNING
cDo not continue to drive if your ve-
hicle overheats. Doing so could
cause a vehicle fire.
cTo avoid the danger of being
scalded, never remove the radiator
cap while the engine is still hot.
When the radiator cap is removed,
pressurized hot water will spurt out,
possibly causing serious injury.
cDo not open the hood if steam is
coming out.
1. Move the vehicle safely off the road,
apply the parking brake and move the
shift lever to N (Neutral) (manual trans-
mission) or to P (Park) (automatic trans-
mission).
Do not stop the engine.
2. Turn off the air conditioner. Open all the
windows, move the heater or air condi-
tioner temperature control to maximumhot and fan control to high speed.
3. If engine overheating is caused by climb-
ing a long hill on a hot day, run the engine
at a fast idle (approximately 1,500 rpm)
until the temperature gauge indication
returns to normal.
4. Get out of the vehicle. Look and listen for
steam or coolant escaping from the ra-
diator before opening the hood. Wait until
no steam or coolant can be seen before
proceeding.
5. Open the engine hood.
WARNING
If steam or water is coming from the
engine, stand clear to prevent getting
burned.
6. Visually check drive belts for damage or
looseness. Also check if the cooling fan
is running. The radiator hoses and radia-
tor should not leak water. If coolant is
leaking, the water pump belt is missing or
loose, or the cooling fan does not run,
stop the engine.
PUSH STARTING IF YOUR VEHICLE
OVERHEATS
In case of emergency6-9
ZX