Page 30 of 217
cAn improperly installed child re-
straint could lead to serious injury or
death in an accident.
cIn general, child restraints are de-
signed to be installed with a lap belt
or the lap portion of a three-point
type seat belt.
Child restraints for infants and children of
various sizes are offered by several manu-
facturers. When selecting any child restraint,
keep the following points in mind:
1) Choose only a restraint with a label cer-
tifying that it complies with Federal Motor
Vehicle Safety Standard 213 or Cana-
dian Motor Vehicle Safety Standard 213.
2) Check the child restraint in your vehicle
to be sure it is compatible with the vehi-
cle's seat and seat belt system. Choose
a child restraint that meets the guidelines
of the Society of Automotive Engineers
recommended practice J1819 for child
restraint installation.
3) If the child restraint is compatible with
your vehicle, place your child in the child
restraint and check the various adjust-
ments to be sure the child restraint iscompatible with your child. Always follow
all recommended procedures.
All U.S. states and provinces of Canada
require that infants and small children be
restrained in approved child restraints at
all times while the vehicle is being
operated.
WARNING
cImproper use of a child restraint can
result in increased injuries for both
the infant or child and other occu-
pants in the vehicle.
cFollow all of the child restraint manu-
facturer's instructions for installa-
tion and use. When purchasing a
child restraint, be sure to select one
which will fit your child and vehicle.
It may not be possible to properly
install some types of child restraints
in your vehicle.
cIf the child restraint is not anchored
properly, the risk of a child being
injured in a collision or a sudden
stop greatly increases.cAdjustable seatbacks should be po-
sitioned to fit the child restraint, but
as upright as possible.
c
After attaching the child restraint,
test it before you place the child in it.
Tilt it from side to side. Try to tug it
forward and check to see if the belt
holds the restraint in place. If the
restraint is not secure, tighten the
belt as necessary, or put the restraint
in another seat and test it again.
cFor a front-facing child restraint, if
the seat position where it is installed
has a three-point type lap/shoulder
belt, check to make sure the shoul-
der belt does not go in front of the
child's face or neck. If it does, put
the shoulder belt behind the child
restraint. If you must install a front-
facing child restraint in the front
seat, see ``Installation on front pas-
senger seat'' later in this section for
details.
c
When your child restraint is not in
use, keep it secured with a seat belt to
prevent it from being thrown around
in case of a sudden stop or accident.
Seats, restraints and supplemental air bag systems1-23
ZX
Page 31 of 217
CAUTION
cRemember that a child restraint left
in a closed vehicle can become very
hot. Check the seating surface and
buckles before placing your child in
the child restraint.
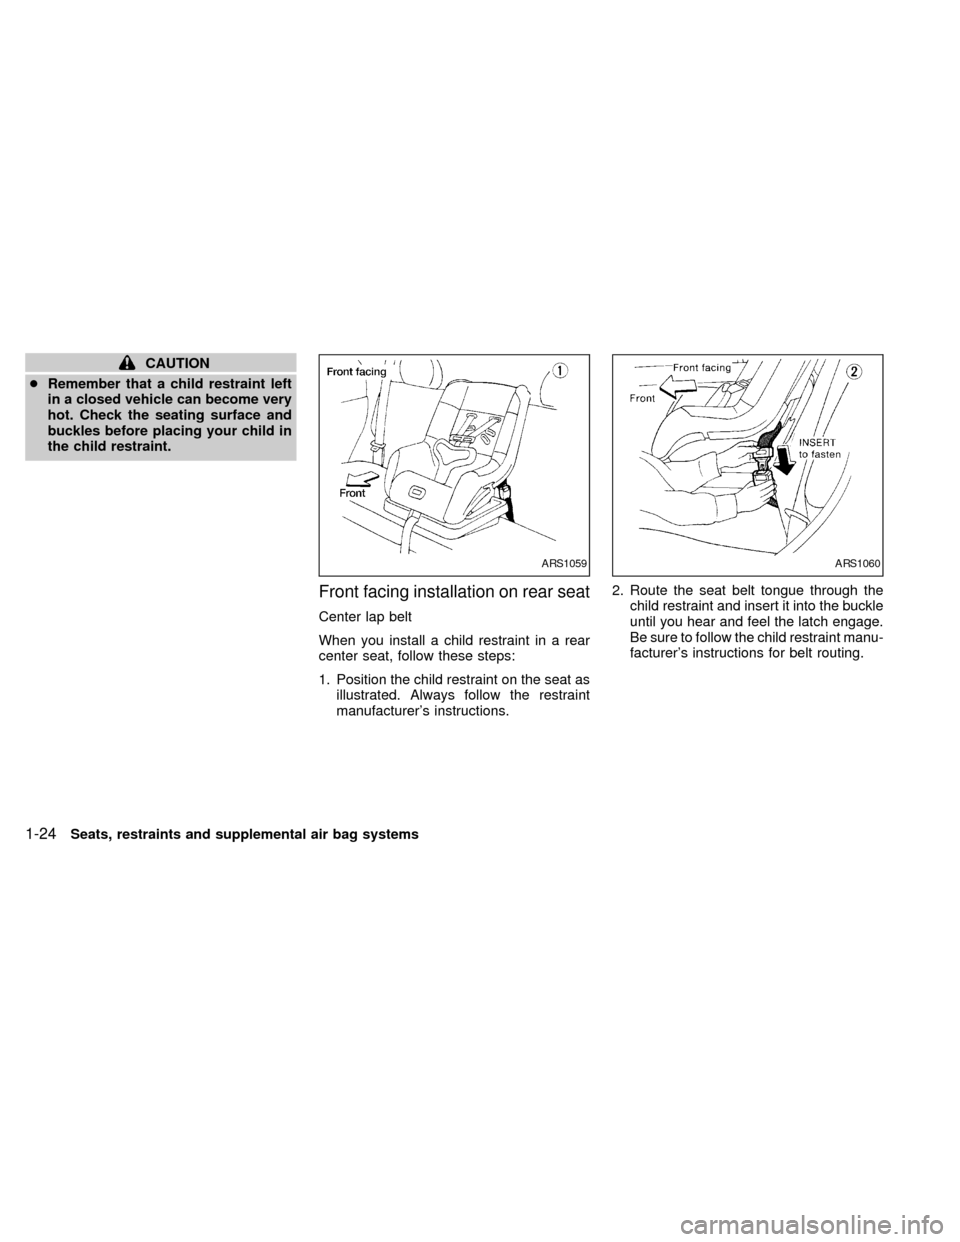
Front facing installation on rear seat
Center lap belt
When you install a child restraint in a rear
center seat, follow these steps:
1. Position the child restraint on the seat as
illustrated. Always follow the restraint
manufacturer's instructions.2. Route the seat belt tongue through the
child restraint and insert it into the buckle
until you hear and feel the latch engage.
Be sure to follow the child restraint manu-
facturer's instructions for belt routing.
ARS1059ARS1060
1-24Seats, restraints and supplemental air bag systems
ZX
Page 32 of 217
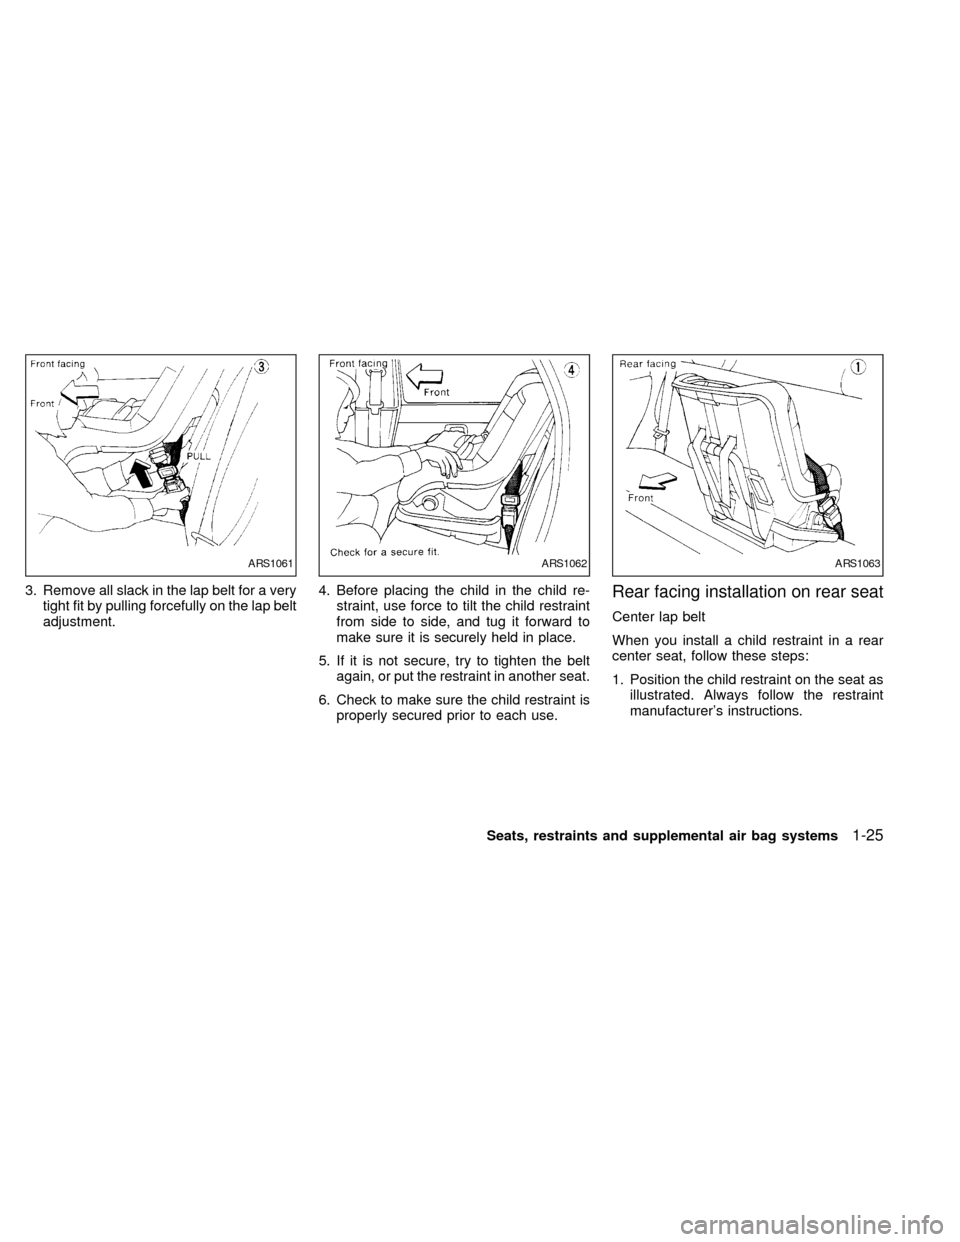
3. Remove all slack in the lap belt for a very
tight fit by pulling forcefully on the lap belt
adjustment.4. Before placing the child in the child re-
straint, use force to tilt the child restraint
from side to side, and tug it forward to
make sure it is securely held in place.
5. If it is not secure, try to tighten the belt
again, or put the restraint in another seat.
6. Check to make sure the child restraint is
properly secured prior to each use.Rear facing installation on rear seat
Center lap belt
When you install a child restraint in a rear
center seat, follow these steps:
1. Position the child restraint on the seat as
illustrated. Always follow the restraint
manufacturer's instructions.
ARS1061ARS1062ARS1063
Seats, restraints and supplemental air bag systems1-25
ZX
Page 33 of 217
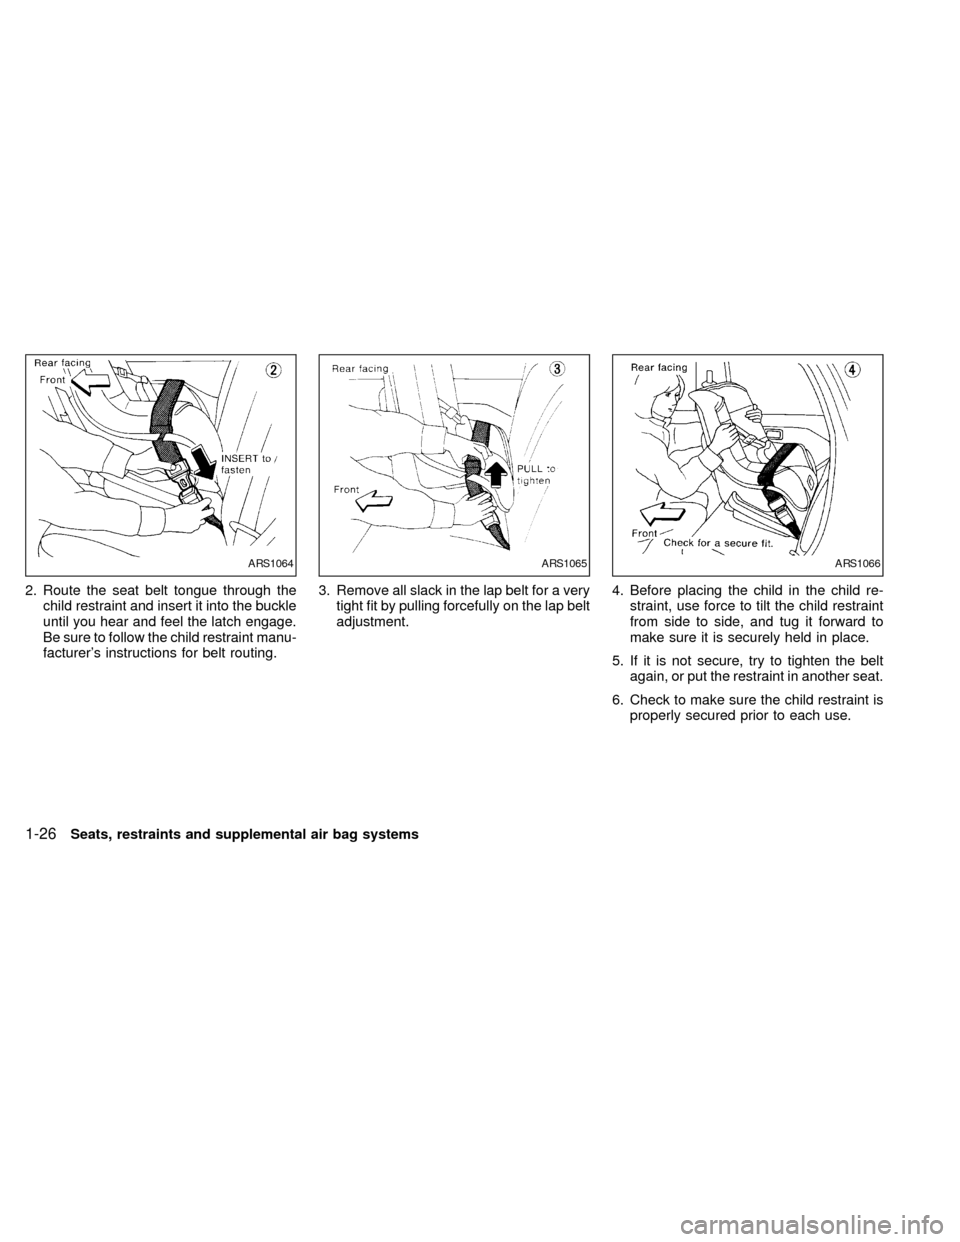
2. Route the seat belt tongue through the
child restraint and insert it into the buckle
until you hear and feel the latch engage.
Be sure to follow the child restraint manu-
facturer's instructions for belt routing.3. Remove all slack in the lap belt for a very
tight fit by pulling forcefully on the lap belt
adjustment.4. Before placing the child in the child re-
straint, use force to tilt the child restraint
from side to side, and tug it forward to
make sure it is securely held in place.
5. If it is not secure, try to tighten the belt
again, or put the restraint in another seat.
6. Check to make sure the child restraint is
properly secured prior to each use.
ARS1064ARS1065ARS1066
1-26Seats, restraints and supplemental air bag systems
ZX
Page 34 of 217
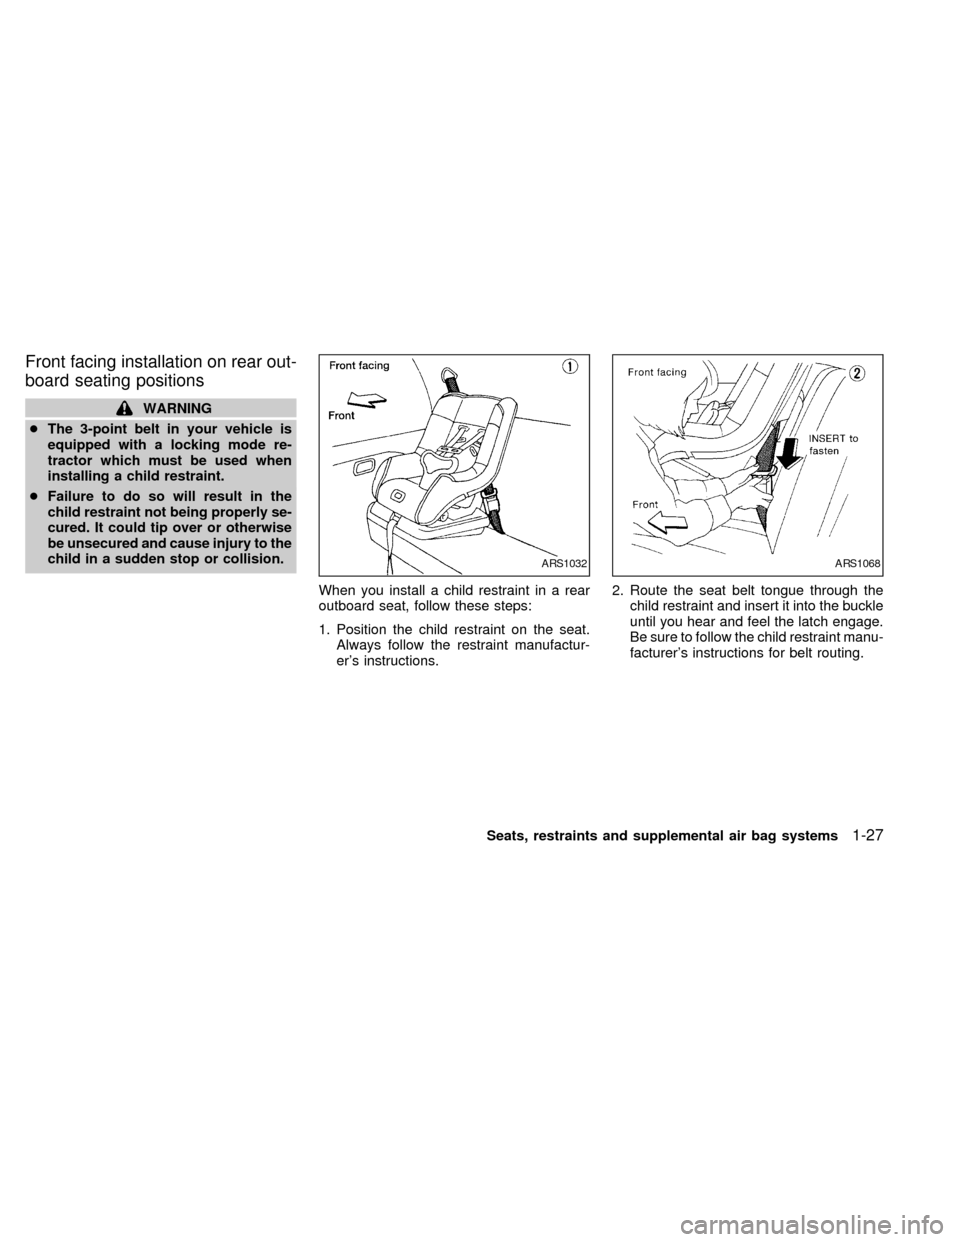
Front facing installation on rear out-
board seating positions
WARNING
cThe 3-point belt in your vehicle is
equipped with a locking mode re-
tractor which must be used when
installing a child restraint.
cFailure to do so will result in the
child restraint not being properly se-
cured. It could tip over or otherwise
be unsecured and cause injury to the
child in a sudden stop or collision.
When you install a child restraint in a rear
outboard seat, follow these steps:
1. Position the child restraint on the seat.
Always follow the restraint manufactur-
er's instructions.2. Route the seat belt tongue through the
child restraint and insert it into the buckle
until you hear and feel the latch engage.
Be sure to follow the child restraint manu-
facturer's instructions for belt routing.
ARS1032ARS1068
Seats, restraints and supplemental air bag systems1-27
ZX
Page 35 of 217
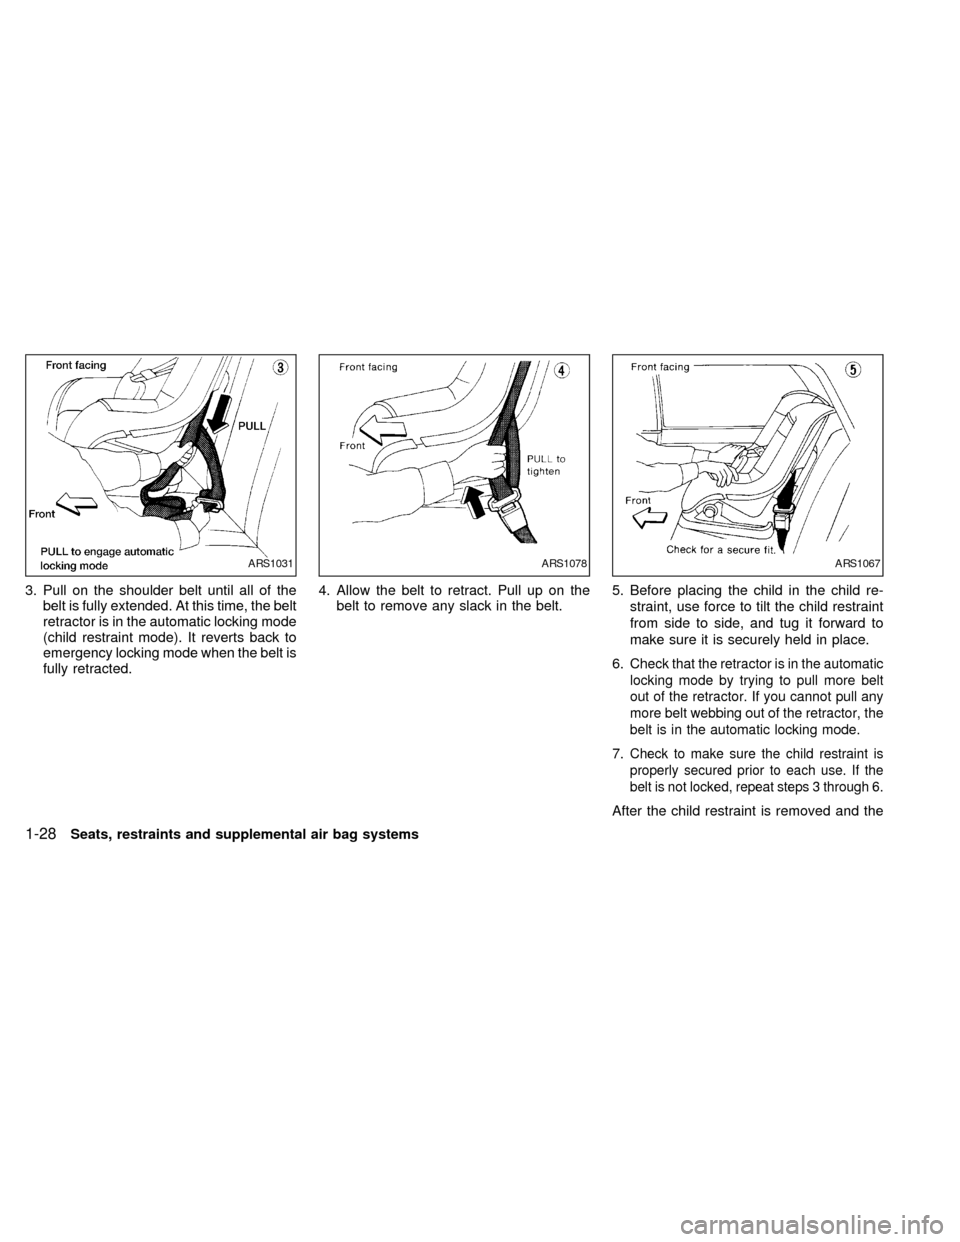
3. Pull on the shoulder belt until all of the
belt is fully extended. At this time, the belt
retractor is in the automatic locking mode
(child restraint mode). It reverts back to
emergency locking mode when the belt is
fully retracted.4. Allow the belt to retract. Pull up on the
belt to remove any slack in the belt.5. Before placing the child in the child re-
straint, use force to tilt the child restraint
from side to side, and tug it forward to
make sure it is securely held in place.
6.
Check that the retractor is in the automatic
locking mode by trying to pull more belt
out of the retractor. If you cannot pull any
more belt webbing out of the retractor, the
belt is in the automatic locking mode.
7.Check to make sure the child restraint is
properly secured prior to each use. If the
belt is not locked, repeat steps 3 through 6.
After the child restraint is removed and the
ARS1031ARS1078ARS1067
1-28Seats, restraints and supplemental air bag systems
ZX
Page 36 of 217
seat belt is allowed to wind back into the
retractor, the automatic locking mode (child
restraint mode) is canceled; the seat belt
only locks during a sudden stop or impact.
Rear facing installation on rear out-
board seating positions
WARNING
cThe 3-point belt in your vehicle is
equipped with a locking mode re-
tractor which must be used when
installing a child restraint.
cFailure to do so will result in the
child restraint not being properly se-
cured. It could tip over or otherwise
be unsecured and cause injury to the
child in a sudden stop or collision.When you install a child restraint in a rear
outboard seat, follow these steps:
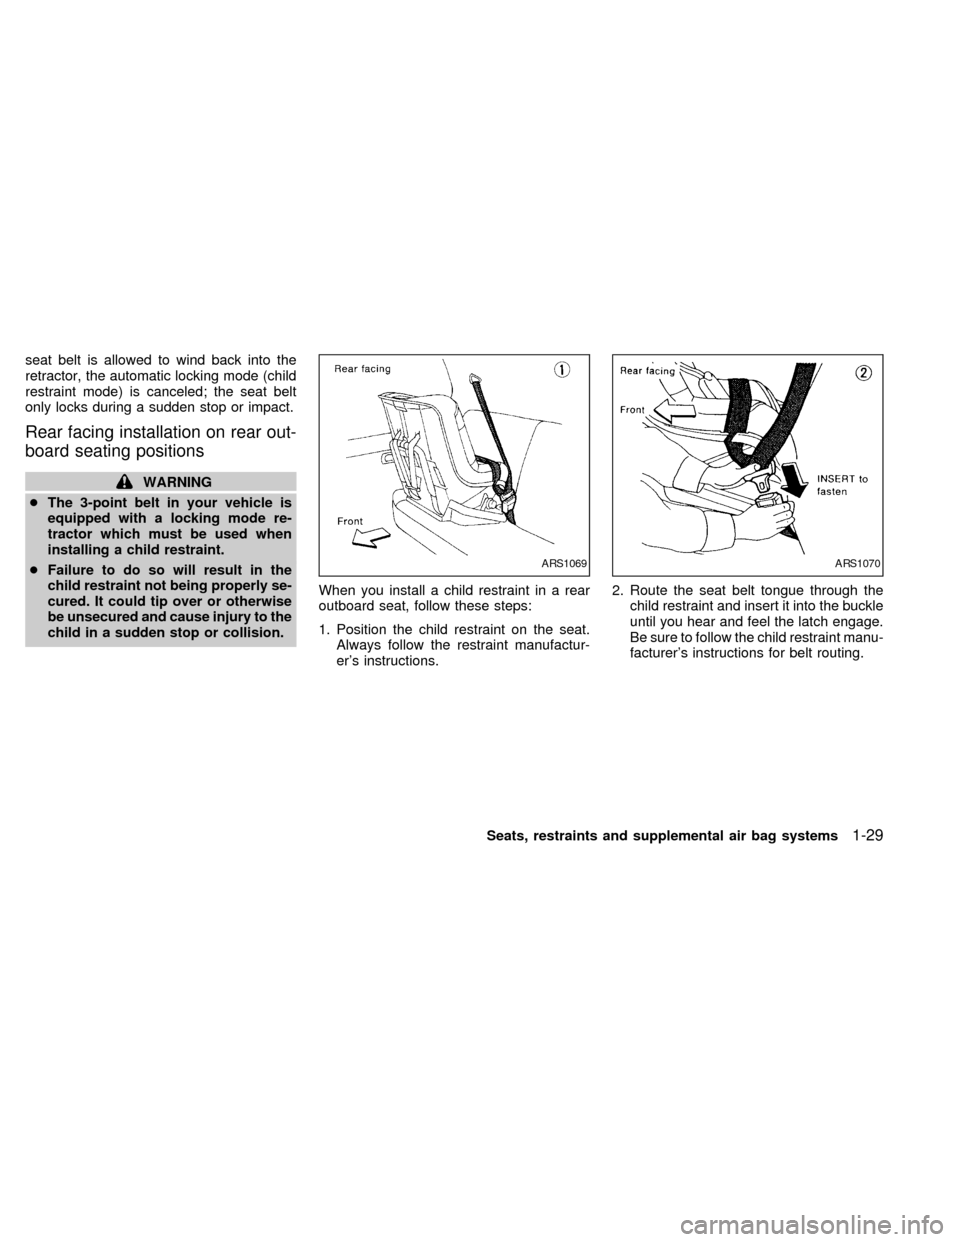
1. Position the child restraint on the seat.
Always follow the restraint manufactur-
er's instructions.2. Route the seat belt tongue through the
child restraint and insert it into the buckle
until you hear and feel the latch engage.
Be sure to follow the child restraint manu-
facturer's instructions for belt routing.
ARS1069ARS1070
Seats, restraints and supplemental air bag systems1-29
ZX
Page 37 of 217
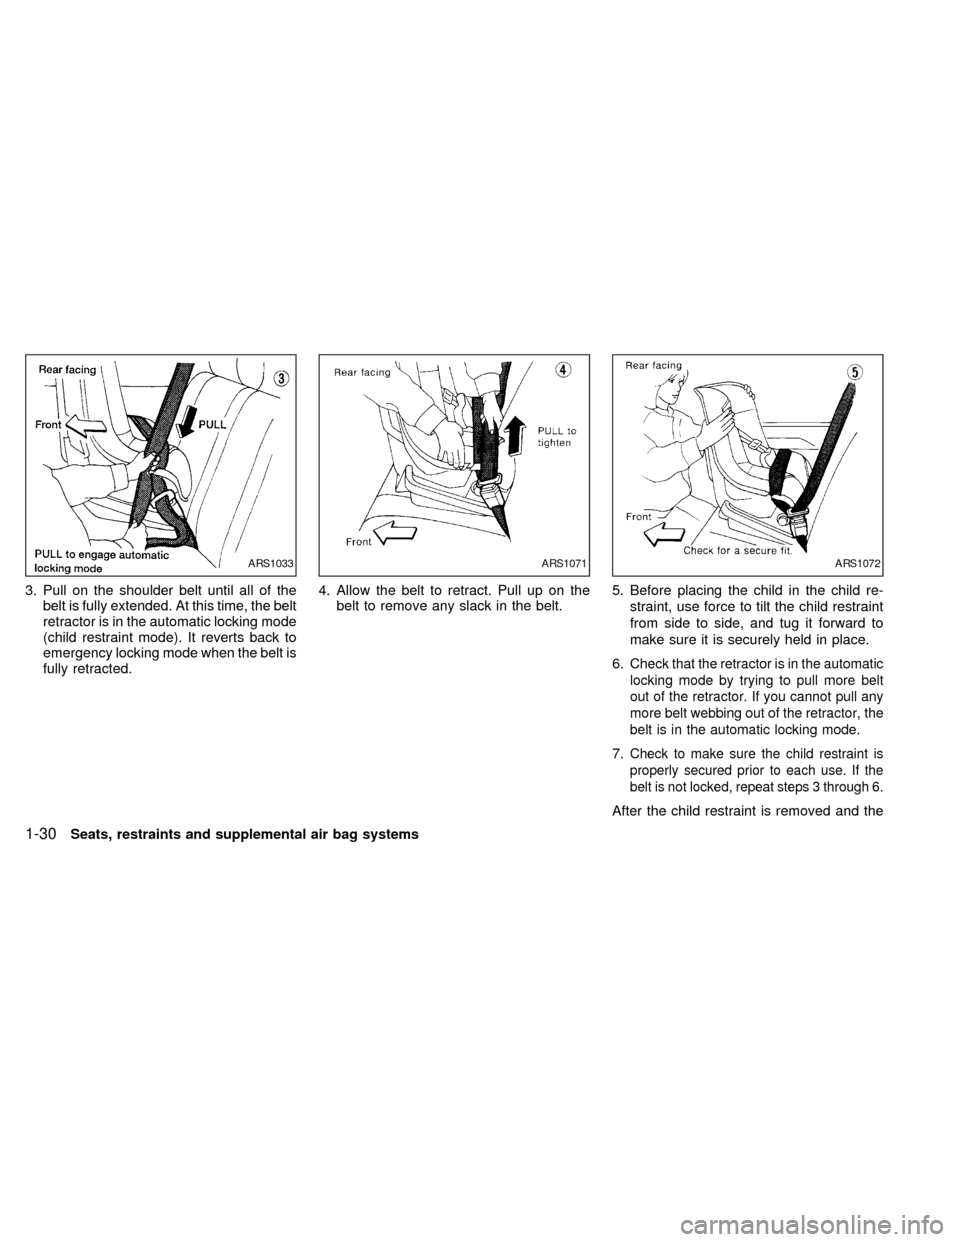
3. Pull on the shoulder belt until all of the
belt is fully extended. At this time, the belt
retractor is in the automatic locking mode
(child restraint mode). It reverts back to
emergency locking mode when the belt is
fully retracted.4. Allow the belt to retract. Pull up on the
belt to remove any slack in the belt.5. Before placing the child in the child re-
straint, use force to tilt the child restraint
from side to side, and tug it forward to
make sure it is securely held in place.
6.
Check that the retractor is in the automatic
locking mode by trying to pull more belt
out of the retractor. If you cannot pull any
more belt webbing out of the retractor, the
belt is in the automatic locking mode.
7.Check to make sure the child restraint is
properly secured prior to each use. If the
belt is not locked, repeat steps 3 through 6.
After the child restraint is removed and the
ARS1033ARS1071ARS1072
1-30Seats, restraints and supplemental air bag systems
ZX