1998 NISSAN ALTIMA tow
[x] Cancel search: towPage 25 of 217

3. Position the lap belt portionlow and
snug on the hipsas shown.
4. Pull the shoulder belt portion toward the
retractor to take up extra slack.
The front passenger side seat belt and rear
three-point seat belts have a cinching
mechanism for child restraint installation. It
is referred to as the automatic locking mode.
When automatic locking mode is activated
the seat belt cannot be withdrawn further
until the seat belt tongue is detached from
the buckle and fully retracted. Once re-
tracted, the seat belt is in the emergencylocking mode. See ``Child Restraints'' later
in this section for more information.
The automatic locking mode should be
used only for child restraint installation.
During normal seat belt use by a passen-
ger, the locking mode should not be
activated. If it is activated it may cause
uncomfortable seat belt tension.
Unfastening the seat belts
To unfasten the belt, press the button on the
buckle. The seat belt automatically retracts.
ARS1077ARS1054
1-18Seats, restraints and supplemental air bag systems
ZX
Page 50 of 217
brake system checked by an authorized
NISSAN dealer.
WARNING
cYour brake system may not be work-
ing properly if the warning light is
on. Driving could be dangerous. If
you judge it to be safe, drive care-
fully to the nearest service station
for repairs. Otherwise, have your ve-
hicle towed.
cPressing the brake pedal with the
engine stopped and/or low brake
fluid level may increase your stop-
ping distance and braking will re-
quire greater pedal effort as well as
greater pedal travel.
cIf the brake fluid level is below the
minimum mark on the brake fluid
reservoir, do not drive until the brake
system has been checked at a NIS-
SAN dealer.
Brake pad wear warning
The disc brake pads have audible wear
warnings. When a brake pad requires re-
placement, it makes a high pitched scraping
sound when the vehicle is in motion,
whether or not the brake pedal is de-pressed. Have the brakes checked as soon
as possible if the warning sound is heard.
orAnti-lock brake
warning light
(if so equipped)
If the light comes on while the engine is
running, it may indicate something is wrong
with the anti-lock portion of the brake system.
Have the system checked by an authorized
NISSAN dealer.
Turn off the engine, and start it again by
slowly turning the ignition key (quickly
doing so may cause the ABS light to stay
on when there is nothing wrong). If the
light stays on, have the system checked
by an authorized NISSAN dealer.
If an abnormality occurs in the system, the
anti-lock function ceases, but the regular
braking system continues to operate.
If the light comes on while you are driving,
contact an authorized NISSAN dealer for
repair.
Overdrive off indicator light
(Automatic transmission
models only)
This light comes on when the overdrive
switch is pushed to the OFF position.
Turn signal/hazard indicator
lights
The appropriate light flashes when the turn
signal switch is activated.
Both lights flash when the hazard switch is
turned on.
High beam indicator light
This light comes on when the headlight high
beam is on and goes out when the low
beam is selected.
Cruise indicator light
This light comes on while the vehicle speed
is controlled by the cruise control system. If
the CRUISE indicator blinks, have the sys-
tem checked by an authorized NISSAN
dealer.
Instruments and controls
2-7
ZX
Page 51 of 217

Key reminder chime
A chime sounds if the driver's door is
opened while the key is left in the ignition
switch. Remove the key and take it with you
when leaving the vehicle.
Light reminder chime
A chime sounds when the driver's door is
opened if the headlight switch is turned on
(ignition switch is turned OFF).
Turn the headlight switch OFF when leaving
the vehicle.
Malfunction indicator light
(MIL)
If the malfunction indicator light comes on
steady or blinks while the engine is running,
it may indicate a potential emission control
problem.
The malfunction indicator light may also
come on steady or blink if the fuel filler cap
has not been closed tightly or if the fuel tank
is nearly empty. Check to make sure the
fuel cap is secure and that you have at least
three gallons of fuel in the fuel tank.
After driving for a while, the light should
remain off if no other potential emission
control system problem exists.
Operation
The malfunction indicator light will come on
in one of two ways:
1. Malfunction indicator light on steady - An
emission control system malfunction has
been detected. Have the vehicle in-
spected by an authorized NISSAN
dealer. You do not need to have your
vehicle towed to the dealer.
2. Malfunction indicator light blinking - An
engine misfire has been detected which
may damage the emission control sys-
tem. To reduce or avoid emission control
system damage:
cdo not drive at speeds above 45 MPH
(72 km/h).
cavoid hard acceleration or decelera-
tion.
cavoid steep uphill grades.
cif possible, reduce the amount of cargo
being hauled or towed.
The malfunction indicator light may stop
blinking and come on steady. Have the
vehicle inspected by an authorized NISSAN
dealer. You do not need to have your ve-
hicle towed to the dealer.
CAUTION
Continued vehicle operation without
having the emission control system
checked and repaired as necessary
could lead to poor driveability, reduced
fuel economy, and possible damage to
the emission control system.
Some conditions may cause the malfunc-
tion indicator light to come on steady or
blink. Examples are as follows:
cvehicle ran out of fuel, which caused the
engine to misfire.
cfuel filler cap was left off or improperly
installed, allowing fuel to evaporate into
the atmosphere.
If you suspect that you experienced one or
both of the above conditions, drive the ve-
hicle to an authorized NISSAN dealer and
have the vehicle inspected. Avoid any un-
necessary diagnosis during the service by
informing the dealer of the condition that
may have occurred.
2-8Instruments and controls
ZX
Page 54 of 217
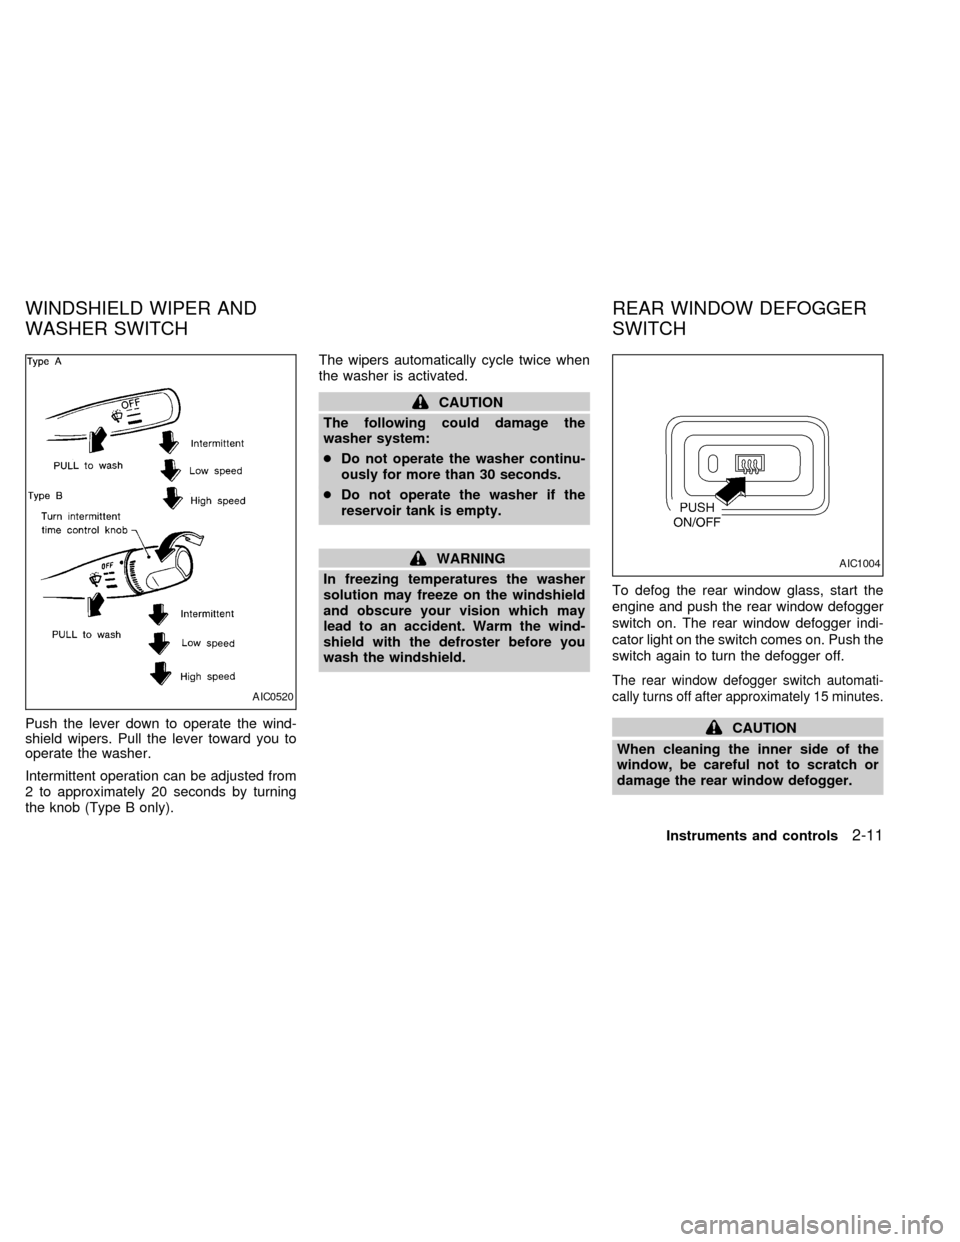
Push the lever down to operate the wind-
shield wipers. Pull the lever toward you to
operate the washer.
Intermittent operation can be adjusted from
2 to approximately 20 seconds by turning
the knob (Type B only).The wipers automatically cycle twice when
the washer is activated.
CAUTION
The following could damage the
washer system:
cDo not operate the washer continu-
ously for more than 30 seconds.
cDo not operate the washer if the
reservoir tank is empty.
WARNING
In freezing temperatures the washer
solution may freeze on the windshield
and obscure your vision which may
lead to an accident. Warm the wind-
shield with the defroster before you
wash the windshield.To defog the rear window glass, start the
engine and push the rear window defogger
switch on. The rear window defogger indi-
cator light on the switch comes on. Push the
switch again to turn the defogger off.
The rear window defogger switch automati-
cally turns off after approximately 15 minutes.
CAUTION
When cleaning the inner side of the
window, be careful not to scratch or
damage the rear window defogger.
AIC0520
AIC1004
WINDSHIELD WIPER AND
WASHER SWITCHREAR WINDOW DEFOGGER
SWITCH
Instruments and controls2-11
ZX
Page 67 of 217
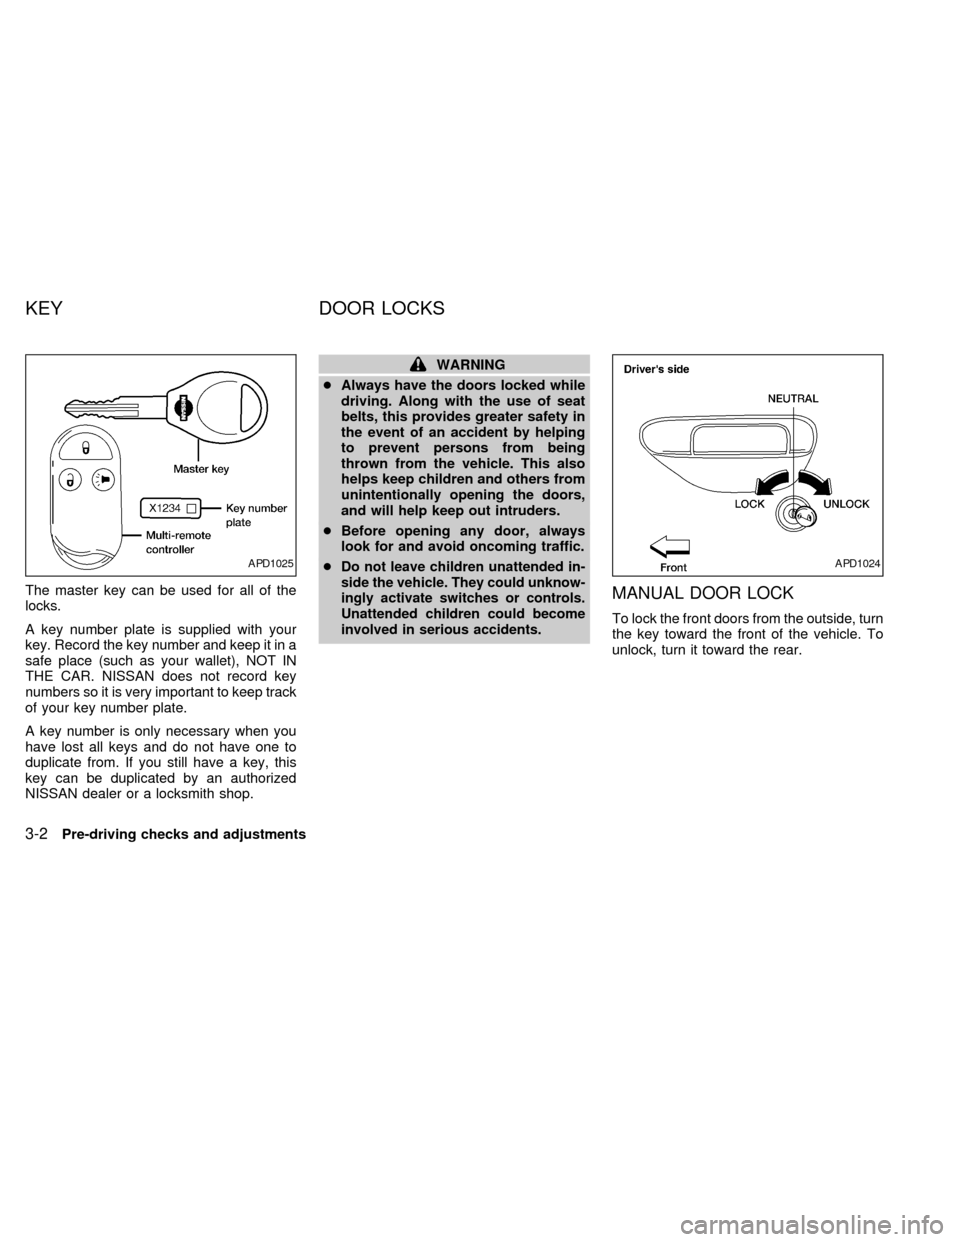
The master key can be used for all of the
locks.
A key number plate is supplied with your
key. Record the key number and keep it in a
safe place (such as your wallet), NOT IN
THE CAR. NISSAN does not record key
numbers so it is very important to keep track
of your key number plate.
A key number is only necessary when you
have lost all keys and do not have one to
duplicate from. If you still have a key, this
key can be duplicated by an authorized
NISSAN dealer or a locksmith shop.
WARNING
cAlways have the doors locked while
driving. Along with the use of seat
belts, this provides greater safety in
the event of an accident by helping
to prevent persons from being
thrown from the vehicle. This also
helps keep children and others from
unintentionally opening the doors,
and will help keep out intruders.
cBefore opening any door, always
look for and avoid oncoming traffic.
c
Do not leave children unattended in-
side the vehicle. They could unknow-
ingly activate switches or controls.
Unattended children could become
involved in serious accidents.
MANUAL DOOR LOCK
To lock the front doors from the outside, turn
the key toward the front of the vehicle. To
unlock, turn it toward the rear.
APD1025APD1024
KEY DOOR LOCKS
3-2Pre-driving checks and adjustments
ZX
Page 102 of 217

Adjusting tone quality and speaker
balance
To adjust BASS, TREB (treble), BAL (bal-
ance) and FADER, the control knobs must
be released from their stowed positions.
Pushing the knobs once moves them from
their stowed positions.
In the released position, the knobs control
tone quality. Turn the control knobs to adjust
BASS and TREB (treble) to the desired level.
From the released position, the knobs must
then be pulled out in order to control FADER
and BAL (balance) and FADER adjusts thesound level between the front and rear speak-
ers, and BAL (balance) adjusts the sound
level between the right and left speakers.
Once sound quality is set to the desired levels,
return the control knobs to their stowed posi-
tions by pushing them in completely.
CASSETTE TAPE OPERATION
PLAY/STOP TAPE button
When thebutton is pushed with the
system turned off and a tape loaded, the
system comes on and the tape plays. The
word TAPE illuminates in the display.When the
button is pushed with ei-
ther the radio or compact disc turned on and
a tape loaded, the compact disc or the radio
turns off and the tape plays.
While the tape is playing, pushing the
button stops tape play. Pushing the
button again resumes tape play.
FF (fast forward) and REW (rewind)
buttons
Push thebutton to fast forward the
tape. Push thebutton to rewind the
tape. Eitherorilluminates in
the display. To stop the FF or REW function,
press the
,,orbuttons.
Automatic Program Search (APS)
FF and REW buttons
When thebutton is pushed while the
tape is being played, the tape runs quickly,
stops, then plays the next selection from the
beginning. Push the
button several
times to skip several selections. Each time
the button is pushed, the tape fast forwards
one additional selection. This number ap-
pears in the display window. The tape can
be fast forwarded through up to nine selec-
AHA1029
Heater, air conditioner and audio systems4-23
ZX
Page 110 of 217
CAUTION
c
Do not use leaded gasoline. Deposits
from leaded gasoline seriously re-
duce the three way catalyst's ability
to help reduce exhaust pollutants.
cKeep your engine tuned up. Malfunc-
tions in the ignition, fuel injection, or
electrical systems can cause over-
rich fuel flow into the catalyst, caus-
ing it to overheat. Do not keep driv-
ing if the engine misfires, or if
noticeable loss of performance or
other unusual operating conditions
are detected. Have the vehicle in-
spected promptly by an authorized
NISSAN dealer.
cAvoid driving with an extremely low
fuel level. Running out of fuel could
cause the engine to misfire, damag-
ing the three way catalyst.
cDo not race the engine while warm-
ing it up.
cDo not push or tow your vehicle to
start the engine.
AVOIDING COLLISION AND
ROLLOVER
WARNING
Failure to operate this vehicle in a safe
and prudent manner may result in loss
of control or an accident.
Be alert and drive defensively at all times.
Obey all traffic regulations. Avoid excessive
speed, high speed cornering, or sudden
steering maneuvers, because these driving
practices could cause you to lose control of
your vehicle.As with any vehicle, loss of
control could result in a collision with
other vehicles or objects, or cause the
vehicle to roll over, particularly if the
vehicle slides sideways.Be attentive at all
times, and avoid driving when tired. Never
drive when under the influence of alcohol or
drugs (including prescription or over-the-
counter drugs which may cause drowsi-
ness). Always wear your seat belt as out-
lined in the ``Seat belts'' section of this
manual, and also instruct your passengers
to do so.
DRINKING ALCOHOL/DRUGS
AND DRIVING
WARNING
Never drive under the influence of alco-
hol or drugs. Alcohol in the bloodstream
reduces coordination, delays reaction
time and impairs judgement. Driving after
drinking alcohol increases the likelihood
of being involved in an accident injuring
yourself and others. Additionally, if you
are injured in an accident, alcohol can
increase the severity of the injury.
Nissan is committed to safe driving. How-
ever, you must choose not to drive under
the influence of alcohol. Every year thou-
sands of people are injured or killed in
alcohol related accidents. Although the local
laws vary on what is considered to be
legally intoxicated, the fact is that alcohol
affects all people differently and most
people underestimate the effects of alcohol.
Remember, drinking and driving don't mix!
And that's true for drugs, too (over the
counter, prescription, and illegal drugs).
Don't drive if your ability to operate your
vehicle is impaired by alcohol, drugs, or
some other physical condition.
Starting and driving
5-3
ZX
Page 112 of 217
1) Move the shift selector lever into the P
(Park) position.
2) Turn the ignition key slightly toward the
ON position.
3) Turn the key to the LOCK position.
4) Remove the key.
If the key is removed from the ignition
switch, the shift selector lever cannot be
moved from P (Park).The shift selector
lever can be moved if the ignition switch
is in the ACC position. The shift selector
lever can also be moved if the ignition
switch is in the ON position and the foot
brake pedal is depressed.
There is an OFF position between the
LOCK and ACC positions. The OFF position
is indicated by a ``1'' on the key cylinder.
When the ignition is in OFF, the steering
wheel is not locked.
To lock the steering wheel, remove the
key. In order for the steering wheel to
be locked, it must be turned about 1/8 of
a turn clockwise from the straight up
position. To unlock the steering wheel,
insert the key and turn it gently while
rotating the steering wheel slightly right
and left.WARNING
Never remove the key while driving. If
the key is removed, the steering wheel
will lock. This may cause the driver to
lose control of the vehicle and could
result in serious vehicle damage or
personal injury.
Key positions
LOCK Normal parking position (0)
OFF (1)
The engine can be turned off without locking
the steering wheel.
ACC (Accessories) (2)
This position activates electrical accesso-
ries such as the radio when the engine is
not running.
ON Normal operating position (3)
This position turns on the ignition system
and the electrical accessories.
START (4)
This position activates the starter motor,
which starts the engine.cMake sure the area around the vehicle is
clear.
cMaintenance items listed here should be
checked periodically, for example, each
time you check engine oil.
cCheck that all windows and lights are
clean.
cVisually inspect tires for their appearance
and condition. Also check tires for proper
inflation.
cLock all doors.
cPosition seat and adjust head restraints.
cAdjust inside and outside mirrors.
cFasten seat belts and ask all passengers
to do likewise.
cCheck the operation of warning lights
when key is turned to the ON (3) position.
See ``Checking bulbs'' in the ``Instru-
ments and controls'' section.
BEFORE STARTING THE
ENGINE
Starting and driving5-5
ZX