Page 106 of 176
Do not exceed the GVWR or the GAWR specified on the Safety
Compliance Certification Label.
Towing trailers beyond the maximum recommended gross trailer
weight could result in engine damage, transmission/axle damage,
structural damage, loss of control, and personal injury.
Preparing to tow
Use the proper equipment for towing a trailer, and make sure it is
properly attached to your vehicle. See your dealer or a reliable trailer
dealer if you require assistance.
Hitches
Do not use hitches that clamp onto the vehicle bumper. Use a load
carrying hitch. You must distribute the load in your trailer so that
10 ± 15% of the total weight of the trailer is on the tongue.
Safety chains
Always connect the trailer's safety chains to the vehicle. To connect the
trailer's safety chains, cross the chains under the trailer tongue and allow
slack for turning corners.
If you use a rental trailer, follow the instructions that the rental agency
gives to you.
Trailer brakes
Electric brakes and manual, automatic or surge-type brakes are safe if
installed properly and adjusted to the manufacturer's specifications. The
trailer brakes must meet local and Federal regulations.
Do not connect a trailer's hydraulic brake system directly to your
vehicle's brake system. Your vehicle may not have enough
braking power and your chances of having a collision greatly increase.
The braking system of the tow vehicle is rated for operation at the
GVWR not GCWR
Trailer lamps
Do not connect a trailer's lighting system directly to your vehicle's
lighting system. To get the proper equipment for hooking up your
Driving
106
Page 107 of 176

trailer's lamps, see your Lincoln dealer. Be sure to follow their
instructions carefully.
If you do not install trailer lights correctly, you may cause damage to the
vehicle's lighting system or other vehicle systems.
Driving while you tow
Do not drive faster than 88 km/h (55 mph) when towing a trailer.
Speed control may shut off if you are towing on long, steep grades.
When towing a trailer:
²Shift out of D (Overdrive) and into 3 (Third) or a lower gear when
towing up or down steep hills. This will eliminate excessive
downshifting and upshifting for optimum fuel economy and transaxle
cooling.
²Anticipate stops and brake gradually.
Servicing after towing
If you tow a trailer for long distances, your vehicle will require more
frequent service intervals. Refer to the Severe Duty Schedule in your
ªService Guideº for more information.
Trailer towing tips
²Practice turning, stopping and backing up in an area before starting on
a trip to get the feel of the vehicle trailer combination. When turning,
make wider turns so the trailer wheels will clear curbs and other
obstacles.
²Allow more distance for stopping with a trailer attached.
²The trailer tongue weight should be 10±15% of the loaded trailer
weight.
²After you have traveled 80 km (50 miles), thoroughly check your
hitch, electrical connections and trailer wheel lug nuts.
²When stopped in traffic for long periods of time in hot weather, place
the gearshift in P (Park) and increase idle speed. This aids engine
cooling and air conditioner efficiency.
²Vehicles with trailers should not be parked on a grade. If you must
park on a grade, place wheel chocks under the trailer's wheels.
Driving
107
Page 110 of 176
Always replace a fuse with one that has the specified amperage
rating. Using a fuse with a higher amperage rating can cause
severe wire damage and could start a fire.
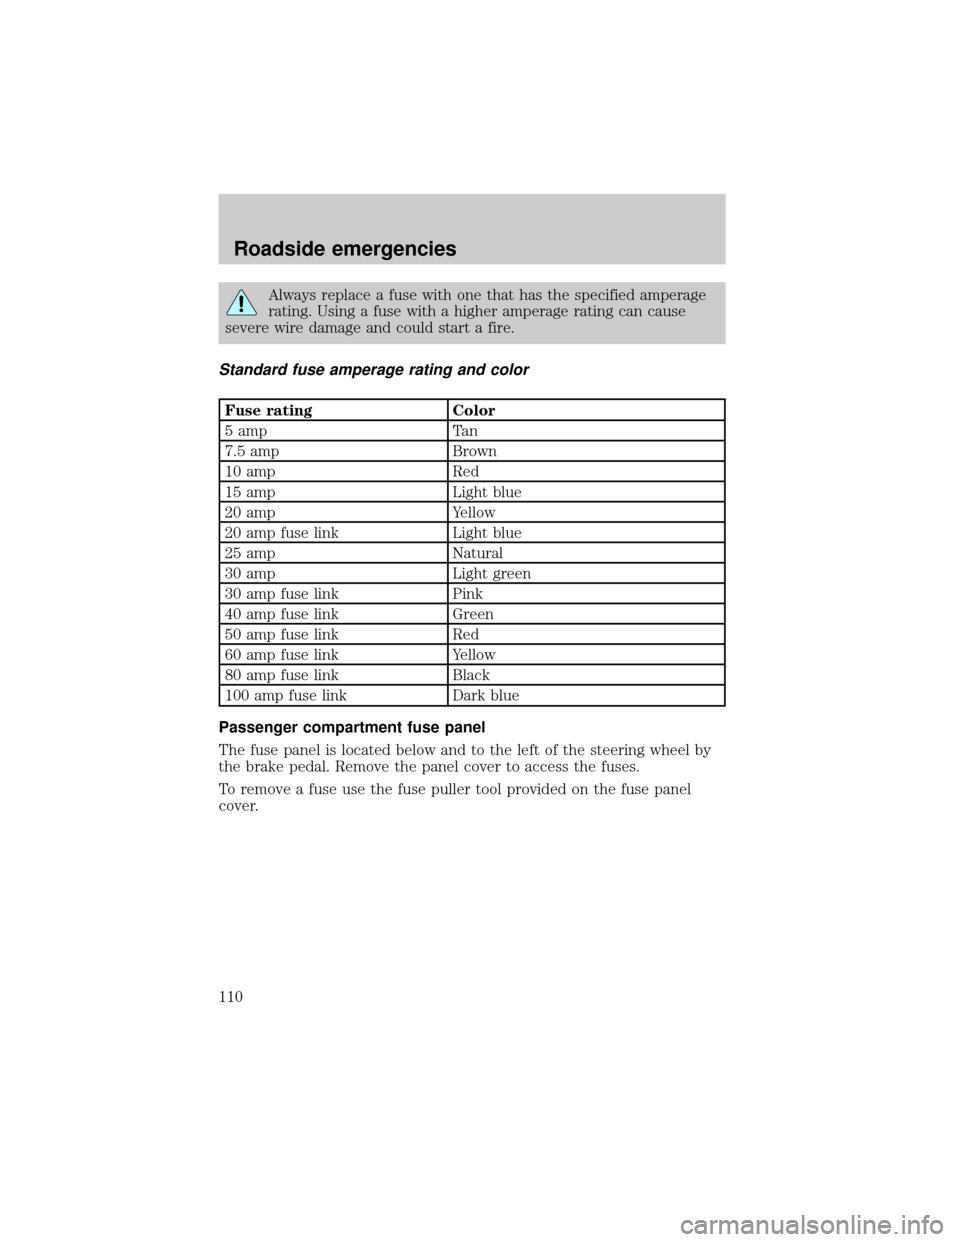
Standard fuse amperage rating and color
Fuse rating Color
5 amp Tan
7.5 amp Brown
10 amp Red
15 amp Light blue
20 amp Yellow
20 amp fuse link Light blue
25 amp Natural
30 amp Light green
30 amp fuse link Pink
40 amp fuse link Green
50 amp fuse link Red
60 amp fuse link Yellow
80 amp fuse link Black
100 amp fuse link Dark blue
Passenger compartment fuse panel
The fuse panel is located below and to the left of the steering wheel by
the brake pedal. Remove the panel cover to access the fuses.
To remove a fuse use the fuse puller tool provided on the fuse panel
cover.
Roadside emergencies
110
Page 115 of 176
Fuse/Relay Location Fuse Amp Rating Description
26 10A Virtual Image
Instrument Cluster,
EATC Module
27 - NOT USED
28 10A Shift Lock Actuator,
Vehicle Dynamic
Module, Virtual Image
Instrument Cluster,
Rear Window Defrost,
Heated Seat Switch
Assembly, Low Tire
Pressure Module
29 10A Radio
30 10A Heated Mirrors
31 15A Lighting Control
Module (LCM): FCU,
Electronic Day/Night
Mirror, RH and LH
Courtesy Lamp, Door
Courtesy Lamps, RH
and LH Map Lamps,
RR and LR Reading
Lamps, RH and LH
Visor Lamps, Storage
Bin Lamps, Trunk Lid
Lamp, Glove Box
Lamp, Light Sensor
Amplifier
32 15A Speed Control DEAC.
Switch, Brake On/Off
(BOO) Switch
33 - NOT USED
Roadside emergencies
115
Page 118 of 176
The high-current fuses are coded as follows:
Fuse/Relay Location Fuse Amp Rating Description
175 Generator/Voltage
Regulator
1 30A** Driver's Seat Module
2 30A** Passenger's Seat
Module
3 40A** Ignition Switch
4 40A** Ignition Switch
5 40A** Driver Window
6 - NOT USED
7 30A** PCM Power
8 40A** Rear Window Defrost
Control
9 60A** I/P Fuse Panel
10 60A** LCM Power
11 60A** Compressor Relay
12 60A** Anti-Lock Brake
Control Module, ABS
EVAC and Fill
Connector
13 40A** Blower Motor Relay
14 60A** Dual Auxiliary Relay
Box
1 30A* PCM CAM
2 20A* ALT SENSE
3 30A* Rear Passenger
Window
4 30A* Air Suspension
5 10A* Air Bag
6 20A* Horns
7 15A* High Beam
Roadside emergencies
118
Page 119 of 176
Fuse/Relay Location Fuse Amp Rating Description
8 30A* Front Passenger
Window
1 - A/C Diode
2 - PCM Diode
* Mini Fuses ** Maxi Fuses
CHANGING THE TIRES
If you get a flat tire while driving, do not apply the brake heavily.
Instead, gradually decrease your speed. Hold the steering wheel firmly
and slowly move to a safe place on the side of the road.
Tire change procedure
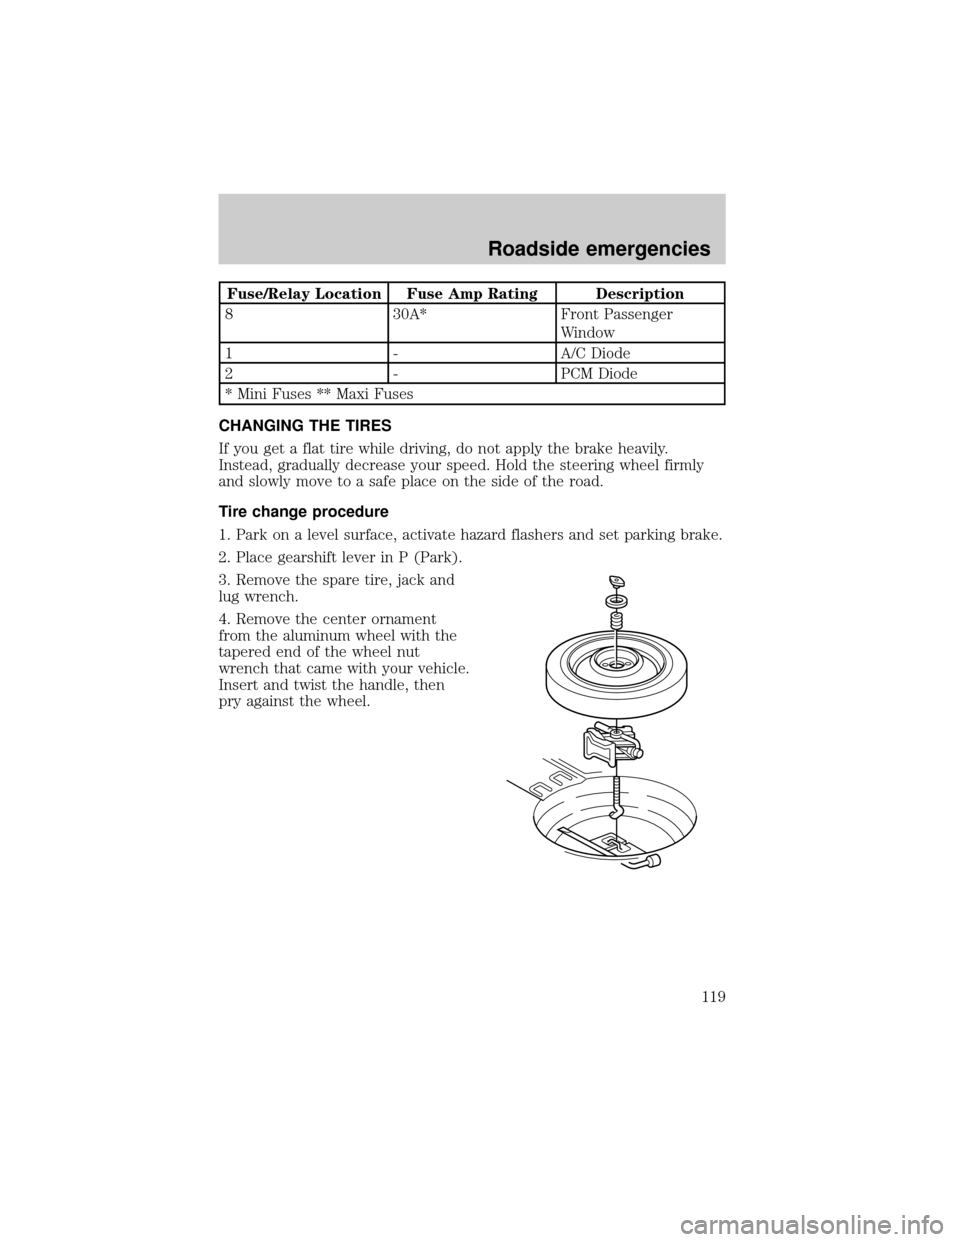
1. Park on a level surface, activate hazard flashers and set parking brake.
2. Place gearshift lever in P (Park).
3. Remove the spare tire, jack and
lug wrench.
4. Remove the center ornament
from the aluminum wheel with the
tapered end of the wheel nut
wrench that came with your vehicle.
Insert and twist the handle, then
pry against the wheel.
Roadside emergencies
119
Page 122 of 176
JUMP STARTING YOUR VEHICLE
The gases around the battery can explode if exposed to flames,
sparks, or lit cigarettes. An explosion could result in injury or
vehicle damage.
Do not push start your vehicle. You could damage the catalytic
converter.
Batteries contain sulfuric acid which burns skin, eyes, and
clothing.
Preparing your vehicle
Also see the label on the battery.
1. Use only a 12±volt supply to start your vehicle. If you connect your
battery to a 24±volt power supply you can damage your starter, ignition
system and other electrical components.
2. Do not disconnect the battery of the disabled vehicle as this could
damage the vehicle's electrical system.
3. Park the booster vehicle close to the hood of the disabled vehicle
making sure theydo nottouch. Set the parking brake on both vehicles
and stay clear of the engine cooling fan and other moving parts.
4. Check all battery terminals and remove any excessive corrosion before
you attach the battery cables.
5. Turn the heater fan on in both vehicles to protect any electrical
surges. Turn all other accessories off.
Roadside emergencies
122
Page 126 of 176

SERVICE RECOMMENDATIONS
To help you service your vehicle:
²We highlight do-it-yourself items in the engine compartment for easy
location.
²We provide a ªService Guideº which makes tracking routine service
easy.
If your vehicle requires professional service, your dealership can provide
necessary parts and service. Check your ªWarranty Guideº to find out
which parts and services are covered.
Use only recommended fuels, lubricants, fluids and service parts
conforming to specifications. Motorcraft parts are designed and built to
provide the best performance in your vehicle.
PRECAUTIONS WHEN SERVICING YOUR VEHICLE
Be especially careful when inspecting or servicing your vehicle.
²Do not work on a hot engine.
²When the engine is running, avoid wearing loose clothing, jewelry or
long hair that could get caught up in moving parts.
²Do not work on a vehicle with the engine running in an enclosed
space, unless you are sure you have enough ventilation.
²Keep all lit cigarettes, open flames and other lit material away from
the battery and all fuel related parts.
If you disconnect the battery, the engine must ªrelearnº its idle
conditions before your vehicle will drive properly, as explained in
theBatterysection in this chapter.
Working with the engine off
1. Set the parking brake, and ensure the gearshift is securely latched in
park.
2. Turn off the engine and remove the key.
3. Block the wheels to prevent the vehicle from moving unexpectedly.
Working with the engine on
1. Set the parking brake and
ensure the gearshift is securely latched in P (Park).
2. Block the wheels to prevent the vehicle from moving unexpectedly.
Maintenance and care
126