Page 27 of 272

Protecting Children
Installing a Child Seat
After selecting a proper child seat, and a good position to install the seat,
there are three main steps in
installing the seat:
1. Secure the child seat to the vehicle
with a seat belt. All child seats
must be secured to the vehicle
with the lap belt or the lap part of a lap/shoulder belt. A child whose
seat is not properly secured to the
vehicle can be endangered in a crash. See pages 28 and 30 for
instructions on how to secure child seats in this vehicle.
2. Make sure the child seat is firmly
secured. After installing a child
seat, push and pull the seat
forward and from side to side to
verify that it is secure. To provide security during normal
driving maneuvers, as well as during
a collision, we recommend that
parents secure a child seat as firmly
as possible.
However, a child seat does not need
to be "rock solid." In some vehicles or seating positions, it may be
difficult to install a child seat so that
it does not move at all. Some side-to- side or forward-and-back movement
can be expected and should not
reduce the child seat's effectiveness.
If the child seat is not secure, try
installing it in a different seating
position, or use a different style of child seat that can be firmly secured
in the desired seating position.
3. Secure the child in the child seat.
Make sure the child is properly
strapped in the child seat
according to the child seat maker's
instructions. A child who is not
properly secured in a child seat can be thrown out of the seat and
be seriously injured in a crash.
Storing a Child Seat
When you are not using a child seat, either remove it and store it in a safe
place, or make sure it is properly secured. An unsecured child seat can
be thrown around the vehicle during a crash or sudden stop and injure
someone.
Driver and Passenger SafetyProCarManuals.comMain Menu Table of Contents s t
Page 75 of 272

Seats
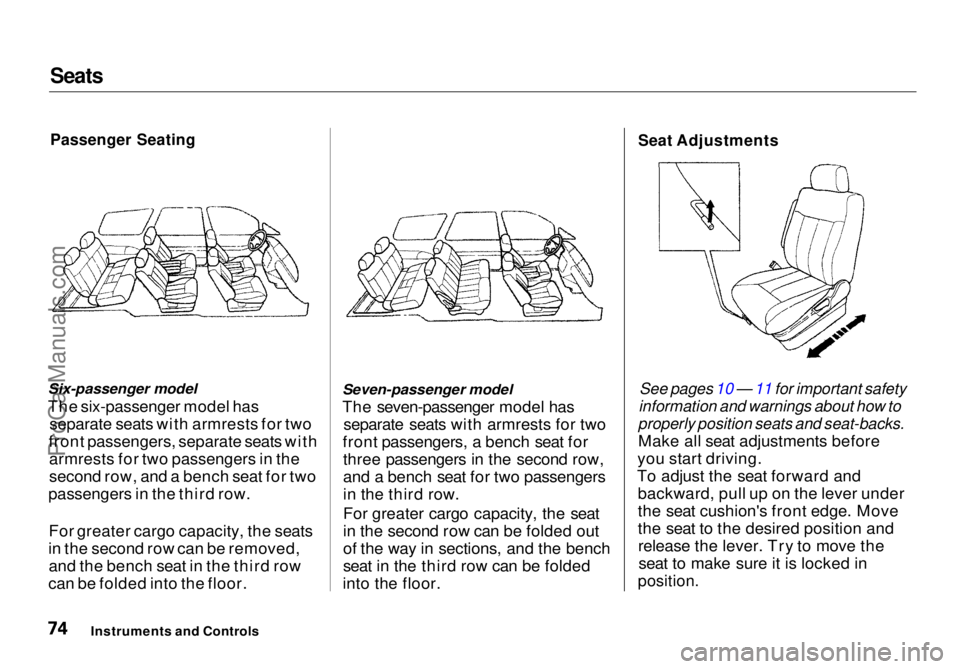
Passenger Seating
Six-passenger model
The six-passenger model has separate seats with armrests for two
front passengers, separate seats with armrests for two passengers in the
second row, and a bench seat for two
passengers in the third row.
For greater cargo capacity, the seats
in the second row can be removed, and the bench seat in the third row
can be folded into the floor. Seven-passenger model
The seven-passenger model has separate seats with armrests for two
front passengers, a bench seat for three passengers in the second row,
and a bench seat for two passengers
in the third row.
For greater cargo capacity, the seat
in the second row can be folded out
of the way in sections, and the bench
seat in the third row can be folded
into the floor.
Seat Adjustments
See pages 10 — 11 for important safety
information and warnings about how to
properly position seats and seat-backs.
Make all seat adjustments before
you start driving.
To adjust the seat forward and backward, pull up on the lever under
the seat cushion's front edge. Move
the seat to the desired position andrelease the lever. Try to move theseat to make sure it is locked in
position.
Instruments and ControlsProCarManuals.comMain Menu Table of Contents s t
Page 77 of 272
Seats
Armrests
To adjust the front seat armrests, push the button on the front. Head Restraints
See page 12 for important safety
information and a warning about how to
properly position the head restraints.
The front head restraints help protect you and your passenger from
whiplash and other injuries. They are most effective when you adjust themso the back of the occupant's head
rests against the center of the
restraint. A taller person should
adjust the restraint as high as
possible.
The head restraints adjust for height.
You need both hands to adjust the restraint. Do not attempt to adjust it
while driving. To raise it, pull upward.
To lower the restraint, push the release button sideways and push
the restraint down.
To remove a head restraint for cleaning or repair, pull it up as far as
it will go. Push the release button
and pull the restraint out of the seat-
back.
Instruments and Controls
KNOBProCarManuals.comMain Menu Table of Contents s t
Page 79 of 272
Seats
Removing the Second Seats in the
Six-Passenger Model
Both seats can be removed to give
more cargo capacity.
To remove a seat, unlock the seat from the floor by pulling both lock
release levers up at the same timeand pulling up on the rear of the seat. Unhook the front of the seat from
the floor by pulling it back slightly,
then pivoting it upward.
Always remove an unlocked seat from the vehicle before driving. A seat that is not locked in place could
fly around and cause injury in a sudden stop or crash. To reinstall a seat, hook the front of
the seat to the floor, then push the
back into the locks. Make sure both
the front and the back of the seat aresecurely fastened down before
driving.
Folding the Second Seats in the
Seven-Passenger Model
The left and right halves of the second seat can be folded up
separately to create more cargo
space.
Instruments and Controls LOCK RELEASE LEVERProCarManuals.comMain Menu Table of Contents s t
Page 80 of 272
Seats
Pull the seat-back angle adjustment
lever and tilt the seat-back forward.
Then pull the lock release lever and pivot the seat forward. Pull out the fastening strap. Hook
the ring on the fastening strap to the rivet on the side of the seat-back.
Make sure the seat is secure.
Reverse this procedure to return the
seat to the upright position. Make
sure you store the fastening strap
properly, and that the seat is locked securely before driving. Reclining the Second Seat
Seven-passenger model only
You can recline the seat-backs on the second seat so they are level with
the seat cushion of the third seat,
making a large, cushioned area. To
do this:
1. Remove the hea d restraints. Store
them in
the pocket in the left side
panel behind the third seat.
Instruments and Controls
LOCK RELEASE LEVER
SEAT-BACK ANGLE
ADJUSTMENT LEVER
FASTENING STRAPRIVET
CONTINUEDProCarManuals.comMain Menu Table of Contents s t
Page 81 of 272
Seats
2. Lift the lever and slide the seat forward as far as it will go. Pull theseat-back angle adjustment lever
and pivot the seat-back backward.
Release the lever when the seat-
back is even with the cushion on
the third seat.
Reverse this procedure to return the second seat to the upright position.
Make sure you install the head
restraints before driving (see page 76). Folding the Third Seat in All
Models
To create more cargo space, you can fold the third seat into the floor
recess.
To fold the third seat:
1. Remove the head restraints. Store them in the pocket in the left side
panel.
2. Unlock the seat-back by turning
the knob. Push the seat-back
forward.
Instruments and Controls
ANGLE ADJUSTMENT LEVER
SLIDE LEVER KNOBProCarManuals.comMain Menu Table of Contents s t