Page 106 of 272

Audio System
Adjusting the Sound
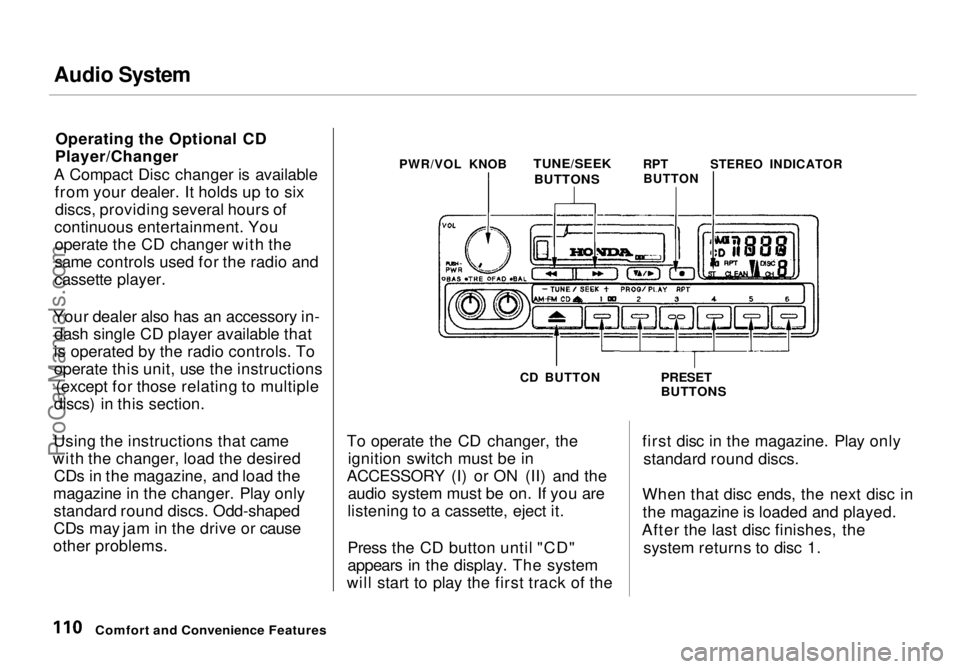
Balance/Fader — These two
controls adjust the strength of thesound coming from each speaker.
The Balance control adjusts the side- to-side strength, while the Fader
control adjusts the front-to-back
strength.
To use these controls, push on the knob to get them to pop out. Adjust
the Fader to your liking by turning
the outside ring. Adjust the Balance
by turning the knob. Push the controls back in when you are done.
Treble/Bass — Use these controls to adjust the tone to your liking.Push on the controls to get them to
pop out. Adjust the Bass by turning
the outer ring. Adjust the Treble by
turning the knob. Push the controls
back in when you are finished so you cannot change the settings by
accidentally bumping them.
Audio System Lighting
You can use the Balance control knob to turn off the illumination of
the audio system. Push the Balance/Fader controls so they pop out, then
pull the Balance control knob out slightly farther.
Check the Balance control knob if
the audio system does not illuminate
with the instrument panel lights. Radio Frequencies and Reception
For information, See page 117.
Comfort and Convenience Features BASS
CONTROL
TREBLE
CONTROL
FADER
CONTROL BALANCE
CONTROLProCarManuals.comMain Menu Table of Contents s t
Page 110 of 272

Audio System
Operating the Optional CD
Player/Changer
A Compact Disc changer is available from your dealer. It holds up to sixdiscs, providing several hours of
continuous entertainment. You operate the CD changer with the
same controls used for the radio and
cassette player.
Your dealer also has an accessory in- dash single CD player available that
is operated by the radio controls. To
operate this unit, use the instructions (except for those relating to multiple
discs) in this section.
Using the instructions that came
with the changer, load the desired CDs in the magazine, and load the
magazine in the changer. Play only standard round discs. Odd-shaped
CDs may jam in the drive or cause
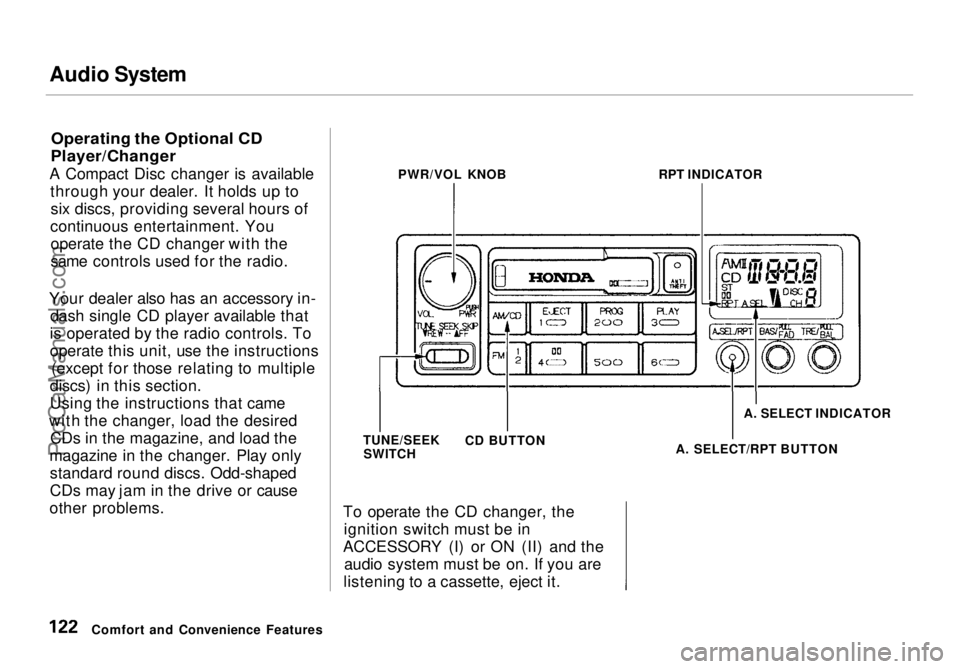
other problems. PWR/VOL KNOB
TUNE/SEEK
RPTSTEREO INDICATOR
CD BUTTON
To operate the CD changer, the ignition switch must be in
ACCESSORY (I) or ON (II) and the audio system must be on. If you are
listening to a cassette, eject it.
Press the CD button until "CD"
appears in the display. The system
will start to play the first track of the
PRESET
BUTTONS
first disc in the magazine. Play only standard round discs.
When that disc ends, the next disc in the magazine is loaded and played.
After the last disc finishes, the system returns to disc 1.
Comfort and Convenience Features
BUTTONS
BUTTONProCarManuals.comMain Menu Table of Contents s t
Page 122 of 272

Audio System
Operating the Optional CD
Player/Changer
A Compact Disc changer is available through your dealer. It holds up tosix discs, providing several hours of
continuous entertainment. You operate the CD changer with the
same controls used for the radio.
Your dealer also has an accessory in- dash single CD player available that
is operated by the radio controls. To
operate this unit, use the instructions (except for those relating to multiple
discs) in this section.
Using the instructions that came
with the changer, load the desired CDs in the magazine, and load the
magazine in the changer. Play only standard round discs. Odd-shaped
CDs may jam in the drive or cause
other problems. To operate the CD changer, the
ignition switch must be in
ACCESSORY (I) or ON (II) and the audio system must be on. If you are
listening to a cassette, eject it.
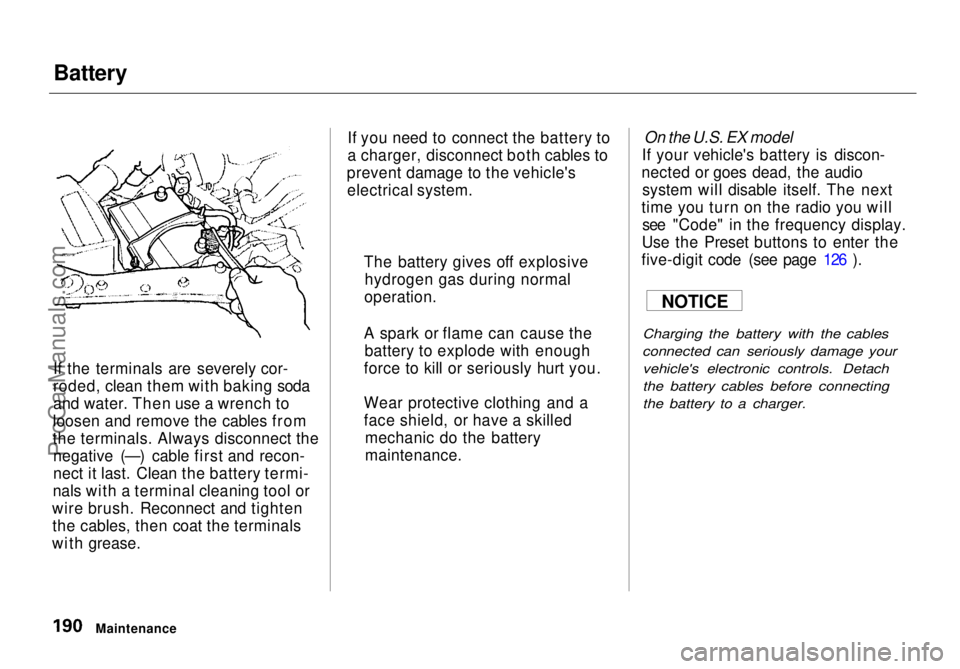
Comfort and Convenience Features PWR/VOL KNOB
RPT INDICATOR
TUNE/SEEK SWITCH CD BUTTON A. SELECT INDICATOR
A. SELECT/RPT BUTTONProCarManuals.comMain Menu Table of Contents s t
Page 189 of 272

Battery
If the terminals are severely cor-
roded, clean them with baking soda
and water. Then use a wrench to
loosen and remove the cables from
the terminals. Always disconnect the negative (—) cable first and recon-
nect it last. Clean the battery termi-
nals with a terminal cleaning tool or
wire brush. Reconnect and tighten the cables, then coat the terminals
with grease. If you need to connect the battery to
a charger, disconnect both cables to
prevent damage to the vehicle's electrical system.
On the U.S. EX model
If your vehicle's battery is discon-
nected or goes dead, the audio system will disable itself. The next
time you turn on the radio you will see "Code" in the frequency display.
Use the Preset buttons to enter the
five-digit code (see page 126 ).
Charging the battery with the cables
connected can seriously damage your vehicle's electronic controls. Detach
the battery cables before connecting
the battery to a charger.
Maintenance The battery gives off explosive
hydrogen gas during normal
operation.
A spark or flame can cause the battery to explode with enough
force to kill or seriously hurt you.
Wear protective clothing and a
face shield, or have a skilled mechanic do the battery
maintenance. NOTICEProCarManuals.comMain Menu Table of Contents s t
Page 232 of 272
Charging System Indicator
This indicator should come on when the ignition switch is ON (II), and goout after the engine starts. If it
comes on brightly when the engine
is running, it indicates that the
charging system has stopped
charging the battery. Immediately turn off all electrical
accessories: radio, heater, A/C, rear
defogger, cruise control, etc. Try not
to use other electrically-operated
controls such as the power windows. Keep the engine running and take
extra care not to stall it. Starting the
engine will discharge the battery
rapidly. By eliminating as much of the
electrical load as possible, you can
drive several miles (kilometers)
before the battery is too discharged
to keep the engine running. Drive to a service station or garage where
you can get technical assistance.
Taking Care of the Unexpected
CHARGING SYSTEM INDICATORProCarManuals.comMain Menu Table of Contents s t