1998 HONDA INTEGRA remove seats
[x] Cancel search: remove seatsPage 89 of 1681

\,
Replacement
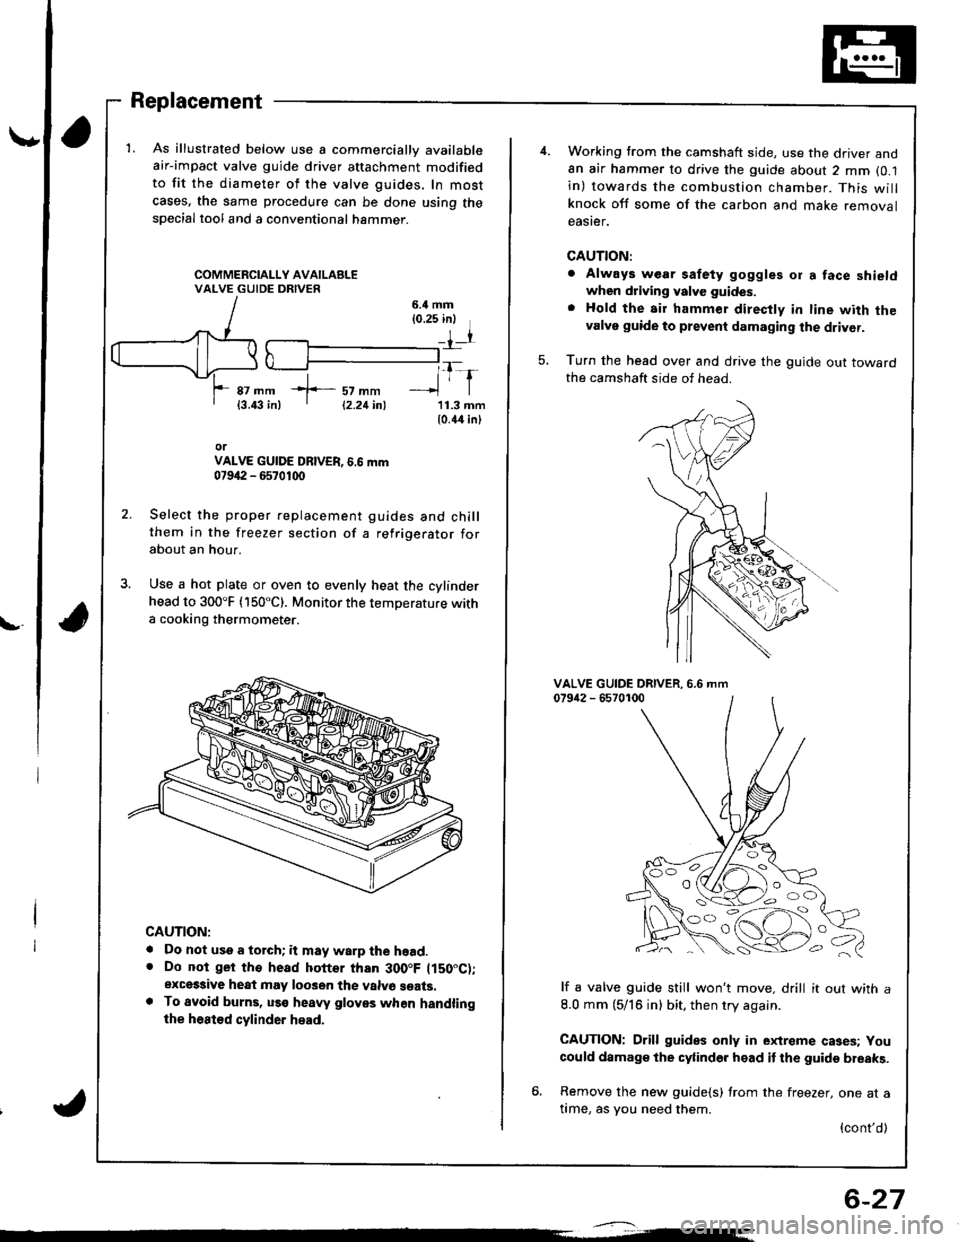
1. As illustrated below use a commercially available
air-impact valve guide driver attachment modified
to fit the diameter of the valve guides, In most
cases, the same procedure can be done using thespecial tool and a conventional hammer.
6.il mm{0.25 inl
rr
*f-::rtl1-r87 mm{3.43 in)11.3 mm10.44 inl
orVALVE GUIDE DBIVER, 6.6 mm07942 - 6570100
Select the proper replacement guides and chillthem in the freezer section of a refrigerator forabout an hour.
Use a hot plate or oven to evenly heat the cylinderhead to 300"F (150"C). Monitor the temperature witha cooking thermometer.
CAUTION:
. Do not use a torch; it may warp the hoad.. Do not ger tho head hotter than 300.F ltS0"C);exces3ive heat may loo3en the valvo seats.. To avoid burns, uss heaw gloves when handlingthe heat€d cylinder head.
12.21inl
6-27
Working trom the camshaft side, use the driver and8n air hammer to drive the guide about 2 mm (0.1
in) towards the combustion chamber. This willknock off some of the carbon and make removaleaster.
CAUTION:
. Always wear safety goggles or a face shieldwhen driving valve guides.
. Hold the air hammer direcfly in line with thevalve guide to prevent damaging the driver.
Turn the head over and drive the guide out towardthe camshaft side of head.
5.
VALVE GUIDE DRIVER.079i12 - 65701006.6 mm
lf a valve guide still won't move. drill it out with a
8.0 mm (5/16 in) bit, then try again.
CAUTION: Drill guides only in extreme cases; You
could damage the cylinder head it the guide breaks.
6. Remove the new guide{s) from the freezer, one at atime, as you need them.
{cont'd)
OO
'o c,
Page 91 of 1681

\
Valve Seats
Reconditioning
ACTUALSEATINGSURFACE
VALVESEAT
Renew the valve seats in the cylinder head using avalve seat cutter.
NOTE: lf guides are worn (see page 6-26), replace
them {see page 6-27) before cutting the valve seats.
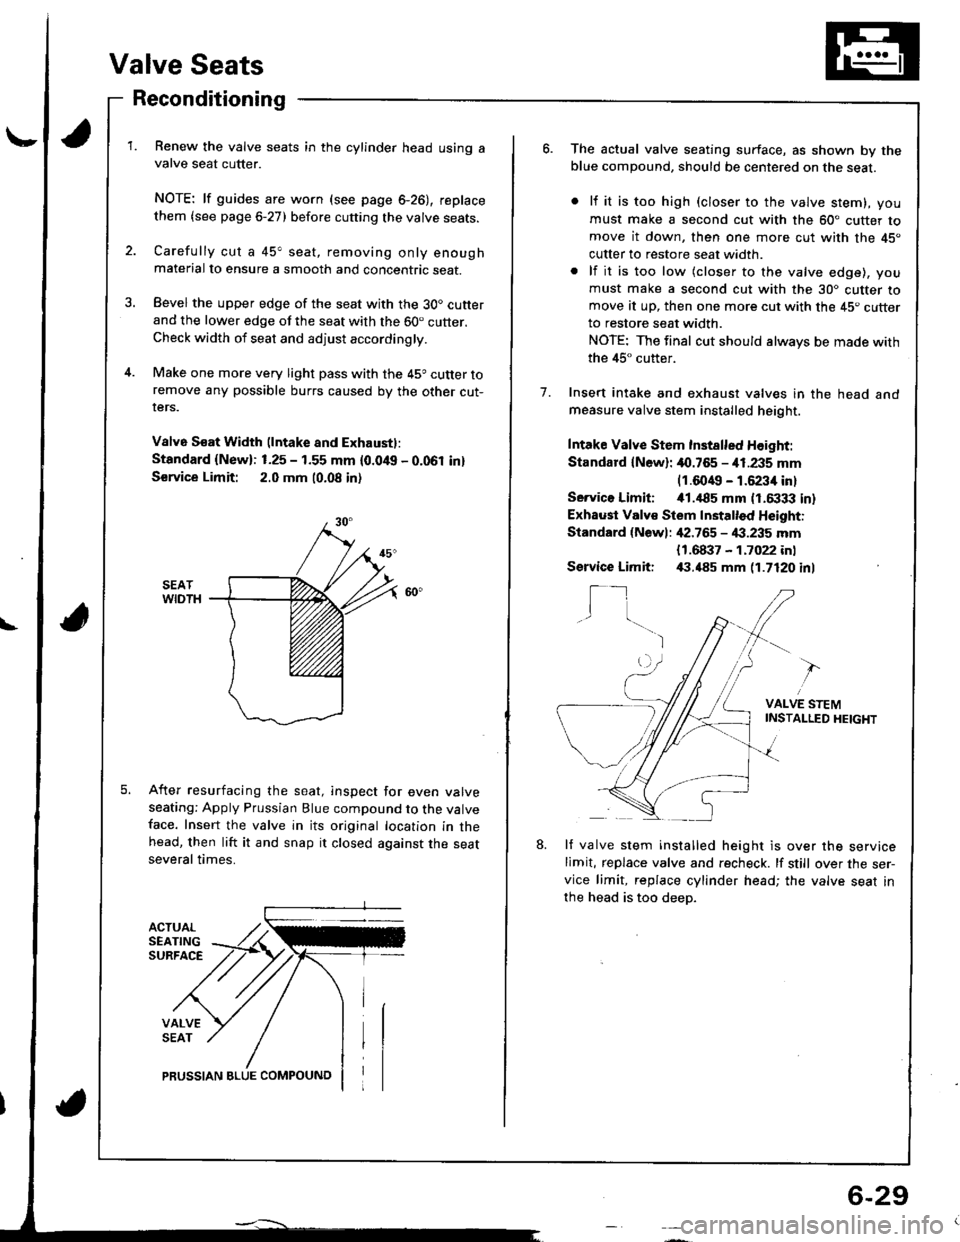
Carefully cut a 45" seat, removing only enoughmaterial to ensure a smooth and concentric seat.
Bevel the upper edge of the seat with the 30. cutterand the lower edge of the seat with the 60. cutter.Check width of seat and adjust accordingly.
Make one more very light pass with the 45o cutter toremove any possible burrs caused by the other cut-rers.
V8lv6 S€at Width (lntake and Exhaustl:
Standard {New}: 1.25 - 1.55 mm {0.0/t{, - 0.061 in}
S€rvice Limit: 2.0 mm 10.08 in)
After resurfacing the seat, inspect for even valveseating: Apply Prussian Blue compound to the valveface. Insert the valve in its original location in thehead, then lift it and snap it closed against the seatseveral times.
PRUSSIAN BLUE COMPOUNO
6-29
o.The actual valve seating surface, as shown by theblue compound, should be centered on the seat.
lf it is too high (closer to the valve stem), you
must make a second cut with the 60" cutter tomove it down, then one more cut with the 45"
cutter to restore seat width.
lf it is too low (closer to the valve edge), you
must make a second cut with the 30. cutter tomove at up, then one more cut with the 45. cutterto restore seat width.
NOTE: The final cut should always be made with
the 45" cutter.
Insert intake and exhaust valves in the head andmeasure valve stem installed height.
Intake Valve Stem Inst8lled Height:
Standard lN6wl: 40.765 - i11.235 mm(1.6049 - 1.6234 in)
Servico Limiti i01.,|85 mm (1.6333 in)
Exhaust Valv€ Stem Installed Height:
Standard {Newl: ,[2.765 - 4:1.235 mm
1.
{1.68i}7 - 1.7022 inl,(1.485 mm 11.7120 inlService Limit:
I_1I
VALVE STEMINSTAI-LED HEIGHT
8.lf valve stem installed height is over the servicelimit, replace valve and recheck. lf still over the ser-vice limit, replace cylinder head; the valve seat in
the head is too deep.
Page 894 of 1681

Rear Edge Closing Adjustment
Open the glass about a foot, then close it to check where
rear edge begins to rise. lf it rises too soon and seats too
tightly against the roof panel, or too late and does not
seat tightly enough, adjust it.
'l . Remove the headliner (see page 2O-98).
2. Remove the glass.
3. Remove the motor (see page 2O-80).
4. Align the tilt up position of the lifter on each side.
Check that the alignment le,ft and right, then install
the motor.
Install the glass, then check for water leaks.
NOTE: Do not use high-pressure water.
Install the headliner.
1.
2.
3.
Glass and Sunshade Replacement
Open the sunshade.
Tilt up the glass.
Remove the bolts, then remove the glass from the
glass bracket.
V : Bolt localions, 6
GLASS
t
4. Remove the screw, and lift the sunshade railon each
srcle.
5. Slide the sunshade torward, then remove the
sunshade.
v : Screw locations, 2
I
I
i
6x1.0mm l9.8 N.m {1.O kgt.m,l7.2 tbt.ftt )
Installation is the reverse of the removal procedure-
Check for water leaks.
NOTE: Do not use high-pressure water.
GLASS BRACKET
20-79
Page 895 of 1681

Moonroof
Motor, Drain Tube and Frame Replacement
CAUTION: Be careful not to damage the seats, dash-
boa.d and other interior trim.
1. Remove the glass (see page 20-79) and headliner
{see page 2O-98}.
2. Disconnect the motor connector, and remove the
clips securing the ceiling light wire harness.
Remove the bolts and nuts, then remove the motor,
if necessary.
NOTE: Make sure both sliders are parallel when in-
stalling the motor.
3.
: Bolt, nut locations
A
: 8olt, 2
6x 1.0mm I9.8Nm L
Nut, 3
6 x 1.0 mm I9.4 N.m
BA:
6@{1.0 kgf7 .2 tbl:!)(1.O kgf m, I
1'�lIltl /
< : Clip locations, 2
4,
FRAME
Oisconnect the drain tubes.
Remove the bolts, then remove the lrame from the
car.
NOTE: You may require assistance when removing
the trame.
A : Bolt locations, 8
TUBE CLIP
FRAME SEAL
Pull the drain tubes out the front and rear pillars.
NOTE: Before pulling out the drain tube, tie a string
to the end of it so it can be reinstalled.
REAR DRAINTUBES
7. Installation is lhe reverse of the removal procedure.
NOTE:
a Clean the surtace of the frame.
a Check the lrame seal.
a Check tor water leaks.
DRAIN TUBETo install, slide the draintube over the {rame nozzleat least 10 mm i0.4 in).
-'
6 x 1.0 mm9.8 N.m 11.0 kgt m,7.2 tbf.fr)
FRAME
FRONTDRAIN VALVES
!
\"
20-80
\
v
Page 901 of 1681

Moonroof
Rear Edge Closing Adjustment
Open the glass about a foot, then close it to check where
rear edge begins to rise. l,f it rises too soon and seats too
tightly against the root panel, or too late and does not
seat tightly enough, adjust it.
1. Remove the headliner (see page 20-1O0).
2. Remove the glass.
3. Remove the motor (see page 20'87).
4. Align the tilt-up position of the lifter on each side.
Check that the alignment left and right, then install
the motor.
Install the glass, then check for water leaks.
NOTE: Do not use high-pressure water.
lnstall the headliner.
20-86
Glass and Sunshade RePlacement
1. Open the sunshade.
2. Tilt-up the glass.
3. Remove the bolts, then remove the glass lrom the
glass bracket.
Use the moonroof
GLASS ERACKET
Remove the screws and lift the sunshade rails
Silde the sunshade forward, then remove the
sunsnaqe.
SUNSHADERAIL
lnstallation is the reverse ofthe removal procedure.
Check for water leaks.
NOTE: Do not use high-pressure water.
9.8 N m (1.0 kgl m,
6.
7.
Page 902 of 1681

Motor, Drain Tube and Frame Replacement
J
J
CAUTION: Be ca.eful not to damage the seats, dash-
board and other interior trim,
1. Remove the glass (see page 2O-86) and headliner(see page 20- 1OO).
2. Disconnect the motor connector, and remove the
clips securing the ceiling light wire harness.
NOTE: To remove the motor, remove the screws.
3. Disconnect the drain tubes.
4. Loosen the front bolts.
5. Remove the bolts, then remove the frame from the
car.
NOTE:
a You may require assistance when removing the
f rame.
a Take care not to bend the sunshade rails.
TUBECLIP
CONNECTORMake sure the sliders areparallel when installing themotor.
FRAMEFRAME SEAL
DRAIN TUBETo Install, slide the drain tube overthe frame nozzle at least 10 mm (0.4 in).
EOLT6 x 1.0 mm9.8 N.m l1.O kgf .m,
7 .2 tbt.ltl
Loosen the front bolts,
Fo.ward
6.
7.
SUNSHADERAILS
Pull the drain tubes out of the front and rear pillars.
NOTE: Before pulling out the drain tube, rie a string
to the end oI it so it can be reinstalled.
Installation is the reverse ol the removal procedure.
NOTE:
a Install the tube clips with the ends {acing the side to ease
a Clean the surface of the frame.
a Check the frame seal.
a Check lor water leaks.
a Make sure the sunshade moves smoothly.
FRONTDRAIN VALVES
installation of the headliner.
Page 918 of 1681

Seats
FrontSeatRemcival
NOTE: Take care not to scratch the seat covers and
oooy.
1 . Slide the front seat backward, then remove the bolts.
>: Bolt locations, 2
3. Remove the bolts.
v:Bolt locations
A V: Bolt, 1I >:Bolr, 1
10 x 1.25 mm l38 N.m (4.0 kgJ m, J,":: J
8 x 1.25 mm22 N.m {2.2 kgt m,
:u",: -/
8 x 1.25 mm I22 N'm 12.2 kst m. )16 rbf.rt)_ /
NOTE: When installing, usey'
--RONT SEAT
2. Slide the front seat forward, then remove the seat
track end covers.
CAUTION: When p.ying with I llat tip screwdliver,
wrap it with protective tape to prevent damage.
liq0id thread lock.
Lift the lront seat, then disconnect the seat
switch connector {driver's).
belt
SEAT TRACKENO COVER
SEAT BELT SWITCHCONNECTOR
5. Carelully remove the front seat through the door
opening.
6. Installation is the reverse of the removal procedure.
Page 919 of 1681

Seats
Front Seat Replacement
CENTER COVER
NOTEr Take care not to scratch the seat covers and
oooy.
l. Remove the front seat through the door opening (see
page 20-'103).
2. Remove the screws and recline knob, then remove
the recline cover.
SCREW
l-{O
BECLINE KNOB
3. Remove the screws, then remove the center cover.
SEAT BELTBUCKLE(see page 20-119)
scREws
4. Remove the hook and fastener, then fold the seat-back cover back.
RECLINE COVER SCREW
20-104
5. Fold the seat-back Qover and pad, then remove the
bo lts.
>: Boli locations, 2
SEAT.EACKCOVER
PAD
6. Remove the pivot nut.
PLAINWASHER
PIVOT NUT8 x 1.25 mm22 N.n (2.2 kgt m,'t 6 tbt.ttl
Remove the seat-back.
NOTE: Take care not to bend the hinge bracket.
10 x 1.25 mm47 N.m 14.8 kgf.m,3!'oli1 /
7.
+ sEAr-BAcK
-A\
@ )\
f\