Page 40 of 1395
Maintenance
Lubrication Points ............3-2
Maintenance Schedule for 1997 Model
(NormalConditions) ...".3-4
Maintenance Schedule for 1997 Model
(Severe Conditions) ."... 3-6
Maintenance Schedule for 1998 - 2000 Models
(NormalConditionsl ..'." 3-8
Maintenance Schedule for 1998 - 2000 Models
(severe Conditionsl '....' 3-10
I
www.emanualpro.com
Page 43 of 1395
Maintenance Schedule (for 1997 Model)
Normal Conditions
o
zo_u
b 6
oz
rE:o?
EJ
'oq
3c)
I
!
g
6
E
99 E
]:
;E
Zo
N.j
z0
!
.9
E
6-
5
P
= !38
i int c:dJ9Eo::cu?
; ; e6- - ri F: rl!
b;z!!9E583.33H;< X oa
53 o! a6!;.=!eg!? !? 3
.9
E
tr
€E
.E
Po oal.9
:3E
I
=
(9
;
=
I
(9
;
.j:
9>
E
3p
;3
t*
-?
!o
.iE
(,.-
c9f9
6
,t
ei6l
* ::: "i
3Ei{:
e:3E.e=9tti
E Ee Xg
3I:E3
E!EE*
9! o:l:;;5 q:..::i.;;6 i9=€ 9;
H :6 g-::t9;od6; d9
.gE
.9
s
3
.9
E
;;
E:
oo
E
E
E
>
a
6
s
aaaaaa
E
-9E
-
aaaaaaa
aa
.9
:
oaaaaaao
aaaa
aaaaaaa
aaaaa
aaaaaaa
aaa
_9EE
'5=
s
!E
:
:
a
E
;
E.E
!
.
!
.E
!
'6
E
3
p
.9
p
!
E6
t
=
E
'6
s
;
;5
iq
:;
E:.9o 3i:EE
dr 3
>
I
.6
=
;
.9
I
;lol
3lPI
'-l-glnlPI
3l9il
;l
EI
>l2l
€l
QI
zl
Ptal
,:I
3-4
www.emanualpro.com
Page 45 of 1395
Maintenance Schedule (for 1997 Modell
OSevere Conditions
o
le
E
,E
.9
T
_9,9
E
ui &,le-u:
6s
;-
€
:>o
E
4
'.
.2I,9
;
f,6
3ialgl'6 1
ol
?l
=i,PI
o
E
;
E
zo_u+1P
Foz=o
'; c?
EJ
I
I
-9
!
j
E
Pe !EE7
.: .'j 6tl.
9--6
i,ii
q.,
zo
zo
E
; ! =Y
i s*9 c
gIii".^
E d --; - rk F!'r I !
H6€be+
F.t ei i.:
ii ti#>
E
tr
o
-,{
E:
. ai>
PQ o,-J.9
€+ B
I
.!
'
;<.i3-oE
aE-r
!9._j
orE
r
.!
(,
!
f-p;-:
c>
E
E
.E3
3pet
;3
tll
:o
;t
E'
i;
(9-
es:
.e;fi
: E:: "i
Y 5 Y= l90sF6i fi--i f
E ag Xs
si! E 9
X 5 >= B
ii d:.s F
E!EEg
Fi FP:
P;.:a:l;;;i3=€ e;
*1E*EdbJ d9
E
E
E
-
a
5
aoaaa
E
E
.i=
E
6
aa
oaaaaO
aaaaaaa
aaO
aoaaaaaa
aaao
aaaaaa
aa
IEE
E
.E
E-
I
:
a
6
E
3
.a
.s.Eg
;6
E
.E
p:
.9
3
-
E
p:
T
E
!
d
=
:2
g
,9:
;,E
c 3;;EP
3-6
www.emanualpro.com
Page 47 of 1395
Maintenance Schedule (for 1998 - 2000 Models)
oNormal Conditions
o
zo_u{:9
+:N
Foz9d
.E
Ed
EJ
€3
:
6
!
E
ooE
rl
!Li:
o2?
*F9r
i
E
B
i q =Y
h Ena q
sili:.E ; *;= - ^
i6: l.*:;=:--o
FEtr 5 S1
6!;: a3
;;;iB:
ti??
'66
EEoo
trtr
5A
.E
aor:
cj ct 6
E''i-;
3=?;
'r
p ^i ..i i
1 39:
r !!=
'Eoo P!i33 !
=;k E
I
.s
(5
!
l_
.j:
c>
E
E
oP
p!
!. ii
::
*c
:a
39l9=
eESl
::-G.
5< d9i=9'ti
E Ee Xe
+ i >= i
;ii5e:=F!-\
!;!a;
a; i 6 si E: P O
s=;sE
.!E
.!
.!
3
.9
.9;t
5>6-a
E
=
:E
-
a
!
aaaaaa
E
eE
aaaaaaa
aa
.9
aaaaoaaa
aaaa
aaaaaaa
aaaaa
aaaaaaa
aaa
EEE
sEg
a'6
I
2
a
3
E
,
.!
E
a
!
E.
!:
,9.9E
6a
p
E
!
d
!
E
.E
:
E.9
6
.F_
3
.s
rE
96
oq
€;
;.E F
--
3
p
,E
6
.9
,E.z
3
.9
E
z
t
o
!
6
E
3-8
www.emanualpro.com
Page 49 of 1395
Maintenance Schedule (for 1998 - 2000 Models)
OSevere Conditions
o
6
;
-E
.9
:.9)
.l:
E
=;
-9c
>ii
-i .:
-xi €
&,6 =
R3 !
!c 6.-j! .:*3: :t:4 3;:P:-eCFg:,.! o--iF Y e E
!€;3_
lP
IElo
IE
:
;.a
.9?s
3
!lE
a?.
6.s>
:
;
E
.>o
€
E
z
a
;l
+l.:l5l
il
:l
3li
.ql
FIEI
€lFI
ol9l
;l
:l:t,PI
o
zo_4
U;
*:R
F
z
;;;
o-
I
!
I
!
3
IE P5E 9
c, ci 6r3
9.:-6
:9
!|;>
oz-:Oo
Tl
t* -
JQ A
z*9
I
'6
i
E'� ^5} E:Y
; EsI EEgeY.:
sINI!;; 6 *^; * r; F;,^!
hEz!:i9
EE€; e1e= a q::6go-.!5.6
;;;iF3
o6 a
.F_ Z
EEoo
EE
=a
{ai
;i3
a--q
eqo? R
s= k;
'-<
:F
ln
c ci.ii
-:oo IIs33 Eii q... "
=ik F
I
'3
(,
'
:
;
f-p
c>
E
E
.9 it
oE
:+
E!
!o
ib
.i:
o-
s3=l|il
t 3=EeES t€ii;t
!: ir:
€ !,3€;E E3 ig
EE;bFj=-;H:26anii 6:.s FEE.ESe
-ii d:1
9;.: 6:
l;;"3
H iq Hrac;a:
E
E
E
-
6
!
aaaaa
E
E
..i=
IE
-
aaa
aaaoaaa
o
.9
->
aaaaaaa
aaao
aaaaoaoa
aaoaa
aaaaaoa
aaa
:
=
j
E
n
E
.=
t
.E
I
!
.9.9
!
.g
a
!
a
E
.9
6
E€:
69:
3-10
www.emanualpro.com
Page 123 of 1395

Timing Belt
Removal
Replace the timing belt at 105,000 miles (168,000 km)
according to the maintenance schedule {normal condi-
tions/severe conditions). lf the vehicle is regularly driven
in either of the following conditions, replace the timing
belt at 60,000 miles (U.S.A.l 100.000 km (Canada).
- ln very high temperatures (over 110'F, 43"C).- In very low temperatures (under -20"F. -29"C).
Turn the crankshaft pu\ley so the No. 1 piston is at
top dead center (TDC).
Remove the guard bar and splash shield (see page
5-7 ).
Loosen the mounting bolt and lock bolt. then remove
the power steering (P/S) pump belt.
MOUNNNG BOLT8 x 1.25 rnm
1.
2.
,l
4. Loosen the idler pulley bracket bolt and adjusting
bolt, then remove the air conditioning (lVC) compres
sor belt (see page 5-4).
6-10
24 N.m {2.4 kgt.m, 17 lbf.ftl
24 N.m 12.4 kgf.m, lt lbf.ftl
5. Loosen the mounting nut and locknut, then remove
the altefnator belt.
LOCKNUTI x 1.25 mm2a N.m 12.4 kgt m, 17 lblftl
6.
10 x 1,25 mm4,1 N.m (,1.5 kgt m, 33 lbtftl
Remove the cruise control actuator (see section 4).
Support the engine with a jack, then remove the
upper bracket. Make sure to place a cushion
between the oil Dan and the iack.
12 x 1.25 mm74 N.m (7.5 kgf m, 54 lbtftl
7.
BRACKET
AELT
www.emanualpro.com
Page 442 of 1395

MaintenanceBack-up Light Switch
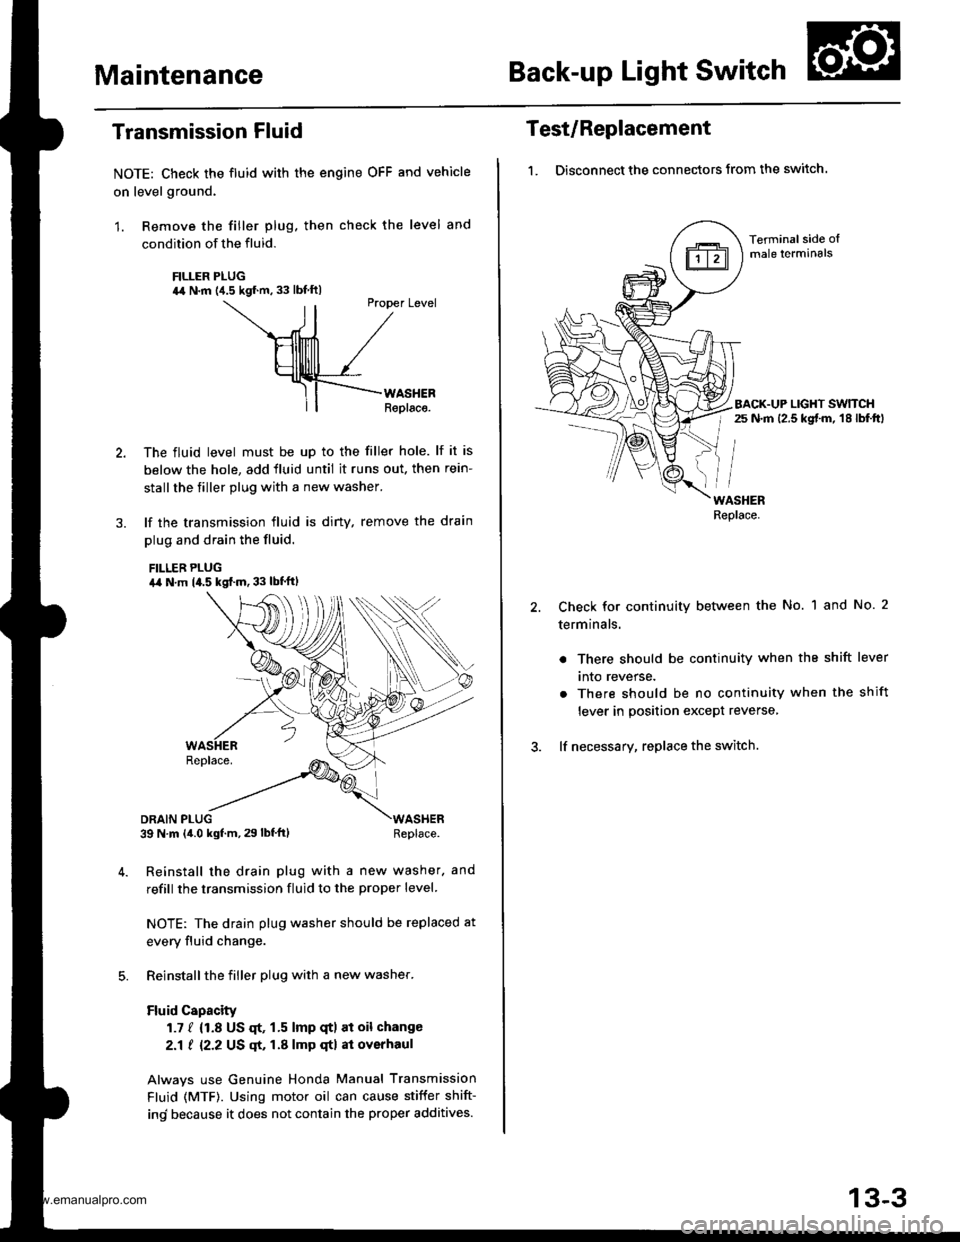
Transmission Fluid
NOTE: Check the fluid with the engine OFF and vehicle
on level ground.
1. Remove the filler plug. then check the level and
condition of the fluid.
FILLER PLUG44 N.m {4.5 kgf.m. 33 lbf ftl
ll
Ptopet Level
\--ril /
HllllllTl /
Hllllrlll /_rf-F{--rno."."
ll| | Replaco.
The fluid level must be up to the filler hole. lf it is
below the hole, add fluid until it runs out. then rein-
stall the tiller plug with a new washer.
lf the transmission fluid is diny, remove the drain
plug and drain the fluid.
FILLEB PLUGa,a N.m 14.5 kgf..n. 33 lbt'ftl
DRAIN PLUG39 N m (4.0 kgf.m, 29 lbf'ft)WASHERReplace.
Reinstall the drain plug with a new washer. and
refill the transmission fluid to the proper level.
NOTE: The drain plug washer should be replaced at
every fluid change.
Reinstall the filler plug with a new washer.
Fluid Capacity
1.7 / {1.8 US qt, 1.5 lmp qtl at oil change
2.1 ! 12.2 US qt, 1.A lmp qtl at overhaul
Alwavs use Genuine Honda Manual Transmission
Fluid (MTF). Using motor oil can cause stiffer shift-
ind because it does not contain the proper additives.
Test/Replacement
1. Disconnect the connectors from the switch.
Terminal side oImale lerminals
BACK.UP LIGHT SWTTCHr 25 N.m 12.5 kgt m, 18 lbf.ftl
WASHERReplace.
Check for continuity between the No. 1 and No. 2
terminals.
. There should be continuity when the shift lever
tnto reverse.
. There should be no continuity when the shift
lever in position except reverse,
lf necessary, replace the switch.
13-3
www.emanualpro.com
Page 781 of 1395

17.Make sure the transmission is in E position.
Fill the transmission with ATF, and run the engine
for 30 seconds or until approximately 0.951 {1.0 US
qt., 0.8 lmp qt.) is discharged.
Remove the drain hose, and reconnect the cooler
return hose to the transmission (see page 14-266).
Refill the transmission with ATF to the proper level
(see page l4'161 ).
18.
19.
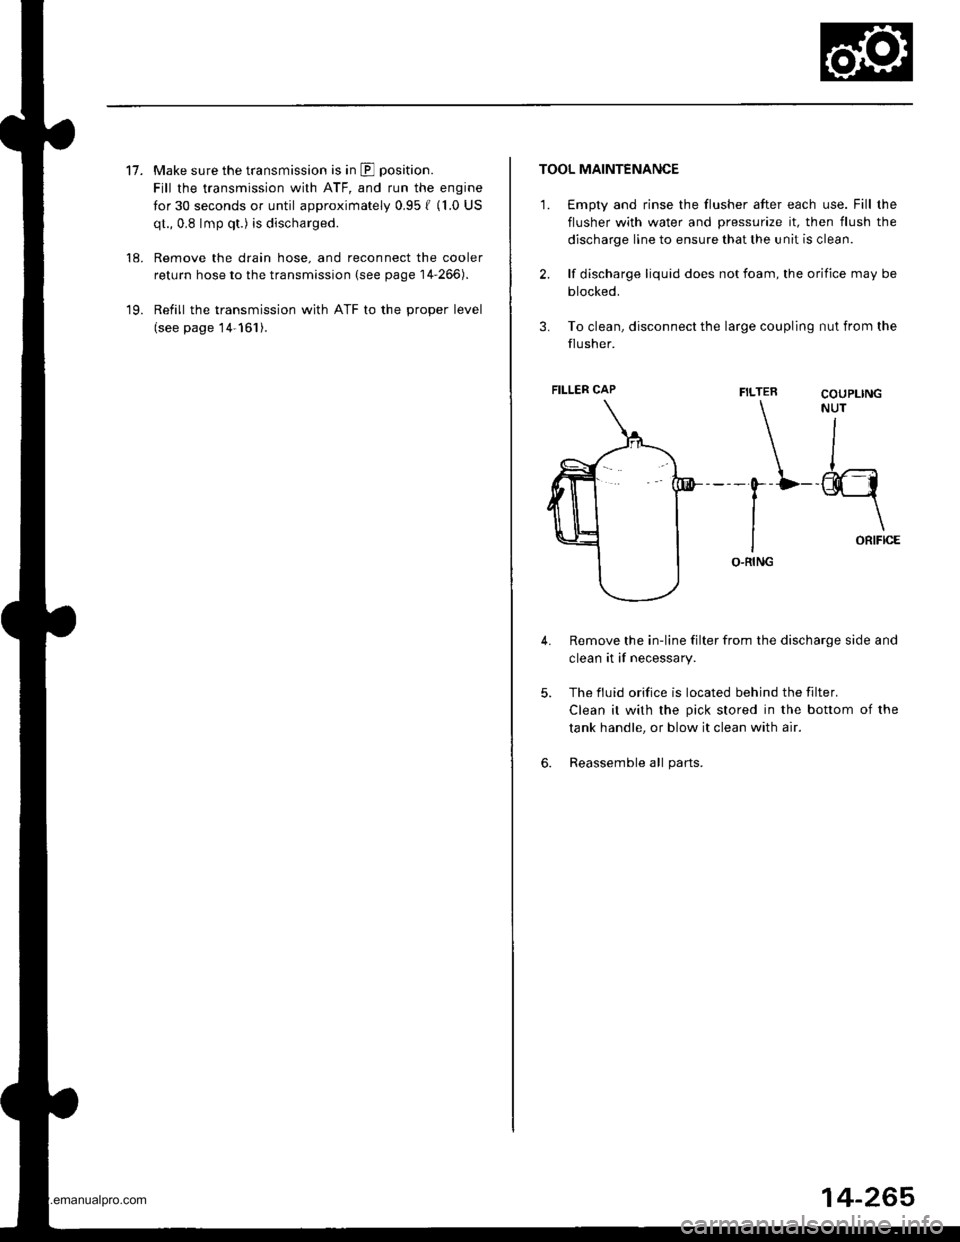
TOOL MAINTENANCE
1. €mpty and rinse the flusher after each use. Fill the
flusher with water and pressurize it, then flush the
discharge line to ensure that the unit is clean.
2. lf discharge liquid does not foam, the orifice may be
blocked.
3. To clean, disconnect the large coupling nut from the
flusher.
FILTER
\-0--D
I
IO.RING
Remove the in-line filter from the discharge side and
clean it if necessary.
The fluid orifice is located behind the filter.
Clean it with the pick stored in the bottom of the
tank handle, or blow it clean with air.
Reassemble all parts.
COUPLINGNUT
II
-@q
\ORIFICE
4.
5.
6.
FILLER CAP
14-265
www.emanualpro.com