Page 263 of 452
5. Put the transfer case in NEUTRAL (N). See
“Four-wheel Drive” in the Index
for the proper
procedure to select NEUTRAL
(N).
6. When the vehicle is hooked up, release the
parking brake.
4. Put the transmission in NEUTRAL (N).
5. Put the transfer case in 2 High (2HI).
6. When the vehicle is hooked up, release the
parking brake.
Four- Wheel Drive-Vehicles (Electronic
Transfer Case)
Tow Limits -- 35 mph (55 krdh), 50 miles (80 krn/l1)
If your vehicle is four-wheel drive with an electronic
transfer case, use the following directions:
1. Engage the parking brake.
2. Turn the ignition key to OFF.
3. Clamp the steering wheel in a straight-ahead position
with a clamping device designed for towing service.
(Do not use the vehicle’s steering column lock for this.)
NOTICE:
If your vehicle is equipped with an electronic
transfer case and the tow limits must be
exceeded, a towing dolly must be used under the rear wheels or vehicle/powertrain damage
will occur.
5-11
ProCarManuals.com
Page 264 of 452

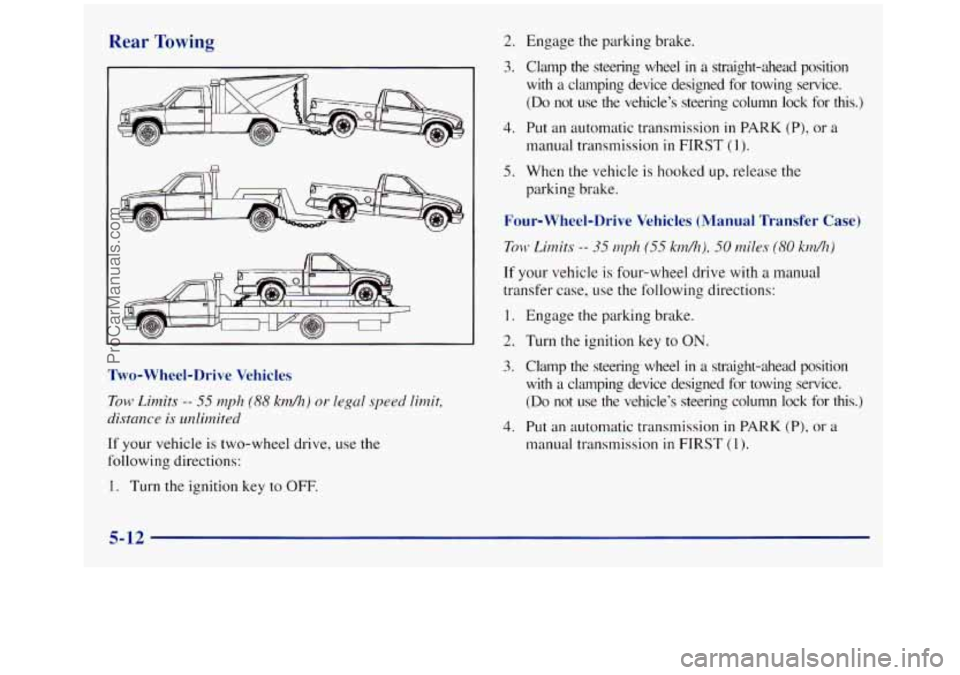
Rear Towing
Two-Wheel-Drive Vehicles
Tow Limits -- 55 ~zph (88 krdh) or legal speed limit,
distmce is ditnited
If your vehicle is two-wheel drive, use the
following directions:
1. Turn the ignition key to OFF.
2.
3.
4.
5.
Engage the parking brake.
Clamp the steering wheel in a straight-ahedd position
with a clamping device designed for towing service.
(Do not use the vehicle’s steering column lock for this.)
Put an automatic transmission
in PARK (P), or a
manual transmission in FIRST (1).
When the vehicle is hooked up, release the
parking brake.
Four-Wheel-Drive Vehicles (Manual Transfer Case)
If your vehicle is four-wheel drive with a manual
transfer case, use the following directions:
1.
2.
3.
4.
Engage the parking brake.
Turn the ignition
key to ON.
Clamp the steering wheel in a straight-ahead position
with a clamping device designed for towing service.
(Do not use the vehicle’s steering column lock for this.)
Put an automatic transmission
in PARK (P), or a
manual transmission in FIRST (1).
5-12
ProCarManuals.com
Page 265 of 452

5. Put the transfer case in NEUTRAL (N). See
“Four-Wheel Drive’’
in the Index for the proper
procedure to select NEUTRAL
(N).
6. When the vehicle is hooked up. release the
parking brake.
7. Turn the ignition key to OFF.
Four- Wheel-Drive Vehicles (Electronic
Transfer Case)
Eml Limits -- 35 mph (55 km/JZ), 50 milc?s (80 kndh)
If your vehicle is four-wheel drive with an electronic
transfer case, use the following directions:
I. Engage the parking brake.
2. Turn the ignition key to ON.
3. Clamp the steering wheel in a straight-ahead position
with
a clamping device designed for towing service.
(Do not use the vehicle’s steering column lock for this.)
4. Put the transmission in NEUTRAL (N).
5. Put the transfer case in 2 High (2HI).
6. When the vehicle is hooked up, release the
parking brake.
7. Turn the ignition key to OFF.
NOTICE:
If your vehicle is equipped with four-wheel drive
and the towing limits must be exceeded, a towing
dolly must be used under the front wheels or
vehicle/powertrain damage will occur.
I NOTICE:
Towing pickup models from the rear while loaded
with heavy cargo may cause the frame side rails
to flex sufficiently to allow the pickup box to
contact the cab and could cause damage to the
cab and/or box.
Engine Overheating (Gasoline Engine)
You will find a coolant temperature gage on your
vehicle’s instrument panel. See “Engine Coolant
Temperature Gage”
in the Index.
If your vehicle has a diesel engine, see “Engine
Overheating”
in the Diesel Engine Supplement.
5-13
ProCarManuals.com
Page 275 of 452

Engine Fan Noise If a Tire Goes Flat
Your vehicle has a clutched engine cooling fan. When
the clutch is engaged, the fan spins faster to provide
more air to cool the engine.
In most everyday driving
conditions, the fan is spinning slower and the clutch
is
not fully engaged. This improves fuel economy and
reduces fan noise. Under heavy vehicle loading. trailer
towing and/or high outside temperatures, the fan speed
increases as the clutch more
fully engages. So you may
hear an increase
in fan noise. This is normal and should
not be mistaken as the transmission slipping or making
extra shifts.
It is merely the cooling system functioning
properly. The fan
will slow down when additional
cooling
is not required and the clutch disengages.
You may
also hear this fan noise when you start
the engine.
It will go away as the fan clutch
partially disengages. It‘s
unusual for
a tire to “blow out’’ while you’re driving,
especially if you maintain your tires properly.
If air goes
out of a tire, it’s much more likely to leak out slowly.
But if you should ever have a “blowout,” here are a
few tips about what to expect and what to do:
If a front tire hils, the flat tire will create a drag that
pulls the vehicle toward that side. Take your foot off the
accelerator pedal and grip the steering wheel firmly.
Steer to maintain lane position, and then gently brake to
a stop well out of the traffic lane.
A rear blowout, particularly on a curve, acts much like a
skid and may require the same correction you’d use in
a skid. In any rear blowout, remove your foot from
the accelerator pedal. Get
the vehicle under control by
steering the way you want the vehicle to go.
It may be
very bumpy and noisy, but you can still steer. Gently
brake to
a stop -- well off the road if possible.
If a tire goes flat, the next part shows how to use your
jacking equipment to change a flat tire safely.
5-23
ProCarManuals.com
Page 276 of 452

Changing a Flat Tire
If a tire goes flat, avoid further tire and wheel damage
by driving slowly to a level place. Turn on your hazard
warning flashers.
Changing a tire can cause an injury. The vehicle
can slip off the jack and roll over you or other
people. You and they could be badly injured.
Find
a level place to change your tire. To help
prevent the vehicle from moving:
1. Set the parking brake firmly.
2. Put an automatic transmission shift
lever in PARK
(P) or shift a manual
transmission to FIRST
(1) or
REVERSE (R).
3. If you have a four-wheel-drive vehicle,
be sure the transfer case is in a drive
gear
-- not in NEUTRAL (N).
4. nrn off the engine.
CAUTION: (Continued)
To be even more certain the vehicle won’t move,
you can put blocks
at the front and rear of the
tire farthest away from the one being changed.
That would be the tire on the other side of the
vehicle.
at the opposite end.
V
The following steps will tell you how to use the jack and
change a tire.
ProCarManuals.com
Page 278 of 452
A. Hoist Assembly
€3. Ratchet
C. Jack Handle
D. Hoist Shaft
E. Valve Stem,
Pointed Down
E Spare Tire
G. Retainer
H. Hoist Cable Follow
these instructions to lower the spare tire:
1.
2.
3.
4.
One side of the ratchet has an UP marking. The other
side has
a DOWN marking. Assemble the ratchet to
the hook near the end
of the jack handle (as
illustrated) with the DOWN marking facing you.
Insert the other end through the hole in the rear
bumper and into the hoist shaft.
Turn the ratchet to lower the spare tire to the ground.
Continue to turn the ratchet until the spare tire can be
pulled out from under the vehicle.
When the tire has been lowered, tilt the retainer at
the end
of the cable so it can be pulled up through
the wheel opening.
Put the spare tire near the flat tire.
5-26 I
h
ProCarManuals.com
Page 279 of 452
The tools you’ll be using include the jack (A), the jack
handle extension
(B), the jack handle (C), the wheel
wrench
(D) and the ratchet (E).
If the flat tire is on the rear of the vehicle, you’ll need
the
jack handle extension also.
Attach thejack handle (and jack handle extension, if
needed) to the jack.
ProCarManuals.com
Page 280 of 452
With the UP marking on the ratchet facing you, rotate the
ratchet
to the right. That will lift the jack head a little. If
your vehicle has wheel
nut caps, use the wheel
wrench and ratchet to remove them. Turn the
wheel wrench
to the left,
with
DOWN facing you, to
remove the wheel
nut caps.
Then take
off the hub cap.
If the wheel also has a trim ring, use the wheel wrench
to pry along the edge and remove it.
If the wheel has a smooth center piece, place the wheel
wrench
in the slot on the wheel and gently pry out.
5-28
ProCarManuals.com