1998 GMC SIERRA wiring
[x] Cancel search: wiringPage 149 of 452

Air Bag Readiness Light
There is an air bag readiness light on the instrument panel,
which shows AIR BAG. The system checks
the air bag’s
electrical system for malfunctions. The light tells
you if
there is an electrical problem. The system check includes
the air bag sensors, the air bag module, the wiring and the
diagnostic module. For more information
on the air bag
system, see “Air Bag”
in the Index,
~
AIR
BAG
This light will come on
when you start your engine,
and
it will flash for a few
seconds. Then the light
should go out. This means
the system is ready.
If the air bag readiness light stays on after you start the
engine or comes on when
you are driving, your air bag
system may not work properly. Have your vehicle
serviced right away.
The air bag readiness light should flash for a few
seconds when
you turn the ignition key to RUN. If the
light doesn’t come
on then, have it fixed so it will be
ready to warn you
if there is a problem.
AIR BAG OFF Light (Except Crew Cab)
When you turn the right front passenger’s air bag off, this
light will come
on and stay on to remind you that the air
bag has been turned off. This light will go off when you
turn the air bag back on again. See “Securing a Child
Restraint in the Right Front Seat Position”
in the Index for
more on this, including important safety information.
-
2-65
ProCarManuals.com
Page 189 of 452
Section 4 Yoiir Driving and the Road
Here you’ll find information about driving on different kinds of roads and in varying weather conditions. We’ve also
included many other useful tips on driving.
4-
2
4- 2
4-5
4-6
4- 8
4-1
1
4-1 1
4- 13
4- 14
4-27
4-28
Defensive Driving Drunken Driving
Control of a Vehicle
Braking
Steering
Off-Road Recovery Passing
Loss of Control
Off-Road Driving with Your
Four-Wheel-Drive Vehicle
Driving at Night
Driving
in Rain and on Wet Roads 4-3
1
4-32
4-33
4-33
4-34
4-36 4-4
1
4-42
4-47
4-47
4-48 City Driving
Freeway Driving
Before Leaving
on a Long Trip
Highway Hypnosis
Hill and Mountain Roads
Winter Driving Recreational Vehicle Towing
Loading Your Vehicle
Camper Wiring Harness
(If Equipped)
Pickup Conversion
to Chassis Cab
Towing a Trailer
4-1
ProCarManuals.com
Page 236 of 452
Camper Wiring Harness
(If Equipped)
~~~
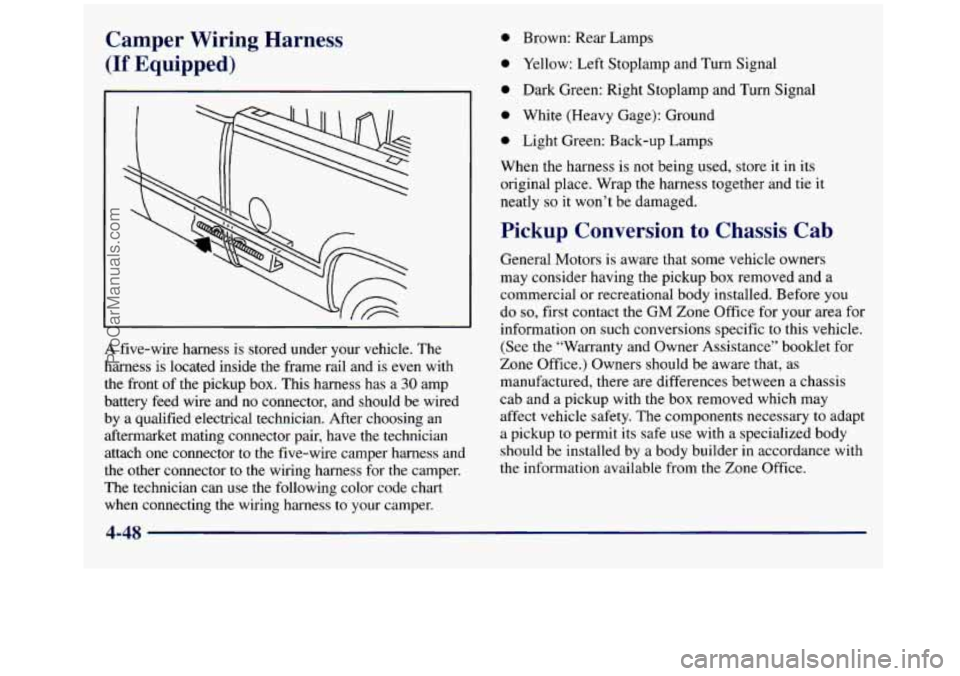
A five-wire harness is stored under your vehicle. The
harness is located inside the frame rail and is even with
the front of the pickup box. This harness has a
30 amp
battery feed wire and no connector, and should be wired
by
a qualified electrical technician. After choosing an
aftermarket mating connector pair, have
the technician
attach one connector to the five-wire camper harness and
the other connector
to the wiring harness for the camper.
The technician can use the following color code chart
when connecting the wiring harness to your camper.
0 Brown: Rear Lamps
0 Yellow: Left Stoplamp and Turn Signal
0 Dark Green: Right Stoplamp and Turn Signal
0 White (Heavy Gage): Ground
0 Light Green: Back-up Lamps
When the harness is
not being used, store it in its
original place. Wrap the harness together and tie
it
neatly so it won’t be damaged.
Pickup Conversion to Chassis Cab
General Motors is aware that some vehicle owners
may consider having the pickup box removed and
a
commercial or recreational body installed. Before you
do so, first contact the GM Zone Office for your area for
information on such conversions specific
to this vehicle.
(See the “Warranty and Owner Assistance” booklet
for
Zone Office.) Owners should be aware that, as
manufactured, there are differences between a chassis
cab and a pickup with the box removed which may
affect vehicle safety. The components necessary to adapt
a pickup
to permit its safe use with a specialized body
should be installed by a body builder in accordance with
the information available from the Zone Office.
4-48
ProCarManuals.com
Page 248 of 452
Trailer Wiring Harness
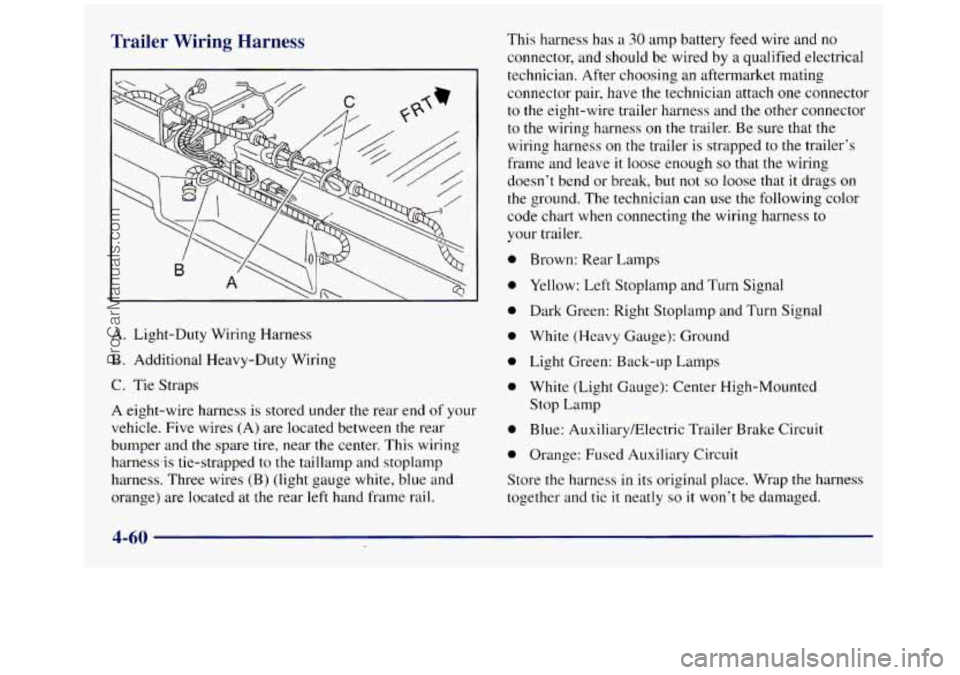
A. Light-Duty Wiring Harness
B. Additional Heavy-Duty Wiring
C. Tie Straps
A eight-wire harness is stored under the rear end of your
vehicle. Five wires (A) are located between the rear
bumper and the spare tire, near the center. This wiring
harnewis tie-strapped to the taillamp and stoplamp
harness. Three wires (B) (light gauge white, blue and
orange) are located at
the rear left hand frame rail. This
harness has a
30 amp battery feed wire and no
connector, and should be wired
by a qualified electrical
technician. After choosing an aftermarket mating
connector pair, have the technician attach one connector
to the eight-wire trailer harness and the other connector
to the wiring harness on the trailer. Be sure that the
wiring harness on the trailer is strapped to the trailer’s
frame and leave
it loose enough so that the wiring
doesn’t bend or break, but not
so loose that it drags on
the ground. The technician can use the following color
code chart when connecting the wiring harness to
your trailer.
0 Brown: Rear Lamps
0 Yellow: Left Stoplamp and Turn Signal
0 Dark Green: Right Stoplamp and Turn Signal
0 White (Heavy Gauge): Ground
0 Light Green: Back-up Lamps
0 White (Light Gauge): Center High-Mounted
Stop Lamp
0 Blue: Auxiliary/Electric Trailer Brake Circuit
0 Orange: Fused Auxiliary Circuit
Store the harness
in its original place. Wrap the harness
together and tie
it neatly so it won’t be damaged.
4-60
ProCarManuals.com
Page 361 of 452
Headlamps Fuses and Circuit Breakers
The headlamp wiring is protected by an internal circuit
breaker. An electrical overload will cause
the lamps
to go on and off, or
in some cases to remain off. If
this happens, have your headlamp wiring checked
right away.
Windshield Wipers
The windshield wiper motor is protected by a circuit
breaker and
a fuse. If the motor overheats due to heavy
snow, etc., the wiper will stop
until the motor cools. If
the overload is caused by some electrical problem and
not snow, etc., be sure to get it fixed.
Power Windows and Other Power Options
Circuit breakers protect the power windows and other
power accessories. When the current load is too heavy,
the circuit breaker opens and closes, protecting the
circuit
until the problem is fixed or goes away. The wiring circuits
in your vehicle are protected from
short circuits by
a combination of fuses, circuit breakers
and fusible thermal links.
This greatly reduces the
chance
of fires caused by electrical problems.
Look at the silver-colored band inside the fuse. If the
band is broken or melted, replace the fuse. Be sure you
replace
a bad fuse with a new one of the identical size
and rating.
If you ever have
a problem on the road and don’t have a
spare fuse, you can “borrow” one that has the same
amperage. Just pick some feature
of your vehicle that
you can get along without
-- like the radio or cigarette
lighter
-- and use its fuse, if it is the correct amperage.
Replace
it as soon as you can.
6-7 1
ProCarManuals.com
Page 436 of 452
Brake Adjustment
.................................. 6-38
Fluid .................................. 6-35, 7-46 Master Cylinder .............................. 6-35
PedalTravel ................................. 6-38 Replacing System Parts ........................ 6-38
System Warning Light ......................... 2-67
Transmission Shift Interlock Check ............... 7-42
Brakes, Anti-Lock ............................... 4-7
Braking ........................................ 4-6 Braking in Emergencies ........................... 4-8
Break-In, New Vehicle .......................... 2-10
Bulb Replacement .............................. 6-39
Parking ..................................... 2-25
Trailer ...................................... 4-56
Wear ....................................... 6-37
BTSICheck ..................................... 42
Camper vpe Mirror ........................... 2-48
Camper Wiring Harness .......................... 4-48
Canadian Roadside Assistance ...................... 8-7
Capacities and Specifications ...................... 6-77
Carbon Monoxide .................... 2.30.2.31. 4.40
Care of Your Cassette Tape Player .................. 3-25
Cassette Deck Service ........................... 7-40
Cassette Tape Player ........................ 3-9, 3- 12
Cassette Tape Player Care ........................ 3-25
CassetteKompact Disc Storage ............... 2-55, 2-56
Center Overhead Console ........................ 2-51
Center Passenger Position ........................ 1-32
Certification Label .............................. 4-43
CargoLamp ................................... 2-45
.
ProCarManuals.com
Page 439 of 452
Tachometer .................................. 2-63
Voltmeter
................................... 2-67
Garage Door Opener
............................ 2-5 1
GAWR ....................................... 4-43
Gear Positions. Automatic Transmission
............. 2- 15
Gear Positions. Manual Transmission .......... 2- I8 . 2- 19
GloveBox .................................... 2-51
Gross Axle Weight Rating ........................ 4-43
Gross Vehicle Weight Rating
...................... 4-43
Guide en Franpis
11
GVWR ....................................... 4-43
.. .................................
Halogen Bulbs ................................ 6-39
Hazard Warning Flashers
.......................... 5-2
Head Restraints ................................. 1-5
Headlamps .................................... 2-41
Bulb Replacement
....................... 6-40. 6.4 I
High/Low Beam Changer ...................... 2-36
On Reminder
................................ 2-42
Wiring
..................................... 6-71
Heating
........................................ 3-5
High-Beam Headlamps
.......................... 2-36
Hill and Mountain Roads
......................... 4-34
Hitches. Trailer
................................. 4-55
Hood
Checking Things Under ......................... 6-9
Release
..................................... 6-10
Horn ......................................... 2-34
Hydraulic Clutch Fluid
...................... 6-25 . 7-46
Hydraulic Clutch System Check
................... 7-41
Hydroplaning
.................................. 4-30
Hearing Ilnpaired
. Customer Assistance .............. 8-4
Highway Hypnosis
.............................. 4-33 Ignition
Positions
..............................
Brakesystem ................................ 7-45
Drive Axle
.................................. 7-45
Engine Cooling System
........................ 7-44
Exhaust
Systems ............................. 7-44
Steering
.................................... 7-44
Suspension
.................................. 7-44
Throttle Linkage
.............................. 7-44
Transfer Case (Four-Wheel Drive)
............... 7-45
Instrument Panel
............................... 2-60
Cleaning
.................................... 6-64
Cluster
..................................... 2-62
FuseBlock
.................................. 6-72
Intensity Control
............................. 2-43
Interior Lamps
................................. 2-43
.................................... J ack. Tire 5-25
Jump Starting
................................... 5-3
Key Lock Cylinders Service
..................... 7-41
Key Release Button
............................. 2-12
Keyless Entry System ............................ 2-6
Keys
.......................................... 2-2
9-5
ProCarManuals.com
Page 445 of 452
Hitches ..................................... 4-55
Maintenance When Towing
..................... 4-59
Parking on Hills
.............................. 4-58
Safety Chains
................................ 4-56
Tongueweight
............................... 4-54
Total Weight on Tires
.......................... 4-55
Towing
..................................... 4-49
Turn Signals ................................. 4-57
Weight
..................................... 4-50
Wiring Harness
............................... 4-60
Transfer Case. Electronic
......................... 2-23
Transfer Case Lubricant ..................... 6-26 . 7-47
Transfer Case. Manual
........................... 2-2 1
Transmission Fluid
Automatic
.............................. 6-2 1.7-47
Manual
................................ 6-24. 7-46
Transmitters. Keyless Entry
........................ 2-6
Transportation
. Courtesy .......................... 8-8
Trip Odometer ................................. 2-63
TTYUsers
..................................... 8-4
Turn Signal and Lane Change Signals
............... 2-35
Turn SignaVMultifunction Lever
................... 2-35
Turn Signals When Towing a Trailer
................ 4-57
Underbody Maintenance
........................ 6-68
Underllood-Fuse/Relay Center
..................... 6-74 Vehicle
Control
...................................... 4-5
Damage Warnings
.............................. iv
Identification Number ......................... 6-70
Loading
.................................... 4-43
Storage
..................................... 6-39
Ventilation System
............................... 3-5
Visors. Sun .................................... 2-59
Voltmeter
..................................... 2-67
warning Devices
............................... 5-3
Wxranty Information
............................ 8- IO
Washer Fluid. Windshield ................... 6.33. 7-47
Washing
Your Vehicle ........................... 6-65
Weatherstrips
.................................. 6-65
West Coast Type Mirror
.......................... 2-50
Wheel Warning
Lights
. Gages and Indicators ............... 2-64
Alignment
.................................. 6-59
Nut Torque ............................. 5-32. 6-77
Replacement
................................. 6-59
Wrench
..................................... 5-25
Windows
..................................... 2-32
Lockout Switch
.............................. 2-33
Manual
..................................... 2-32
Power
...................................... 2-32
Sliding Rear
................................. 2-34
Swing-Out
.................................. 2-34
9-11
ProCarManuals.com