1998 GMC SAVANA heating
[x] Cancel search: heatingPage 142 of 388
Air Conditioning Heating
Before using your vehicle’s air conditioning, open the
windows to clear the vehicle
of hot air. This reduces the
time it takes for your vehicle to cool down. Then keep
your windows closed for the air conditioner to work at
its best.
You can use MAX
AIC with the temperature knob in the
blue area when it’s really hot outside and you need to
cool
the inside air quickly. MAX A/C lets in only a little
air from the outside.
If you first
use MAX A/C, you can then use A/C with
the temperature knob in the blue area, as soon as the
vehicle has cooled down,
so outside air will be going
through your vehicle.
If your vehicle has rear air conditioning, setting it on
LO
may enhance front A/C performance by allowing
trapped refrigerant in rear lines to circulate.
When the air conditioning,
DEFROST or BLEND is on,
you may notice a slight increase
or decrease in engine
speed, due to compressor operation. This
is normal
because the system
is designed to cycle the compressor
on and off to keep the desired temperature.
On cold days, use HEATER with the temperature knob
in the red area. Outside air will be brought in through
the floor outlets. The heater works best if you keep your
windows closed while using it.
If you use the optional engine coolant heater before
starting your engine, your heating system will produce
warmer air faster
to heat the passenger compartment in
cold weather. See “Engine Coolant Heater” in the Index.
Ventilation Tips
0
0
0
Keep the hood and front air inlet free of ice, snow, or
any other obstruction (such
as leaves). The heater
and defroster will work
far better, reducing the
chance of fogging
the inside of your windows.
When you
enter a vehicle in cold weather, turn the
blower fan to
HI for a few moments before driving
off. This helps clear the intake ducts of snow and
moisture, and reduces the chance
of fogging the
inside
of your windows.
Keep the air path under the front seats clear of objects.
This helps air
to circulate throughout your vehicle.
Your vehicle has air vents in
the center and on the sides
of your instrument panel.
3-6
ProCarManuals.com
Page 197 of 388
Safety Chains Driving with a Trailer
You should always attach chains between your vehicle
and your trailer. Cross the safety chains under the tongue
of the trailer
so that the tongue will not drop to the road
if it becomes separated from the hitch. Instructions
about safety chains may be provided by the hitch
manufacturer or by the trailer manufacturer. Follow the
manufacturer’s recommendation for attaching safety
chains and do not attach them to the bumper. Always
leave just enough slack
so you can turn with your rig.
And, never allow safety chains to drag
on the ground.
Trailer Brakes
If your trailer weighs more than 1,000 lbs. (450 kg)
loaded, then it needs its own brakes
-- and they must be
adequate. Be sure to read and follow the instructions for
the trailer brakes
so you’ll be able to install, adjust and
maintain them properly.
If you have a rear-most window open and you
pull
a trailer with your vehicle, carbon monoxide
(CO) could come into your vehicle. You can’t see
or smell
CO. It can cause unconsciousness or
death. (See “Engine Exhaust” in the Index.)
To
maximize your safety when towing a trailer:
0
0
0
Have your exhaust system inspected for
leaks, and make necessary repairs before
starting on your trip.
Keep the rear-most windows closed.
If exhaust does come into your vehicle
through a window in the rear or another
opening, drive
with your front, main
heating or cooling system on and with the
fan on any speed. This will bring fresh,
outside
air into your vehicle. Do not use
MAX A/C because it only recirculates the
air inside your vehicle. (See “Comfort
Controls’’ in the Index.)
4-33
ProCarManuals.com
Page 199 of 388
Making Turns
NOTICE:
Making very sharp turns while trailering could cause the trailer to come in contact with the vehicle. Your vehicle could be damaged. Avoid
making very sharp turns while trailering.
When you’re turning with a trailer, make wider turns than
normal.
Do this so your trailer won’t strike soft shoulders,
curbs, road signs, trees or other objects. Avoid jerky or
sudden maneuvers. Signal well
in advance.
Turn Signals When Towing a Trailer
When you tow a trailer, your vehicle has to have extra
wiring and a heavy-duty turn signal flasher (included in
the optional trailering package).
The arrows on your instrument panel will flash
whenever you signal
a turn or lane change. Properly
hooked up, the trailer lamps will also flash, telling other
drivers you’re about
to turn, change lanes or stop. When towing
a trailer,
the arrows on your instrument
panel
will flash for turns even if the bulbs on the trailer
are burned out. Thus, you may think drivers behind
you are seeing your signal when they are not. It’s
important to check occasionally
to be sure the trailer
bulbs are still working.
Driving On Grades
Reduce speed and shift to a lower gear before you start
down a long or steep downgrade. If you don’t shift
down, you might have
to use your brakes so much that
they would get hot and
no longer work well.
On a long uphill grade, shift down and reduce your
speed to around
45 mph (70 km/h) to reduce the
possibility of engine and transmission overheating.
When towing at high altitude on steep uphill grades,
consider the following: Engine coolant will boil at a lower
temperature than at normal altitudes. If you turn your
engine
off immediately after towing at high altitude on
steep uphill grades, your vehicle may show signs similar to
engine overheating.
To avoid this, let the engine run while
parked (preferably
on level ground) with the automatic
transmission
in PARK (P) for a few minutes before turning
the engine off. If you do get
the overheat warning, see
“Engine Overheating” in
the Index.
4-35
ProCarManuals.com
Page 203 of 388
Section 5 Problems on the Road
Here you’ll find what to do about some problems that can occur on the road.
5-2
5-2
5-3
5-8
5-1 1
Hazard Warning Flashers
Other Warning Devices
Jump Starting
Towing Your Vehicle
Engine Overheating (Gasoline Engine)
5- 14
5-2 1
5-2 1
5 -22
5-36
Cooling System (Gasoline Engines)
Engine Fan Noise
If a Tire Goes Flat
Changing a
Flat Tire
If You’re Stuck: In Sand, Mud, Ice or Snow
5-1
ProCarManuals.com
Page 213 of 388
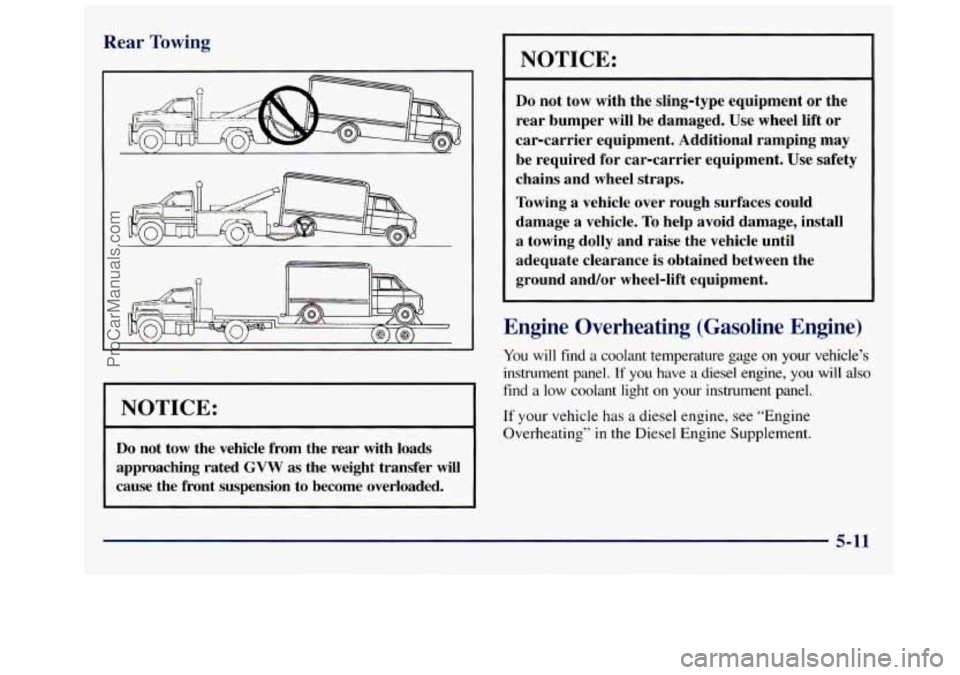
Rear Towir -
I NOTICE:
Do not tow the vehicle from the rear with loads
approaching rated
GVW as the weight transfer will
cause the front suspension to become overloaded.
NOTICE:
Do not tow with the sling-type equipment or the
rear bumper will be damaged. Use wheel lift
or
car-carrier equipment. Additional ramping may
be required for car-carrier equipment. Use safety
chains and wheel straps.
Towing a vehicle over rough surfaces could
damage a vehicle. To help avoid damage, install
a towing dolly and raise the vehicle until
adequate clearance is obtained between the
ground and/or wheel-lift equipment.
Engine Overheating (Gasoline Engine)
You will find a coolant temperature gage on your vehicle’s
instrument panel.
If you have a diesel engine, you will also
find a low coolant light on your instrument panel.
If your vehicle has a diesel engine, see “Engine
Overheating”
in the Diesel Engine Supplement.
5-11
ProCarManuals.com
Page 261 of 388

Rear Axle What to Use
When to Check and Change Lubricant
Refer to the Maintenance Schedule to determine how
often to check the lubricant and when to change it. See
“Scheduled Maintenance Services” in the Index.
How to Check Lu’_ -~I
If the level is below the
bottom of the filler plug
hole, you’ll need
to add
some lubricant. Add enough
lubricant to raise the level
to the bottom of the filler
plug hole. Refer
to the Maintenance Schedule to determine what
kind of lubricant to use. See “Recommended Fluids and
Lubricants”
in the Index.
Engine Coolant
The cooling s stem in your vehicle is filled with
DEX-COOL engine coolant. This coolant is designea
to remain
in your vehicle for 5 years or 150,000 miles
(240 000 km) whichever occurs first, if you add only
DEX-COOL6 extended life coolant.
The following explains your cooling system and how to
add coolant when it is low. If you have
a problem with
engine overheating, see “Engine Overheating” in the
Index.
A 50/50 mixture of water and DEX-COOL@
coolant will:
2
0 Give freezing protection down to -34°F (-37°C).
Give boiling protection up to 265 “F (129” C).
0 Protect against rust and corrosion.
0 Help keep the proper engine temperature.
0 Let the warning lights and gages work as
they should.
6-21
ProCarManuals.com
Page 264 of 388
Adding Coolant
If you need more coolant, add the proper DEX-COOL@
coolant mixture at the coolant recovery tank. 1
lbrning me radiator pressure cap when the
engine and radiator are hot can allow steam
and scalding liquids to blow out and burn you
badly. With the coolant recovery tank, you will
almost never have to add coolant at the radiator.
Never turn the radiator pressure cap
-- even a
little
-- when the engine and radiator are hot.
I
e I.
Add coolant mixture at the recovery tank, but be careful
not to spill it.
You can be burned if you spill coolant on hot
engine parts. Coolant contains ethylene glycol,
and
it will burn if the engine parts are hot
enough. Don’t spill coolant on
a hot engine.
Radiator Pressure Cap
The radiator pressure cap must be tightly installed with
the arrows on the cap lined up with the ovefflow tube on
the radiator filler neck.
NOTICE:
Your radiator cap is a pressure-type cap and
must be tightly installed to prevent coolant loss
and possible engine damage from overheating.
Be sure the arrows on the cap line up with the
overflow tube on the radiator filler neck.
6-24
ProCarManuals.com
Page 281 of 388
2.
3.
4.
5.
6.
7.
Press down on the blade assembly pivot locking tab.
Pull down on the blade assembly to release it from
the wiper arm hook.
Remove the insert from the blade assembly. The
insert has two notches at one end that
are locked by
bottom claws of the blade assembly. At the notched
end, pull the insert from the blade assembly.
To install the new wiper insert, slide the notched
end last, into the end with two blade claws. Slide
the insert all the way through the blade claws at the
opposite end.
Be sure that the notches are locked by the bottom
claws. Make sure that all other claws are properly
locked on both sides of the insert slot.
Put the blade assembly pivot in the wiper arm
hook. Pull up until the pivot locking tab locks in
the hook slot.
Carefully lower the wiper arm and blade assembly
into the windshield.
Tires
Your new vehicle comes with high-quality tires made by
a leading tire manufacturer.
If you ever have questions
about your
tire warranty and where to obtain service, see
your
GM Warranty booklet for details.
Poorly maintained and improperly used tires
are dangerous.
Overloading your tires can cause
overheating
as a result of too much friction.
You could have an air-out and
a serious
accident. See “Loading Your Vehicle” in
the Index.
Underinflated tires pose the same danger
as overloaded tires. The resulting accident
could cause serious injury. Check all tires
frequently to maintain the recommended
pressure. Tire pressure should be checked
when your tires are cold.
cut, punctured or broken by a sudden
impact
-- such as when you hit a pothole.
Keep tires at the recommended pressure.
Worn, old tires can cause accidents. If your
tread is badly worn, or
if your tires have
been damaged, replace them.
Overinflated tires are more likely to be
6-41
ProCarManuals.com