Page 141 of 192
If your vehicle is
equipped with the
3.8L V6 engine,check
the power steering
fluid level with the
engine at normal
operating temperature.
1. Start the engine and
let it run until it
reaches normal
operating temperature
(the engine coolant
temperature gauge
indicator will be near
the center of the
normal area between H
and C).
2. While the engine idles, turn the steering wheel
left and right several times.
3. Turn the engine off.
4. Check the fluid level on the dipstick. It should be
within the FULL HOT range. Do not add fluid if the
level is within this range.
5. If the fluid is low, add fluid in small amounts,
continuously checking the level until it reaches the
correct operating range. Be sure to put the cap back
on the reservoir.
FILL
HOT
Maintenance and care
141
Page 142 of 192

If your vehicle is
equipped with a 4.6L
V8 engine,check the
power steering fluid
level with the engine at
ambient temperature.
Allow at least one-half
hour after driving for
the power steering
fluid to cool.
1. Start the engine and
allow the engine to
idle.
2. Turn the steering
wheel left and right
several times.
3. Turn the engine off.
4. Check the fluid level in the reservoir. It should be
between the MIN and MAX lines. Do not add fluid if
the level is within this range.
5. If the fluid is low, add fluid in small amounts,
continuously checking the level until it reaches the
correct operating range. Be sure to put the cap back
on the reservoir.
TRANSMISSION FLUID
Checking automatic transmission fluid
Refer to your Scheduled Maintenance Guide for
scheduled intervals for fluid checks and changes.
Your transmission does not consume fluid. However,
the fluid level should be checked if the transmission
is not working properly, i.e., if the transmission slips
or shifts slowly or if you notice some sign of fluid
leakage.
Automatic transmission fluid expands when warmed.
To obtain an accurate fluid check, drive the vehicle
until it is at normal operating temperature
(approximately 30 km [20 miles]). If your vehicle has
MAXMIN
Maintenance and care
142
Page 143 of 192

been operated for an extended period at high
speeds, in city traffic during hot weather or pulling a
trailer, the vehicle should be turned off for about
30 minutes to allow fluid to cool before checking.
1. Drive the vehicle 30 km (20 miles) or until it
reaches normal operating temperature.
2. Park the vehicle on a level surface and engage the
parking brake.
3. With the parking brake engaged and your foot on
the brake pedal, start the engine and move the
gearshift lever through all of the gear ranges. Allow
sufficient time for each gear to engage.
4. Latch the gearshift lever in P (Park) and leave the
engine running.
5. Remove the dipstick, wiping it clean with a clean,
dry lint free rag.
6. Install the dipstick making sure it is fully seated in
the filler tube.
7. Remove the dipstick and inspect the fluid level.
The fluid should be in the designated area for
normal operating temperature (H) or ambient
temperature (C).
Low fluid level
Do not drive the
vehicle if the fluid level
is at the bottom of the
dipstick and the ambient temperature is above 10ÉC
(50ÉF).
Correct fluid level
The transmission fluid should be checked at normal
operating temperature 66ÉC-77ÉC (150ÉF-170ÉF) on
a level surface. The normal operating temperature
can be reached after approximately 30 km
(20 miles) of driving.
You can check the fluid without driving if the
ambient temperature is above 10ÉC (50ÉF). However,
if fluid is added at this time, an overfill condition
Maintenance and care
143
Page 145 of 192
An overfill condition of transmission fluid may
cause shift and/or engagement concerns and/or
possible damage.
Checking and adding manual transmission fluid
1. Clean the filler plug.
2. Remove the filler
plug and inspect the
fluid level.
3. Fluid level should be
at bottom of the
opening.
4. Add enough fluid
through the filler
opening so that the
fluid level is at the
bottom of the opening.
5. Install and tighten the fill plug securely.
Use only fluid that meets Ford specifications. Refer
to theCapacities and specificationschapter.
Maintenance and care
145
Page 146 of 192
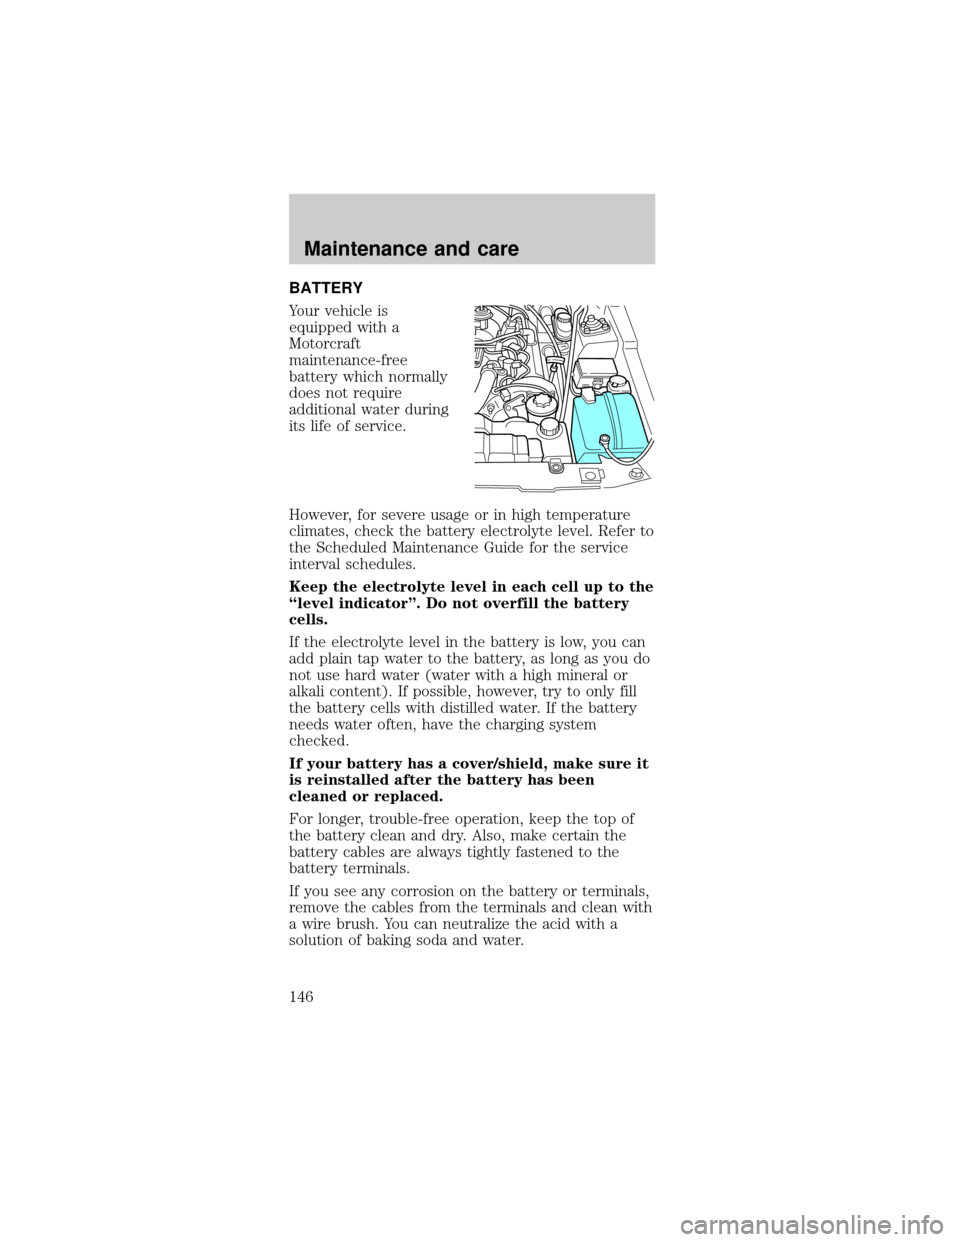
BATTERY
Your vehicle is
equipped with a
Motorcraft
maintenance-free
battery which normally
does not require
additional water during
its life of service.
However, for severe usage or in high temperature
climates, check the battery electrolyte level. Refer to
the Scheduled Maintenance Guide for the service
interval schedules.
Keep the electrolyte level in each cell up to the
ªlevel indicatorº. Do not overfill the battery
cells.
If the electrolyte level in the battery is low, you can
add plain tap water to the battery, as long as you do
not use hard water (water with a high mineral or
alkali content). If possible, however, try to only fill
the battery cells with distilled water. If the battery
needs water often, have the charging system
checked.
If your battery has a cover/shield, make sure it
is reinstalled after the battery has been
cleaned or replaced.
For longer, trouble-free operation, keep the top of
the battery clean and dry. Also, make certain the
battery cables are always tightly fastened to the
battery terminals.
If you see any corrosion on the battery or terminals,
remove the cables from the terminals and clean with
a wire brush. You can neutralize the acid with a
solution of baking soda and water.
Maintenance and care
146
Page 148 of 192

4. The relearning process will automatically
complete as you drive the vehicle.
²The vehicle may need to be driven 16 km
(10 miles) or more to relearn the idle and fuel
trim strategy.
²If you do not allow the engine to relearn its idle
trim, the idle quality of your vehicle may be
adversely affected until the idle trim is eventually
relearned.
If the battery has been disconnected or a new
battery has been installed, the clock and the preset
radio stations must be reset once the battery is
reconnected.
²Always dispose of
automotive batteries
in a responsible
manner. Follow your
local authorized
standards for
disposal. Call your
local authorized
recycling center to find out more about recycling
automotive batteries.
WINDSHIELD WIPER BLADES
Check the wiper blades at least twice a year or when
they seem less effective. Substances such as tree sap
and some hot wax treatments used by commercial
car washes reduce the effectiveness of wiper blades.
Checking the wiper blades
If the wiper blades do not wipe properly, clean both
the windshield and wiper blades using undiluted
windshield wiper solution or a mild detergent. Rinse
thoroughly with clean water. To avoid damaging the
blades, do not use fuel, kerosene, paint thinner or
other solvents.
LEAD
RETURN
RECYCLE
Maintenance and care
148
Page 151 of 192

Motor Vehicle Safety Standard No. 109. Grades B
and A represent higher levels of performance on the
laboratory test wheel than the minimum required by
law.
The temperature grade for this tire is
established for a tire that is properly inflated
and not overloaded. Excessive speed,
underinflation, or excessive loading, either
separately or in combination, can cause heat
buildup and possible tire failure.
SERVICING YOUR TIRES
Checking the tire pressure
²Use an accurate tire pressure gauge.
²Check the tire pressure when tires are cold, after
the vehicle has been parked for at least one hour
or has been driven less than 5 km (3 miles).
²Adjust tire pressure to recommended
specifications found on the tire pressure label
inside the glove compartment door.
Improperly inflated tires can affect vehicle
handling and can fail suddenly, possibly
resulting in loss of vehicle control.
Tire rotation
Because your vehicle's tires perform different jobs,
they often wear differently. To make sure your tires
wear evenly and last longer, rotate them as indicated
in the Schedule maintenance guide. If you notice
that the tires wear unevenly, have them checked.
Maintenance and care
151
Page 156 of 192

2. Carefully turn the filler cap counterclockwise 1/8
of a turn until it stops.
3. Pull to remove the cap from the fuel filler pipe.
4. To install the cap, align the tabs on the cap with
the notches on the filler pipe.
5. Turn the filler cap clockwise 1/8 of a turn until it
stops.
If the ªService Engine Soon/Check Engineº indicator
comes on and stays on when you start the engine,
the fuel filler cap may not be properly installed.
Turn off the engine, remove the fuel filler cap and
reinstall it being careful to align the cap properly.
If you must replace the fuel filler cap, replace
it with a genuine Ford or Motorcraft part. The
customer warranty may be void for any damage
to the fuel tank or fuel system if a genuine
Ford or Motorcraft fuel filler cap is not used.
The fuel system may be under pressure. If
the fuel filler cap is venting vapor or if you
hear a hissing sound, wait until it stops before
completely removing the fuel filler cap. Otherwise,
fuel may spray out and injure you or others.
If you do not use the proper fuel filler cap,
the pressure in the fuel tank can damage
the fuel system or cause it to work improperly in a
collision.
Choosing the right fuel
Use only UNLEADED FUEL. The use of leaded fuel
is prohibited by law and could damage your vehicle.
Do not use gasolines containing methanol. It can
damage critical fuel systems components.
Vehicles certified to meet California emission
standards (indicated on the underhood Vehicle
Maintenance and care
156

