Page 166 of 219

1. Before you remove the cap, turn
the engine off and let it cool.
2. When the engine is cool, wrap a
thick cloth around the cap. Slowly
turn cap counterclockwise to the
first stop.
3. Step back while the pressure
releases.
4. When you are sure that all the
pressure has been released, use
the cloth to press the cap down,
turn it counterclockwise and
remove it.
Use Ford Premium Cooling System
Fluid E2FZ-19549±AA (in Canada,
Motorcraft CXC-8±B) or an
equivalent premium engine coolant
that meets Ford specification
ESE-M97B44±A. Ford Premium
Engine Coolant is an optimized
formula that will protect all metals
and rubber elastomers used in
Ford cooling systems for four years
or 80,000 km (50,000 miles).
Do not use alcohol or methanol
antifreeze or any engine coolants
mixed with alcohol or methanol
antifreeze. Do not use
supplemental coolant additives in
your vehicle. These additives may
harm your engine cooling system.
The use of an improper coolant
may void your warranty of your
vehicle's engine cooling system.
Recycled engine coolant
Ford Motor Company recommends
that Ford and Lincoln-Mercury
dealers use recycled engine
Maintenance and care
166
Page 177 of 219

its idle conditions before your
vehicle will drive properly. To
begin this process:
1. Put the gearshift in P (Park)
(automatic transmissions) or the
neutral position (manual
transmissions), turn off all
accessories and start the vehicle.
2. Let the engine idle for at least
one minute.
3. The relearning process will
automatically complete as you
drive the vehicle.
²If you do not allow the engine to
relearn its idle, the idle quality
of your vehicle may be adversely
affected until the idle is
eventually relearned.
²If the battery has been
disconnected or a new battery
has been installed, the clock and
the preset radio stations must
be reset once the battery is
reconnected.
²Always dispose of automotive
batteries in a responsible
manner. Follow your
communities standards for
disposal. Call your local
recycling center to find out
more about recycling automotive
batteries.
WINDSHIELD WIPER BLADES
Check the wiper blades at least
twice a year or when they seem
less effective. Substances such as
tree sap and some hot wax
Maintenance and care
177
Page 178 of 219

treatments used by commercial car
washes reduce the effectiveness of
wiper blades.
Checking the wiper blades
If the wiper blades do not wipe
properly, clean both the windshield
and wiper blades using undiluted
windshield wiper solution or a mild
detergent. Rinse thoroughly with
clean water. To avoid damaging the
blades, do not use fuel, kerosene,
paint thinner or other solvents.
Changing the wiper blades
When replacing wiper blade
assemblies, always use a
Motorcraft part or equivalent. To
make replacing the wipers easy,
turn the ignition to ACC, then turn
the wipers on. When the wipers
reach the vertical position, turn
the ignition to LOCK.
To replace the wiper blades:
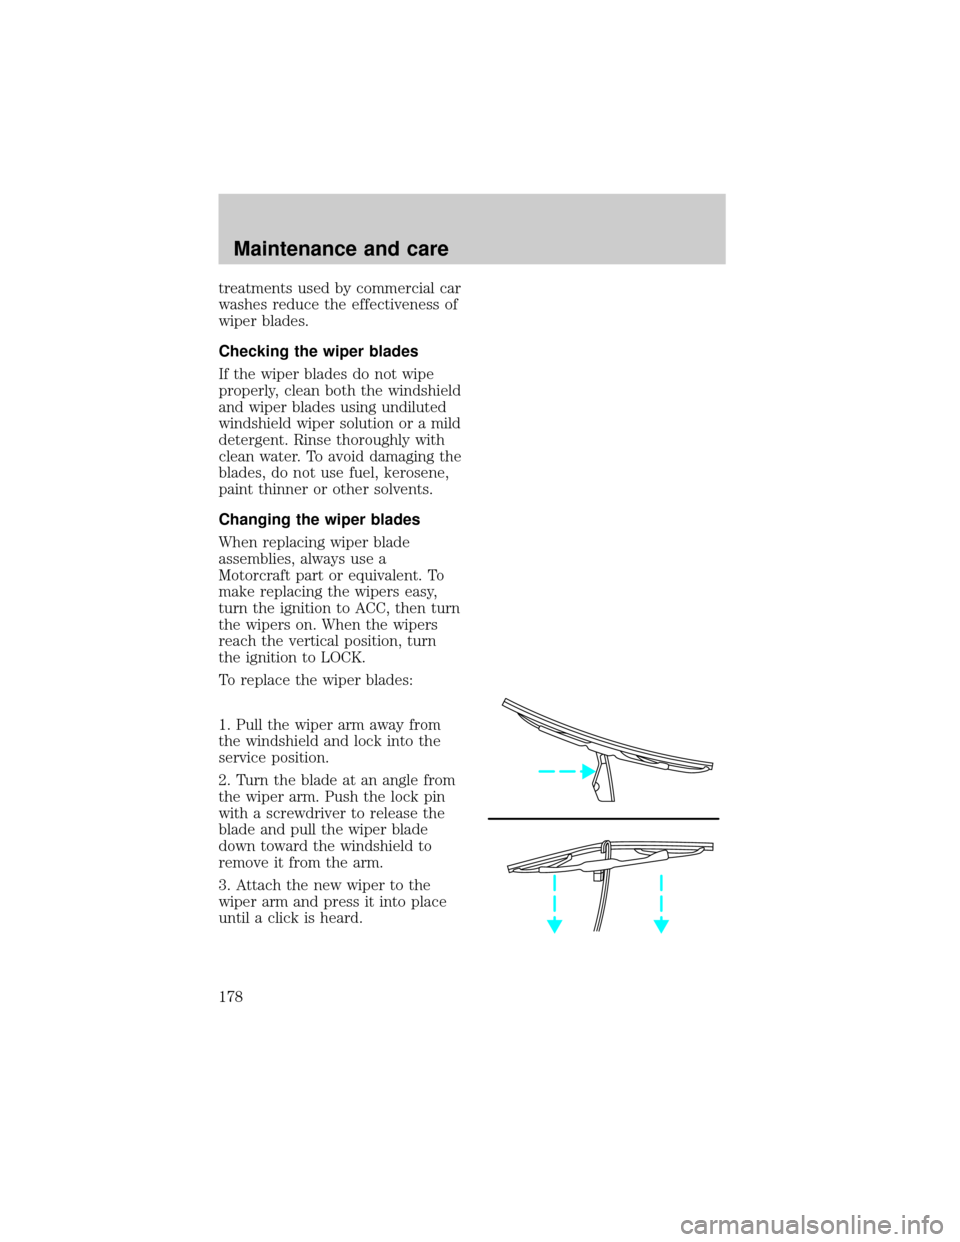
1. Pull the wiper arm away from
the windshield and lock into the
service position.
2. Turn the blade at an angle from
the wiper arm. Push the lock pin
with a screwdriver to release the
blade and pull the wiper blade
down toward the windshield to
remove it from the arm.
3. Attach the new wiper to the
wiper arm and press it into place
until a click is heard.
Maintenance and care
178
Page 193 of 219
Replacing headlamp bulbs
Handle a halogen
headlamp bulb carefully
and keep out of children's reach.
Grasp the bulb only by its plastic
base and do not touch the glass.
The oil from your hand could
cause the bulb to break the next
time the headlamps are
operated.
1. Make sure that the headlamp
control is in the OFF position.
2. Open the hood.
3. At the back of the headlamp,
pull clips rearward and up (about
ôº) to release the headlamp
assembly.
4. Slide headlamp assembly
forward and off of guide ribs to
expose the back of the bulb and
wiring connector.
5. Remove the electrical connector
from the bulb by grasping the wire
and pulling it rearward.
6. Remove bulb retainer ring by
turning it counterclockwise about
1¤4turn, then slide the ring off the
plastic base.
7. Without turning, carefully pull
bulb assembly out of headlamp
assembly.
Maintenance and care
193
Page 194 of 219
8. Insert the glass end of the new
bulb into the headlamp assembly
socket. When the grooves in the
plastic base are aligned, push the
bulb into the socket until the
plastic base contacts the rear of
the socket.
9. Slip bulb retaining ring over the
plastic base and lock the ring into
the socket by turning it clockwise
until you feel a ªstop.º
10. Push the electrical connector
into the rear of the plastic base
until it ªsnaps.º
11. Straighten alignment pins,
making them parallel with the
outer edges of the attachment
standoff.
12. Carefully insert the headlamp
assembly into the vehicle making
sure the alignment pins are
inserted into the proper holes and
into the guide ribs.
13. Hold the headlamp assembly
snugly against the vehicle and
push down on the clips to lock the
lamp into position.
Maintenance and care
194
Page 195 of 219
Replacing parking lamp/turn
signal bulbs
1. Remove screw from the top of
lamp assembly.
2. Disengage lamp assembly (it has
a snap fit).
3. Remove the electrical connector
from the bulb by grasping the wire
and pulling it rearward.
4. Remove bulb retainer ring by
turning it counterclockwise about
1/4 turn, then slide the ring off the
plastic base.
5. Without turning, carefully pull
bulb assembly out of parking lamp
assembly.
6. Insert the glass end of the new
bulb into the parking lamp
assembly socket. When the grooves
in the plastic base are aligned,
push the bulb into the socket until
the plastic base contacts the rear
of the socket.
7. Slip bulb retaining ring over the
plastic base and lock the ring into
the socket by turning it clockwise
until you feel a ªstop.º
8. Push the electrical connector
into the rear of the plastic base
until it ªsnaps.º
Maintenance and care
195
Page 197 of 219
Replacing license plate lamp
bulbs
The license plate bulbs are located
under and behind the rear bumper.
To change the license plate lamp
bulbs:
1. Reach under and behind the
rear bumper to locate the bulb
connector.
2. Twist the connector
counterclockwise
1¤4turn and
carefully pull to remove it.
3. Pull out the old bulb and press
in the replacement bulb.
4. Replace the connector by
placing it back into the assembly
and turning it
1¤4turn clockwise.
Using the right bulbs
Function Number of
bulbsTrade number
Front park/turn lamps 2 3157 NAK
Foglamps 2 9006
Headlamps 2 9007
Rear turn/sidemarker 2 3157 NAK
To replace all instrument panel
lights - see your dealer
AIMING THE HEADLAMPS
The alignment of your headlamps
should be checked by a qualified
service technician if:
Maintenance and care
197
Page 200 of 219
Cleaning the engine
Engines are more efficient when
they are clean because grease and
dirt buildup keep the engine
warmer than normal. When
washing:
²Take care when using a power
washer to clean the engine. The
high pressure fluid could
penetrate the sealed parts and
cause damage.
²Do not spray with cold water to
avoid cracking the engine block
or other engine components.
²Cover the highlighted areas to
prevent water damage when
cleaning the engine.
²Never wash or rinse the engine
while it is running; water in the
running engine may cause
internal damage.
Maintenance and care
200