Page 129 of 210

Trailer towing table (4x2 automatic transmission)
GCWR (Gross Combined Weight Rating)/Trailer weights
EngineRear
axle
ratioMaximum
GCWR-kg
(lbs.)Trailer Weight
Range-kg (lbs.)
0-MaximumMaximum
frontal area of
trailer-m
2(ft2)
2-door
4.0L
SOHC3.27 3 402 (7 500) 0-1 361 (0-3 000) 4.64 (50)
4.0L
SOHC3.55 3 856 (8 500) 0-2 041 (0-4 500) 4.64 (50)
4.0L EFI 3.73 4 082 (9 000) 0-2 313 (0-5 100) 4.64 (50)
4.0L
SOHC3.73 4 082 (9 000) 0-2 041 (0-4 500) 4.64 (50)
4-door
4.0L
SOHC3.55 4 082 (9 000) 0-2 041 (0-4 500) 4.64 (50)
4.0L EFI 3.73 4 309 (9 500) 0-2 449 (5 400) 4.64 (50)
4.0L
SOHC3.734 535 (10
000)0-2 658 (0-5 860) 4.64 (50)
4.0L
SOHC4.104 535 (10
000)0-2 630 (0-5 800) 4.64 (50)
5.0L 3.734 990 (11
000)0-3 039 (0-6 700) 4.64 (50)
Notes:For high altitude operation, reduce GCW by 2% per 300 meters
(1 000 ft) elevation. For definition of terms and instructions on
calculating your vehicle's load, refer toVehicle loadingin this chapter.
Maximum trailer weights shown. The combined weight of the
completed towing vehicle and the loaded trailer must not exceed the
GCWR.
Towing a trailer over 907 kg (2 000 lbs.) requires a weight distributing
hitch.
Driving
129
Page 130 of 210

Trailer towing table
(4x4 and AWD with automatic transmission)
GCWR (Gross Combined Weight Rating)/Trailer Weights
EngineRear
axle
ratioMaximum
GCWR-kg
(lbs.)Trailer Weight
Range-kg (lbs.)
0-MaximumMaximum
frontal area of
trailer-m
2(ft2)
2-door
4.0L
SOHC3.27 3 402 (7 500) 0-1 524 (0-3 360) 4.64 (50)
4.0L
SOHC3.55 3 856 (8 500) 0-1 978 (0-4 360) 4.64 (50)
4.0L EFI 3.73 4 082 (9 000) 0-2 214 (0-4 880) 4.64 (50)
4.0L
SOHC3.73 4 082 (9 000) 0-2 204 (0-4 860) 4.64 (50)
4.0L EFI 4.10 4 082 (9 000) 0-2 214 (4 880) 4.64 (50)
4.0L
SOHC4.10 4 082 (9 000) 0-2 204 (4 860) 4.64 (50)
4-door
4.0L
SOHC3.55 4 082 (9 000) 0-2 041 (0-4 500) 4.64 (50)
4.0L EFI 3.73 4 309 (9 500) 0-2 341 (0-5 160) 4.64 (50)
4.0L
SOHC3.734 535
(10 000)0-2 558 (0-5 640) 4.64 (50)
4.0L
SOHC4.104 535
(10 000)0-2 558 (0-5 640) 4.64 (50)
5.0L 3.734 990
(11 000)0-2 930 (6 460) 4.64 (50)
Notes:For high altitude operation, reduce GCW by 2% per 300 meters
(1 000 ft) elevation. For definition of terms and instructions on
calculating your vehicle's load, refer toVehicle loadingin this chapter.
Maximum trailer weights shown. The combined weight of the
completed towing vehicle and the loaded trailer must not exceed the
GCWR.
Towing a trailer over 907 kg (2 000 lbs.) requires a weight distributing
hitch.
Driving
130
Page 131 of 210

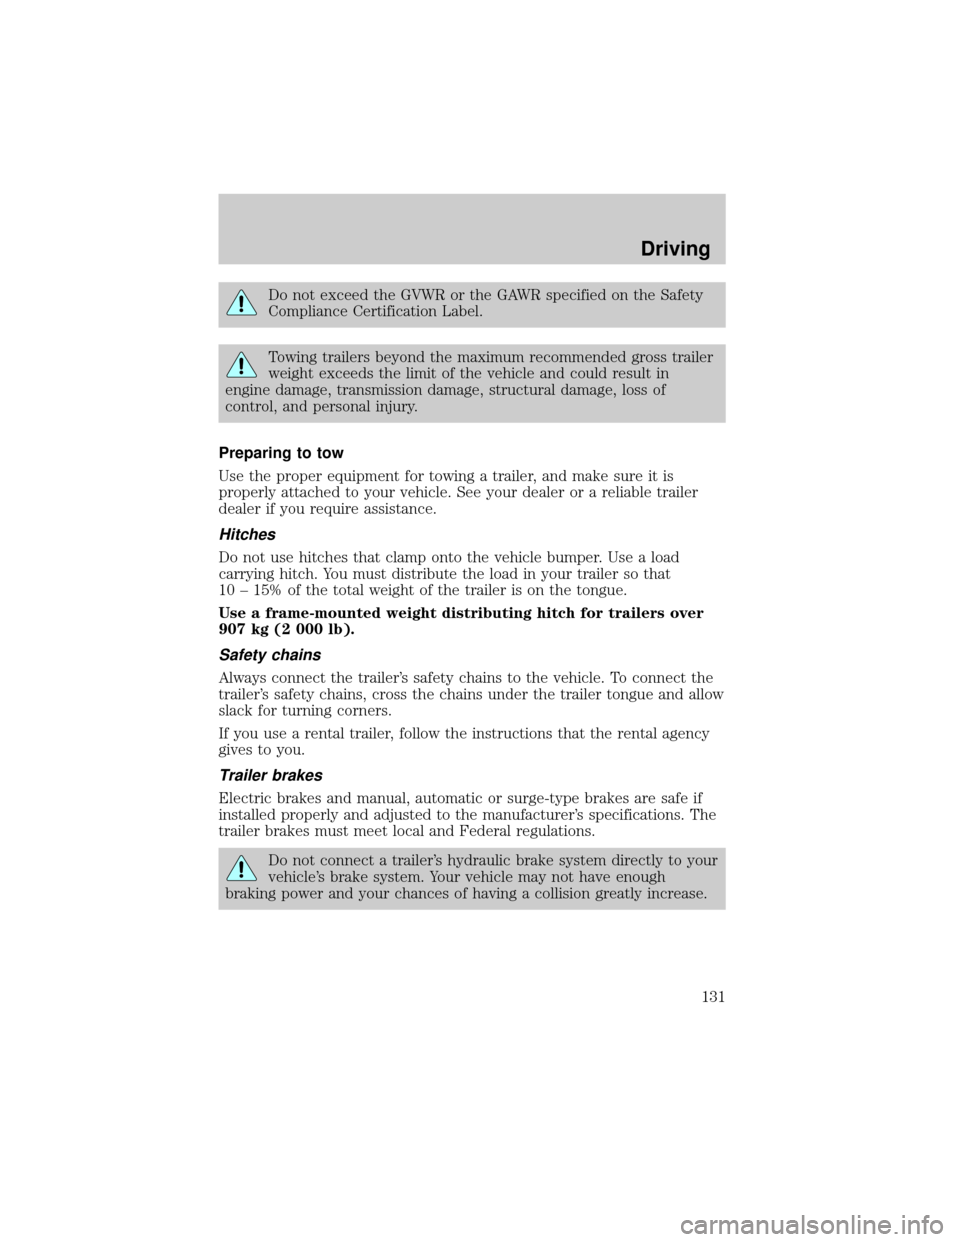
Do not exceed the GVWR or the GAWR specified on the Safety
Compliance Certification Label.
Towing trailers beyond the maximum recommended gross trailer
weight exceeds the limit of the vehicle and could result in
engine damage, transmission damage, structural damage, loss of
control, and personal injury.
Preparing to tow
Use the proper equipment for towing a trailer, and make sure it is
properly attached to your vehicle. See your dealer or a reliable trailer
dealer if you require assistance.
Hitches
Do not use hitches that clamp onto the vehicle bumper. Use a load
carrying hitch. You must distribute the load in your trailer so that
10 ± 15% of the total weight of the trailer is on the tongue.
Use a frame-mounted weight distributing hitch for trailers over
907 kg (2 000 lb).
Safety chains
Always connect the trailer's safety chains to the vehicle. To connect the
trailer's safety chains, cross the chains under the trailer tongue and allow
slack for turning corners.
If you use a rental trailer, follow the instructions that the rental agency
gives to you.
Trailer brakes
Electric brakes and manual, automatic or surge-type brakes are safe if
installed properly and adjusted to the manufacturer's specifications. The
trailer brakes must meet local and Federal regulations.
Do not connect a trailer's hydraulic brake system directly to your
vehicle's brake system. Your vehicle may not have enough
braking power and your chances of having a collision greatly increase.
Driving
131
Page 132 of 210

Trailer lamps
Trailer lamps are required on most towed vehicles. Make sure your
trailer lamps conform to local and Federal regulations. See your dealer or
trailer rental agency for proper instructions and equipment for hooking
up trailer lamps.
Never connect any trailer lighting to the vehicle's taillamp
circuits, because it may damage the electrical system resulting in
fire. Contact your local Ford dealership for assistance in proper trailer
tow wiring installation. Additional electrical equipment may be
required.
Using a step bumper
The rear bumper is equipped with an integral hitch and requires only a
ball with a 19 mm (3/4 inch) shank diameter. The bumper has a 1 590 kg
(3 500 lb.) trailer weight and 159 kg (350 lb.) tongue weight capability.
Use a frame-mounted weight distributing hitch for trailers over 1 590 kg
(3 500 lb).
Driving while you tow
Do not drive faster than 88 km/h (55 mph) when towing a trailer.
Speed control may shut off if you are towing on long, steep grades.
When towing a trailer:
²Use a lower gear when towing up or down steep hills. This will
eliminate excessive downshifting and upshifting for optimum fuel
economy and transmission cooling.
²Anticipate stops and brake gradually.
Servicing after towing
If you tow a trailer for long distances, your vehicle will require more
frequent service intervals. Refer to the Severe Duty Schedule in your
``Service Guide'' for more information.
Trailer towing tips
²Practice turning, stopping and backing up in an area before starting on
a trip to get the feel of the vehicle trailer combination. When turning,
make wider turns so the trailer wheels will clear curbs and other
obstacles.
Driving
132
Page 133 of 210

²Allow more distance for stopping with a trailer attached.
²The trailer tongue weight should be 10±15% of the loaded trailer
weight.
²After you have traveled 80 km (50 miles), thoroughly check your
hitch, electrical connections and trailer wheel lug nuts.
²When stopped in traffic for long periods of time in hot weather, place
the gearshift in P (Park) (automatic transmissions) or 1 (First)
(manual transmissions) and increase idle speed. This aids engine
cooling and air conditioner efficiency.
²Vehicles with trailers should not be parked on a grade. If you must
park on a grade, place wheel chocks under the trailer's wheels.
Launching or retrieving a boat
When backing down a ramp during boat launching or retrieval,
²Do not allow the static water level to rise above the bottom edge of
the rear bumper and
²Do not allow waves to break higher than 15 cm (six inches) above the
bottom edge of the rear bumper.
Exceeding these limits may allow water to enter critical vehicle
components, adversely affecting driveability, emissions and reliability.
If the rear axle is submerged in water, the rear axle lubricant should be
checked and changed, if necessary. The rear axle is filled with a
synthetic lubricant and does not normally require a lubricant change for
the life of the vehicle. Rear axle lubricant quantities should not need to
be checked unless a leak is suspected.
Recreational towing (all wheels on the ground)
(Neutral tow kit accessory)
On vehicles equipped with a 4.0L engine, an accessory is available that
allows you to tow your vehicle, behind another vehicle, with all the
wheels on the ground. Contact your dealer for more details. Do not tow
your vehicle with all wheels on the ground unless you install the neutral
tow kit as vehicle damage may occur.
LUGGAGE RACK
Maximum load is 45 kg (100 lbs), evenly distributed. If it is not possible
to distribute the load, position it as far rearward as possible. Adjustable
tie down loops must be used to secure the load.
Driving
133
Page 139 of 210

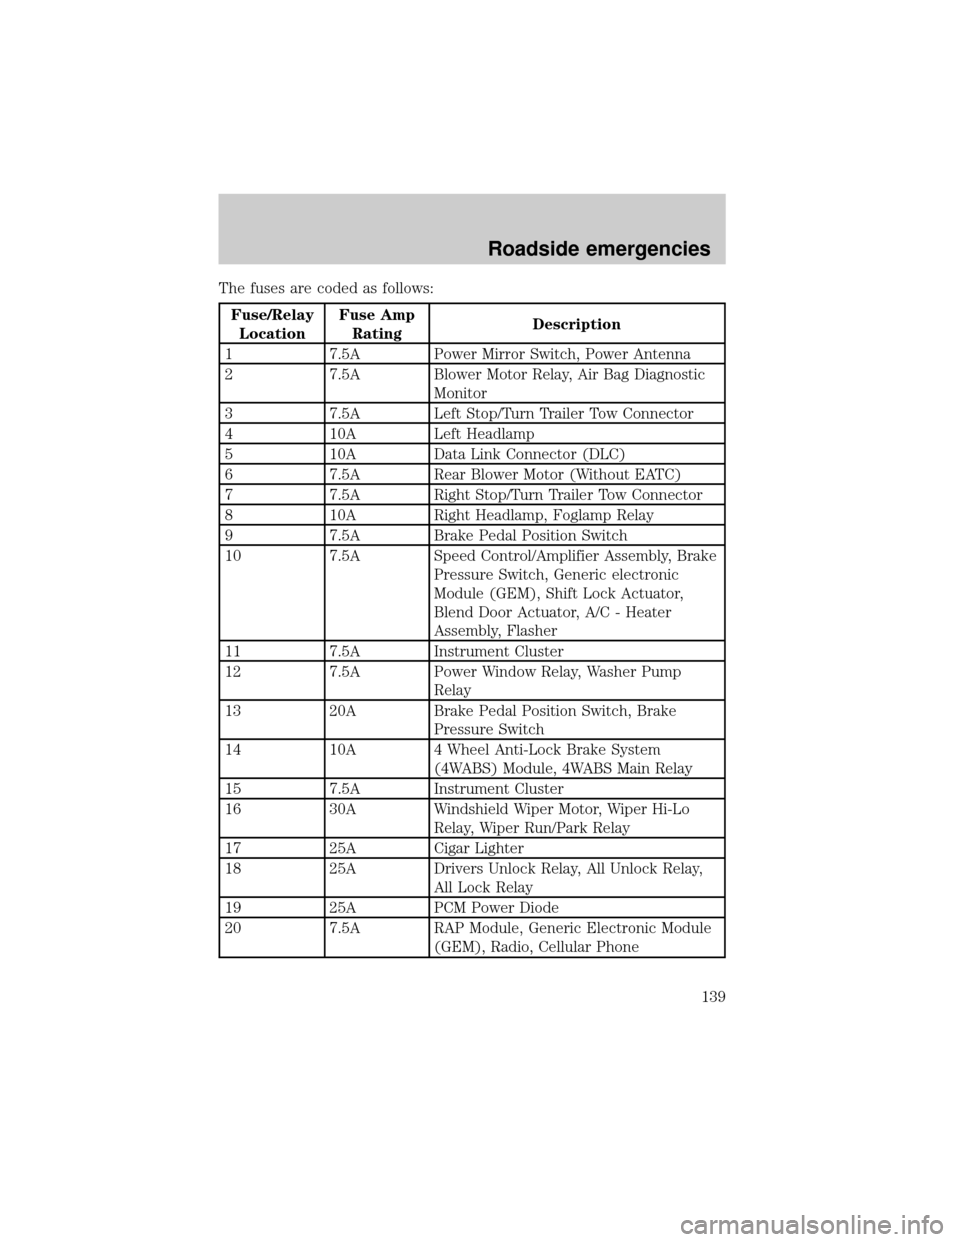
The fuses are coded as follows:
Fuse/Relay
LocationFuse Amp
RatingDescription
1 7.5A Power Mirror Switch, Power Antenna
2 7.5A Blower Motor Relay, Air Bag Diagnostic
Monitor
3 7.5A Left Stop/Turn Trailer Tow Connector
4 10A Left Headlamp
5 10A Data Link Connector (DLC)
6 7.5A Rear Blower Motor (Without EATC)
7 7.5A Right Stop/Turn Trailer Tow Connector
8 10A Right Headlamp, Foglamp Relay
9 7.5A Brake Pedal Position Switch
10 7.5A Speed Control/Amplifier Assembly, Brake
Pressure Switch, Generic electronic
Module (GEM), Shift Lock Actuator,
Blend Door Actuator, A/C - Heater
Assembly, Flasher
11 7.5A Instrument Cluster
12 7.5A Power Window Relay, Washer Pump
Relay
13 20A Brake Pedal Position Switch, Brake
Pressure Switch
14 10A 4 Wheel Anti-Lock Brake System
(4WABS) Module, 4WABS Main Relay
15 7.5A Instrument Cluster
16 30A Windshield Wiper Motor, Wiper Hi-Lo
Relay, Wiper Run/Park Relay
17 25A Cigar Lighter
18 25A Drivers Unlock Relay, All Unlock Relay,
All Lock Relay
19 25A PCM Power Diode
20 7.5A RAP Module, Generic Electronic Module
(GEM), Radio, Cellular Phone
Roadside emergencies
139
Page 140 of 210
Fuse/Relay
LocationFuse Amp
RatingDescription
21 15A Flasher (Hazard)
22 20A Auxiliary Power Socket
23 - NOT USED
24 7.5A Clutch Pedal Position (CPP) Switch,
Starter Interrupt Relay, Anti-Theft
25 7.5A Generic Electronic Module (GEM),
Instrument Cluster, Securi-Lock
26 10A Battery Saver Relay, Electronic Shift
Relay, Interior Lamp Relay, Power
Window Relay, Electronic Shift Control
Module
27 15A DRL, Backup Lamps Switch, DTR
Sensor, GEM, Electric Shift
28 7.5A Generic Electronic Module (GEM),
Radio, Memory Seat
29 25A Radio
30 15A Park Lamp/Trailer Tow Relay
31 - NOT USED
32 10A Heated Mirror
33 15A Headlamps, Daytime Running Lamps
(DRL) Module, Instrument Cluster
34 7.5A Rear Integrated Control Panel, CD
35 7.5A Rear Blower Motor (With EATC)
36 7.5A EATC Memory, CD, Rear Integrated
Control Panel, Memory Seat, Message
Center
Roadside emergencies
140
Page 144 of 210

CHANGING THE TIRES
If you get a flat tire while driving, do not apply the brake heavily.
Instead, gradually decrease your speed. Hold the steering wheel firmly
and slowly move to a safe place on the side of the road.
Spare tire information
Your vehicle is equipped with a spare tire that may be used as a spare or
a regular tire. The spare tire is not equipped with wheel trim. The wheel
trim from the original wheel/tire may be used on the spare.
If your vehicle is equipped with 4WD or AWD, a spare tire of a
different size than the road tires should not be used. Such a tire
could result in damage to driveline components and make the
vehicle difficult to control.
Location of the spare tire and tools
The spare tire and tools for your vehicle are stowed in the following
locations:
Tool Location
Spare tire Under the vehicle, just in front of the rear
bumper
Jack, lug nut wrench Left rear quarter panel behind interior trim
Jack handle Behind rear seats, under carpet
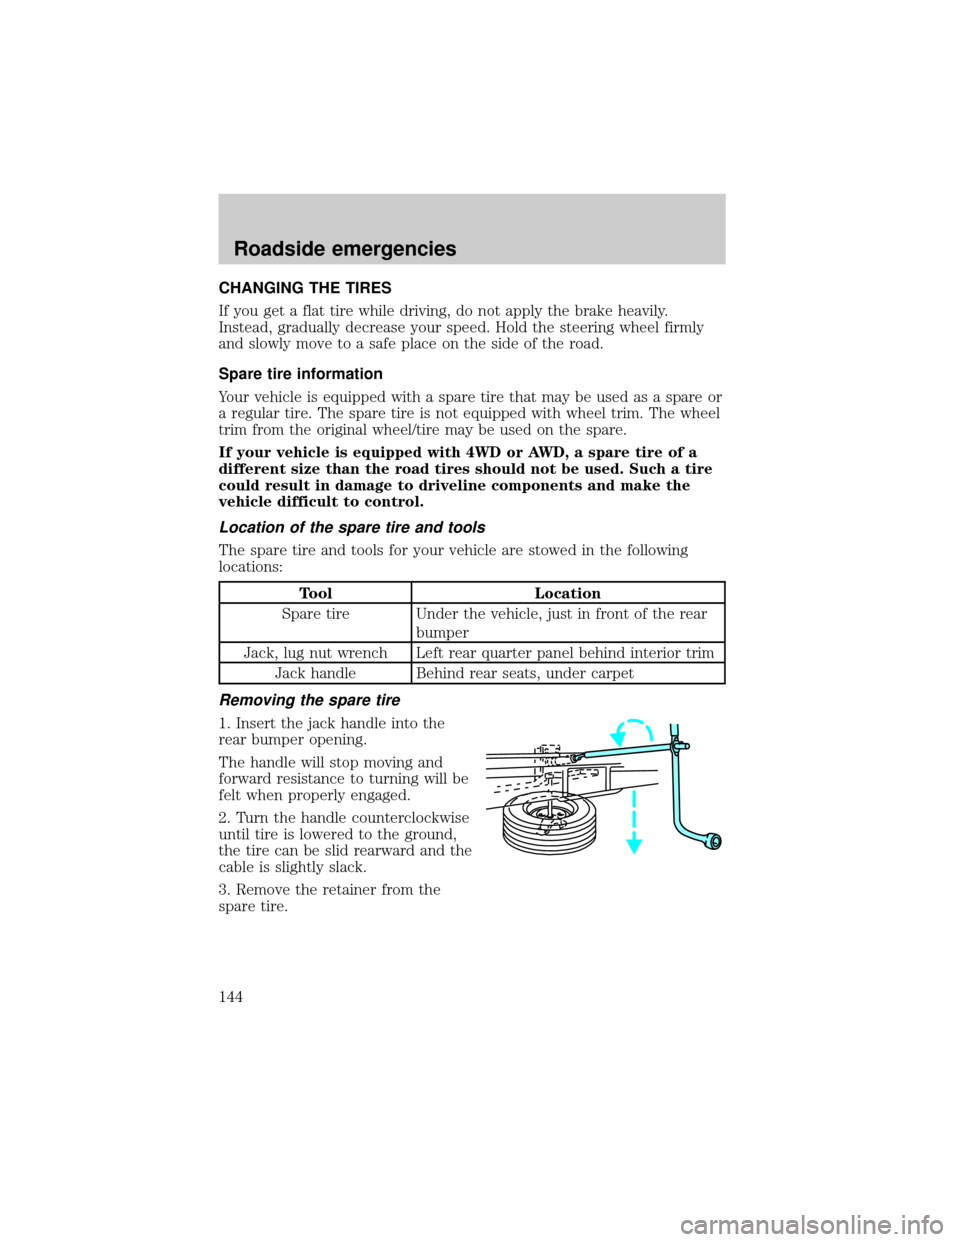
Removing the spare tire
1. Insert the jack handle into the
rear bumper opening.
The handle will stop moving and
forward resistance to turning will be
felt when properly engaged.
2. Turn the handle counterclockwise
until tire is lowered to the ground,
the tire can be slid rearward and the
cable is slightly slack.
3. Remove the retainer from the
spare tire.
Roadside emergencies
144