1998 FORD EXPLORER reset
[x] Cancel search: resetPage 20 of 210

indications, you should only perform the following procedure after you
have the oil changed.
Oil change reset
Press the OIL CHANGE RESET
control to reset the oil life feature to
100% (or your personalized oil reset
percentage). After you have the oil
changed, you must press and hold
the OIL CHANGE RESET control
for five seconds. The message
center will count down for five
seconds. After a successful reset,
the message center will display OIL
LIFE RESET TO 100%. (If you have
established a personalized oil reset
percentage, the display will show
that percentage instead of 100%.) This reset procedure should be
performed only after an oil change to ensure accurate oil life indications.
Your personalized oil reset percentage allows you to establish a smaller
oil change interval than the manufacturer's recommended interval. To
establish your personalized oil reset percentage:
1. Press and hold the OIL CHANGE RESET control and press the RESET
control while the display is still counting down the 5 seconds to reset.
The display will change to START OIL LIFE AT XXX%.
2. Press the OIL CHANGE RESET control until the displayed percentage
is the personalized oil reset percentage you desire. Your choices are
100%, 90%, 80%, 70%, 60%, 50%, 40% and 30%.
1. Press the RESET control to
complete the procedure. Pressing
any control other than RESET or
OIL CHANGE RESET will abort this
procedure and will not establish
your new personalized oil reset
percentage.
When your personalized oil reset
percentage has been established, it
will be used beginning with the
completion of your next OIL
CHANGE RESET procedure.
ENGLISH/
METRICRANGESTATUS
ECONRESETSYSTEM
CHECKOIL
CHANGE
RESET
FUEL
ENGLISH/
METRICRANGESTATUS
ECONRESETSYSTEM
CHECKOIL
CHANGE
RESET
FUEL
Instrumentation
20
Page 43 of 210

Press the control for rear washer
fluid operation.
STEERING WHEEL CONTROLS (IF EQUIPPED)
These controls allow you to operate some radio and climate control
features.
Radio control features
²Press MEM/NEXT to select a
preset station from memory.
²Press BAND/MODE to select AM,
FM1, FM2, TAPE or CD (if
equipped).
²Press VOL up or down to adjust
the volume.
Climate control features
²Press TEMP up or down to adjust temperature.
²Press FAN up or down to adjust fan speed.
PUSH
OFFR.WIPE
HI
NEXT
MODE
Controls and features
43
Page 67 of 210

Operating your perimeter alarm system (if equipped) from the
keyless entry pad
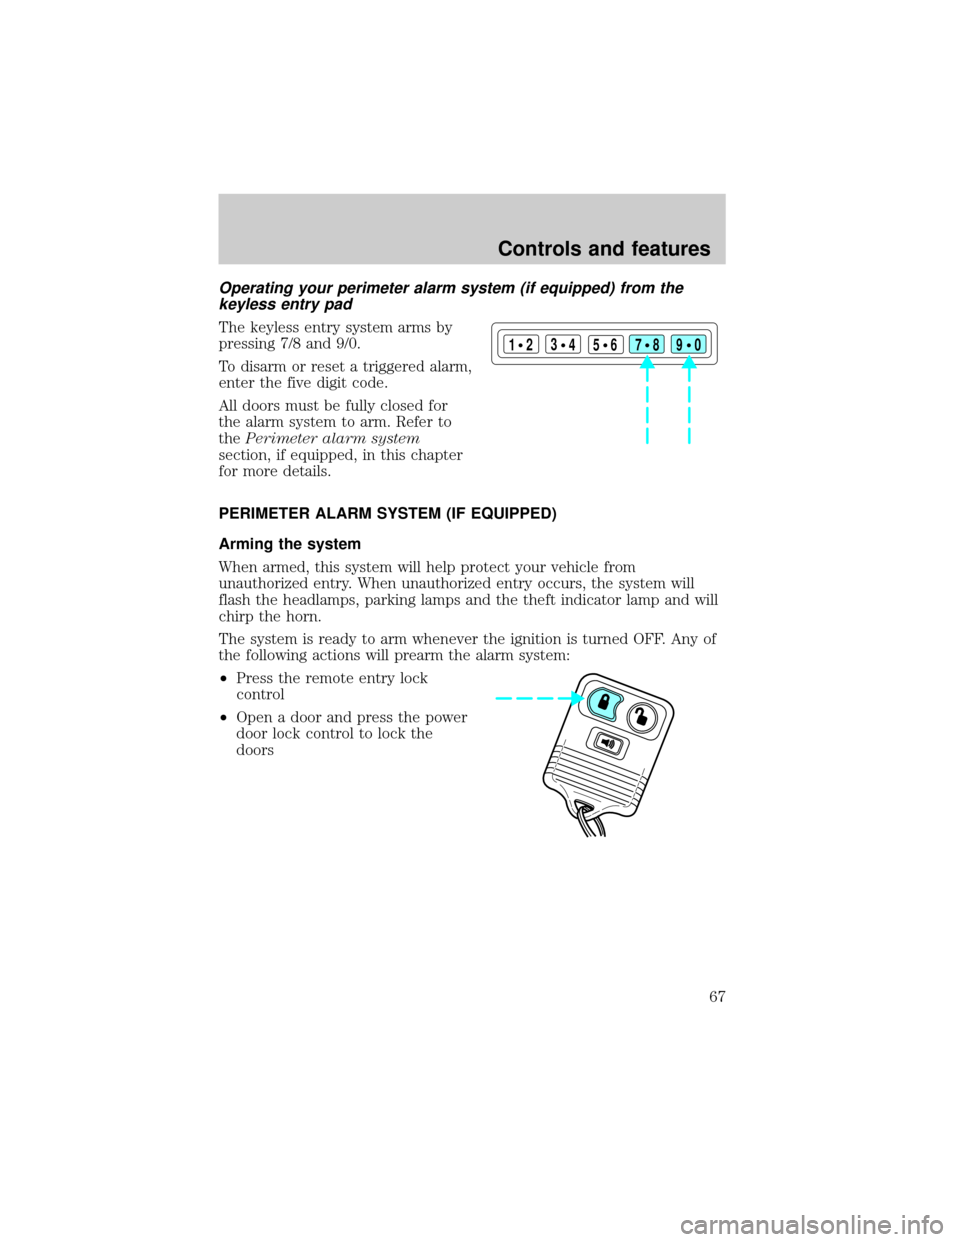
The keyless entry system arms by
pressing 7/8 and 9/0.
To disarm or reset a triggered alarm,
enter the five digit code.
All doors must be fully closed for
the alarm system to arm. Refer to
thePerimeter alarm system
section, if equipped, in this chapter
for more details.
PERIMETER ALARM SYSTEM (IF EQUIPPED)
Arming the system
When armed, this system will help protect your vehicle from
unauthorized entry. When unauthorized entry occurs, the system will
flash the headlamps, parking lamps and the theft indicator lamp and will
chirp the horn.
The system is ready to arm whenever the ignition is turned OFF. Any of
the following actions will prearm the alarm system:
²Press the remote entry lock
control
²Open a door and press the power
door lock control to lock the
doors
123
45678
90
Controls and features
67
Page 121 of 210

reduces strain on the engine and the possibility of stalling.
When descending a steep hill, avoid sudden braking. Rapid pumping of
the brake pedal will help slow the vehicle and still maintain steering
control.
When speed control is on and you are driving uphill, your vehicle speed
may drop considerably, especially if you are carrying a heavy load.
If vehicle speed drops more than 16 km/h (10 mph), the speed control
will cancel automatically. Resume speed with accelerator pedal.
If speed control cancels after climbing the hill, reset speed by pressing
and holding the SET ACCEL button (to resume speeds over 50 km/h (30
mph).
Automatic transmissions may shift frequently while driving up steep
grades. Eliminate frequent shifting by shifting out of
(Overdrive) into
D (Drive).
Driving on snow and ice
A 4WD vehicle has advantages over 2WD vehicles in snow and ice but
can skid like any other vehicle.
Avoid sudden applications of power and quick changes of direction on
snow and ice. Apply the accelerator slowly and steadily when starting
from a full stop.
When braking, apply the brakes as you normally would. In order to allow
the anti-lock brake system (ABS) to operate properly, keep steady
pressure on the brake pedal.
Allow more stopping distance and drive slower than usual. Consider
using one of the lower gears.
ALL WHEEL DRIVE (AWD) SYSTEM (IF EQUIPPED)
(5.0L ENGINES ONLY)
Your vehicle is equipped with a full-time All Wheel Drive (AWD) transfer
case. Power is supplied to all four wheels all the time with no need to
shift between two-wheel drive and four-wheel drive.
For the lubricant specification and refill capacity of the AWD transfer
case refer toCapacities and specificationschapter.
Driving
121
Page 124 of 210

If speed control cancels after climbing the hill, reset speed by pressing
and holding the SET ACCEL button (to resume speeds over 50 km/h (30
mph).
Automatic transmissions may shift frequently while driving up steep
grades. Eliminate frequent shifting by shifting out of
(Overdrive) into
D (Drive).
Driving on snow and ice
An AWD vehicle has advantages over 2WD vehicles in snow and ice but
can skid like any other vehicle.
Avoid sudden applications of power and quick changes of direction on
snow and ice. Apply the accelerator slowly and steadily when starting
from a full stop.
When braking, apply the brakes as you normally would. In order to allow
the anti-lock brake system (ABS) to operate properly, keep steady
pressure on the brake pedal.
Allow more stopping distance and drive slower than usual. Consider
using one of the lower gears.
TRACTION-LOK AXLE (IF EQUIPPED)
This axle provides added traction on slippery surfaces, particularly when
one wheel is on a poor traction surface. Under normal conditions, the
Traction-Lok axle functions like a standard rear axle.
Extended use of other than the manufacturer's specified size tires on a
Traction-Lok rear axle could result in a permanent reduction in
effectiveness. This loss of effectiveness does not affect normal driving
and should not be noticeable to the driver.
To avoid injury, never run the engine with one wheel off the
ground, such as when changing a tire.
VEHICLE LOADING
Before loading a vehicle, familiarize yourself with the following terms:
²Base Curb Weight: Weight of the vehicle including any standard
equipment, fluids, lubricants, etc. It does not include passengers or
aftermarket equipment.
Driving
124
Page 135 of 210

HAZARD LIGHTS CONTROL
Use only in an emergency to warn traffic of vehicle breakdown,
approaching danger, etc. The hazard flashers can be operated when the
ignition is off.
²The hazard lights control is
located on top of the steering
column.
²Depress hazard lights control to
activate all hazard flashers
simultaneously.
²Depress control again to turn the
flashers off.
FUEL PUMP SHUT-OFF SWITCH
If the engine cranks but does not start after a collision, the fuel pump
shut-off switch may have been activated. The ``Fuel Reset'' indicator light
will illuminate in the instrument cluster. The shut-off switch is a device
intended to stop the electric fuel pump when your vehicle has been
involved in a substantial jolt.
1. Turn the ignition switch to the OFF position.
2. Check the fuel system for leaks.
3. If no fuel leak is apparent, reset the fuel pump shut-off switch by
pushing in the button on the switch.
4. Turn the ignition switch to the ON position. Pause for a few seconds
and return the key to the OFF position.
5. Make a further check for leaks in the fuel system.
Roadside emergencies
135
Page 176 of 210

relearn its idle conditions before your vehicle will drive properly. To
begin this process:
1. Put the gearshift in P (Park) (automatic transmissions) or the neutral
position (manual transmissions), turn off all accessories and start the
vehicle.
2. Let the engine idle for at least one minute.
3. The relearning process will automatically complete as you drive the
vehicle.
²If you do not allow the engine to relearn its idle, the idle quality of
your vehicle may be adversely affected until the idle is eventually
relearned.
²If the battery has been disconnected or a new battery has been
installed, the clock and the preset radio stations must be reset once
the battery is reconnected.
²Always dispose of automotive
batteries in a responsible manner.
Follow your community's
standards for disposal. Call your
local recycling center to find out
more about recycling automotive
batteries.
WINDSHIELD WIPER BLADES
Check the wiper blades at least twice a year or when they seem less
effective. Substances such as tree sap and some hot wax treatments used
by commercial car washes reduce the effectiveness of wiper blades.
Checking the wiper blades
If the wiper blades do not wipe properly, clean both the windshield and
wiper blades using undiluted windshield wiper solution or a mild
detergent. Rinse thoroughly with clean water. To avoid damaging the
blades, do not use fuel, kerosene, paint thinner or other solvents.
Changing the wiper blades
When replacing wiper blade assemblies, always use a Motorcraft part or
equivalent. To make replacing the wipers easy, turn the ignition to ACC,
then turn the wipers on. When the wipers reach the vertical position,
turn the ignition to LOCK.
Maintenance and care
176
Page 186 of 210

the Vehicle Emission Control Information Decal located on or near the
engine. This decal identifies engine displacement and gives some tune up
specifications.
Please consult your ``Warranty Guide'' for complete emission warranty
information.
Readiness for inspection/maintenance (I/M) testing
In some localities, it may be a legal requirement to pass an I/M test of
the on-board diagnostic (OBD-II) system. If your ``check engine/service
engine soon'' light is on, reference the applicable light description in the
Warning Lights and Chimessection of your owners guide. Your vehicle
may not pass the I/M test with the ``check engine/service engine soon''
light on.
If the vehicle's powertrain system or its battery has just been serviced,
the OBD-II system is reset to a ``not ready for I/M test'' condition. To
ready the OBD-II system for I/M testing, a minimum of 30 minutes of city
and highway driving is necessary as described below:
²First, at least 10 minutes of driving on an expressway or highway.
²Next, at least 20 minutes driving in stop and go, city type traffic with
at least four idle periods.
Allow the vehicle to sit for at least eight hours without starting the
engine. Then, start the engine and complete the above driving cycle. The
engine must warm up to its normal operating temperature. Once started,
do not turn off the engine until the above driving cycle is complete.
EXTERIOR BULBS
Replacing exterior bulbs
Check the operation of the following lamps frequently:
²headlamps
²foglamps
²high-mount brakelamp
²brakelamps
²turn signals
²license plate lamp
²tail lamps
Maintenance and care
186