1998 DODGE RAM 1500 rear brake shoes
[x] Cancel search: rear brake shoesPage 68 of 2627

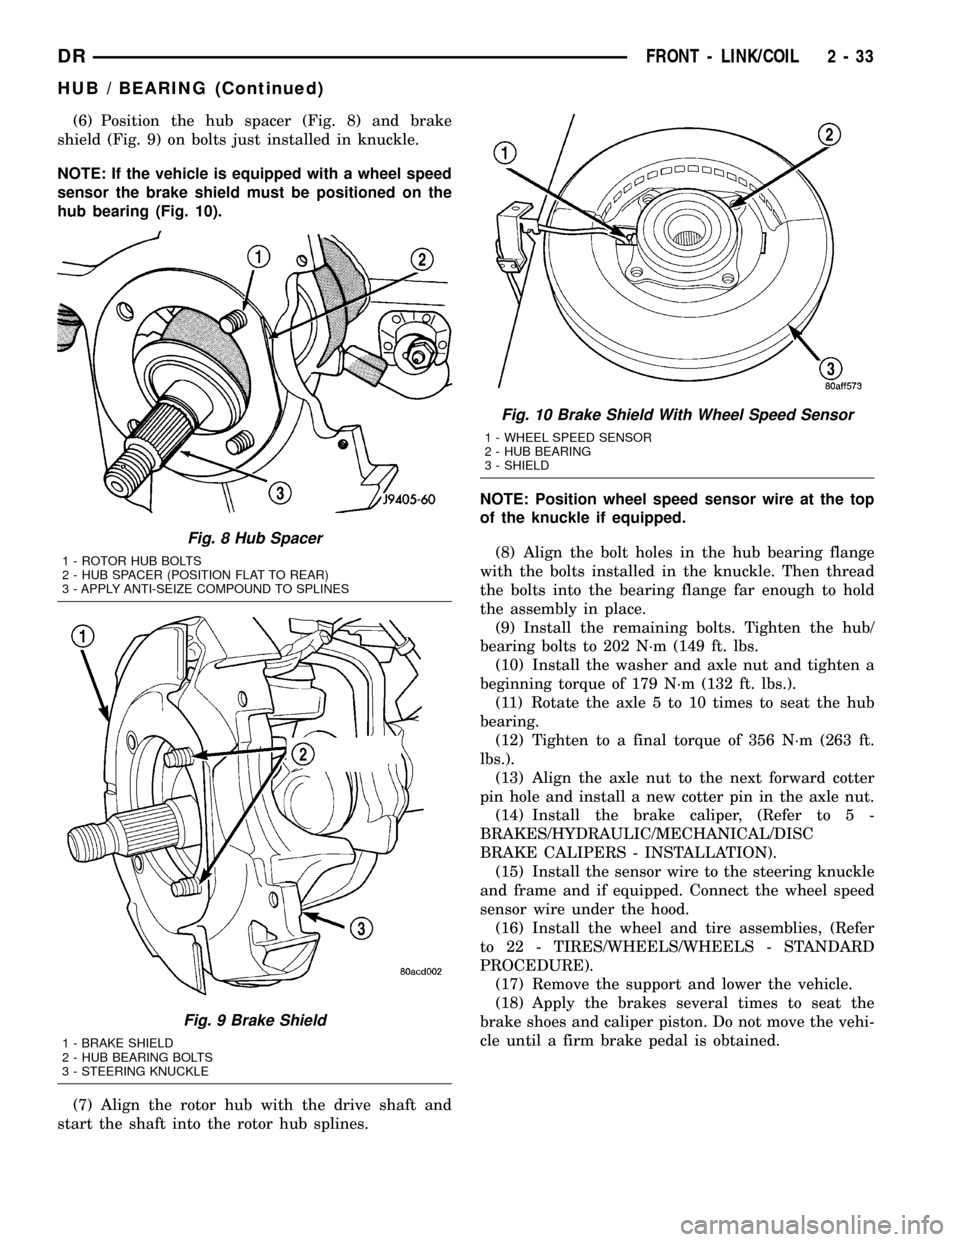
(6) Position the hub spacer (Fig. 8) and brake
shield (Fig. 9) on bolts just installed in knuckle.
NOTE: If the vehicle is equipped with a wheel speed
sensor the brake shield must be positioned on the
hub bearing (Fig. 10).
(7) Align the rotor hub with the drive shaft and
start the shaft into the rotor hub splines.NOTE: Position wheel speed sensor wire at the top
of the knuckle if equipped.
(8) Align the bolt holes in the hub bearing flange
with the bolts installed in the knuckle. Then thread
the bolts into the bearing flange far enough to hold
the assembly in place.
(9) Install the remaining bolts. Tighten the hub/
bearing bolts to 202 N´m (149 ft. lbs.
(10) Install the washer and axle nut and tighten a
beginning torque of 179 N´m (132 ft. lbs.).
(11) Rotate the axle 5 to 10 times to seat the hub
bearing.
(12) Tighten to a final torque of 356 N´m (263 ft.
lbs.).
(13) Align the axle nut to the next forward cotter
pin hole and install a new cotter pin in the axle nut.
(14) Install the brake caliper, (Refer to 5 -
BRAKES/HYDRAULIC/MECHANICAL/DISC
BRAKE CALIPERS - INSTALLATION).
(15) Install the sensor wire to the steering knuckle
and frame and if equipped. Connect the wheel speed
sensor wire under the hood.
(16) Install the wheel and tire assemblies, (Refer
to 22 - TIRES/WHEELS/WHEELS - STANDARD
PROCEDURE).
(17) Remove the support and lower the vehicle.
(18) Apply the brakes several times to seat the
brake shoes and caliper piston. Do not move the vehi-
cle until a firm brake pedal is obtained.
Fig. 8 Hub Spacer
1 - ROTOR HUB BOLTS
2 - HUB SPACER (POSITION FLAT TO REAR)
3 - APPLY ANTI-SEIZE COMPOUND TO SPLINES
Fig. 9 Brake Shield
1 - BRAKE SHIELD
2 - HUB BEARING BOLTS
3 - STEERING KNUCKLE
Fig. 10 Brake Shield With Wheel Speed Sensor
1 - WHEEL SPEED SENSOR
2 - HUB BEARING
3 - SHIELD
DRFRONT - LINK/COIL 2 - 33
HUB / BEARING (Continued)
Page 212 of 2627

DIFFERENTIAL TRAC-RITE
DESCRIPTION
The Trac-RiteŸ differential is a helical gear differ-
ential. The differential has two side gears, six pinion
gears and six pinion brake shoes.
NOTE: The differential is seviced as an assembly
only if damaged, but can be disassembled for
cleaning. The assembly should be cleaned every
time a bearing is changed due to damage.
OPERATION
When one wheel begins to spin the pinion gears on
that side are forced toward the pinion brake shoes.
The pinion brake shoes then cause frictional drag on
the opposite pinion gears and the side gear. These
friction forces transfer the power to the opposite
wheel. Once the frictional forces are overcome, differ-
entiation will occur. The torque will be continually
biased by the frictional forces to the high traction
wheel.
DISASSEMBLY
(1) Remove differential ring gear bolts.
(2) Remove differential case cover locating screws
(Fig. 38).
(3) Remove differential case cover.(4) Remove side gear and thrust washer (Fig. 39).
NOTE: Mark all component locations.
(5) Remove three pinion brake shoes (Fig. 40).
Fig. 38 LOCATION SCREWS
1 - DIFFERENTIAL COVER
2 - LOCATION SCREWS
Fig. 39 SIDE GEAR AND THRUST WASHER
1 - SIDE GEAR
2 - THRUST WASHER
Fig. 40 PINION BRAKE SHOES
1 - BRAKE SHOES
2 - PINION GEARS
DRREAR AXLE - 10 1/2 AA 3 - 131
Page 213 of 2627

(6) Remove six pinion gears (Fig. 41).
(7) Remove remaining side gear thrust washer and
spacer.
(8) Remove remaining three pinion brake shoes.
CLEANING
Clean the differential case and gears with light oil
or a lint free cloth.
NOTE: Never use water, steam, kerosene or gaso-
line for cleaning.
INSPECTION
NOTE: Minor corrosion, nicks or scratches can be
smoothed with 400 grit emery cloth and polished
out with crocus cloth.
(1) Inspect pinion gears teeth for chips and cracks
(Fig. 42).
(2) Inspect pinion gears shafts and brake shoes for
scratches, flat-spots or worn (Fig. 42).(3) Inspect side gears teeth for chips and cracks
(Fig. 43).
(4) Inspect pinion and side gear bores for scratches
(Fig. 44).
NOTE: If any damage is found the differential must
be replaced as an assembly. Individual components
can not be replaced separately.
Fig. 41 PINION GEARS
1 - PINION GEARS
2 - SIDE GEAR
Fig. 42 PINION GEAR AND BRAKE SHOE
1 - BRAKE SHOES
2 - PINION GEAR
3 - PINION SHAFT
Fig. 43 SIDE GEARS
1 - THRUST WASHERS
2 - SPACER
3 - SIDE GEARS
3 - 132 REAR AXLE - 10 1/2 AADR
DIFFERENTIAL TRAC-RITE (Continued)
Page 214 of 2627

ASSEMBLY
NOTE: Install all component in their original loca-
tions.
(1) Lubricate all gears and differential bores with
differential lubricant.
(2) Install one set of pinion brake shoes into the
case bores.
NOTE: Brake shoes can be installed upside down,
but if install wrong pinion gear will not fit.
(3) Install side gear thrust washer, side gear and
spacer (Fig. 45).
(4) Install one set of pinion gears into the bores
next to the brake shoes, with the pinion shaft facing
up.
(5) Install other side gear and thrust washer.
(6) Install other set of pinion gears into the brake
shoes in the case.
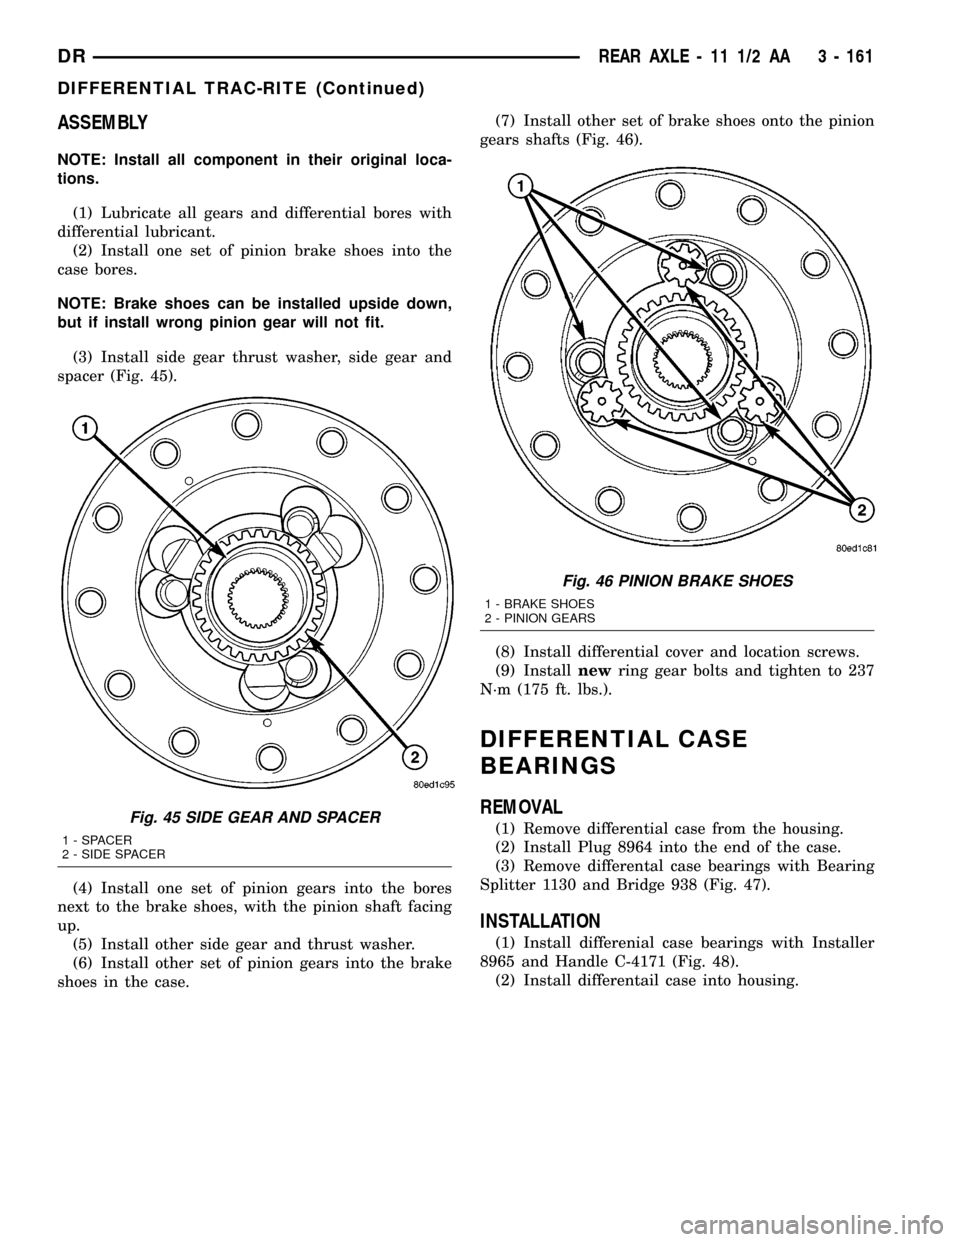
(7) Install other set of brake shoes onto the pinion
gears shafts (Fig. 46).
(8) Install differential cover and location screws.
(9) Installnewring gear bolts and tighten to 237
N´m (175 ft. lbs.).
Fig. 44 PINION/SIDE GEAR BORE
1 - PINION BORES
2 - SIDE GEAR BORE
Fig. 45 SIDE GEAR AND SPACER
1 - SPACER
2 - SIDE SPACER
Fig. 46 PINION BRAKE SHOES
1 - BRAKE SHOES
2 - PINION GEARS
DRREAR AXLE - 10 1/2 AA 3 - 133
DIFFERENTIAL TRAC-RITE (Continued)
Page 239 of 2627

(5) Slide differential case toward the pinion gear
until the gears make contact/zero backlash. If zero
backlash cannot be obtained, turn the pinion side
adjuster until zero backlash is obtained.
(6) Holding the differential case toward the pinion
gear, turn bearing adjusters with Spanner Wrench
8883 until they make contact with the differential
bearings/cups.
(7) Back off the ring gear side adjuster 4 holes, to
obtain initial ring gear backlash.
(8) Install ring gear side adjuster lock and bolt. Do
not tighten adjuster lock bolt at this time.
(9) Tighten pinion gear side adjuster firmly
against the differential case bearing cup.
(10) Rotate the pinion several times to seat the dif-
ferential bearings.
(11) Loosen pinion gear side adjuster until it is no
longer in contact with the bearing cup.
(12) Tighten pinion gear side adjuster until it just
makes contact with the bearing cup.
(13) Tighten pinion gear side adjuster an addi-
tional:
²New Bearings6 Adjuster Holes
²Original Bearings4 Adjuster Holes
(14) Install pinion gear side adjuster lock and bolt.
Do not tighten adjuster lock bolt at this time.
(15) Tighten bearing cap bolts to 281 N´m (207 ft.
lbs.).
(16) Tighten adjuster lock bolts to 25 N´m (18 ft.
lbs.) (Fig. 37).
(17) Measure ring gear backlash and check gear
tooth contact pattern. Refer to Adjustments for pro-
cedure.
(18) Install axle shaft gasket and install axle
shafts.
(19) Install differential housing gasket and cover.
Tighten cover bolts to 40 N´m (30 ft. lbs.).
(20) Fill axle with lubricant, refer to Lubrication &
Maintenance for capacity and lubricant type.
(21) Install fill plug and tighten to 32 N´m (24 ft.
lbs.).
DIFFERENTIAL TRAC-RITE
DESCRIPTION
The Trac-RiteŸ differential is a helical gear differ-
ential. The differential has two side gears, six pinion
gears and six pinion brake shoes.
NOTE: The differential is seviced as an assembly
only if damaged, but can be disassembled for
cleaning. The assembly should be cleaned every
time a bearing is changed due to damage.
OPERATION
When one wheel begins to spin the pinion gears on
that side are forced toward the pinion brake shoes.
The pinion brake shoes then cause frictional drag on
the opposite pinion gears and the side gear. These
friction forces transfer the power to the opposite
wheel. Once the frictional forces are overcome, differ-
entiation will occur. The torque will be continually
biased by the frictional forces to the high traction
wheel.
DISASSEMBLY
(1) Remove differential ring gear bolts.
(2) Remove differential case cover locating screws
(Fig. 38).
(3) Remove differential case cover.
(4) Remove side gear and thrust washer (Fig. 39).
NOTE: Mark all component locations.
Fig. 37 ADJUSTER LOCK BOLT
1 - DIFFERENTIAL CASE
2 - ADJUSTER LOCK
3 - ADJUSTER LOCK BOLT
4 - BEARING CAP BOLT
3 - 158 REAR AXLE - 11 1/2 AADR
DIFFERENTIAL (Continued)
Page 240 of 2627

(5) Remove three pinion brake shoes (Fig. 40).
(6) Remove six pinion gears (Fig. 41).(7) Remove remaining side gear thrust washer and
spacer.
(8) Remove remaining three pinion brake shoes.
Fig. 38 LOCATION SCREWS
1 - DIFFERENTIAL COVER
2 - LOCATION SCREWS
Fig. 39 SIDE GEAR AND THRUST WASHER
1 - SIDE GEAR
2 - THRUST WASHER
Fig. 40 PINION BRAKE SHOES
1 - BRAKE SHOES
2 - PINION GEARS
Fig. 41 PINION GEARS
1 - PINION GEARS
2 - SIDE GEAR
DRREAR AXLE - 11 1/2 AA 3 - 159
DIFFERENTIAL TRAC-RITE (Continued)
Page 241 of 2627

CLEANING
Clean the differential case and gears with light oil
or a lint free cloth.
NOTE: Never use water, steam, kerosene or gaso-
line for cleaning.
INSPECTION
NOTE: Minor corrosion, nicks or scratches can be
smoothed with 400 grit emery cloth and polished
out with crocus cloth.
(1) Inspect pinion gears teeth for chips and cracks
(Fig. 42).
(2) Inspect pinion gears shafts and brake shoes for
scratches, flat-spots or worn (Fig. 42).
(3) Inspect side gears teeth for chips and cracks
(Fig. 43).
(4) Inspect pinion and side gear bores for scratches
(Fig. 44).
NOTE: If any damage is found the differential must
be replaced as an assembly. Individual components
can not be replaced separately.
Fig. 42 PINION GEAR AND BRAKE SHOE
1 - BRAKE SHOES
2 - PINION GEAR
3 - PINION SHAFT
Fig. 43 SIDE GEARS
1 - THRUST WASHERS
2 - SPACER
3 - SIDE GEARS
Fig. 44 PINION/SIDE GEAR BORE
1 - PINION BORES
2 - SIDE GEAR BORE
3 - 160 REAR AXLE - 11 1/2 AADR
DIFFERENTIAL TRAC-RITE (Continued)
Page 242 of 2627

ASSEMBLY
NOTE: Install all component in their original loca-
tions.
(1) Lubricate all gears and differential bores with
differential lubricant.
(2) Install one set of pinion brake shoes into the
case bores.
NOTE: Brake shoes can be installed upside down,
but if install wrong pinion gear will not fit.
(3) Install side gear thrust washer, side gear and
spacer (Fig. 45).
(4) Install one set of pinion gears into the bores
next to the brake shoes, with the pinion shaft facing
up.
(5) Install other side gear and thrust washer.
(6) Install other set of pinion gears into the brake
shoes in the case.(7) Install other set of brake shoes onto the pinion
gears shafts (Fig. 46).
(8) Install differential cover and location screws.
(9) Installnewring gear bolts and tighten to 237
N´m (175 ft. lbs.).
DIFFERENTIAL CASE
BEARINGS
REMOVAL
(1) Remove differential case from the housing.
(2) Install Plug 8964 into the end of the case.
(3) Remove differental case bearings with Bearing
Splitter 1130 and Bridge 938 (Fig. 47).
INSTALLATION
(1) Install differenial case bearings with Installer
8965 and Handle C-4171 (Fig. 48).
(2) Install differentail case into housing.
Fig. 45 SIDE GEAR AND SPACER
1 - SPACER
2 - SIDE SPACER
Fig. 46 PINION BRAKE SHOES
1 - BRAKE SHOES
2 - PINION GEARS
DRREAR AXLE - 11 1/2 AA 3 - 161
DIFFERENTIAL TRAC-RITE (Continued)