Page 1891 of 2627
HYDRAULIC FLOW DURING FULL THROTTLE 3-2 DOWNSHIFT (PASSING GEAR)
21 - 188 AUTOMATIC TRANSMISSION - 48REDR
AUTOMATIC TRANSMISSION - 48RE (Continued)
Page 1892 of 2627

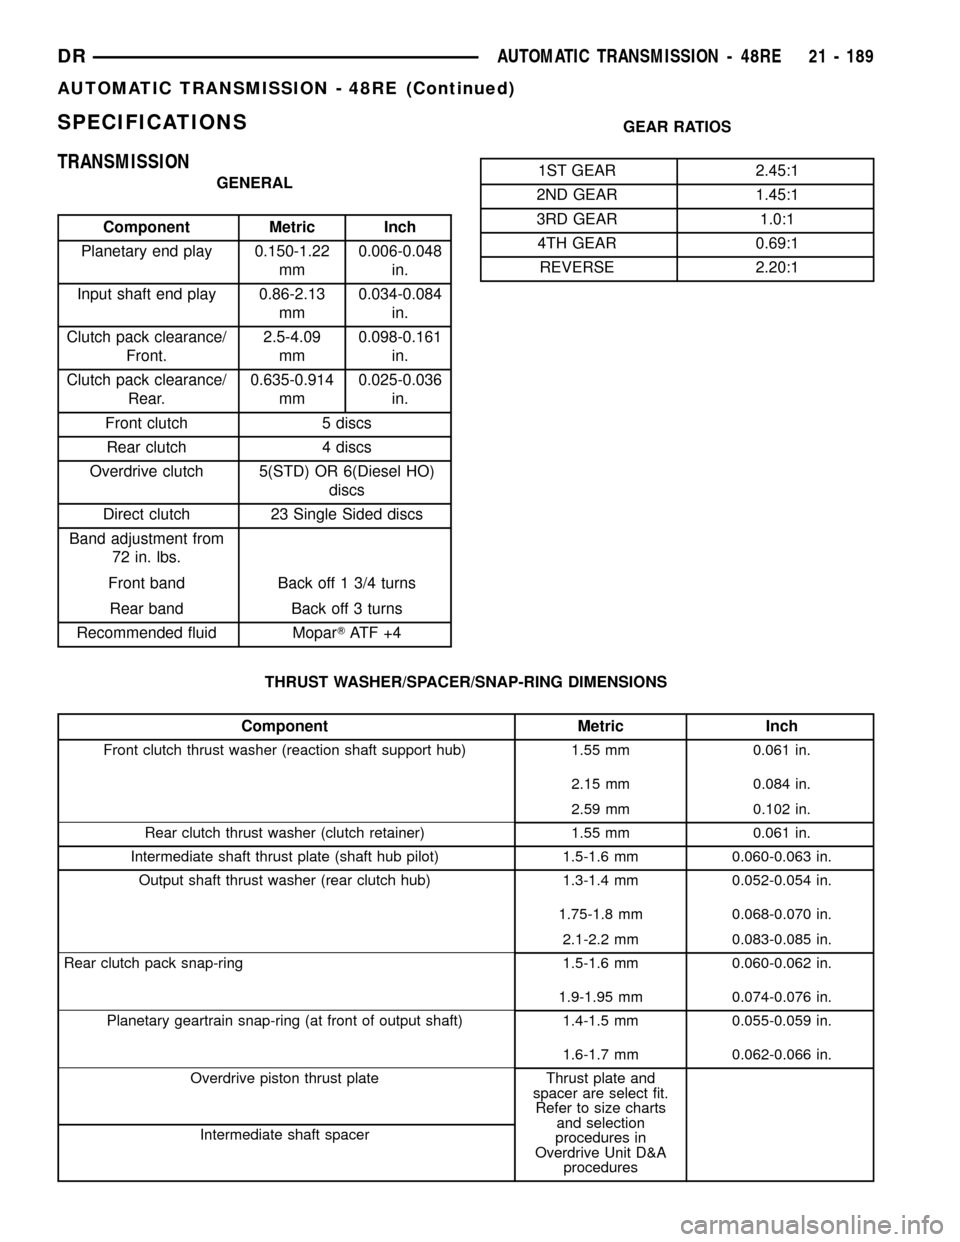
SPECIFICATIONS
TRANSMISSION
GENERAL
Component Metric Inch
Planetary end play 0.150-1.22
mm0.006-0.048
in.
Input shaft end play 0.86-2.13
mm0.034-0.084
in.
Clutch pack clearance/
Front.2.5-4.09
mm0.098-0.161
in.
Clutch pack clearance/
Rear.0.635-0.914
mm0.025-0.036
in.
Front clutch 5 discs
Rear clutch 4 discs
Overdrive clutch 5(STD) OR 6(Diesel HO)
discs
Direct clutch 23 Single Sided discs
Band adjustment from
72 in. lbs.
Front band Back off 1 3/4 turns
Rear band Back off 3 turns
Recommended fluid MoparTAT F + 4GEAR RATIOS
1ST GEAR 2.45:1
2ND GEAR 1.45:1
3RD GEAR 1.0:1
4TH GEAR 0.69:1
REVERSE 2.20:1
THRUST WASHER/SPACER/SNAP-RING DIMENSIONS
Component Metric Inch
Front clutch thrust washer (reaction shaft support hub) 1.55 mm 0.061 in.
2.15 mm 0.084 in.
2.59 mm 0.102 in.
Rear clutch thrust washer (clutch retainer) 1.55 mm 0.061 in.
Intermediate shaft thrust plate (shaft hub pilot) 1.5-1.6 mm 0.060-0.063 in.
Output shaft thrust washer (rear clutch hub) 1.3-1.4 mm 0.052-0.054 in.
1.75-1.8 mm 0.068-0.070 in.
2.1-2.2 mm 0.083-0.085 in.
Rear clutch pack snap-ring 1.5-1.6 mm 0.060-0.062 in.
1.9-1.95 mm 0.074-0.076 in.
Planetary geartrain snap-ring (at front of output shaft) 1.4-1.5 mm 0.055-0.059 in.
1.6-1.7 mm 0.062-0.066 in.
Overdrive piston thrust plate Thrust plate and
spacer are select fit.
Refer to size charts
and selection
procedures in
Overdrive Unit D&A
procedures Intermediate shaft spacer
DRAUTOMATIC TRANSMISSION - 48RE 21 - 189
AUTOMATIC TRANSMISSION - 48RE (Continued)
Page 1893 of 2627

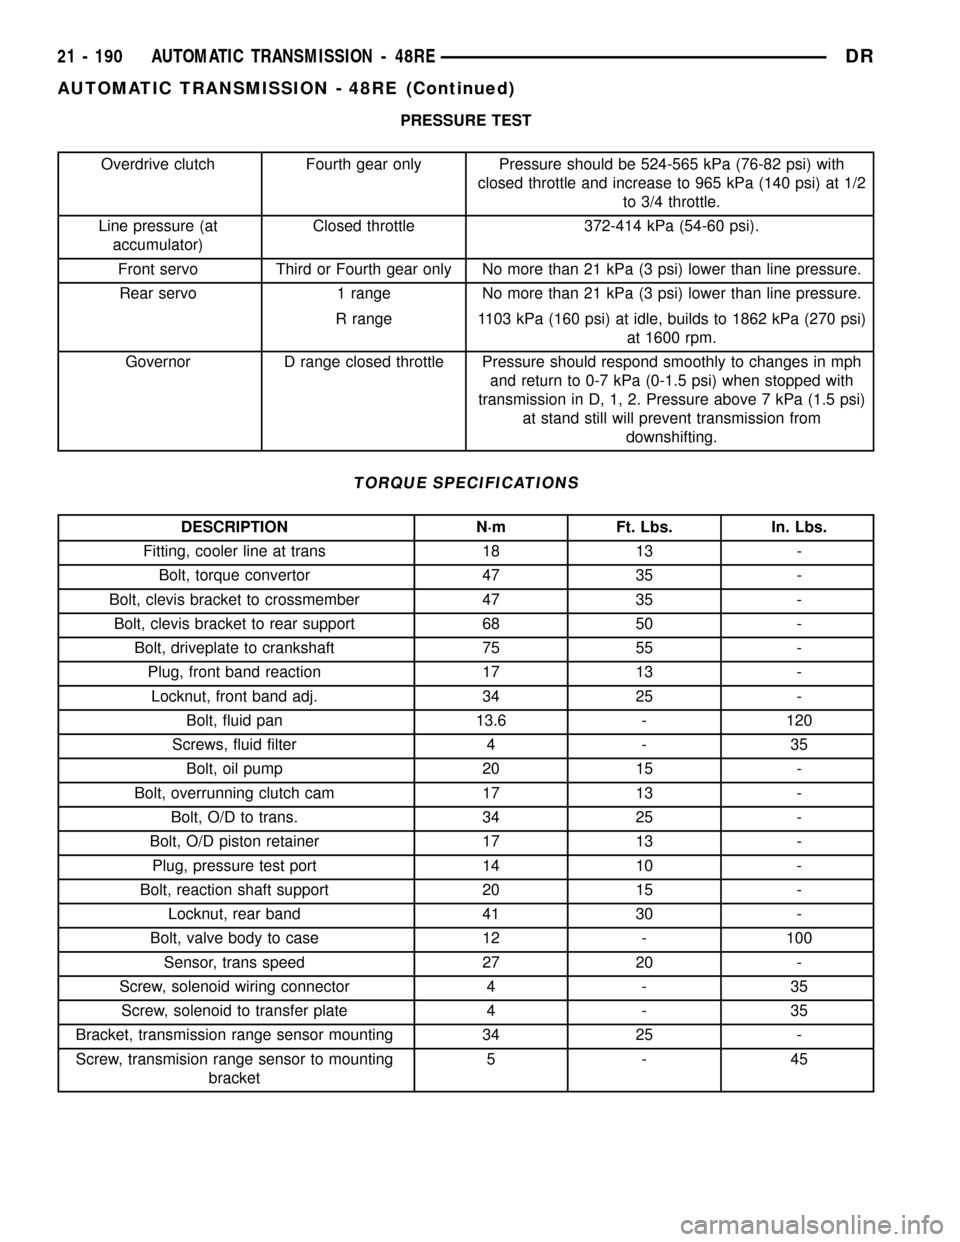
PRESSURE TEST
Overdrive clutch Fourth gear only Pressure should be 524-565 kPa (76-82 psi) with
closed throttle and increase to 965 kPa (140 psi) at 1/2
to 3/4 throttle.
Line pressure (at
accumulator)Closed throttle 372-414 kPa (54-60 psi).
Front servo Third or Fourth gear only No more than 21 kPa (3 psi) lower than line pressure.
Rear servo 1 range No more than 21 kPa (3 psi) lower than line pressure.
R range 1103 kPa (160 psi) at idle, builds to 1862 kPa (270 psi)
at 1600 rpm.
Governor D range closed throttle Pressure should respond smoothly to changes in mph
and return to 0-7 kPa (0-1.5 psi) when stopped with
transmission in D, 1, 2. Pressure above 7 kPa (1.5 psi)
at stand still will prevent transmission from
downshifting.
TORQUE SPECIFICATIONS
DESCRIPTION N´m Ft. Lbs. In. Lbs.
Fitting, cooler line at trans 18 13 -
Bolt, torque convertor 47 35 -
Bolt, clevis bracket to crossmember 47 35 -
Bolt, clevis bracket to rear support 68 50 -
Bolt, driveplate to crankshaft 75 55 -
Plug, front band reaction 17 13 -
Locknut, front band adj. 34 25 -
Bolt, fluid pan 13.6 - 120
Screws, fluid filter 4 - 35
Bolt, oil pump 20 15 -
Bolt, overrunning clutch cam 17 13 -
Bolt, O/D to trans. 34 25 -
Bolt, O/D piston retainer 17 13 -
Plug, pressure test port 14 10 -
Bolt, reaction shaft support 20 15 -
Locknut, rear band 41 30 -
Bolt, valve body to case 12 - 100
Sensor, trans speed 27 20 -
Screw, solenoid wiring connector 4 - 35
Screw, solenoid to transfer plate 4 - 35
Bracket, transmission range sensor mounting 34 25 -
Screw, transmision range sensor to mounting
bracket5-45
21 - 190 AUTOMATIC TRANSMISSION - 48REDR
AUTOMATIC TRANSMISSION - 48RE (Continued)
Page 1894 of 2627
SPECIAL TOOLS
RE TRANSMISSION
Pilot Studs C-3288-B
Oil Pressure Gauge - C-3292
Pressure Gauge - C-3293SP
Dial Indicator C-3339
Valve Spring Compressor C-3422-B
Adapter, Band Adjuster - C-3705
Puller/Slide Hammer, C-3752
Gauge, Throttle Setting - C-3763
Installer C-3860-A
Spring Compressor - C-3863-A
DRAUTOMATIC TRANSMISSION - 48RE 21 - 191
AUTOMATIC TRANSMISSION - 48RE (Continued)
Page 1895 of 2627
Handle C-4171
Dial Caliper - C-4962
Spring Compressor and Alignment Shaft - 6227
Gauge Bar - 6311
Gauge - 6312
Retainer - 6583
Installer - 8114
Socket, TRS Mounting Bracket - 8581
Installer, Seal - 9037
21 - 192 AUTOMATIC TRANSMISSION - 48REDR
AUTOMATIC TRANSMISSION - 48RE (Continued)
Page 1896 of 2627

ACCUMULATOR
DESCRIPTION
The accumulator (Fig. 66) is a hydraulic device
that has the sole purpose of cushioning the applica-
tion of a band or clutch. The accumulator consists of
a dual-land piston and a spring located in a bore in
the transmission case. The 3-4 accumulator is located
in a housing attached to the side of the valve body
(Fig. 67).
OPERATION
Both the accumulator and the 3-4 accumulator
function the same. Line pressure is directed to the
small end of the piston when the transmission is
placed into a DRIVE position (Fig. 68), bottoming it
against the accumulator plate. When the 1-2 upshift
occurs (Fig. 69), line pressure is directed to the large
end of the piston and then to the kickdown servo. As
the line pressure reaches the accumulator, the com-
bination of spring pressure and line pressure forces
the piston away from the accumulator plate. This
causes a balanced pressure situation, which results
in a cushioned band application. After the kickdown
servo has become immovable, line pressure will fin-
ish pushing the accumulator up into its bore. When
the large end of the accumulator piston is seated in
its bore, the band or clutch is fully applied.
NOTE: The accumulator is shown in the inverted
position for illustrative purposes.
Fig. 66 Accumulator
1 - ACCUMULATOR PISTON
2 - PISTON SPRING
Fig. 67 3-4 Accumulator and Housing
1 - ACCUMULATOR PISTON
2 - 3-4 ACCUMULATOR HOUSING
3 - TEFLON SEALS
4 - PISTON SPRING
5 - COVER PLATE AND SCREWS
Fig. 68 Accumulator in DRIVE - FIRST Gear Position
1 - LINE PRESSURE
DRAUTOMATIC TRANSMISSION - 48RE 21 - 193
Page 1897 of 2627

INSPECTION
Inspect the accumulator piston and seal rings.
Replace the seal rings if worn or cut. Replace the pis-
ton if chipped or cracked.
Check condition of the accumulator inner and
outer springs. Replace the springs if the coils are
cracked, distorted or collapsed.
BANDS
DESCRIPTION
KICKDOWN (FRONT) BAND
The kickdown, or ªfrontº, band (Fig. 70) holds the
common sun gear of the planetary gear sets. The
front (kickdown) band is made of steel, and faced on
its inner circumference with a friction-type lining.
One end of the band is anchored to the transmission
case, and the other is acted on with a pushing force
by a servo piston. The front band is a single-wrap
design (the band does not completely encompass/
wrap the drum that it holds).
LOW/REVERSE (REAR) BAND
The low/reverse band, or ªrearº, band (Fig. 71) is
similar in appearance and operation to the front
band. The rear band is slightly different in that it
does not use a link bar, but is acted directly on by
the apply lever. This is referred to as a double-wrapband design (the drum is completely encompassed/
wrapped by the band). The double-wrap band pro-
vides a greater holding power in comparison to the
single-wrap design.
OPERATION
KICKDOWN (FRONT) BAND
The kickdown band holds the common sun gear of
the planetary gear sets by applying and holding the
front clutch retainer, which is splined to the sun gear
driving shell, and in turn splined directly to the sun
gear. The application of the band by the servo is typ-
ically done by an apply lever and link bar.
Fig. 69 Accumulator in SECOND Gear Position
1 - BOTTOM OF BORE
2 - LINE PRESSURE
3 - SHUTTLE VALVE
Fig. 70 Front Band
1 - FRONT BAND
2 - TRANSMISSION HOUSING
Fig. 71 Rear Band
1 - ADJUSTING SCREW
2 - LOCKNUT
3 - LEVER
4 - REAR BAND
5 - REACTION PIN
6 - O-RINGS
7 - PIVOT PIN
21 - 194 AUTOMATIC TRANSMISSION - 48REDR
ACCUMULATOR (Continued)
Page 1898 of 2627

LOW/REVERSE (REAR) BAND
The rear band holds the rear planet carrier sta-
tionary by being mounted around and applied to the
low/reverse drum.
ADJUSTMENTS
ADJUSTMENT - BANDS
FRONT BAND
The front (kickdown) band adjusting screw is
located on the left side of the transmission case
above the manual valve and throttle valve levers.
(1) Raise vehicle.
(2) Loosen band adjusting screw locknut (Fig. 72).
Then back locknut off 3-5 turns. Be sure adjusting
screw turns freely in case. Apply lubricant to screw
threads if necessary.
(3) Tighten band adjusting screw to 8 N´m (72 in.
lbs.) torque with an appropriate TorxŸ socket.
CAUTION: If Adapter C-3705 is needed to reach the
adjusting screw, tighten the screw to only 5 N´m
(47-50 in. lbs.) torque.
(4) Back off front band adjusting screw 1-3/4
turns.
(5) Hold adjuster screw in position and tighten
locknut to 41 N´m (30 ft. lbs.) torque.
(6) Lower vehicle.
REAR BAND
The transmission oil pan must be removed for
access to the rear band adjusting screw.
(1) Raise vehicle.
(2) Remove transmission oil pan and drain fluid.
(3) Loosen band adjusting screw locknut 5-6 turns.
Be sure adjusting screw turns freely in lever.
(4) Tighten adjusting screw to 8 N´m (72 in. lbs.)
torque (Fig. 73).
(5) Back off adjusting screw 3 turns.
(6) Hold adjusting screw in place and tighten lock-
nut to 34 N´m (25 ft. lbs.) torque.
(7) Position new gasket on oil pan and install pan
on transmission. Tighten pan bolts to 17 N´m (13 ft.
lbs.) torque.
(8) Lower vehicle and refill transmission with
MopartATF +4, Automatic Transmission fluid.
Fig. 72 Front Band Adjustment Screw Location
1 - LOCK-NUT
2 - FRONT BAND ADJUSTER
Fig. 73 Rear Band Adjustment Screw Location
1 - LOW-REVERSE BAND ADJUSTMENT
DRAUTOMATIC TRANSMISSION - 48RE 21 - 195
BANDS (Continued)