1998 DODGE RAM 1500 Ignition
[x] Cancel search: IgnitionPage 1144 of 2627
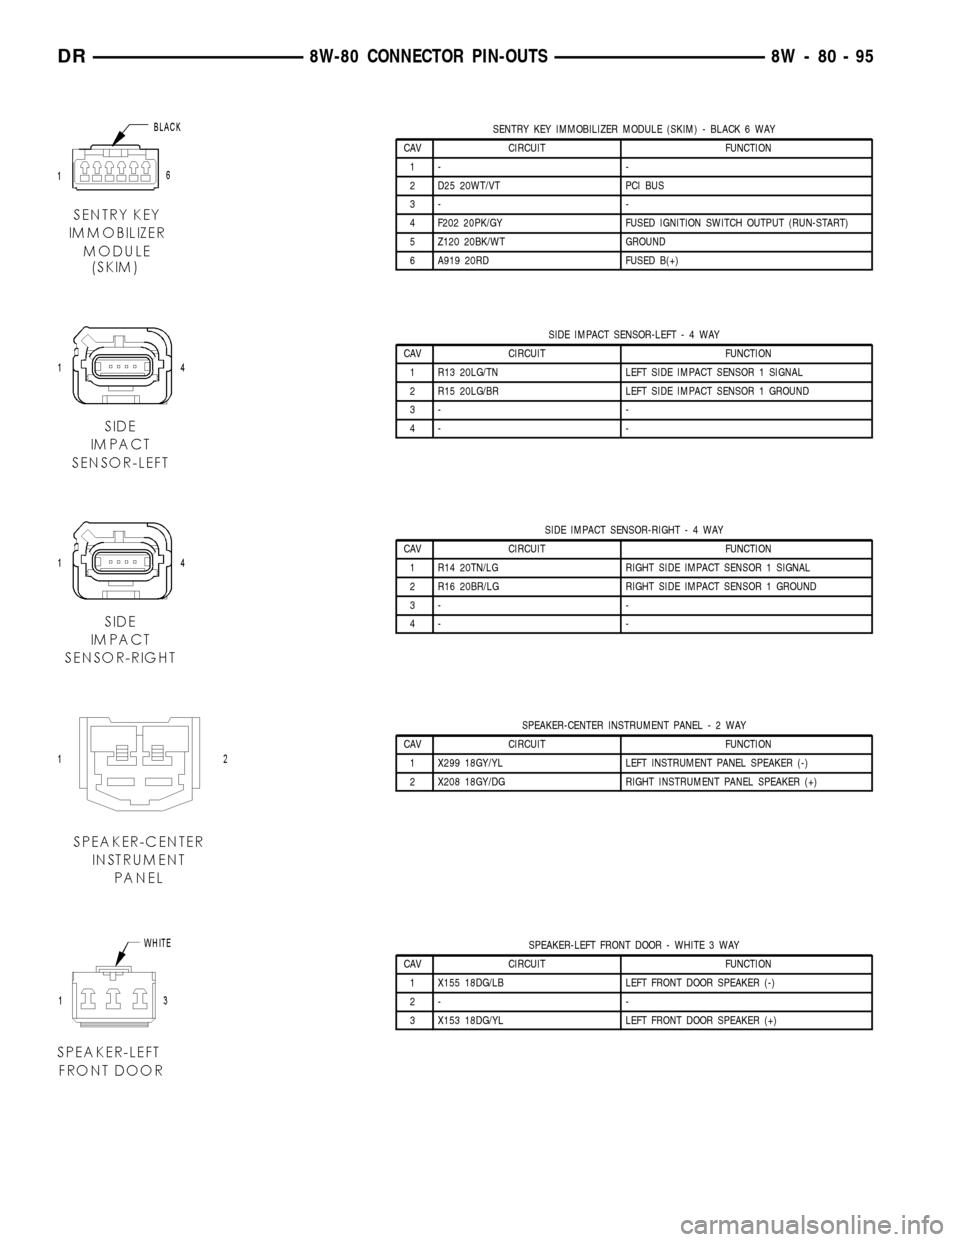
SENTRY KEY IMMOBILIZER MODULE (SKIM) - BLACK 6 WAY
CAV CIRCUIT FUNCTION
1- -
2 D25 20WT/VT PCI BUS
3- -
4 F202 20PK/GY FUSED IGNITION SWITCH OUTPUT (RUN-START)
5 Z120 20BK/WT GROUND
6 A919 20RD FUSED B(+)
SIDE IMPACT SENSOR-LEFT-4WAY
CAV CIRCUIT FUNCTION
1 R13 20LG/TN LEFT SIDE IMPACT SENSOR 1 SIGNAL
2 R15 20LG/BR LEFT SIDE IMPACT SENSOR 1 GROUND
3- -
4- -
SIDE IMPACT SENSOR-RIGHT-4WAY
CAV CIRCUIT FUNCTION
1 R14 20TN/LG RIGHT SIDE IMPACT SENSOR 1 SIGNAL
2 R16 20BR/LG RIGHT SIDE IMPACT SENSOR 1 GROUND
3- -
4- -
SPEAKER-CENTER INSTRUMENT PANEL-2WAY
CAV CIRCUIT FUNCTION
1 X299 18GY/YL LEFT INSTRUMENT PANEL SPEAKER (-)
2 X208 18GY/DG RIGHT INSTRUMENT PANEL SPEAKER (+)
SPEAKER-LEFT FRONT DOOR - WHITE 3 WAY
CAV CIRCUIT FUNCTION
1 X155 18DG/LB LEFT FRONT DOOR SPEAKER (-)
2- -
3 X153 18DG/YL LEFT FRONT DOOR SPEAKER (+)
DR8W-80 CONNECTOR PIN-OUTS 8W - 80 - 95
Page 1149 of 2627
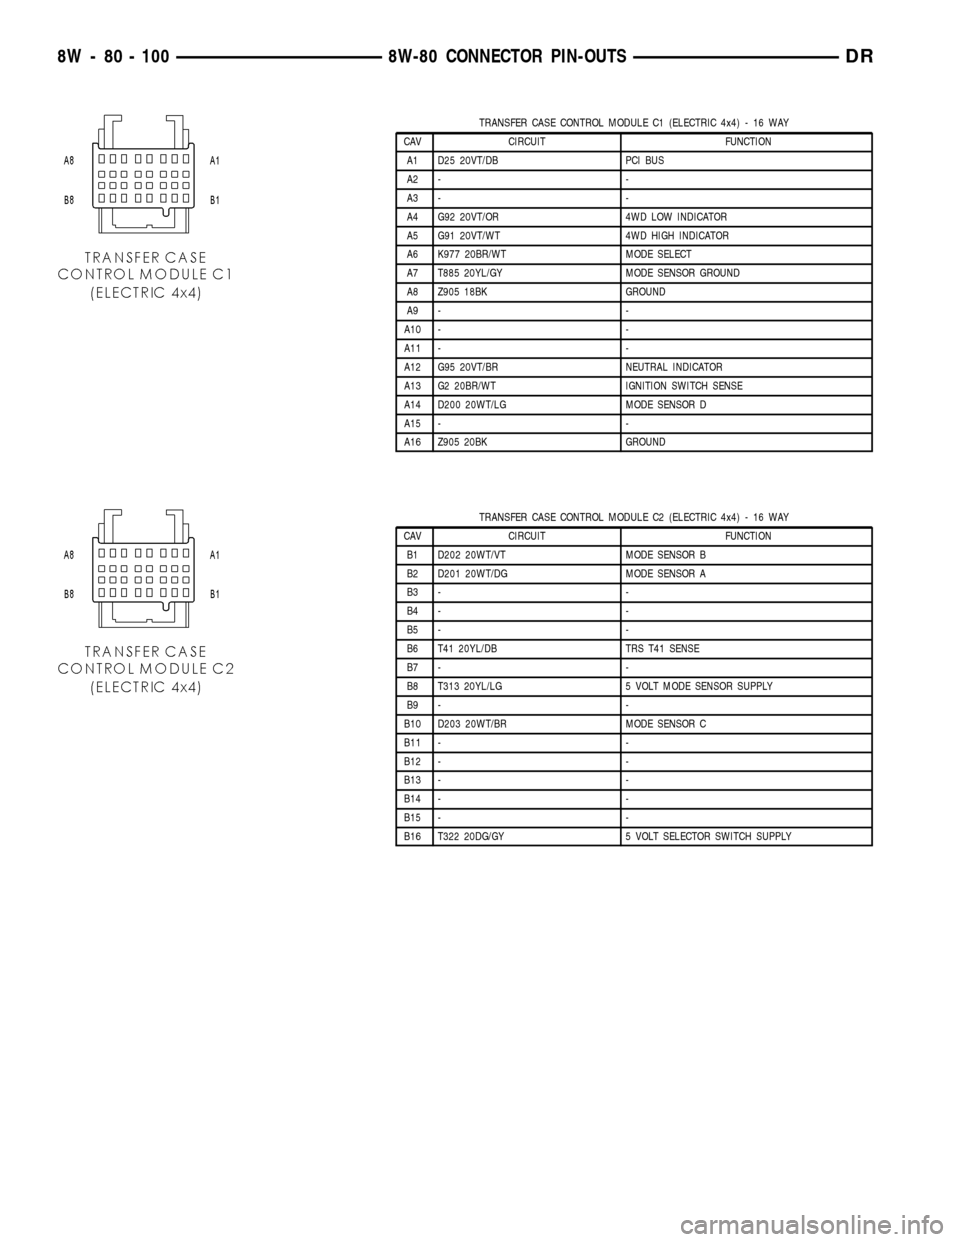
TRANSFER CASE CONTROL MODULE C1 (ELECTRIC 4x4) - 16 WAY
CAV CIRCUIT FUNCTION
A1 D25 20VT/DB PCI BUS
A2 - -
A3 - -
A4 G92 20VT/OR 4WD LOW INDICATOR
A5 G91 20VT/WT 4WD HIGH INDICATOR
A6 K977 20BR/WT MODE SELECT
A7 T885 20YL/GY MODE SENSOR GROUND
A8 Z905 18BK GROUND
A9 - -
A10 - -
A11 - -
A12 G95 20VT/BR NEUTRAL INDICATOR
A13 G2 20BR/WT IGNITION SWITCH SENSE
A14 D200 20WT/LG MODE SENSOR D
A15 - -
A16 Z905 20BK GROUND
TRANSFER CASE CONTROL MODULE C2 (ELECTRIC 4x4) - 16 WAY
CAV CIRCUIT FUNCTION
B1 D202 20WT/VT MODE SENSOR B
B2 D201 20WT/DG MODE SENSOR A
B3 - -
B4 - -
B5 - -
B6 T41 20YL/DB TRS T41 SENSE
B7 - -
B8 T313 20YL/LG 5 VOLT MODE SENSOR SUPPLY
B9 - -
B10 D203 20WT/BR MODE SENSOR C
B11 - -
B12 - -
B13 - -
B14 - -
B15 - -
B16 T322 20DG/GY 5 VOLT SELECTOR SWITCH SUPPLY
8W - 80 - 100 8W-80 CONNECTOR PIN-OUTSDR
Page 1150 of 2627
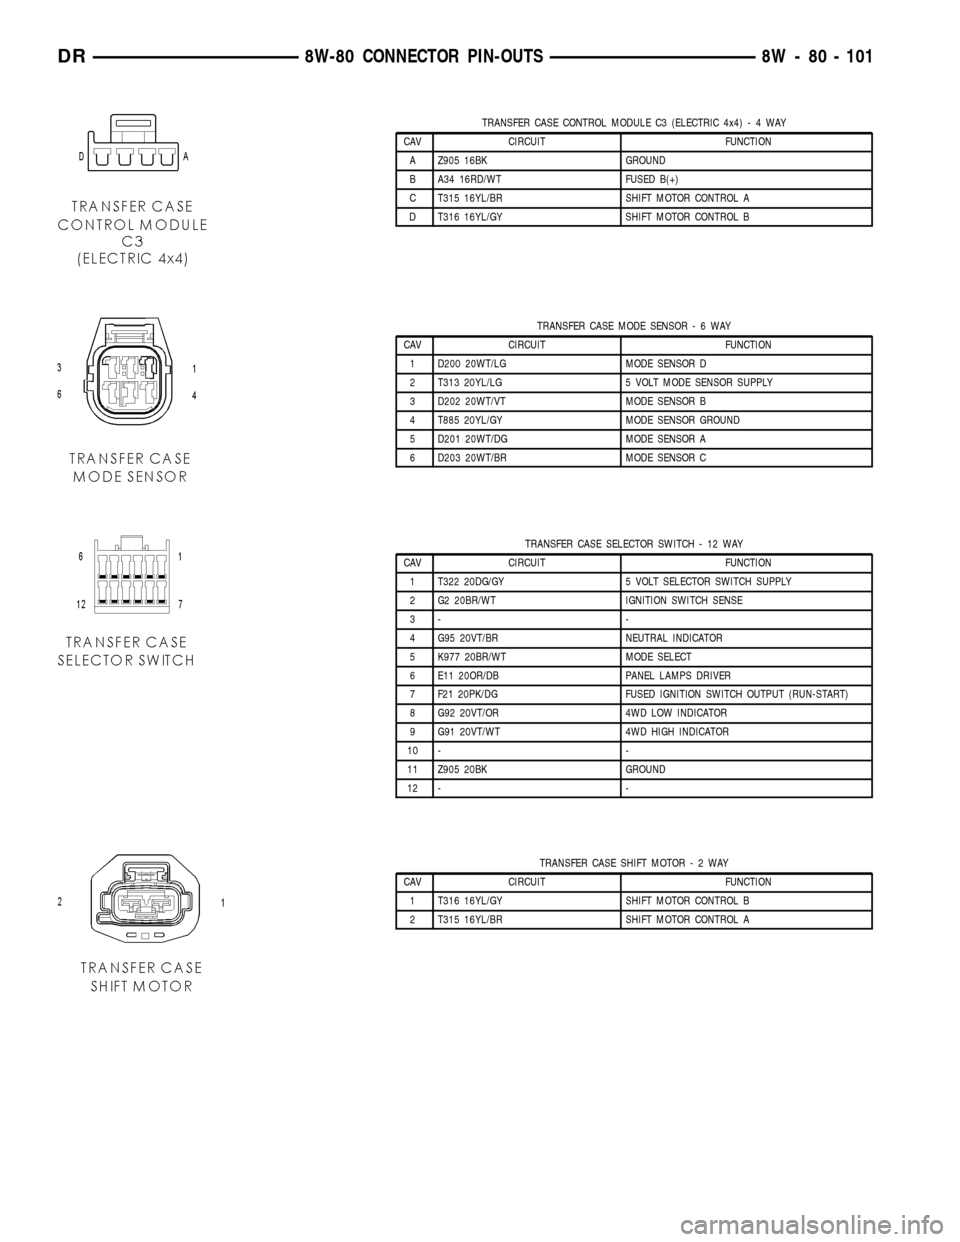
TRANSFER CASE CONTROL MODULE C3 (ELECTRIC 4x4)-4WAY
CAV CIRCUIT FUNCTION
A Z905 16BK GROUND
B A34 16RD/WT FUSED B(+)
C T315 16YL/BR SHIFT MOTOR CONTROL A
D T316 16YL/GY SHIFT MOTOR CONTROL B
TRANSFER CASE MODE SENSOR-6WAY
CAV CIRCUIT FUNCTION
1 D200 20WT/LG MODE SENSOR D
2 T313 20YL/LG 5 VOLT MODE SENSOR SUPPLY
3 D202 20WT/VT MODE SENSOR B
4 T885 20YL/GY MODE SENSOR GROUND
5 D201 20WT/DG MODE SENSOR A
6 D203 20WT/BR MODE SENSOR C
TRANSFER CASE SELECTOR SWITCH - 12 WAY
CAV CIRCUIT FUNCTION
1 T322 20DG/GY 5 VOLT SELECTOR SWITCH SUPPLY
2 G2 20BR/WT IGNITION SWITCH SENSE
3- -
4 G95 20VT/BR NEUTRAL INDICATOR
5 K977 20BR/WT MODE SELECT
6 E11 20OR/DB PANEL LAMPS DRIVER
7 F21 20PK/DG FUSED IGNITION SWITCH OUTPUT (RUN-START)
8 G92 20VT/OR 4WD LOW INDICATOR
9 G91 20VT/WT 4WD HIGH INDICATOR
10 - -
11 Z905 20BK GROUND
12 - -
TRANSFER CASE SHIFT MOTOR-2WAY
CAV CIRCUIT FUNCTION
1 T316 16YL/GY SHIFT MOTOR CONTROL B
2 T315 16YL/BR SHIFT MOTOR CONTROL A
DR8W-80 CONNECTOR PIN-OUTS 8W - 80 - 101
Page 1151 of 2627
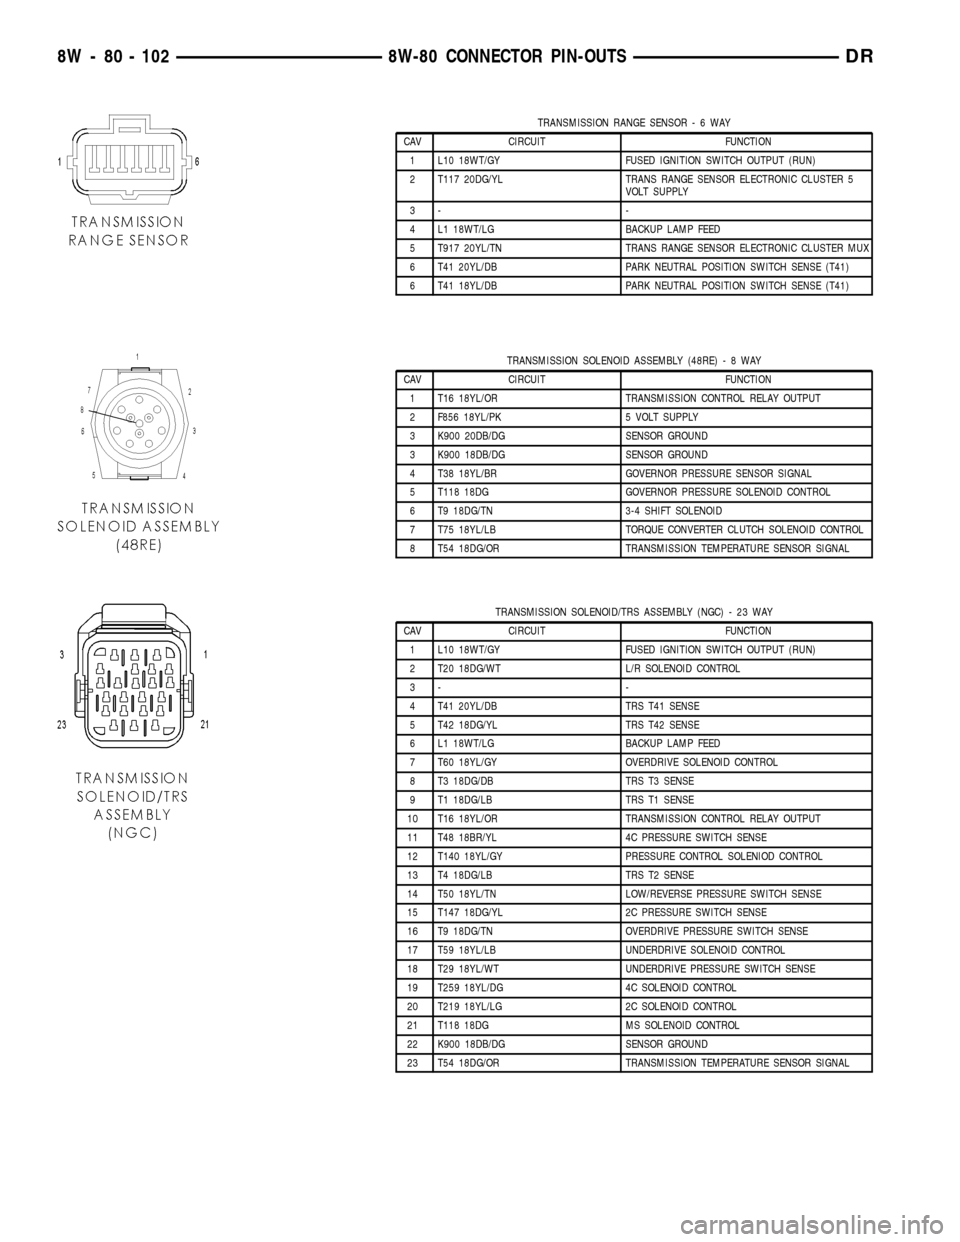
TRANSMISSION RANGE SENSOR-6WAY
CAV CIRCUIT FUNCTION
1 L10 18WT/GY FUSED IGNITION SWITCH OUTPUT (RUN)
2 T117 20DG/YL TRANS RANGE SENSOR ELECTRONIC CLUSTER 5
VOLT SUPPLY
3- -
4 L1 18WT/LG BACKUP LAMP FEED
5 T917 20YL/TN TRANS RANGE SENSOR ELECTRONIC CLUSTER MUX
6 T41 20YL/DB PARK NEUTRAL POSITION SWITCH SENSE (T41)
6 T41 18YL/DB PARK NEUTRAL POSITION SWITCH SENSE (T41)
TRANSMISSION SOLENOID ASSEMBLY (48RE)-8WAY
CAV CIRCUIT FUNCTION
1 T16 18YL/OR TRANSMISSION CONTROL RELAY OUTPUT
2 F856 18YL/PK 5 VOLT SUPPLY
3 K900 20DB/DG SENSOR GROUND
3 K900 18DB/DG SENSOR GROUND
4 T38 18YL/BR GOVERNOR PRESSURE SENSOR SIGNAL
5 T118 18DG GOVERNOR PRESSURE SOLENOID CONTROL
6 T9 18DG/TN 3-4 SHIFT SOLENOID
7 T75 18YL/LB TORQUE CONVERTER CLUTCH SOLENOID CONTROL
8 T54 18DG/OR TRANSMISSION TEMPERATURE SENSOR SIGNAL
TRANSMISSION SOLENOID/TRS ASSEMBLY (NGC) - 23 WAY
CAV CIRCUIT FUNCTION
1 L10 18WT/GY FUSED IGNITION SWITCH OUTPUT (RUN)
2 T20 18DG/WT L/R SOLENOID CONTROL
3- -
4 T41 20YL/DB TRS T41 SENSE
5 T42 18DG/YL TRS T42 SENSE
6 L1 18WT/LG BACKUP LAMP FEED
7 T60 18YL/GY OVERDRIVE SOLENOID CONTROL
8 T3 18DG/DB TRS T3 SENSE
9 T1 18DG/LB TRS T1 SENSE
10 T16 18YL/OR TRANSMISSION CONTROL RELAY OUTPUT
11 T48 18BR/YL 4C PRESSURE SWITCH SENSE
12 T140 18YL/GY PRESSURE CONTROL SOLENIOD CONTROL
13 T4 18DG/LB TRS T2 SENSE
14 T50 18YL/TN LOW/REVERSE PRESSURE SWITCH SENSE
15 T147 18DG/YL 2C PRESSURE SWITCH SENSE
16 T9 18DG/TN OVERDRIVE PRESSURE SWITCH SENSE
17 T59 18YL/LB UNDERDRIVE SOLENOID CONTROL
18 T29 18YL/WT UNDERDRIVE PRESSURE SWITCH SENSE
19 T259 18YL/DG 4C SOLENOID CONTROL
20 T219 18YL/LG 2C SOLENOID CONTROL
21 T118 18DG MS SOLENOID CONTROL
22 K900 18DB/DG SENSOR GROUND
23 T54 18DG/OR TRANSMISSION TEMPERATURE SENSOR SIGNAL
8W - 80 - 102 8W-80 CONNECTOR PIN-OUTSDR
Page 1152 of 2627
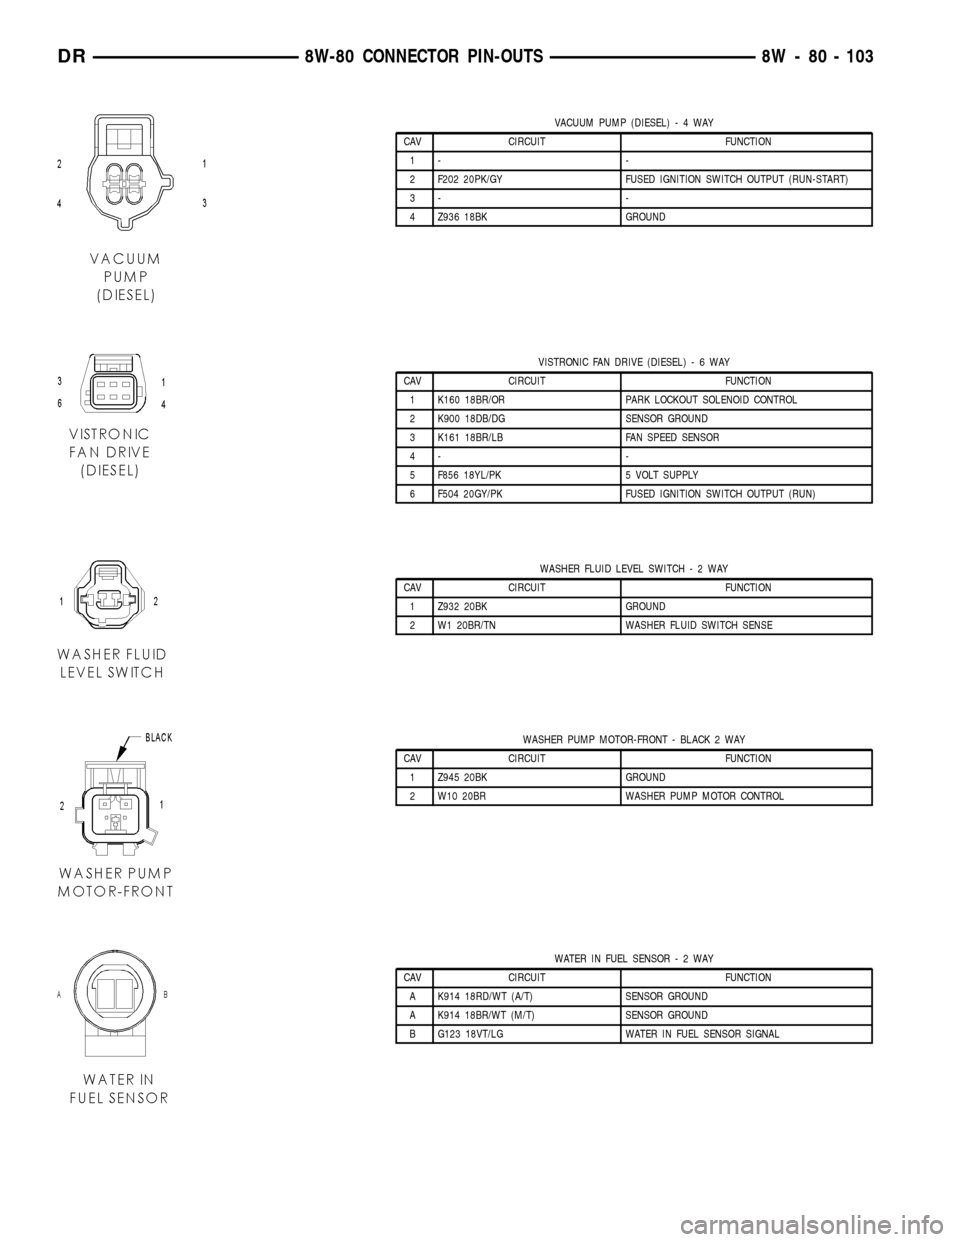
VACUUM PUMP (DIESEL)-4WAY
CAV CIRCUIT FUNCTION
1- -
2 F202 20PK/GY FUSED IGNITION SWITCH OUTPUT (RUN-START)
3- -
4 Z936 18BK GROUND
VISTRONIC FAN DRIVE (DIESEL)-6WAY
CAV CIRCUIT FUNCTION
1 K160 18BR/OR PARK LOCKOUT SOLENOID CONTROL
2 K900 18DB/DG SENSOR GROUND
3 K161 18BR/LB FAN SPEED SENSOR
4- -
5 F856 18YL/PK 5 VOLT SUPPLY
6 F504 20GY/PK FUSED IGNITION SWITCH OUTPUT (RUN)
WASHER FLUID LEVEL SWITCH-2WAY
CAV CIRCUIT FUNCTION
1 Z932 20BK GROUND
2 W1 20BR/TN WASHER FLUID SWITCH SENSE
WASHER PUMP MOTOR-FRONT - BLACK 2 WAY
CAV CIRCUIT FUNCTION
1 Z945 20BK GROUND
2 W10 20BR WASHER PUMP MOTOR CONTROL
WATER IN FUEL SENSOR-2WAY
CAV CIRCUIT FUNCTION
A K914 18RD/WT (A/T) SENSOR GROUND
A K914 18BR/WT (M/T) SENSOR GROUND
B G123 18VT/LG WATER IN FUEL SENSOR SIGNAL
DR8W-80 CONNECTOR PIN-OUTS 8W - 80 - 103
Page 1158 of 2627
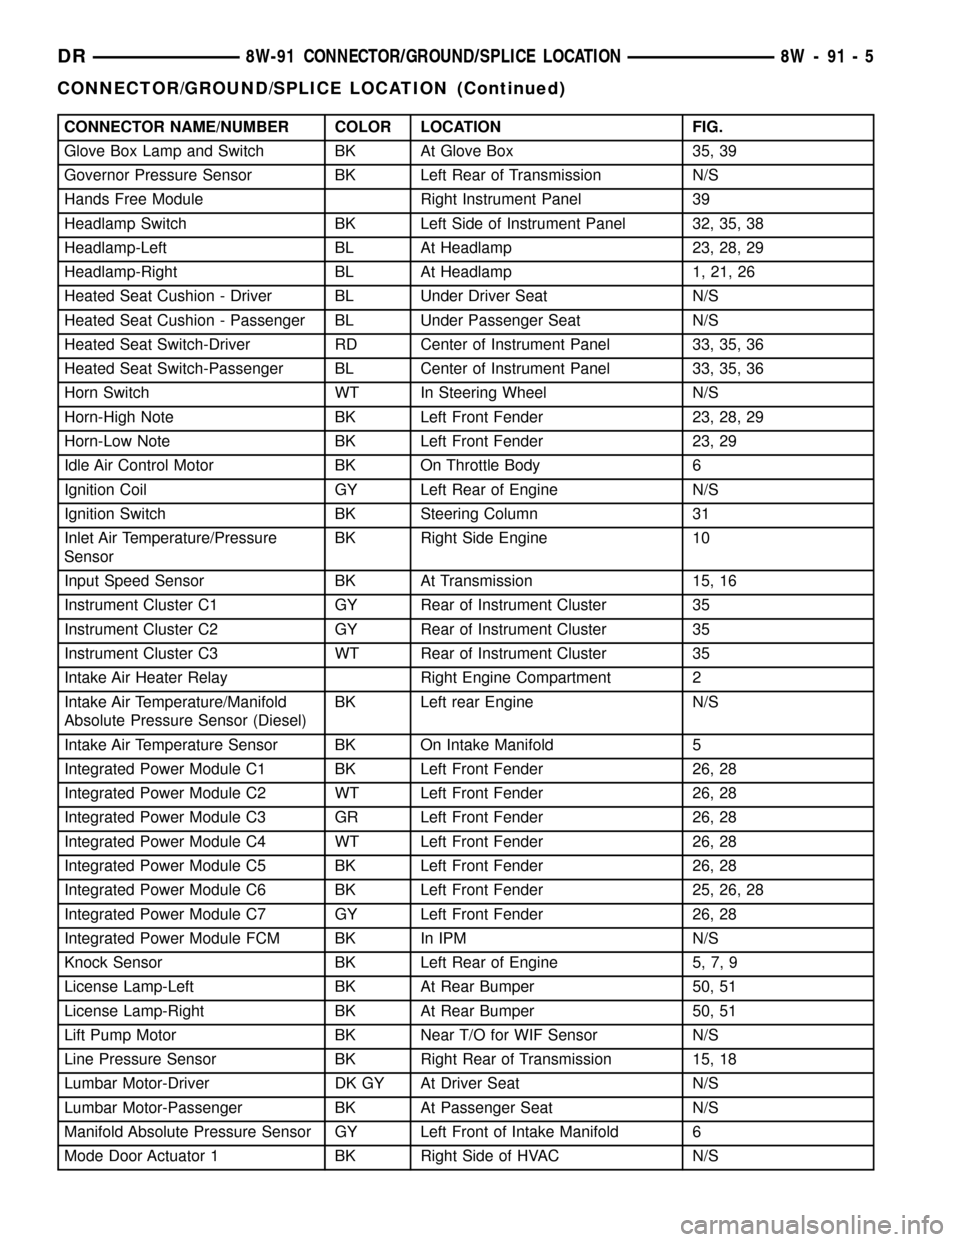
CONNECTOR NAME/NUMBER COLOR LOCATION FIG.
Glove Box Lamp and Switch BK At Glove Box 35, 39
Governor Pressure Sensor BK Left Rear of Transmission N/S
Hands Free Module Right Instrument Panel 39
Headlamp Switch BK Left Side of Instrument Panel 32, 35, 38
Headlamp-Left BL At Headlamp 23, 28, 29
Headlamp-Right BL At Headlamp 1, 21, 26
Heated Seat Cushion - Driver BL Under Driver Seat N/S
Heated Seat Cushion - Passenger BL Under Passenger Seat N/S
Heated Seat Switch-Driver RD Center of Instrument Panel 33, 35, 36
Heated Seat Switch-Passenger BL Center of Instrument Panel 33, 35, 36
Horn Switch WT In Steering Wheel N/S
Horn-High Note BK Left Front Fender 23, 28, 29
Horn-Low Note BK Left Front Fender 23, 29
Idle Air Control Motor BK On Throttle Body 6
Ignition Coil GY Left Rear of Engine N/S
Ignition Switch BK Steering Column 31
Inlet Air Temperature/Pressure
SensorBK Right Side Engine 10
Input Speed Sensor BK At Transmission 15, 16
Instrument Cluster C1 GY Rear of Instrument Cluster 35
Instrument Cluster C2 GY Rear of Instrument Cluster 35
Instrument Cluster C3 WT Rear of Instrument Cluster 35
Intake Air Heater Relay Right Engine Compartment 2
Intake Air Temperature/Manifold
Absolute Pressure Sensor (Diesel)BK Left rear Engine N/S
Intake Air Temperature Sensor BK On Intake Manifold 5
Integrated Power Module C1 BK Left Front Fender 26, 28
Integrated Power Module C2 WT Left Front Fender 26, 28
Integrated Power Module C3 GR Left Front Fender 26, 28
Integrated Power Module C4 WT Left Front Fender 26, 28
Integrated Power Module C5 BK Left Front Fender 26, 28
Integrated Power Module C6 BK Left Front Fender 25, 26, 28
Integrated Power Module C7 GY Left Front Fender 26, 28
Integrated Power Module FCM BK In IPM N/S
Knock Sensor BK Left Rear of Engine 5, 7, 9
License Lamp-Left BK At Rear Bumper 50, 51
License Lamp-Right BK At Rear Bumper 50, 51
Lift Pump Motor BK Near T/O for WIF Sensor N/S
Line Pressure Sensor BK Right Rear of Transmission 15, 18
Lumbar Motor-Driver DK GY At Driver Seat N/S
Lumbar Motor-Passenger BK At Passenger Seat N/S
Manifold Absolute Pressure Sensor GY Left Front of Intake Manifold 6
Mode Door Actuator 1 BK Right Side of HVAC N/S
DR8W-91 CONNECTOR/GROUND/SPLICE LOCATION 8W - 91 - 5
CONNECTOR/GROUND/SPLICE LOCATION (Continued)
Page 1217 of 2627

SPECIAL TOOLS
POWER DISTRIBUTION SYSTEMS
CIGAR LIGHTER OUTLET
DESCRIPTION
On models equipped a cigar lighter outlet is
installed to the left of the center stack area in the
lower instrument panel. The cigar lighter outlet is
secured by a snap fit within the bezel.
The cigar lighter outlet, plastic cap and the knob
and heating element unit are available for service
replacement. These components cannot be repaired
and, if faulty or damaged, they must be replaced.
OPERATION
The cigar lighter consists of two major components:
a knob and heating element unit, and the cigar
lighter base or outlet shell. The receptacle shell is
connected to ground, and an insulated contact in the
bottom of the shell is connected to battery current.
The cigar lighter receives battery voltage from a fuse
in the junction block when the ignition switch is in
the Accessory or Run positions.
The cigar lighter knob and heating element are
encased within a spring-loaded housing, which also
features a sliding protective heat shield. When the
knob and heating element are inserted in the outlet
shell, the heating element resistor coil is grounded
through its housing to the outlet shell. If the cigar
lighter knob is pushed inward, the heat shield slides
up toward the knob exposing the heating element,
and the heating element extends from the housing
toward the insulated contact in the bottom of the
outlet shell.
Two small spring-clip retainers are located on
either side of the insulated contact inside the bottom
of the outlet shell. These clips engage and hold the
heating element against the insulated contact longenough for the resistor coil to heat up. When the
heating element is engaged with the contact, battery
current can flow through the resistor coil to ground,
causing the resistor coil to heat.
When the resistor coil becomes sufficiently heated,
excess heat radiates from the heating element caus-
ing the spring-clips to expand. Once the spring-clips
expand far enough to release the heating element,
the spring-loaded housing forces the knob and heat-
ing element to pop back outward to their relaxed
position. When the cigar lighter knob and element
are pulled out of the outlet shell, the protective heat
shield slides downward on the housing so that the
heating element is recessed and shielded around its
circumference for safety.
DIAGNOSIS AND TESTING - CIGAR LIGHTER
OUTLET
For complete circuit diagrams, refer toWiring
Diagrams.
(1) Check the fused B(+) fuse in the integrated
power module. If OK, go to Step 2. If not OK, repair
the shorted circuit or component as required and
replace the faulty fuse.
(2) Turn the ignition switch to the Run position.
Check for battery voltage at the fused B(+) fuse in
the integrated power module. If OK, go to Step 3. If
not OK, repair the open or short as required.
(3) Remove the cigar lighter knob and element
from the cigar lighter outlet shell. Check for continu-
ity between the inside circumference of the cigar
lighter outlet shell and a good ground. there should
be continuity. If OK, go to Step 4. If not OK, go to
Step 5.
(4) Turn the ignition switch to the Run position.
Check for battery voltage at the insulated contact
located at the back of the cigar lighter outlet shell. If
OK, replace the faulty cigar lighter knob and ele-
ment. If not OK, go to Step 5.
(5) Turn the ignition switch to the Off position.
Disconnect and isolate the battery negative cable.
Check for continuity between the ground circuit cav-
ity of the cigar lighter wire harness connector and a
good ground. There should be continuity. If OK, go to
Step 6. If not OK, repair the open ground circuit to
ground as required.
(6) Connect the battery negative cable. Turn the
ignition switch to the Accessory or Run positions.
Check for battery voltage at the fused B(+) circuit
cavity of the cigar lighter wire harness connector. If
OK, replace the faulty cigar lighter outlet. If not OK,
repair the open fused B(+) circuit to the integrated
power module fuse as required.Terminal Pick Kit 6680
8W - 97 - 2 8W-97 POWER DISTRIBUTIONDR
POWER DISTRIBUTION (Continued)
Page 1220 of 2627

(3) Connect the electrical connectors by pushing
straight on and rotating the connector arm inboard,
until the connector is firmly locked in place on the
module assembly.
(4) Grasp the integrated power module with two
hands and install the assembly on the battery tray
(Fig. 5).
(5) Install the integrated power module retaining
bolt and screw.
(6) Connect the gray connector on the integrated
power module housing.
(7) Install the B+ terminal cable and nut on the
integrated power module B+ terminal. Snap the
cover in place.
(8) Connect the negative and positive battery
cables.
FRONT CONTROL MODULE
DESCRIPTION
The Front Control Module (FCM) is a micro con-
troller based module located in the left front corner
of the engine compartment. On this model the inte-
grated power module must be positioned aside in
order to access the front control module. The front
control module mates to the power distribution cen-
ter to form the Integrated Power Module (IPM). Theintegrated power module connects directly to the bat-
tery and provides the primary means of circuit pro-
tection and power distribution for all vehicle
electrical systems. The front control module controls
power to some of these vehicle systems electrical and
electromechanical loads based on inputs received
from hard wired switch inputs and data received on
the PCI bus circuit (J1850).
For information on theIntegrated Power Mod-
ule Refer to the Power Distribution Sectionof
the service manual.
OPERATION
As messages are sent over the PCI bus circuit, the
front control module reads these messages and con-
trols power to some of the vehicles electrical systems
by completing the circuit to ground (low side driver)
or completing the circuit to 12 volt power (high side
driver). The following functions areControlledby
the Front Control Module:
²Headlamp Power with Voltage Regulation
²Windshield Wiper ªON/OFFº Relay Actuation
²Windshield Wiper ªHI/LOº Relay Actuation
²Windshield Washer Pump Motor
²Fog Lamp Relay Actuation
²Park Lamp Relay Actuation
²Horn Relay Actuation
The following inputs areReceived/Monitoredby
the Front Control Module:
²B+ Connection Detection
²Power Ground
²Ambient Temperature Sensing
²Ignition Switch Run
²Washer Fluid Level Switch
²Windshield Wiper Park Switch
²PCI Bus Circuit
DIAGNOSIS AND TESTING - FRONT CONTROL
MODULE
The front control module is a printed circuit board
based module with a on-board micro-processor. The
front control module interfaces with other electronic
modules in the vehicle via the Programmable Com-
munications Interface (PCI) data bus (J1850). In
order to obtain conclusive testing the Programmable
Communications Interface (PCI) data bus network
and all of the electronic modules that provide inputs
to, or receive outputs from the front control module
must be checked. All PCI (J1850) communication
faults must be resolved prior to further diagnosing
any front control module related issues.
The front control module was designed to be diag-
nosed with an appropriate diagnostic scan tool, such
as the DRB IIIt. The most reliable, efficient, and
accurate means to diagnose the front control module
Fig. 5 INTEGRATED POWER MODULE MOUNTING
TABS
1 - INTEGRATED POWER MODULE MOUNTING HOLES
2 - BATTERY TRAY ASSEMBLY
3 - FRONT CONTROL MODULE
DR8W-97 POWER DISTRIBUTION 8W - 97 - 5
INTEGRATED POWER MODULE (Continued)