1998 DODGE RAM 1500 rear light
[x] Cancel search: rear lightPage 2106 of 2627

OPERATION
The converter impeller (Fig. 123) (driving member),
which is integral to the converter housing and bolted
to the engine drive plate, rotates at engine speed.
The converter turbine (driven member), which reacts
from fluid pressure generated by the impeller, rotates
and turns the transmission input shaft.
TURBINE
As the fluid that was put into motion by the impel-
ler blades strikes the blades of the turbine, some of
the energy and rotational force is transferred into the
turbine and the input shaft. This causes both of them
(turbine and input shaft) to rotate in a clockwise
direction following the impeller. As the fluid is leav-
ing the trailing edges of the turbine's blades it con-
tinues in a ªhinderingº direction back toward the
impeller. If the fluid is not redirected before it strikes
the impeller, it will strike the impeller in such a
direction that it would tend to slow it down.
STATOR
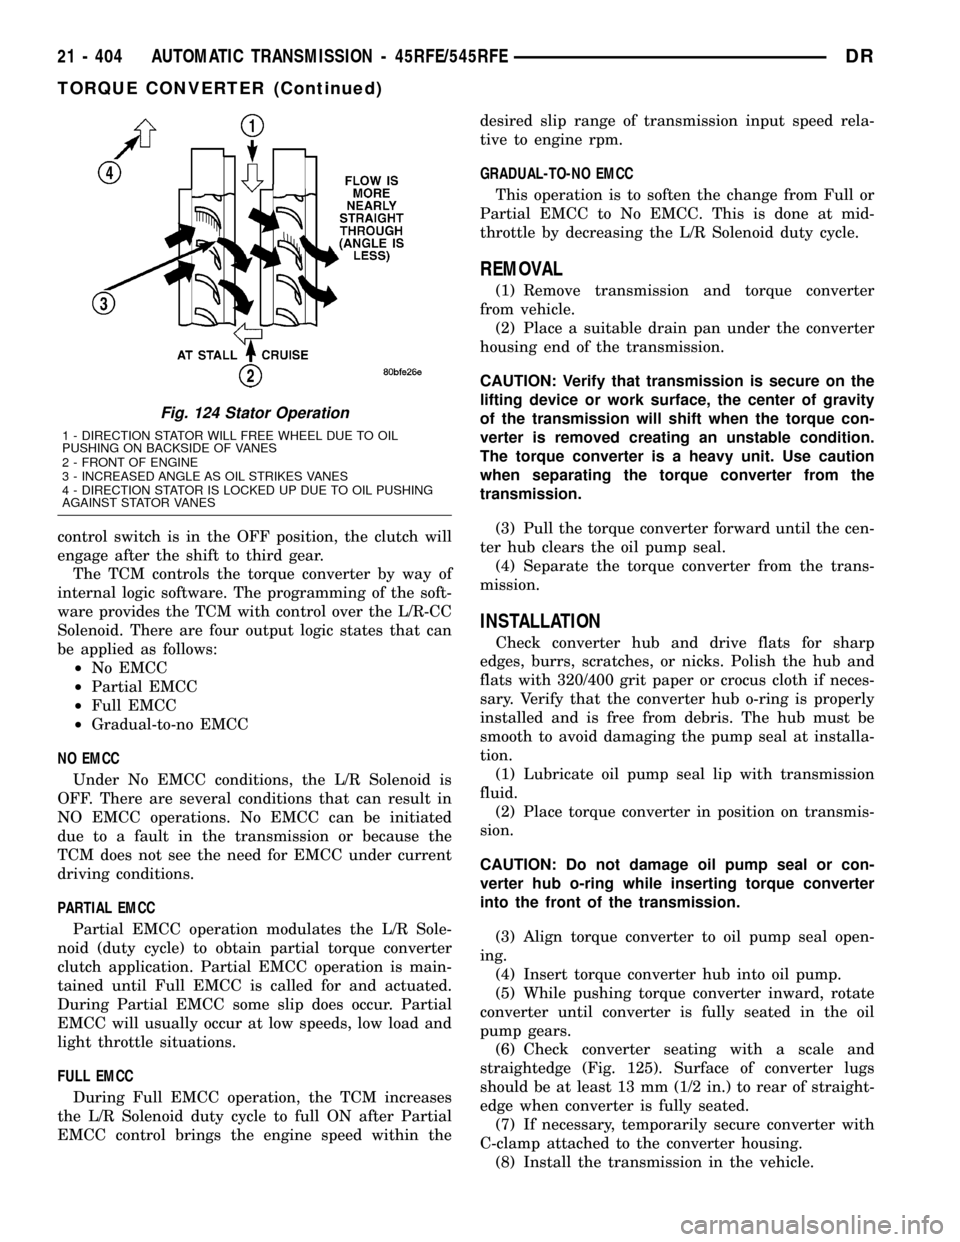
Torque multiplication is achieved by locking the
stator's over-running clutch to its shaft (Fig. 124).
Under stall conditions (the turbine is stationary), the
oil leaving the turbine blades strikes the face of the
stator blades and tries to rotate them in a counter-
clockwise direction. When this happens the over-run-ning clutch of the stator locks and holds the stator
from rotating. With the stator locked, the oil strikes
the stator blades and is redirected into a ªhelpingº
direction before it enters the impeller. This circula-
tion of oil from impeller to turbine, turbine to stator,
and stator to impeller, can produce a maximum
torque multiplication of about 2.4:1. As the turbine
begins to match the speed of the impeller, the fluid
that was hitting the stator in such as way as to
cause it to lock-up is no longer doing so. In this con-
dition of operation, the stator begins to free wheel
and the converter acts as a fluid coupling.
TORQUE CONVERTER CLUTCH (TCC)
In a standard torque converter, the impeller and
turbine are rotating at about the same speed and the
stator is freewheeling, providing no torque multipli-
cation. By applying the turbine's piston and friction
material to the front cover, a total converter engage-
ment can be obtained. The result of this engagement
is a direct 1:1 mechanical link between the engine
and the transmission.
The clutch can be engaged in second, third, fourth,
and fifth (if appicable) gear ranges depending on
overdrive control switch position. If the overdrive
control switch is in the normal ON position, the
clutch will engage after the shift to fourth gear. If the
Fig. 123 Torque Converter Fluid Operation - Typical
1 - APPLY PRESSURE 3 - RELEASE PRESSURE
2 - THE PISTON MOVES SLIGHTLY FORWARD 4 - THE PISTON MOVES SLIGHTLY REARWARD
DRAUTOMATIC TRANSMISSION - 45RFE/545RFE 21 - 403
TORQUE CONVERTER (Continued)
Page 2107 of 2627
control switch is in the OFF position, the clutch will
engage after the shift to third gear.
The TCM controls the torque converter by way of
internal logic software. The programming of the soft-
ware provides the TCM with control over the L/R-CC
Solenoid. There are four output logic states that can
be applied as follows:
²No EMCC
²Partial EMCC
²Full EMCC
²Gradual-to-no EMCC
NO EMCC
Under No EMCC conditions, the L/R Solenoid is
OFF. There are several conditions that can result in
NO EMCC operations. No EMCC can be initiated
due to a fault in the transmission or because the
TCM does not see the need for EMCC under current
driving conditions.
PARTIAL EMCC
Partial EMCC operation modulates the L/R Sole-
noid (duty cycle) to obtain partial torque converter
clutch application. Partial EMCC operation is main-
tained until Full EMCC is called for and actuated.
During Partial EMCC some slip does occur. Partial
EMCC will usually occur at low speeds, low load and
light throttle situations.
FULL EMCC
During Full EMCC operation, the TCM increases
the L/R Solenoid duty cycle to full ON after Partial
EMCC control brings the engine speed within thedesired slip range of transmission input speed rela-
tive to engine rpm.
GRADUAL-TO-NO EMCC
This operation is to soften the change from Full or
Partial EMCC to No EMCC. This is done at mid-
throttle by decreasing the L/R Solenoid duty cycle.
REMOVAL
(1) Remove transmission and torque converter
from vehicle.
(2) Place a suitable drain pan under the converter
housing end of the transmission.
CAUTION: Verify that transmission is secure on the
lifting device or work surface, the center of gravity
of the transmission will shift when the torque con-
verter is removed creating an unstable condition.
The torque converter is a heavy unit. Use caution
when separating the torque converter from the
transmission.
(3) Pull the torque converter forward until the cen-
ter hub clears the oil pump seal.
(4) Separate the torque converter from the trans-
mission.
INSTALLATION
Check converter hub and drive flats for sharp
edges, burrs, scratches, or nicks. Polish the hub and
flats with 320/400 grit paper or crocus cloth if neces-
sary. Verify that the converter hub o-ring is properly
installed and is free from debris. The hub must be
smooth to avoid damaging the pump seal at installa-
tion.
(1) Lubricate oil pump seal lip with transmission
fluid.
(2) Place torque converter in position on transmis-
sion.
CAUTION: Do not damage oil pump seal or con-
verter hub o-ring while inserting torque converter
into the front of the transmission.
(3) Align torque converter to oil pump seal open-
ing.
(4) Insert torque converter hub into oil pump.
(5) While pushing torque converter inward, rotate
converter until converter is fully seated in the oil
pump gears.
(6) Check converter seating with a scale and
straightedge (Fig. 125). Surface of converter lugs
should be at least 13 mm (1/2 in.) to rear of straight-
edge when converter is fully seated.
(7) If necessary, temporarily secure converter with
C-clamp attached to the converter housing.
(8) Install the transmission in the vehicle.
Fig. 124 Stator Operation
1 - DIRECTION STATOR WILL FREE WHEEL DUE TO OIL
PUSHING ON BACKSIDE OF VANES
2 - FRONT OF ENGINE
3 - INCREASED ANGLE AS OIL STRIKES VANES
4 - DIRECTION STATOR IS LOCKED UP DUE TO OIL PUSHING
AGAINST STATOR VANES
21 - 404 AUTOMATIC TRANSMISSION - 45RFE/545RFEDR
TORQUE CONVERTER (Continued)
Page 2319 of 2627
ADJUSTMENTS
ADJUSTMENT
(1) Using a grease pencil or equivalent, mark the
position of the striker to aid in adjustment.
(2) Loosen the striker bolts.
(3) Change the striker position to adjust the rear
gap and flush measurement. (Refer to 23 - BODY/
BODY STRUCTURE/GAP AND FLUSH - SPECIFI-
CATIONS)
(4) Tighten the bolts to 28 N´m (21 ft. lbs.).
LOCK CYLINDER
REMOVAL
(1) Remove the exterior handle. (Refer to 23 -
BODY/DOOR - FRONT/EXTERIOR HANDLE -
REMOVAL)
(2) Remove the clip and remove the lock cylinder
lever and switch, if equipped.
(3) Remove the screw and remove the lock cylin-
der. (Fig. 11)
INSTALLATION
(1) Install the lock cylinder and install the screw.
(2) Install the lock cylinder switch, if equipped,
lever and retaining clip.
(3) Install the exterior handle. (Refer to 23 -
BODY/DOOR - FRONT/EXTERIOR HANDLE -
INSTALLATION)
TRIM PANEL
REMOVAL
(1) Remove the window crank, if equipped. (Fig.
13)
(2) Remove the interior handle. (Refer to 23 -
BODY/DOOR - FRONT/INSIDE HANDLE ACTUA-
TOR - REMOVAL)
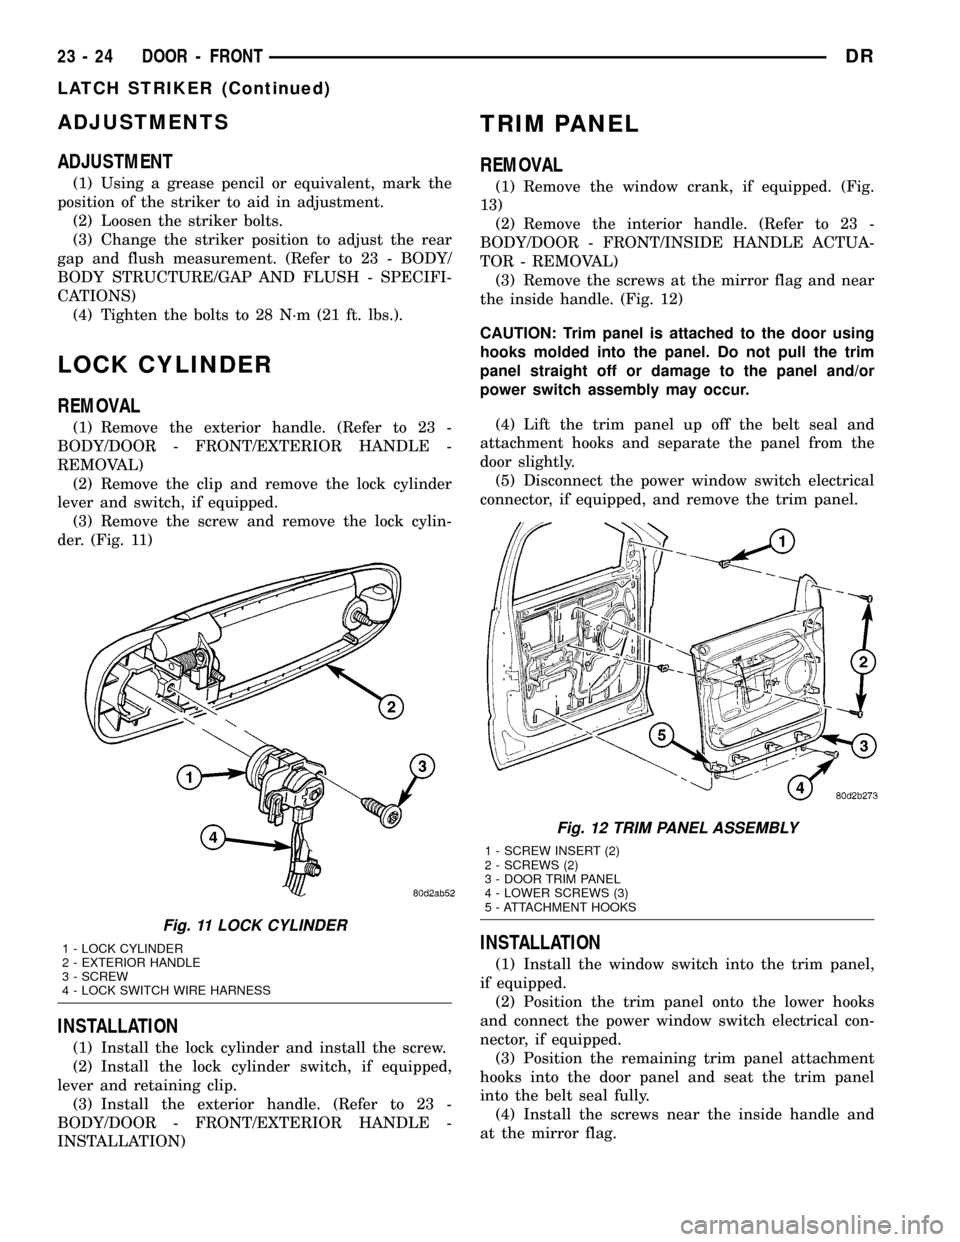
(3) Remove the screws at the mirror flag and near
the inside handle. (Fig. 12)
CAUTION: Trim panel is attached to the door using
hooks molded into the panel. Do not pull the trim
panel straight off or damage to the panel and/or
power switch assembly may occur.
(4) Lift the trim panel up off the belt seal and
attachment hooks and separate the panel from the
door slightly.
(5) Disconnect the power window switch electrical
connector, if equipped, and remove the trim panel.
INSTALLATION
(1) Install the window switch into the trim panel,
if equipped.
(2) Position the trim panel onto the lower hooks
and connect the power window switch electrical con-
nector, if equipped.
(3) Position the remaining trim panel attachment
hooks into the door panel and seat the trim panel
into the belt seal fully.
(4) Install the screws near the inside handle and
at the mirror flag.
Fig. 11 LOCK CYLINDER
1 - LOCK CYLINDER
2 - EXTERIOR HANDLE
3 - SCREW
4 - LOCK SWITCH WIRE HARNESS
Fig. 12 TRIM PANEL ASSEMBLY
1 - SCREW INSERT (2)
2 - SCREWS (2)
3 - DOOR TRIM PANEL
4 - LOWER SCREWS (3)
5 - ATTACHMENT HOOKS
23 - 24 DOOR - FRONTDR
LATCH STRIKER (Continued)
Page 2328 of 2627
ADJUSTMENTS
ADJUSTMENT
(1) Locate access hole and remove the mylar tape
covering it. (Fig. 8)
(2) Insert a 5/32-inch hex-wrench through hole and
into adjustment screw. Loosen screw.
(3) Operate outside handle several times to release
any restriction because of mis-alignment.
(4) Tighten adjustment screw to 3 N´m (30 in.
lbs.).
(5) Test handle for proper operation.
LATCH STRIKER
REMOVAL
(1) Using a grease pencil or equivalent, mark the
position of the striker.
(2) Remove the bolts and remove the striker.
INSTALLATION
(1) Install the striker and install the bolts.
(2) Tighten the bolts to 28 N´m (21 ft. lbs.).
(3) Adjust the striker if needed. (Refer to 23 -
BODY/DOOR - FRONT/LATCH STRIKER - ADJUST-
MENTS)
ADJUSTMENTS
ADJUSTMENT
(1) Using a grease pencil or equivalent, mark the
position of the striker to aid in adjustment.
(2) Loosen the striker bolts.
(3) Change the striker position to adjust the rear
gap and flush measurement. (Refer to 23 - BODY/BODY STRUCTURE/GAP AND FLUSH - SPECIFI-
CATIONS)
(4) Tighten the bolts to 28 N´m (21 ft. lbs.).
TRIM PANEL
REMOVAL
(1) Remove the window crank, if equipped. (Fig.
10)
(2) Remove the interior handle. (Refer to 23 -
BODY/DOORS - REAR/INSIDE HANDLE ACTUA-
TOR - REMOVAL)
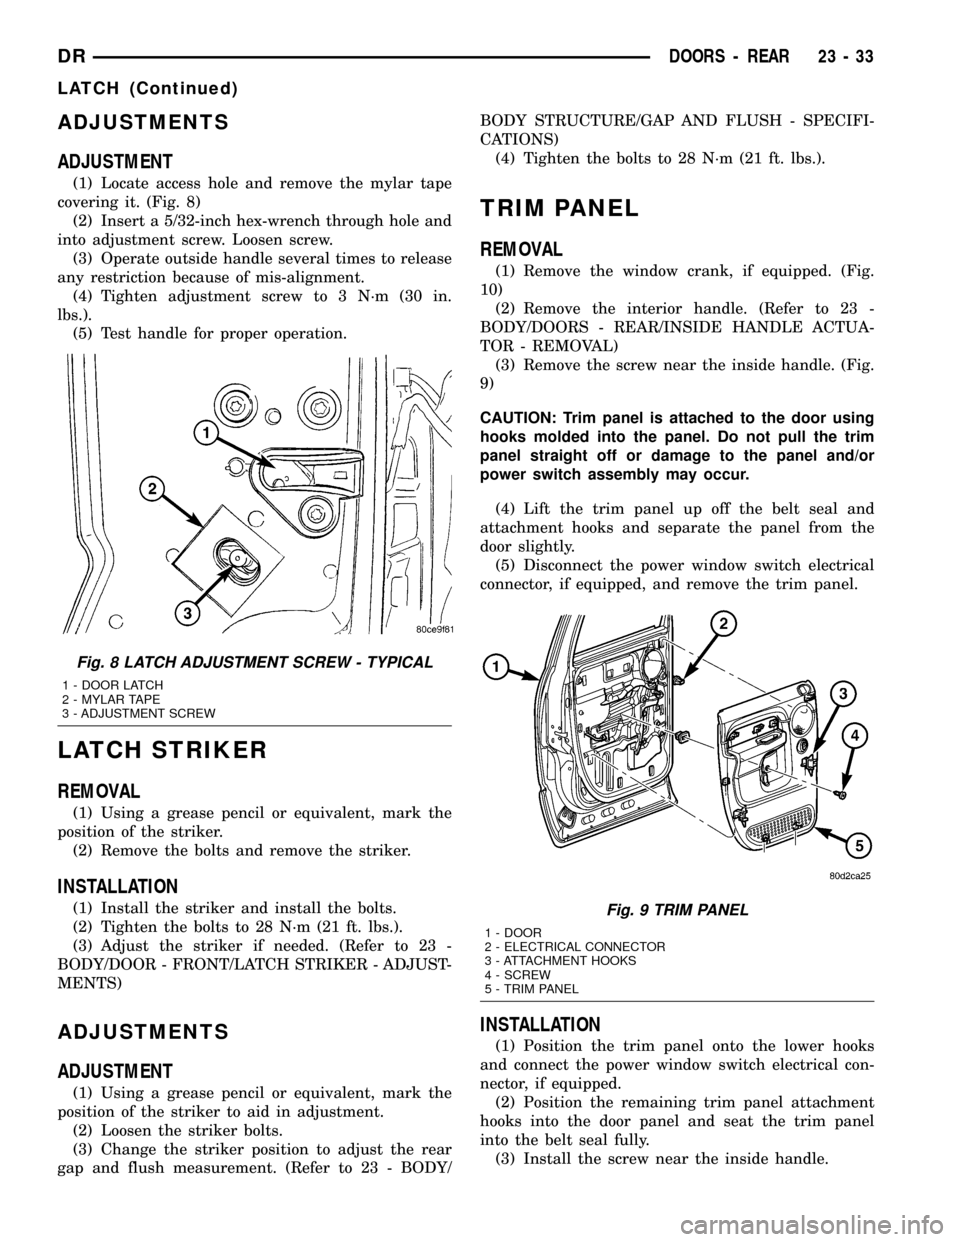
(3) Remove the screw near the inside handle. (Fig.
9)
CAUTION: Trim panel is attached to the door using
hooks molded into the panel. Do not pull the trim
panel straight off or damage to the panel and/or
power switch assembly may occur.
(4) Lift the trim panel up off the belt seal and
attachment hooks and separate the panel from the
door slightly.
(5) Disconnect the power window switch electrical
connector, if equipped, and remove the trim panel.
INSTALLATION
(1) Position the trim panel onto the lower hooks
and connect the power window switch electrical con-
nector, if equipped.
(2) Position the remaining trim panel attachment
hooks into the door panel and seat the trim panel
into the belt seal fully.
(3) Install the screw near the inside handle.
Fig. 8 LATCH ADJUSTMENT SCREW - TYPICAL
1 - DOOR LATCH
2 - MYLAR TAPE
3 - ADJUSTMENT SCREW
Fig. 9 TRIM PANEL
1 - DOOR
2 - ELECTRICAL CONNECTOR
3 - ATTACHMENT HOOKS
4 - SCREW
5 - TRIM PANEL
DRDOORS - REAR 23 - 33
LATCH (Continued)
Page 2339 of 2627
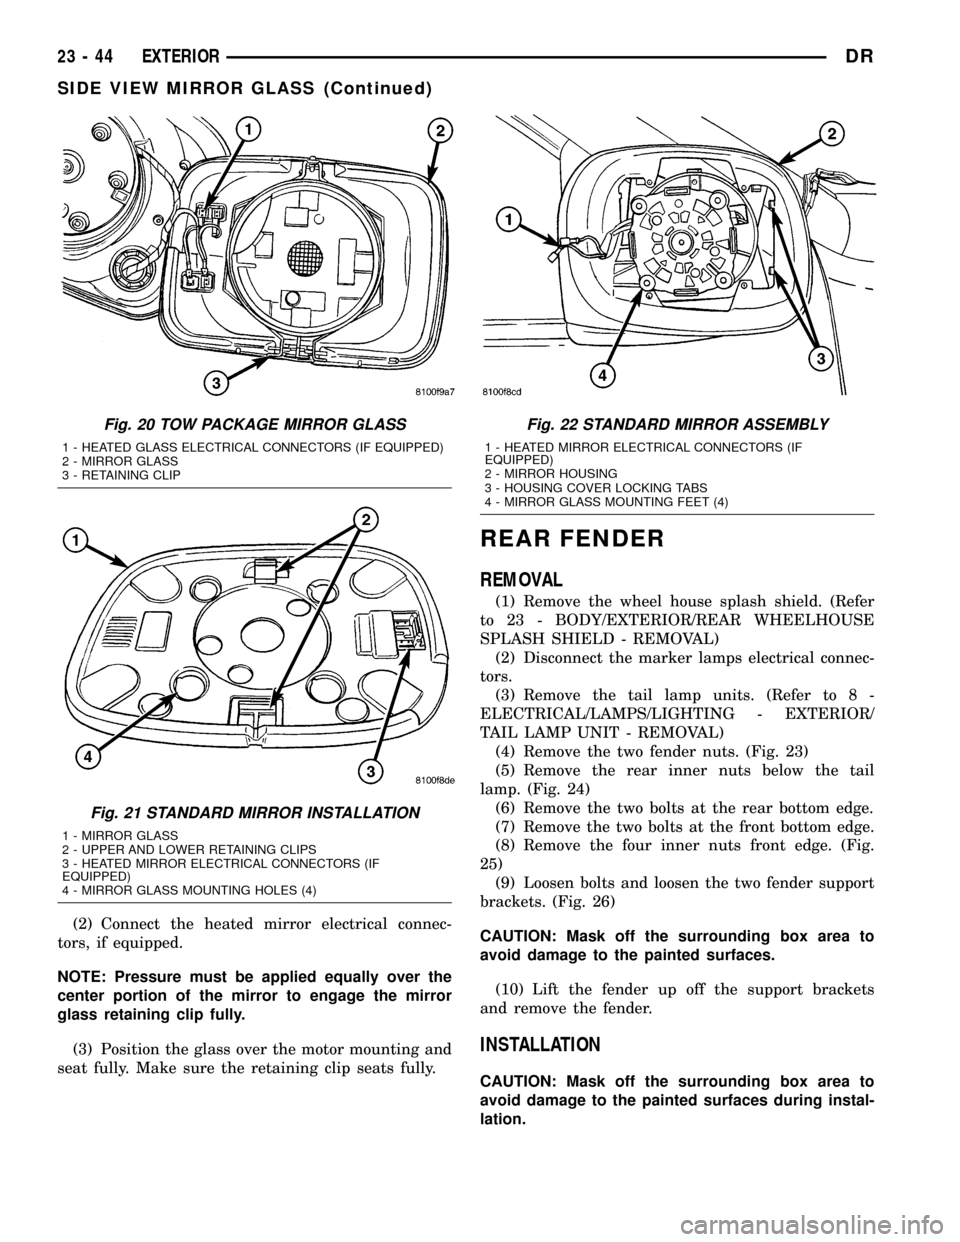
(2) Connect the heated mirror electrical connec-
tors, if equipped.
NOTE: Pressure must be applied equally over the
center portion of the mirror to engage the mirror
glass retaining clip fully.
(3) Position the glass over the motor mounting and
seat fully. Make sure the retaining clip seats fully.
REAR FENDER
REMOVAL
(1) Remove the wheel house splash shield. (Refer
to 23 - BODY/EXTERIOR/REAR WHEELHOUSE
SPLASH SHIELD - REMOVAL)
(2) Disconnect the marker lamps electrical connec-
tors.
(3) Remove the tail lamp units. (Refer to 8 -
ELECTRICAL/LAMPS/LIGHTING - EXTERIOR/
TAIL LAMP UNIT - REMOVAL)
(4) Remove the two fender nuts. (Fig. 23)
(5) Remove the rear inner nuts below the tail
lamp. (Fig. 24)
(6) Remove the two bolts at the rear bottom edge.
(7) Remove the two bolts at the front bottom edge.
(8) Remove the four inner nuts front edge. (Fig.
25)
(9) Loosen bolts and loosen the two fender support
brackets. (Fig. 26)
CAUTION: Mask off the surrounding box area to
avoid damage to the painted surfaces.
(10) Lift the fender up off the support brackets
and remove the fender.
INSTALLATION
CAUTION: Mask off the surrounding box area to
avoid damage to the painted surfaces during instal-
lation.
Fig. 20 TOW PACKAGE MIRROR GLASS
1 - HEATED GLASS ELECTRICAL CONNECTORS (IF EQUIPPED)
2 - MIRROR GLASS
3 - RETAINING CLIP
Fig. 21 STANDARD MIRROR INSTALLATION
1 - MIRROR GLASS
2 - UPPER AND LOWER RETAINING CLIPS
3 - HEATED MIRROR ELECTRICAL CONNECTORS (IF
EQUIPPED)
4 - MIRROR GLASS MOUNTING HOLES (4)
Fig. 22 STANDARD MIRROR ASSEMBLY
1 - HEATED MIRROR ELECTRICAL CONNECTORS (IF
EQUIPPED)
2 - MIRROR HOUSING
3 - HOUSING COVER LOCKING TABS
4 - MIRROR GLASS MOUNTING FEET (4)
23 - 44 EXTERIORDR
SIDE VIEW MIRROR GLASS (Continued)
Page 2340 of 2627
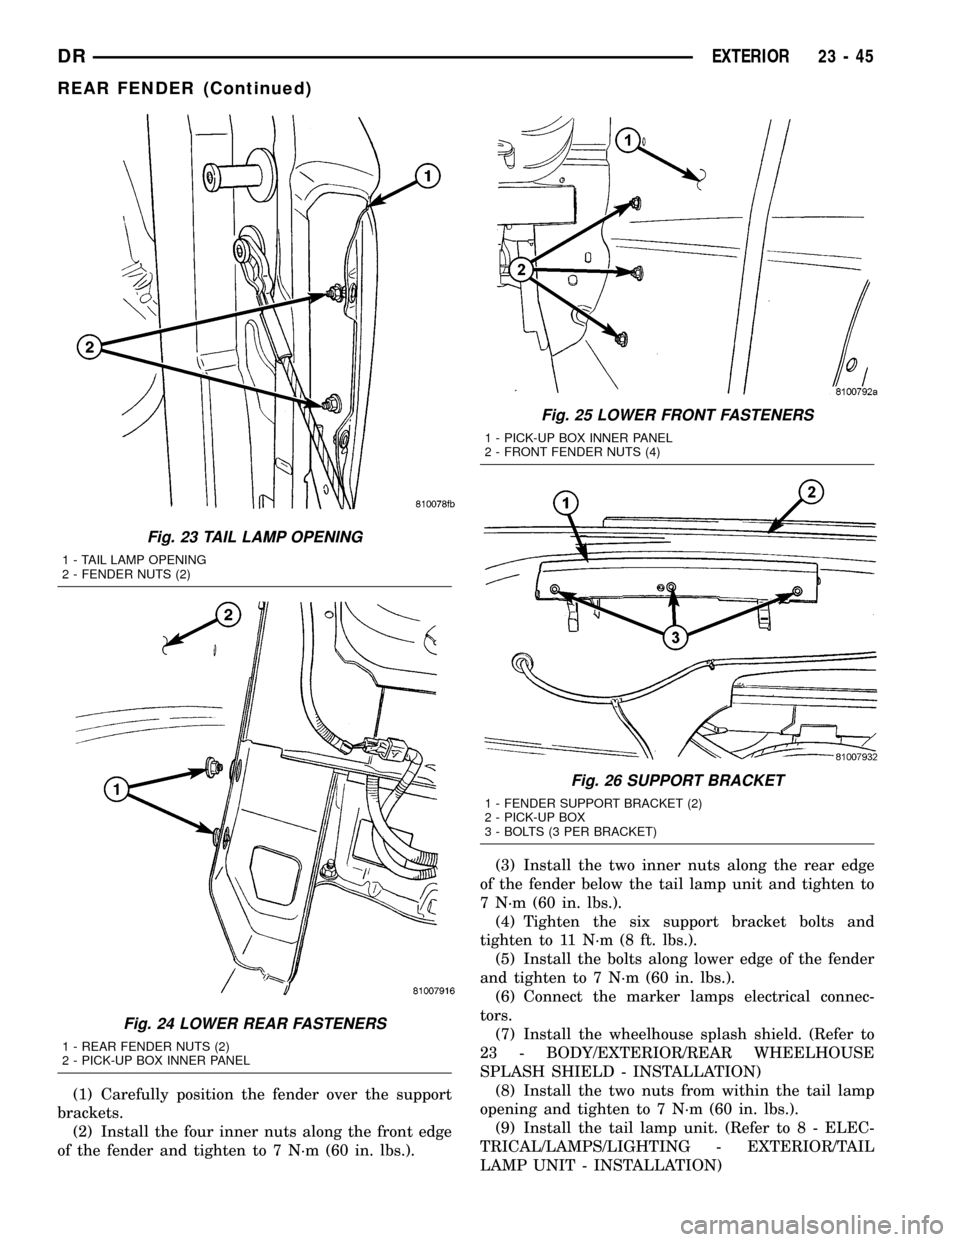
(1) Carefully position the fender over the support
brackets.
(2) Install the four inner nuts along the front edge
of the fender and tighten to 7 N´m (60 in. lbs.).(3) Install the two inner nuts along the rear edge
of the fender below the tail lamp unit and tighten to
7 N´m (60 in. lbs.).
(4) Tighten the six support bracket bolts and
tighten to 11 N´m (8 ft. lbs.).
(5) Install the bolts along lower edge of the fender
and tighten to 7 N´m (60 in. lbs.).
(6) Connect the marker lamps electrical connec-
tors.
(7) Install the wheelhouse splash shield. (Refer to
23 - BODY/EXTERIOR/REAR WHEELHOUSE
SPLASH SHIELD - INSTALLATION)
(8) Install the two nuts from within the tail lamp
opening and tighten to 7 N´m (60 in. lbs.).
(9) Install the tail lamp unit. (Refer to 8 - ELEC-
TRICAL/LAMPS/LIGHTING - EXTERIOR/TAIL
LAMP UNIT - INSTALLATION)
Fig. 23 TAIL LAMP OPENING
1 - TAIL LAMP OPENING
2 - FENDER NUTS (2)
Fig. 24 LOWER REAR FASTENERS
1 - REAR FENDER NUTS (2)
2 - PICK-UP BOX INNER PANEL
Fig. 25 LOWER FRONT FASTENERS
1 - PICK-UP BOX INNER PANEL
2 - FRONT FENDER NUTS (4)
Fig. 26 SUPPORT BRACKET
1 - FENDER SUPPORT BRACKET (2)
2 - PICK-UP BOX
3 - BOLTS (3 PER BRACKET)
DREXTERIOR 23 - 45
REAR FENDER (Continued)
Page 2363 of 2627
HEADLINER
REMOVAL
(1) Remove the a-pillar trim. (Refer to 23 - BODY/
INTERIOR/A-PILLAR TRIM - REMOVAL)
(2) Remove the upper b-pillar trim. (Refer to 23 -
BODY/INTERIOR/B-PILLAR UPPER TRIM -
REMOVAL)
(3) Remove the upper c-pillar trim, if equipped.
(Refer to 23 - BODY/INTERIOR/C-PILLAR TRIM -
REMOVAL)
(4) Remove the coat hooks. (Refer to 23 - BODY/
INTERIOR/COAT HOOK - REMOVAL)
(5) Disconnect the headliner harness electrical con-
nector at the left a-pillar.
(6) Remove the dome lamp. (Refer to 8 - ELEC-
TRICAL/LAMPS/LIGHTING - INTERIOR/DOME
LAMP - REMOVAL)
(7) Remove the overhead console. (Refer to 8 -
ELECTRICAL/OVERHEAD CONSOLE - REMOVAL)
(8) Remove the sun visors. (Refer to 23 - BODY/
INTERIOR/SUN VISOR - REMOVAL)
(9) Remove the sun visor supports. (Refer to 23 -
BODY/INTERIOR/SUN VISOR SUPPORT -
REMOVAL)
(10) Lower the headliner and disconnect the center
high mounted stop light.
(11) Lower the front of the headliner down to the
floor just in front of the instrument panel and
remove through the passenger door.
INSTALLATION
(1) Install the headliner into the vehicle through
the passenger door.
(2) Raise the headliner and insert the right side
above right side pillar trim pieces.
(3) Connect the center high mounted stop light
electrical connector.
(4) Install the sun visor supports. (Refer to 23 -
BODY/INTERIOR/SUN VISOR SUPPORT - INSTAL-
LATION)
(5) Install the coat hooks. (Refer to 23 - BODY/IN-
TERIOR/COAT HOOK - INSTALLATION)
(6) Install the sun visors. (Refer to 23 - BODY/IN-
TERIOR/SUN VISOR - INSTALLATION)
(7) Install the overhead console. (Refer to 8 -
ELECTRICAL/OVERHEAD CONSOLE - INSTALLA-
TION)
(8) Install the dome lamp. (Refer to 8 - ELECTRI-
CAL/LAMPS/LIGHTING - INTERIOR/DOME LAMP
- INSTALLATION)
(9) Connect the headliner harness electrical con-
nector at the left a-pillar.
(10) Install the upper c-pillar trim, if equipped.
(Refer to 23 - BODY/INTERIOR/C-PILLAR TRIM -
INSTALLATION)(11) Install the upper b-pillar trim. (Refer to 23 -
BODY/INTERIOR/B-PILLAR UPPER TRIM -
INSTALLATION)
(12) Install the upper a-pillar trim. (Refer to 23 -
BODY/INTERIOR/A-PILLAR TRIM - INSTALLA-
TION)
B-PILLAR GRAB HANDLE
REMOVAL
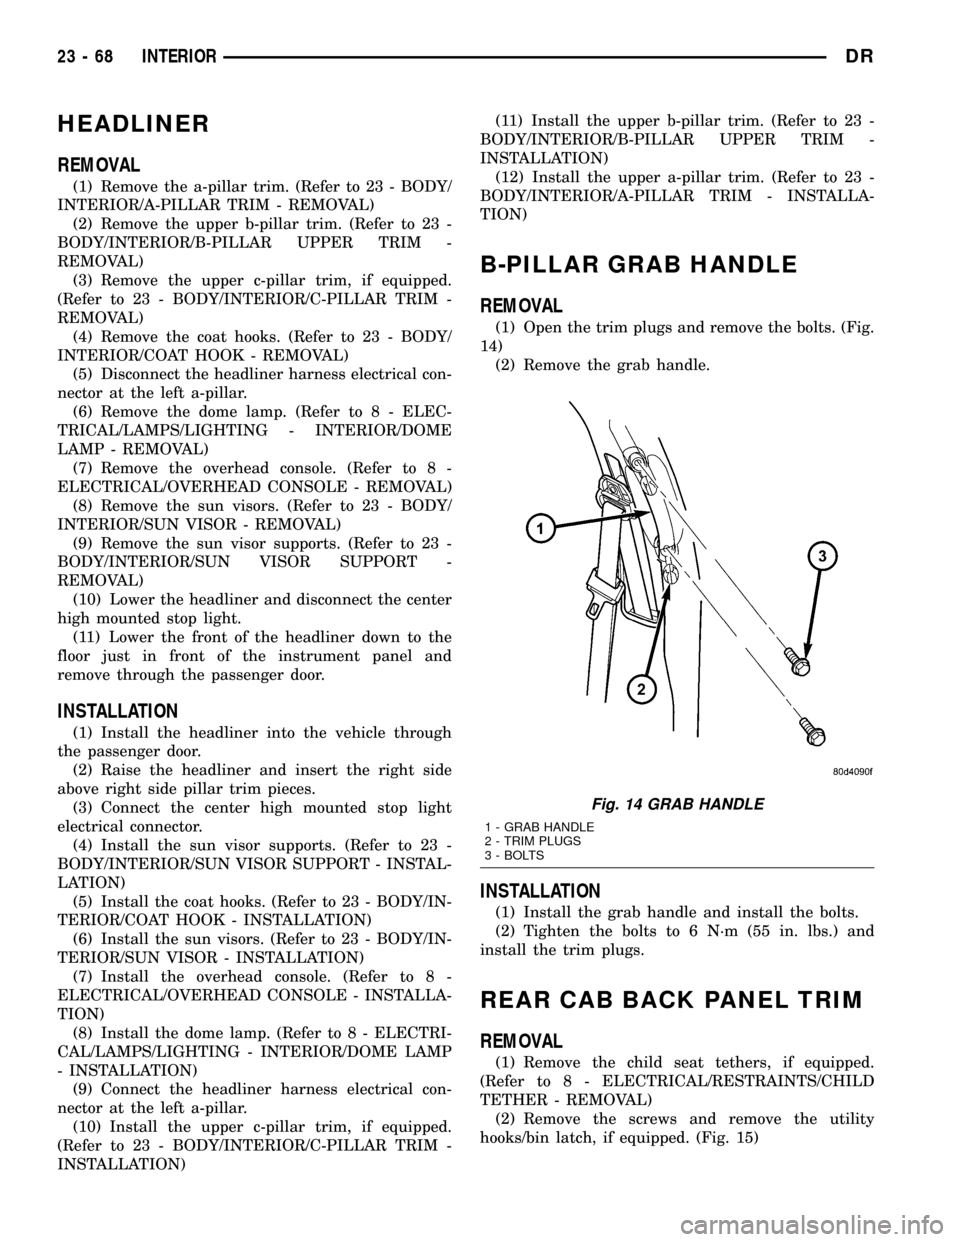
(1) Open the trim plugs and remove the bolts. (Fig.
14)
(2) Remove the grab handle.
INSTALLATION
(1) Install the grab handle and install the bolts.
(2) Tighten the bolts to 6 N´m (55 in. lbs.) and
install the trim plugs.
REAR CAB BACK PANEL TRIM
REMOVAL
(1) Remove the child seat tethers, if equipped.
(Refer to 8 - ELECTRICAL/RESTRAINTS/CHILD
TETHER - REMOVAL)
(2) Remove the screws and remove the utility
hooks/bin latch, if equipped. (Fig. 15)
Fig. 14 GRAB HANDLE
1 - GRAB HANDLE
2 - TRIM PLUGS
3 - BOLTS
23 - 68 INTERIORDR
Page 2384 of 2627
and 25 mm (1 in.) on the bottom of windshield. Allow
at least three minutes drying time.
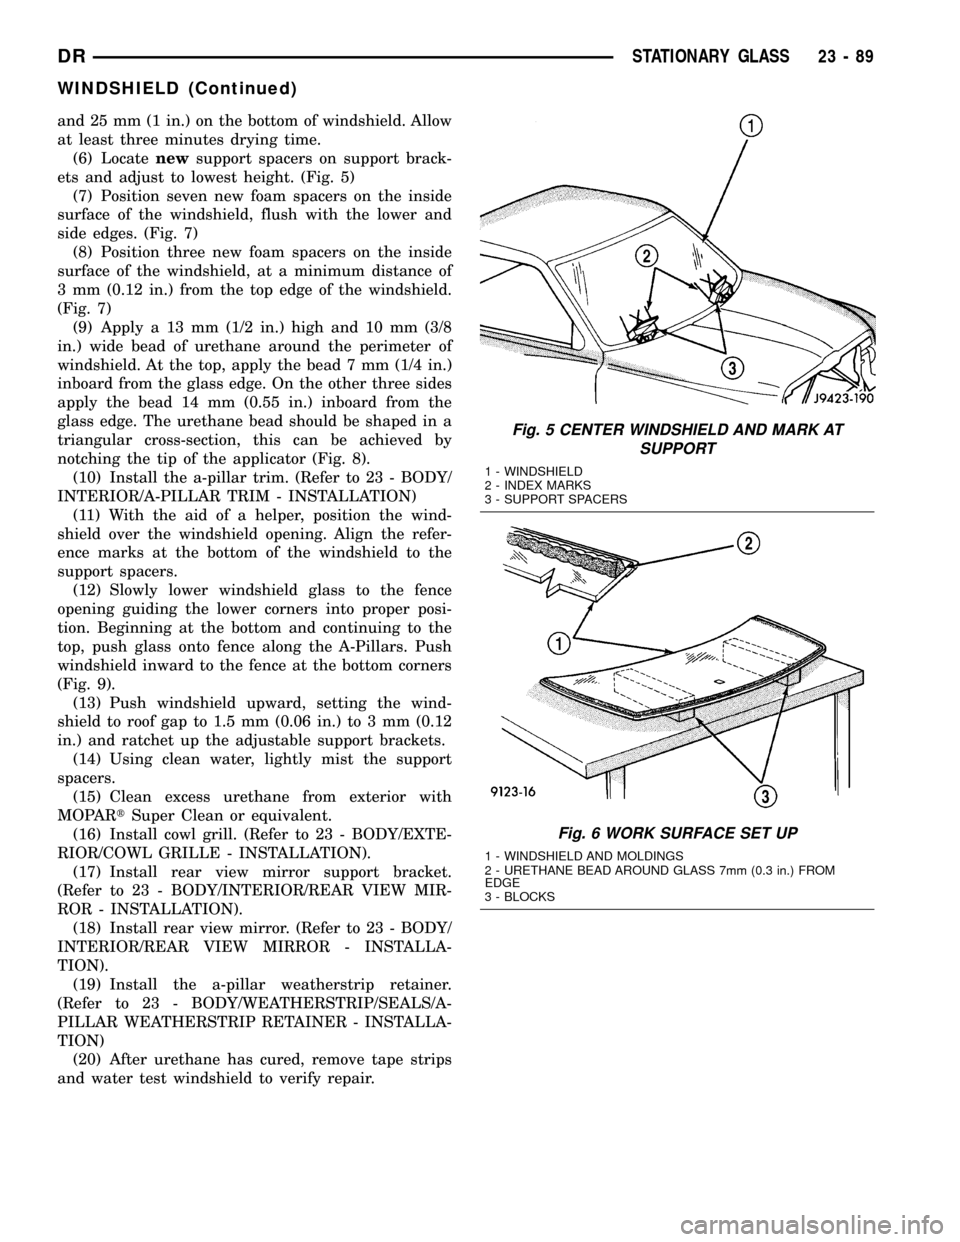
(6) Locatenewsupport spacers on support brack-
ets and adjust to lowest height. (Fig. 5)
(7) Position seven new foam spacers on the inside
surface of the windshield, flush with the lower and
side edges. (Fig. 7)
(8) Position three new foam spacers on the inside
surface of the windshield, at a minimum distance of
3 mm (0.12 in.) from the top edge of the windshield.
(Fig. 7)
(9) Apply a 13 mm (1/2 in.) high and 10 mm (3/8
in.) wide bead of urethane around the perimeter of
windshield. At the top, apply the bead 7 mm (1/4 in.)
inboard from the glass edge. On the other three sides
apply the bead 14 mm (0.55 in.) inboard from the
glass edge. The urethane bead should be shaped in a
triangular cross-section, this can be achieved by
notching the tip of the applicator (Fig. 8).
(10) Install the a-pillar trim. (Refer to 23 - BODY/
INTERIOR/A-PILLAR TRIM - INSTALLATION)
(11) With the aid of a helper, position the wind-
shield over the windshield opening. Align the refer-
ence marks at the bottom of the windshield to the
support spacers.
(12) Slowly lower windshield glass to the fence
opening guiding the lower corners into proper posi-
tion. Beginning at the bottom and continuing to the
top, push glass onto fence along the A-Pillars. Push
windshield inward to the fence at the bottom corners
(Fig. 9).
(13) Push windshield upward, setting the wind-
shield to roof gap to 1.5 mm (0.06 in.) to 3 mm (0.12
in.) and ratchet up the adjustable support brackets.
(14) Using clean water, lightly mist the support
spacers.
(15) Clean excess urethane from exterior with
MOPARtSuper Clean or equivalent.
(16) Install cowl grill. (Refer to 23 - BODY/EXTE-
RIOR/COWL GRILLE - INSTALLATION).
(17) Install rear view mirror support bracket.
(Refer to 23 - BODY/INTERIOR/REAR VIEW MIR-
ROR - INSTALLATION).
(18) Install rear view mirror. (Refer to 23 - BODY/
INTERIOR/REAR VIEW MIRROR - INSTALLA-
TION).
(19) Install the a-pillar weatherstrip retainer.
(Refer to 23 - BODY/WEATHERSTRIP/SEALS/A-
PILLAR WEATHERSTRIP RETAINER - INSTALLA-
TION)
(20) After urethane has cured, remove tape strips
and water test windshield to verify repair.
Fig. 5 CENTER WINDSHIELD AND MARK AT
SUPPORT
1 - WINDSHIELD
2 - INDEX MARKS
3 - SUPPORT SPACERS
Fig. 6 WORK SURFACE SET UP
1 - WINDSHIELD AND MOLDINGS
2 - URETHANE BEAD AROUND GLASS 7mm (0.3 in.) FROM
EDGE
3 - BLOCKS
DRSTATIONARY GLASS 23 - 89
WINDSHIELD (Continued)