1998 DODGE RAM 1500 Connectors
[x] Cancel search: ConnectorsPage 2314 of 2627

ADJUSTMENTS
ADJUSTMENT
NOTE: For vehicles with four doors, it is recom-
mended that you adjust the rear door before adjust-
ing the front door. (Refer to 23 - BODY/DOORS -
REAR/DOOR - ADJUSTMENTS)
²Door adjustment measurements should be
taken from stationary or welded body panels like
the roof, rocker or quarter panels.
²During adjustment procedures, it is recom-
mended that all the hinge fasteners be loosened
except for the upper most fasteners. Adjustments
can be made using the upper bolts to hold the door
with final torque of the fasteners occurring after
correct door positioning is achieved.
²A suitable body sealant should be used when
removing or moving the hinges.
FORE/AFT
NOTE: Fore/aft (lateral) door adjustment is done by
loosening the hinge to the hinge pillar fasteners
one hinge at a time and moving the door to the cor-
rect position.
(1) Support the door with a suitable lifting device.
(2)
Loosen the hinge to hinge pillar fasteners. (Refer
to 23 - BODY/DOOR - FRONT/HINGE - REMOVAL)
(3) Adjust the door to the correct position. (Refer
to 23 - BODY/BODY STRUCTURE/GAP AND
FLUSH - SPECIFICATIONS)(4) Tighten the hinge pillar fasteners to 28 N´m
(21 ft. lbs.).
UP/DOWN
NOTE: Up/down door adjustment is done by loosen-
ing either the hinge to the hinge pillar fasteners or
the hinge to door fasteners and moving the door to
the correct position.
NOTE: When adjustment of the door requires the
loosening of the door to hinge fasteners, it will be
necessary to separate the epoxy bonded washers
with a chisel or other suitable tool.
NOTE: When the up/down adjustments are done
correctly, the top of the door is positioned over
flush to the roof. (Refer to 23 - BODY/BODY STRUC-
TURE/GAP AND FLUSH - SPECIFICATIONS)
(1) Support the door with a suitable lifting device.
(2) Loosen the latch striker bolts. (Refer to 23 -
BODY/DOOR - FRONT/LATCH STRIKER -
REMOVAL)
(3) Loosen the hinge to door fasteners (Refer to 23
- BODY/DOOR - FRONT/DOOR - REMOVAL) or
loosen the hinge to hinge pillar fasteners (Refer to 23
- BODY/DOOR - FRONT/HINGE - REMOVAL).
(4) Adjust the door to the correct position. (Refer
to 23 - BODY/BODY STRUCTURE/GAP AND
FLUSH - SPECIFICATIONS)
(5) Tighten the hinge pillar fasteners or the door
to hinges fasteners to 28 N´m (21 ft. lbs.).
(6) Tighten the latch striker bolts. (Refer to 23 -
BODY/DOOR - FRONT/LATCH STRIKER - INSTAL-
LATION)
IN/OUT
NOTE: In/out door adjustment is done by loosening
the hinge to door fasteners one hinge at a time and
moving the door to the correct position.
NOTE: When adjustment of the door requires the
loosening of the door to hinge fasteners, it will be
necessary to separate the epoxy bonded washers
with a chisel or other suitable tool.
(1) Support the door with a suitable lifting device.
(2) Loosen the latch striker bolts. (Refer to 23 -
BODY/DOOR - FRONT/LATCH STRIKER -
REMOVAL)
(3) Loosen the hinge to door fasteners. (Refer to 23
- BODY/DOOR - FRONT/DOOR - REMOVAL)
Fig. 1 FRONT DOOR
1 - NUTS (2)
2 - UPPER HINGE
3 - STUDS
4 - FRONT DOOR
5 - WIRE HARNESS
6 - LOWER HINGE
7 - ELECTRICAL CONNECTORS (2)
8 - BOLTS (2)
DRDOOR - FRONT 23 - 19
DOOR (Continued)
Page 2338 of 2627
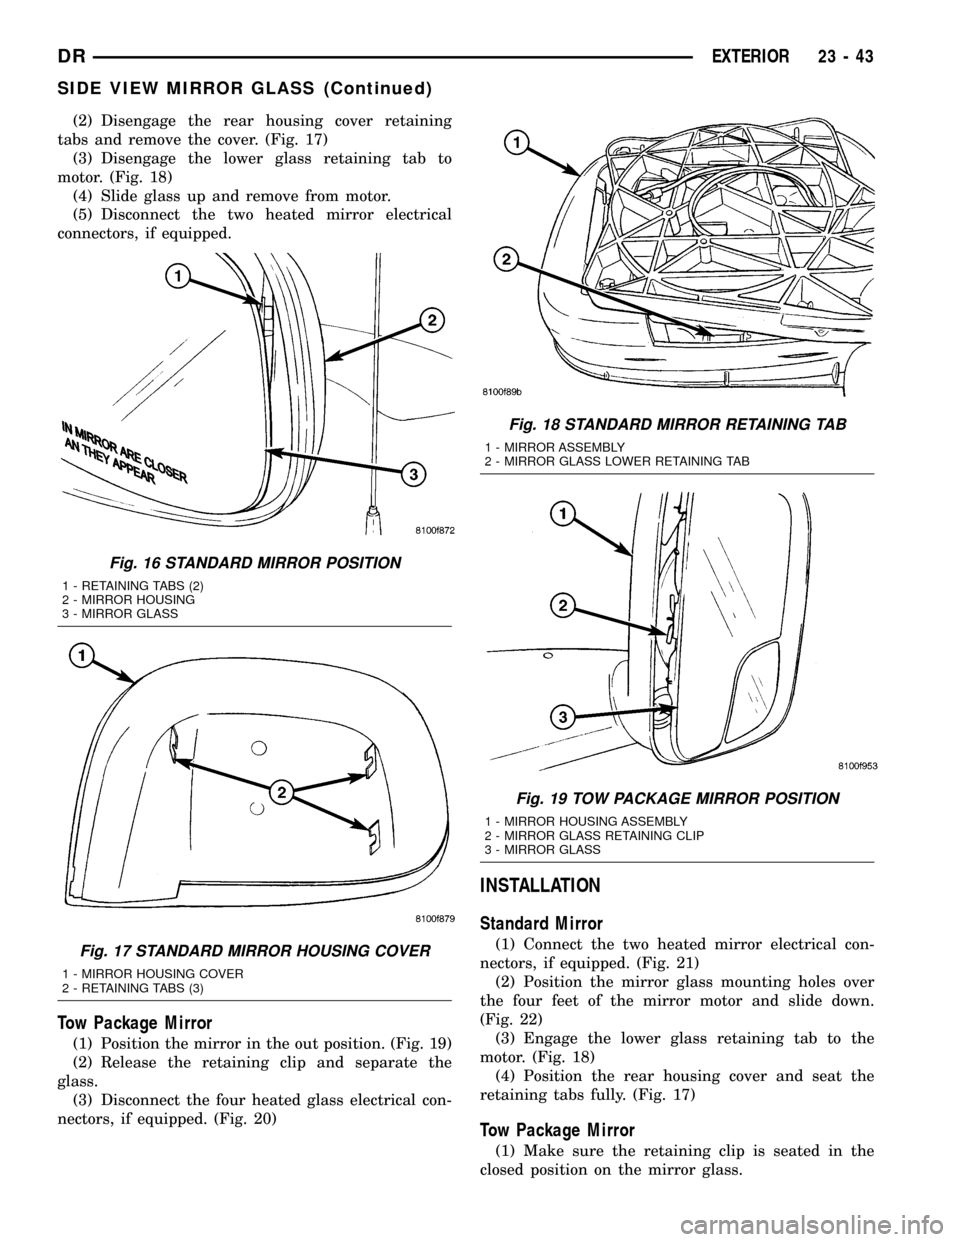
(2) Disengage the rear housing cover retaining
tabs and remove the cover. (Fig. 17)
(3) Disengage the lower glass retaining tab to
motor. (Fig. 18)
(4) Slide glass up and remove from motor.
(5) Disconnect the two heated mirror electrical
connectors, if equipped.
Tow Package Mirror
(1) Position the mirror in the out position. (Fig. 19)
(2) Release the retaining clip and separate the
glass.
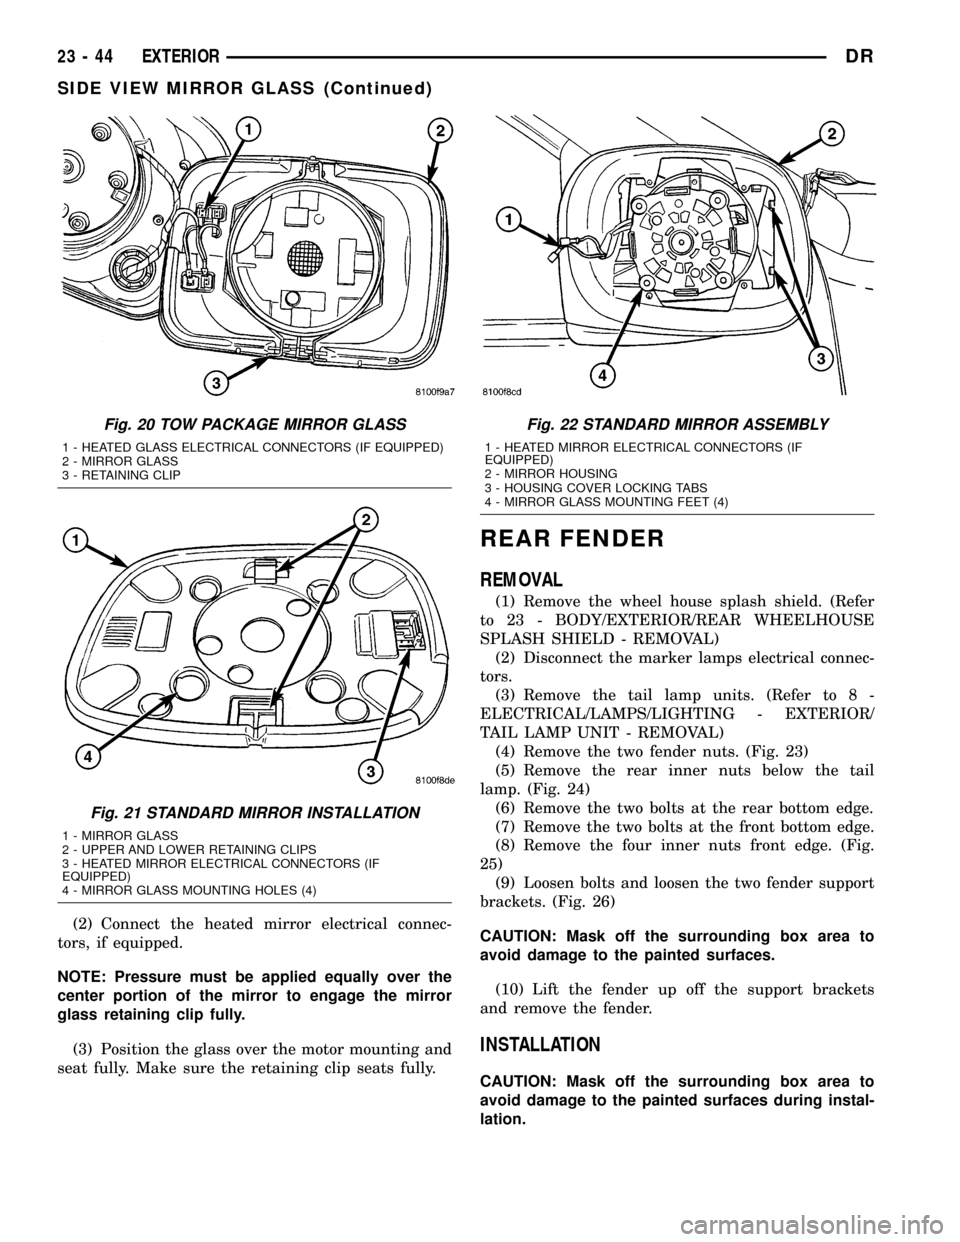
(3) Disconnect the four heated glass electrical con-
nectors, if equipped. (Fig. 20)
INSTALLATION
Standard Mirror
(1) Connect the two heated mirror electrical con-
nectors, if equipped. (Fig. 21)
(2) Position the mirror glass mounting holes over
the four feet of the mirror motor and slide down.
(Fig. 22)
(3) Engage the lower glass retaining tab to the
motor. (Fig. 18)
(4) Position the rear housing cover and seat the
retaining tabs fully. (Fig. 17)
Tow Package Mirror
(1) Make sure the retaining clip is seated in the
closed position on the mirror glass.
Fig. 16 STANDARD MIRROR POSITION
1 - RETAINING TABS (2)
2 - MIRROR HOUSING
3 - MIRROR GLASS
Fig. 17 STANDARD MIRROR HOUSING COVER
1 - MIRROR HOUSING COVER
2 - RETAINING TABS (3)
Fig. 18 STANDARD MIRROR RETAINING TAB
1 - MIRROR ASSEMBLY
2 - MIRROR GLASS LOWER RETAINING TAB
Fig. 19 TOW PACKAGE MIRROR POSITION
1 - MIRROR HOUSING ASSEMBLY
2 - MIRROR GLASS RETAINING CLIP
3 - MIRROR GLASS
DREXTERIOR 23 - 43
SIDE VIEW MIRROR GLASS (Continued)
Page 2339 of 2627
(2) Connect the heated mirror electrical connec-
tors, if equipped.
NOTE: Pressure must be applied equally over the
center portion of the mirror to engage the mirror
glass retaining clip fully.
(3) Position the glass over the motor mounting and
seat fully. Make sure the retaining clip seats fully.
REAR FENDER
REMOVAL
(1) Remove the wheel house splash shield. (Refer
to 23 - BODY/EXTERIOR/REAR WHEELHOUSE
SPLASH SHIELD - REMOVAL)
(2) Disconnect the marker lamps electrical connec-
tors.
(3) Remove the tail lamp units. (Refer to 8 -
ELECTRICAL/LAMPS/LIGHTING - EXTERIOR/
TAIL LAMP UNIT - REMOVAL)
(4) Remove the two fender nuts. (Fig. 23)
(5) Remove the rear inner nuts below the tail
lamp. (Fig. 24)
(6) Remove the two bolts at the rear bottom edge.
(7) Remove the two bolts at the front bottom edge.
(8) Remove the four inner nuts front edge. (Fig.
25)
(9) Loosen bolts and loosen the two fender support
brackets. (Fig. 26)
CAUTION: Mask off the surrounding box area to
avoid damage to the painted surfaces.
(10) Lift the fender up off the support brackets
and remove the fender.
INSTALLATION
CAUTION: Mask off the surrounding box area to
avoid damage to the painted surfaces during instal-
lation.
Fig. 20 TOW PACKAGE MIRROR GLASS
1 - HEATED GLASS ELECTRICAL CONNECTORS (IF EQUIPPED)
2 - MIRROR GLASS
3 - RETAINING CLIP
Fig. 21 STANDARD MIRROR INSTALLATION
1 - MIRROR GLASS
2 - UPPER AND LOWER RETAINING CLIPS
3 - HEATED MIRROR ELECTRICAL CONNECTORS (IF
EQUIPPED)
4 - MIRROR GLASS MOUNTING HOLES (4)
Fig. 22 STANDARD MIRROR ASSEMBLY
1 - HEATED MIRROR ELECTRICAL CONNECTORS (IF
EQUIPPED)
2 - MIRROR HOUSING
3 - HOUSING COVER LOCKING TABS
4 - MIRROR GLASS MOUNTING FEET (4)
23 - 44 EXTERIORDR
SIDE VIEW MIRROR GLASS (Continued)
Page 2348 of 2627
(1) Remove the left a-pillar trim. (Refer to 23 -
BODY/INTERIOR/A-PILLAR TRIM/GRAB HANDLE
- REMOVAL)
(2) Remove the top cover. (Refer to 23 - BODY/IN-
STRUMENT PANEL/INSTRUMENT PANEL TOP
COVER - REMOVAL)
(3) Disconnect the headliner harness electrical con-
nector at the a-pillar.
(4) Using a trim stick C-4755 or equivalent, from
the notch on the bottom, remove the left side cover.
(Fig. 20)
(5) Remove the steering column. (Refer to 19 -
STEERING/COLUMN - REMOVAL)
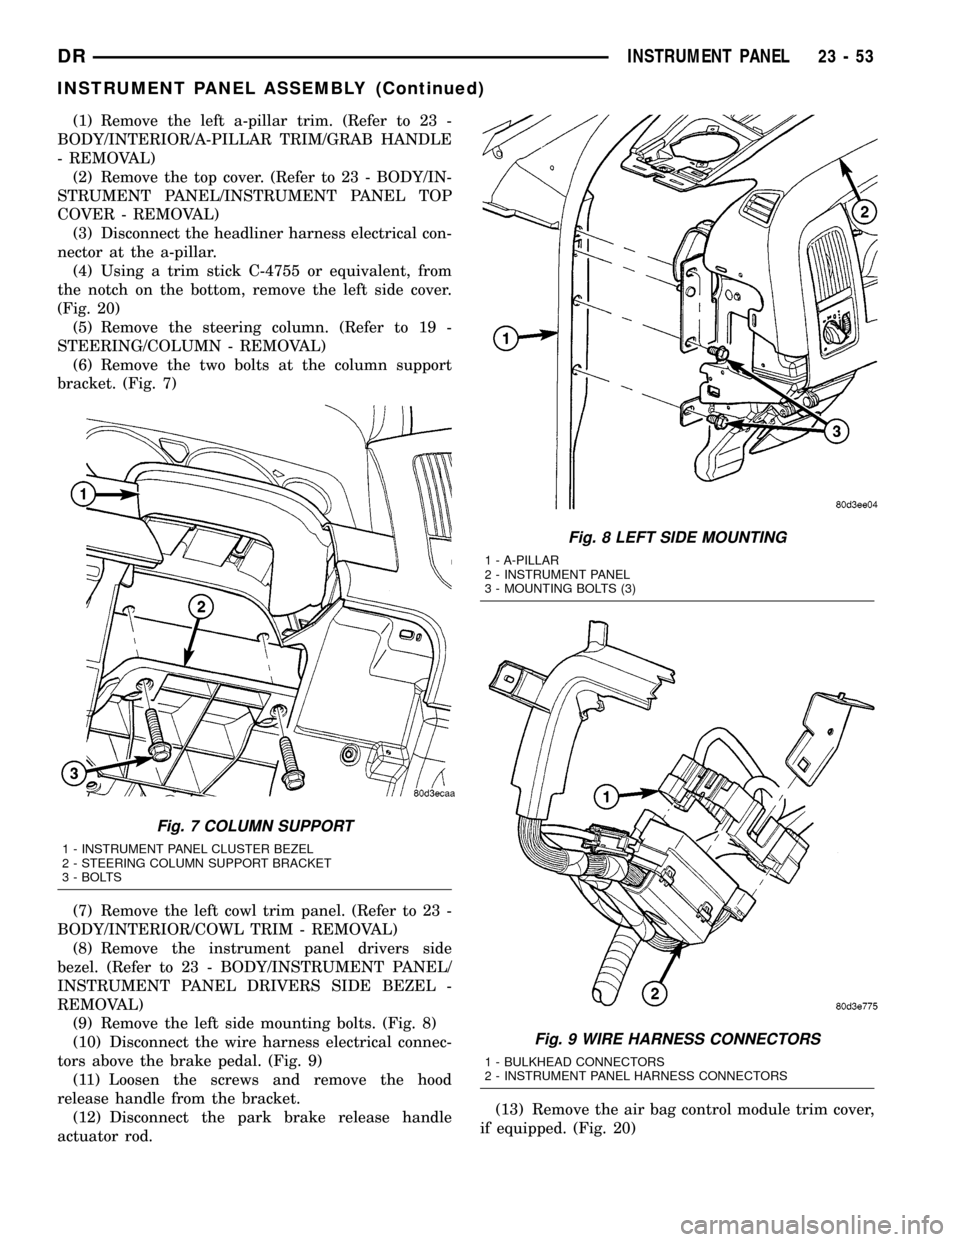
(6) Remove the two bolts at the column support
bracket. (Fig. 7)
(7) Remove the left cowl trim panel. (Refer to 23 -
BODY/INTERIOR/COWL TRIM - REMOVAL)
(8) Remove the instrument panel drivers side
bezel. (Refer to 23 - BODY/INSTRUMENT PANEL/
INSTRUMENT PANEL DRIVERS SIDE BEZEL -
REMOVAL)
(9) Remove the left side mounting bolts. (Fig. 8)
(10) Disconnect the wire harness electrical connec-
tors above the brake pedal. (Fig. 9)
(11) Loosen the screws and remove the hood
release handle from the bracket.
(12) Disconnect the park brake release handle
actuator rod.(13) Remove the air bag control module trim cover,
if equipped. (Fig. 20)
Fig. 7 COLUMN SUPPORT
1 - INSTRUMENT PANEL CLUSTER BEZEL
2 - STEERING COLUMN SUPPORT BRACKET
3 - BOLTS
Fig. 8 LEFT SIDE MOUNTING
1 - A-PILLAR
2 - INSTRUMENT PANEL
3 - MOUNTING BOLTS (3)
Fig. 9 WIRE HARNESS CONNECTORS
1 - BULKHEAD CONNECTORS
2 - INSTRUMENT PANEL HARNESS CONNECTORS
DRINSTRUMENT PANEL 23 - 53
INSTRUMENT PANEL ASSEMBLY (Continued)
Page 2349 of 2627
(14) Remove the floor console, if equipped. (Refer
to 23 - BODY/INTERIOR/FLOOR CONSOLE -
REMOVAL)
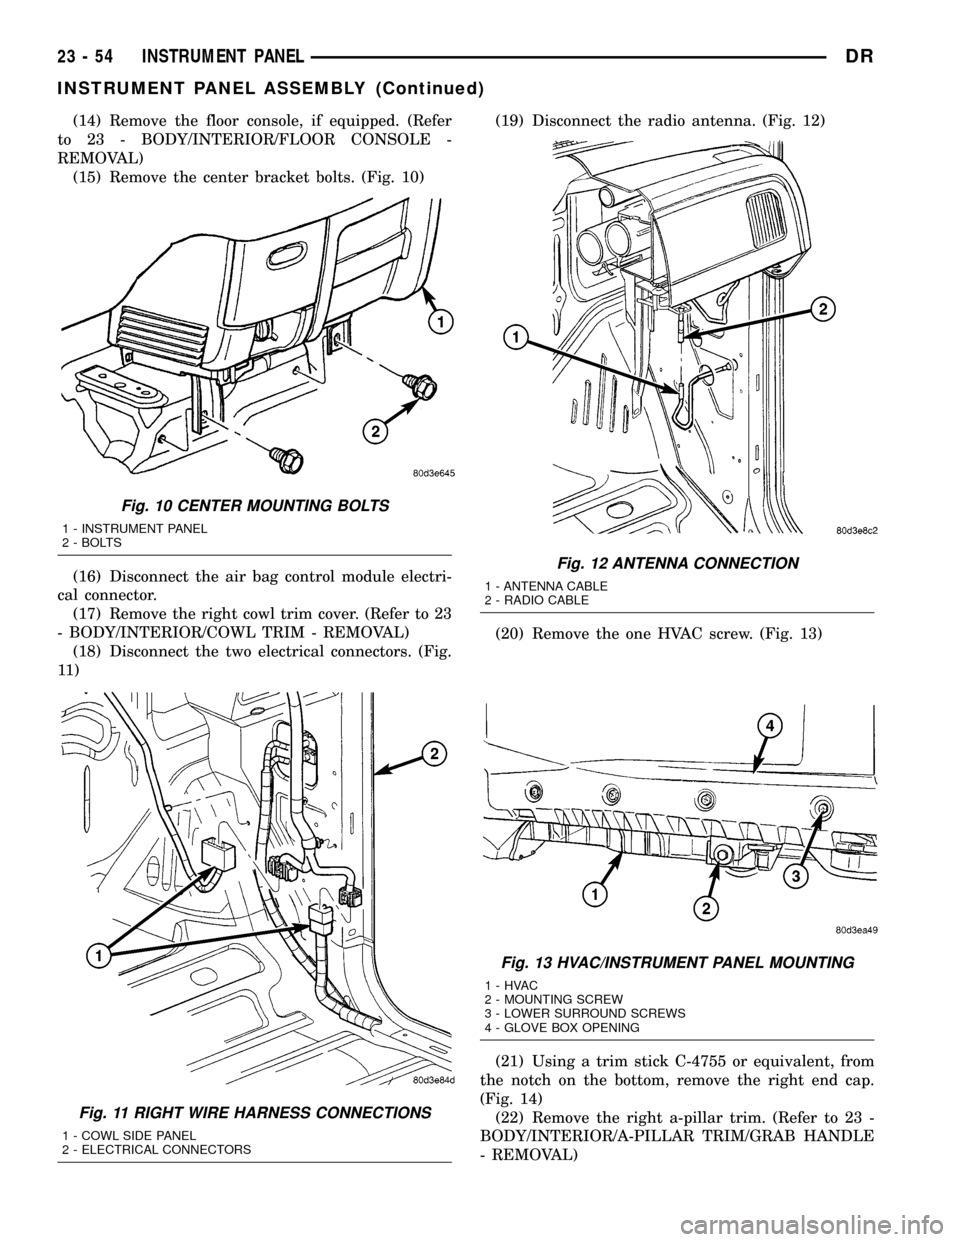
(15) Remove the center bracket bolts. (Fig. 10)
(16) Disconnect the air bag control module electri-
cal connector.
(17) Remove the right cowl trim cover. (Refer to 23
- BODY/INTERIOR/COWL TRIM - REMOVAL)
(18) Disconnect the two electrical connectors. (Fig.
11 )(19) Disconnect the radio antenna. (Fig. 12)
(20) Remove the one HVAC screw. (Fig. 13)
(21) Using a trim stick C-4755 or equivalent, from
the notch on the bottom, remove the right end cap.
(Fig. 14)
(22) Remove the right a-pillar trim. (Refer to 23 -
BODY/INTERIOR/A-PILLAR TRIM/GRAB HANDLE
- REMOVAL)
Fig. 10 CENTER MOUNTING BOLTS
1 - INSTRUMENT PANEL
2 - BOLTS
Fig. 11 RIGHT WIRE HARNESS CONNECTIONS
1 - COWL SIDE PANEL
2 - ELECTRICAL CONNECTORS
Fig. 12 ANTENNA CONNECTION
1 - ANTENNA CABLE
2 - RADIO CABLE
Fig. 13 HVAC/INSTRUMENT PANEL MOUNTING
1-HVAC
2 - MOUNTING SCREW
3 - LOWER SURROUND SCREWS
4 - GLOVE BOX OPENING
23 - 54 INSTRUMENT PANELDR
INSTRUMENT PANEL ASSEMBLY (Continued)
Page 2351 of 2627

(8) Install the left a-pillar trim. (Refer to 23 -
BODY/INTERIOR/A-PILLAR TRIM - INSTALLA-
TION)
(9) Position the left end cap and seat the attach-
ment clips fully.
(10) Install the right side mounting bolts on the
a-pillar and one right mounting bolt on the cowl side
panel and tighten to 12 N´m (9 ft. lbs.).
(11) Install the right a-pillar trim panel. (Refer to
23 - BODY/INTERIOR/A-PILLAR TRIM - INSTAL-
LATION)
(12) Position the right end cap and seat the
attachment clips fully.
(13) Install the one HVAC mounting screw.
(14) Connect the radio antenna.
(15) Connect the two electrical connectors at the
right cowl panel.
(16) Install the right cowl trim cover. (Refer to 23 -
BODY/INTERIOR/COWL TRIM - INSTALLATION)
(17) Connect the air bag control module electrical
connector.
(18) Install the center bracket bolts and tighten to
12 N´m (9 ft. lbs.).
(19) Install the floor console, if equipped. (Refer to
23 - BODY/INTERIOR/FLOOR CONSOLE - INSTAL-
LATION)
(20) Install the air bag control module cover, if
equipped.
(21) Connect the park brake release handle actua-
tor rod.
(22) Install the hood release handle and tighten
the screws.
(23) Install the two bolts at the column support
bracket and tighten to 14 N´m (10 ft. lbs.).
(24) Install the steering column. (Refer to 19 -
STEERING/COLUMN - INSTALLATION)
(25) Connect the wire harness electrical connectors
above the brake pedal.
(26) Install the two top instrument panel bolts and
tighten to 12 N´m (9 ft. lbs.).
(27) Install the four top instrument panel screws.
(28) Install the instrument panel top cover. (Refer
to 23 - BODY/INSTRUMENT PANEL/INSTRUMENT
PANEL TOP COVER - INSTALLATION)
INSTRUMENT PANEL
HEADLAMP SWITCH BEZEL
REMOVAL
WARNING: ON VEHICLES EQUIPPED WITH AIR-
BAGS, DISABLE THE AIRBAG SYSTEM BEFORE
ATTEMPTING ANY STEERING WHEEL, STEERING
COLUMN, SEAT BELT TENSIONER, OR INSTRU-
MENT PANEL COMPONENT DIAGNOSIS OR SER-VICE. DISCONNECT AND ISOLATE THE BATTERY
NEGATIVE (GROUND) CABLE, THEN WAIT TWO
MINUTES FOR THE AIRBAG SYSTEM CAPACITOR
TO DISCHARGE BEFORE PERFORMING FURTHER
DIAGNOSIS OR SERVICE. THIS IS THE ONLY SURE
WAY TO DISABLE THE AIRBAG SYSTEM. FAILURE
TO TAKE THE PROPER PRECAUTIONS COULD
RESULT IN ACCIDENTAL AIRBAG DEPLOYMENT
AND POSSIBLE PERSONAL INJURY.
(1) Using a trim stick C-4755 or equivalent,
release the top clips on the steering column opening
cover and the lower drivers side bezel.
(2) Using a trim stick C-4755 or equivalent,
release the switch bezel. (Fig. 17)
(3) Disconnect the electrical connector and remove
the bezel.
INSTALLATION
WARNING: ON VEHICLES EQUIPPED WITH AIR-
BAGS, DISABLE THE AIRBAG SYSTEM BEFORE
ATTEMPTING ANY STEERING WHEEL, STEERING
COLUMN, SEAT BELT TENSIONER, OR INSTRU-
MENT PANEL COMPONENT DIAGNOSIS OR SER-
VICE. DISCONNECT AND ISOLATE THE BATTERY
NEGATIVE (GROUND) CABLE, THEN WAIT TWO
MINUTES FOR THE AIRBAG SYSTEM CAPACITOR
TO DISCHARGE BEFORE PERFORMING FURTHER
DIAGNOSIS OR SERVICE. THIS IS THE ONLY SURE
WAY TO DISABLE THE AIRBAG SYSTEM. FAILURE
TO TAKE THE PROPER PRECAUTIONS COULD
RESULT IN ACCIDENTAL AIRBAG DEPLOYMENT
AND POSSIBLE PERSONAL INJURY.
(1) Connect the electrical connector.
Fig. 17 HEADLIGHT SWITCH BEZEL
1 - SWITCH BEZEL
2 - INSTRUMENT PANEL
3 - ELECTRICAL CONNECTOR
4 - HEADLIGHT SWITCH
23 - 56 INSTRUMENT PANELDR
INSTRUMENT PANEL ASSEMBLY (Continued)
Page 2352 of 2627
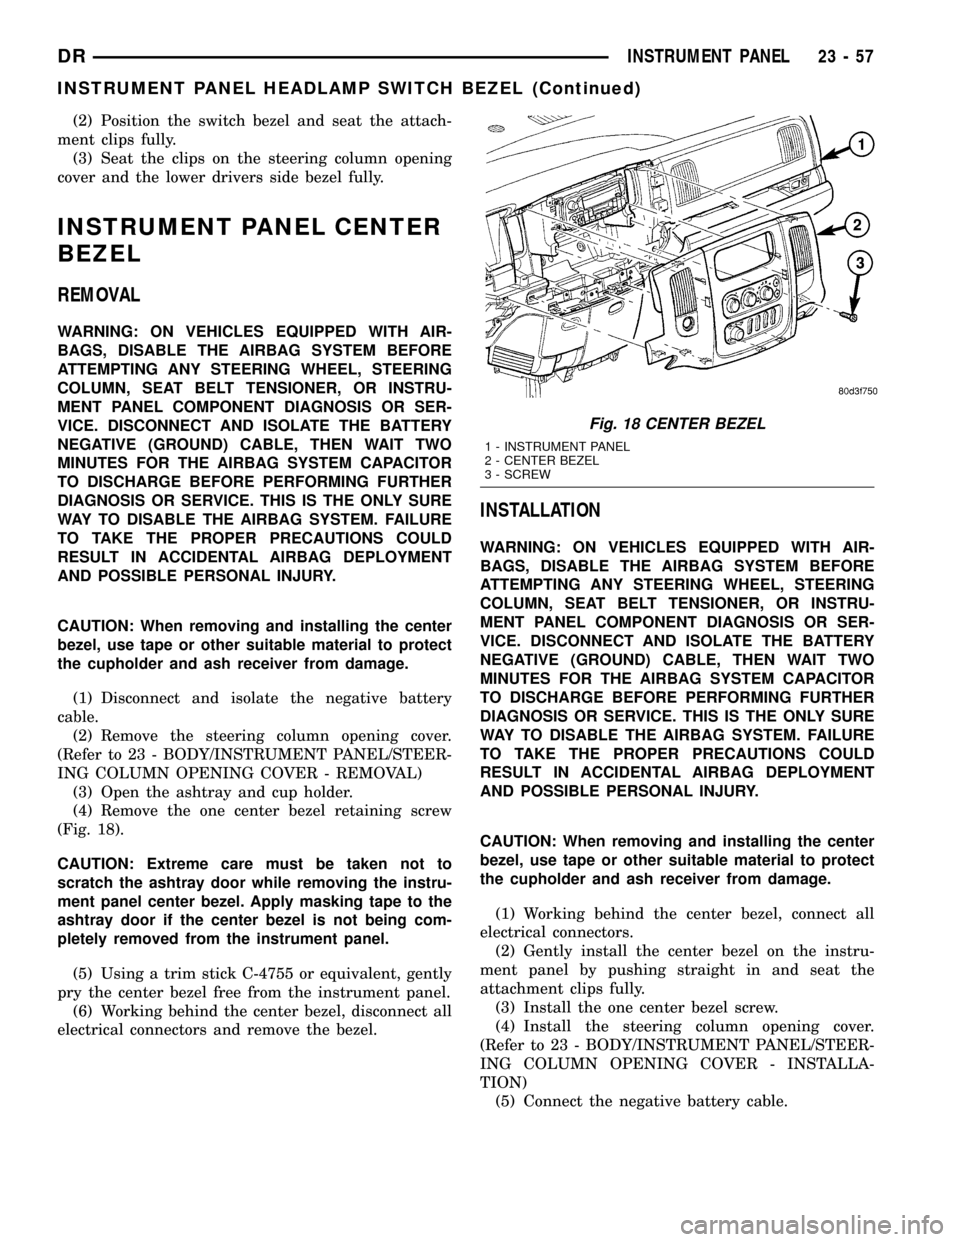
(2) Position the switch bezel and seat the attach-
ment clips fully.
(3) Seat the clips on the steering column opening
cover and the lower drivers side bezel fully.
INSTRUMENT PANEL CENTER
BEZEL
REMOVAL
WARNING: ON VEHICLES EQUIPPED WITH AIR-
BAGS, DISABLE THE AIRBAG SYSTEM BEFORE
ATTEMPTING ANY STEERING WHEEL, STEERING
COLUMN, SEAT BELT TENSIONER, OR INSTRU-
MENT PANEL COMPONENT DIAGNOSIS OR SER-
VICE. DISCONNECT AND ISOLATE THE BATTERY
NEGATIVE (GROUND) CABLE, THEN WAIT TWO
MINUTES FOR THE AIRBAG SYSTEM CAPACITOR
TO DISCHARGE BEFORE PERFORMING FURTHER
DIAGNOSIS OR SERVICE. THIS IS THE ONLY SURE
WAY TO DISABLE THE AIRBAG SYSTEM. FAILURE
TO TAKE THE PROPER PRECAUTIONS COULD
RESULT IN ACCIDENTAL AIRBAG DEPLOYMENT
AND POSSIBLE PERSONAL INJURY.
CAUTION: When removing and installing the center
bezel, use tape or other suitable material to protect
the cupholder and ash receiver from damage.
(1) Disconnect and isolate the negative battery
cable.
(2) Remove the steering column opening cover.
(Refer to 23 - BODY/INSTRUMENT PANEL/STEER-
ING COLUMN OPENING COVER - REMOVAL)
(3) Open the ashtray and cup holder.
(4) Remove the one center bezel retaining screw
(Fig. 18).
CAUTION: Extreme care must be taken not to
scratch the ashtray door while removing the instru-
ment panel center bezel. Apply masking tape to the
ashtray door if the center bezel is not being com-
pletely removed from the instrument panel.
(5) Using a trim stick C-4755 or equivalent, gently
pry the center bezel free from the instrument panel.
(6) Working behind the center bezel, disconnect all
electrical connectors and remove the bezel.
INSTALLATION
WARNING: ON VEHICLES EQUIPPED WITH AIR-
BAGS, DISABLE THE AIRBAG SYSTEM BEFORE
ATTEMPTING ANY STEERING WHEEL, STEERING
COLUMN, SEAT BELT TENSIONER, OR INSTRU-
MENT PANEL COMPONENT DIAGNOSIS OR SER-
VICE. DISCONNECT AND ISOLATE THE BATTERY
NEGATIVE (GROUND) CABLE, THEN WAIT TWO
MINUTES FOR THE AIRBAG SYSTEM CAPACITOR
TO DISCHARGE BEFORE PERFORMING FURTHER
DIAGNOSIS OR SERVICE. THIS IS THE ONLY SURE
WAY TO DISABLE THE AIRBAG SYSTEM. FAILURE
TO TAKE THE PROPER PRECAUTIONS COULD
RESULT IN ACCIDENTAL AIRBAG DEPLOYMENT
AND POSSIBLE PERSONAL INJURY.
CAUTION: When removing and installing the center
bezel, use tape or other suitable material to protect
the cupholder and ash receiver from damage.
(1) Working behind the center bezel, connect all
electrical connectors.
(2) Gently install the center bezel on the instru-
ment panel by pushing straight in and seat the
attachment clips fully.
(3) Install the one center bezel screw.
(4) Install the steering column opening cover.
(Refer to 23 - BODY/INSTRUMENT PANEL/STEER-
ING COLUMN OPENING COVER - INSTALLA-
TION)
(5) Connect the negative battery cable.
Fig. 18 CENTER BEZEL
1 - INSTRUMENT PANEL
2 - CENTER BEZEL
3 - SCREW
DRINSTRUMENT PANEL 23 - 57
INSTRUMENT PANEL HEADLAMP SWITCH BEZEL (Continued)
Page 2378 of 2627

SEAT CUSHION / COVER -
FRONT
REMOVAL
(1) Remove the front seat. (Refer to 23 - BODY/
SEATS/SEAT - FRONT - REMOVAL)
(2) Remove the screw and remove the recliner han-
dle.
(3) Remove the two screws and remove the power
seat controls, if equipped, and disconnect the electri-
cal connector.
(4) Remove the seat track. (Refer to 23 - BODY/
SEATS/SEAT TRACK - REMOVAL)
(5) Disconnect the j-straps and remove the seat
cushion and cover.
INSTALLATION
(1) Position the seat cushion and cover onto the
frame assembly and connect the j-straps.
(2) Install the seat track. (Refer to 23 - BODY/
SEATS/SEAT TRACK - INSTALLATION)
(3) Connect the power seat control switch electrical
connector, if equipped.
(4) Install the power seat control switch and
install the two screws, if equipped.
(5) Install the recliner handle and install the
screw.
(6) Install the front seat. (Refer to 23 - BODY/
SEATS/SEAT - FRONT - INSTALLATION)
SEAT TRACK
REMOVAL
(1) Remove the front seat. (Refer to 23 - BODY/
SEATS/SEAT - FRONT - REMOVAL)
(2) Disconnect the heated seat electrical connec-
tors, if equipped.
(3) Remove the four nuts attaching the seat track
to the seat and remove the track.
INSTALLATION
(1) Position the seat track onto the seat and install
the four nuts.
(2) Tighten the four nuts to 25 N´m (18 ft. lbs.).
(3) Connect the heated seat electrical connectors, if
equipped.
(4) Install the seat. (Refer to 23 - BODY/SEATS/
SEAT - FRONT - INSTALLATION)
SEAT - REAR
REMOVAL
(1) Remove the load floor. (Refer to 23 - BODY/IN-
TERIOR/LOAD FLOOR - REMOVAL)
(2) Fold the rear seat cushions up and remove the
rear bolts. (Fig. 17)
(3) Lift each seat assembly up and disengage the
seat back frame hooks from the footmans loops bolted
to the rear cab back. (Fig. 18)
(4) Remove the seats from the vehicle.
INSTALLATION
(1) Install the seats into the vehicle and engage
the seat back frame hooks with the footmans loops in
the cab back panel.
(2) Install the rear seat bolts and tighten to 40
N´m (30 ft. lbs.).
(3) Install the load floor. (Refer to 23 - BODY/IN-
TERIOR/LOAD FLOOR - INSTALLATION)
SEAT BACK - REAR
REMOVAL
(1) Remove the rear seat. (Refer to 23 - BODY/
SEATS/SEAT - REAR - REMOVAL)
(2) Remove the seat back bolts and remove the
seat back. (Fig. 19)
INSTALLATION
(1) Install the seat back and install the bolts.
(2) Tighten the bolts to 25 N´m (18 ft. lbs.).
Fig. 17 SEAT ATTACHMENT
1 - OUTER BOLTS (2)
2 - REAR SEAT ASSEMBLY
3 - INNER BOLTS (4)
4 - REAR SEAT BACK
5 - OUTER BOLTS (2)
DRSEATS 23 - 83