1998 CHEVROLET EXPRESS tire size
[x] Cancel search: tire sizePage 190 of 386

Downloaded from www.Manualslib.com manuals search engine Loading Your Vehicle
COLD TIRE PRESSURE
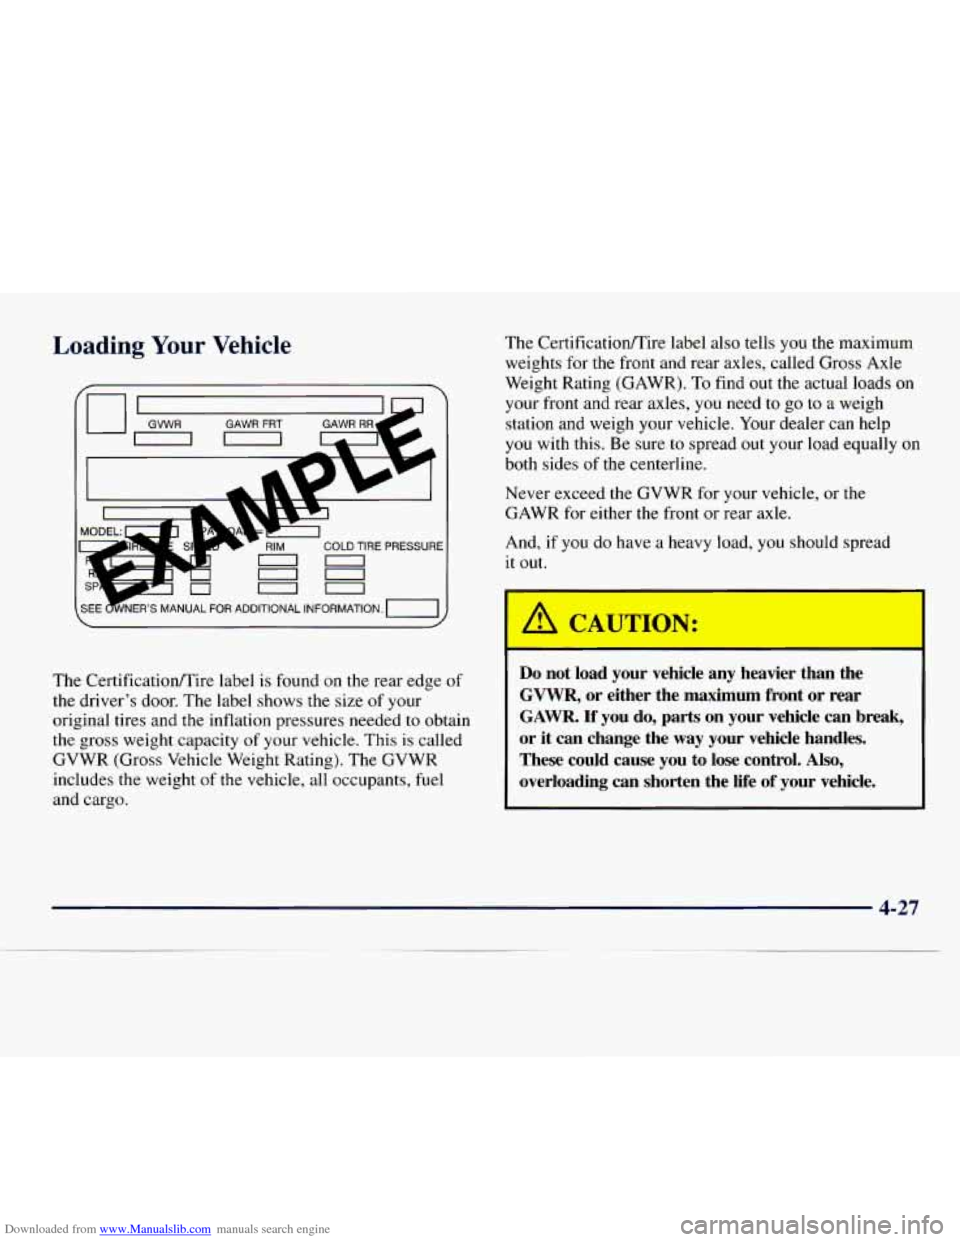
The Certificationrnire label is found on the rear edge of
the driver's door. The label shows the size
of your
original tires and the inflation pressures needed to obtain
the gross weight capacity of your vehicle. This is called
GVWR (Gross Vehicle Weight Rating). The GVWR
includes the weight of the vehicle, all occupants, fuel
and cargo. The
Certificatioflire label also tells you the maximum
weights for the front and rear axles, called
Gross Axle
Weight Rating (GAWR).
To find out the actual loads on
your front and rear axles, you need to go to a weigh
station and weigh your vehicle. Your dealer can help
you with
this. Be sure to spread out your load equally on
both sides of the centerline.
Never exceed the GVWR for your vehicle, or the
GAWR
for either the front or rear axle.
And, if you do have a heavy load, you should spread
it out.
I
I
A QUI 0 :
Do not load your vehicle any heavier than the
GVWR, or either the maximum front or rear
GAWR. If you do, parts on your vehicle can break,
or
it can change the way your vehicle handles.
These could cause you to lose control.
Also,
overloading can shorten the life of your vehicle.
4-27
Page 195 of 386

Downloaded from www.Manualslib.com manuals search engine 1 Total Weight on Your Vehicle’s Tires
Be sure your vehicle’s tires are inflated to the upper
limit for cold tires. You’ll find these numbers on the
Certification label at the rear edge of the driver’s door or
see “Tire Loading” in the Index. Then be sure you don’t
go over the
GVW limit for your vehicle, including the
weight of the trailer tongue.
witches
It’s important to have the correct hitch equipment.
Crosswinds, large trucks going by and rough roads are a
few reasons why you’ll need the right hitch. Here are
some rules to follow:
1 The bumpers on your vehicle are not intended for
hitches.
Do not attach rental hitches or other
bumper-type hitches to them. Use only a
frame-mounted hitch that does not attach to the
bumper.
Do not use a ball hitch, because it could pull
the bumper loose.
0 If you’ll be pulling a trailer that, when loaded, will
weigh
more than 4,000 lbs. (1 800 kg), be sure to use
a properly mounted, weight-distributing hitch and
sway control of the proper size.
This equipment is
very important for proper vehicle loading and good
handling when you’re driving.
0 Will you have to make any holes in the body of your
vehicle when
you install a trailer hitch?
If you’re using the wiring provided by the
factory-installed hitch, you should not need to make
any holes in the body of your vehicle. However, if
you have an aftermarket hitch installed, you may
need to make holes in the body.
If
you do, then be sure to seal the holes later when
you remove the hitch. If you don’t seal them, deadly
carbon monoxide (CO) from your exhaust can get
into your vehicle (see “Carbon Monoxide” in the
Index). Dirt and water can, too.
Page 224 of 386

Downloaded from www.Manualslib.com manuals search engine Removing the Spare Tire and Tools
::.. ..,. .. .
. . . . , . . .. . .j
Your spare tire is stored underneath the rear of your
vehicle. You will use the ratchet and extension to lower
the spare tire.
A flat rear tire reduces clearance to remove the spare
tire. If there is less than 12 inches (30.48 cm) between
the ground and the rear bumper or any trailer hitch, jack
up the vehicle until the flat tire is
off the ground. (See
“Removing the Flat Tire” and “Installing the Spare
Tire,” Steps
4 through 8, in this section.) Unless your vehicle has
a flat rear tire, do not remove
or restore a tire frodto a storage position under the
vehicle while the vehicle is supported by a jack. Always
tighten the tire fully against the underside
of the vehicle
when restoring.
If you have a vehicle which was completed from a cab
and chassis, refer to the information from the body
supplierhnstaller.
The spare
tire is a full size tire, like the other tires on
your vehicle.
For cargo vans, and all
passenger vans except those
with the 15-passenger
seating arrangement, the
jack is secured in the rear
passenger side corner
of
the vehicle.
Remove the retaining wing
bolt and lift it off the
mounting bracket. Set the jack and jacking equipment
near the flat tire.
5-23
Page 284 of 386

Downloaded from www.Manualslib.com manuals search engine When It’s Time for New Tires
One way to tell when it’s
time for new tires
is to
check the treadwear
indicators, which will
appear when your tires have
only 1/16 inch
(1.6 mm) or
less
of tread remaining.
Some commercial truck
tires may not have
treadwear indicators.
You need
a new tire if any of the following statements
are true:
You can see the indicators at three or more places
around the tire.
You can see cord or fabric showing through the
tire’s rubber.
The tire has a bump, bulge or split.
The tire has a puncture, cut or other damage that
can’t be repaired well because of the size or location
of the damage.
Dual Tire Operation
When the vehicle is new, or whenever a wheel, wheel
bolt or wheel nut is replaced, check the wheel nut
torque after
100, 1,000 and 6,000 miles (160, 1 600 and
10 000 km) of driving. For proper torque, see “Wheel
Nut Torque” in the Index.
The outer tire on
a dual wheel setup generally wears
faster than the inner tire. Your tires will wear more
evenly and last longer if you rotate the tires periodically.
If you’re going to be doing a lot of driving on
high-crown roads, you can reduce tire wear by adding
5 psi (35 kPa) to the tire pressure in the outer tires. Be
sure to return
to the recommended pressures when no
longer driving under those conditions. See “Changing a
Flat Tire”
in the Index for more information.
0 The tread or sidewall is cracked, cut or snagged deep
enough
to show cord or fabric.
6-45
__
Page 285 of 386

Downloaded from www.Manualslib.com manuals search engine I A CAUTION:
If you operate your vehicle with a tire that is
badly underinflated, the tire can overheat.
An
overheated tire can lose air suddenly or catch
fire. You or others could be injured. Be sure all
tires (including the spare) are properly inflated.
Buying New Tires
To find out what kind and size of tires you need, look at
the CertificatiodTire label.
The tires installed
on your vehicle when it was new had
a Tire Performance Criteria Specification (TPC Spec)
number on each tire’s sidewall. When you get new tires,
get ones with that same TPC Spec number. That way
your vehicle will continue
to have tires that are designed
to give proper endurance, handling, speed rating,
traction, ride and other things during normal service
on your vehicle. If your tires have an all-season tread
design, the TPC number will be followed by an
“MS”
(for mud and snow). If you
ever replace your tires with those
not having a
TPC Spec number, make sure they are the same size,
load range, speed rating and construction type (bias,
bias-belted or radial) as your original tires.
Mixing tires could cause you to lose control while
driving.
If you mix tires of different sizes or types
(radial and bias-belted tires), the vehicle may not
handle properly, and you could have a crash.
Using tires
of different sizes may also cause
damage
to your vehicle. Be sure to use the same
size and type tires on all wheels.
Page 289 of 386

Downloaded from www.Manualslib.com manuals search engine Whenever a wheel, wheel bolt or wheel nut is replaced
on
a dual wheel setup, check the wheel nut torque after
100, 1,000 and 6,000 miles ( 160, 1 600 and 10 000 km)
of driving. For proper torque, see “Wheel Nut Torque’’
in the Index.
See “Changing
a Flat Tire” in the Index for more
information.
Used Replacement Wheels
Putting a used wheel on your vehicle is
dangerous. You can’t know how it’s been used or
how
far it’s been driven. It could fail suddenly
and cause an accident. If you have to replace
a
wheel, use a new GM original equipment wheel.
NOTICE:
Use tire chains only where legal and only when you
must. Use chains that are the proper size for your
tires. Install them on the tires of the rear axle.
Tighten them as tightly as possible with the ends
securely fastened. Drive slowly and follow the
chain manufacturer’s instructions. If you can
hear the chains contacting your vehicle, stop
and retighten them.
If the contact continues,
slow down until it stops. Driving too fast
or
spinning the wheels with chains on will
damage your vehicle.
6-50
Page 298 of 386

Downloaded from www.Manualslib.com manuals search engine Care Materials Chart
Appearance
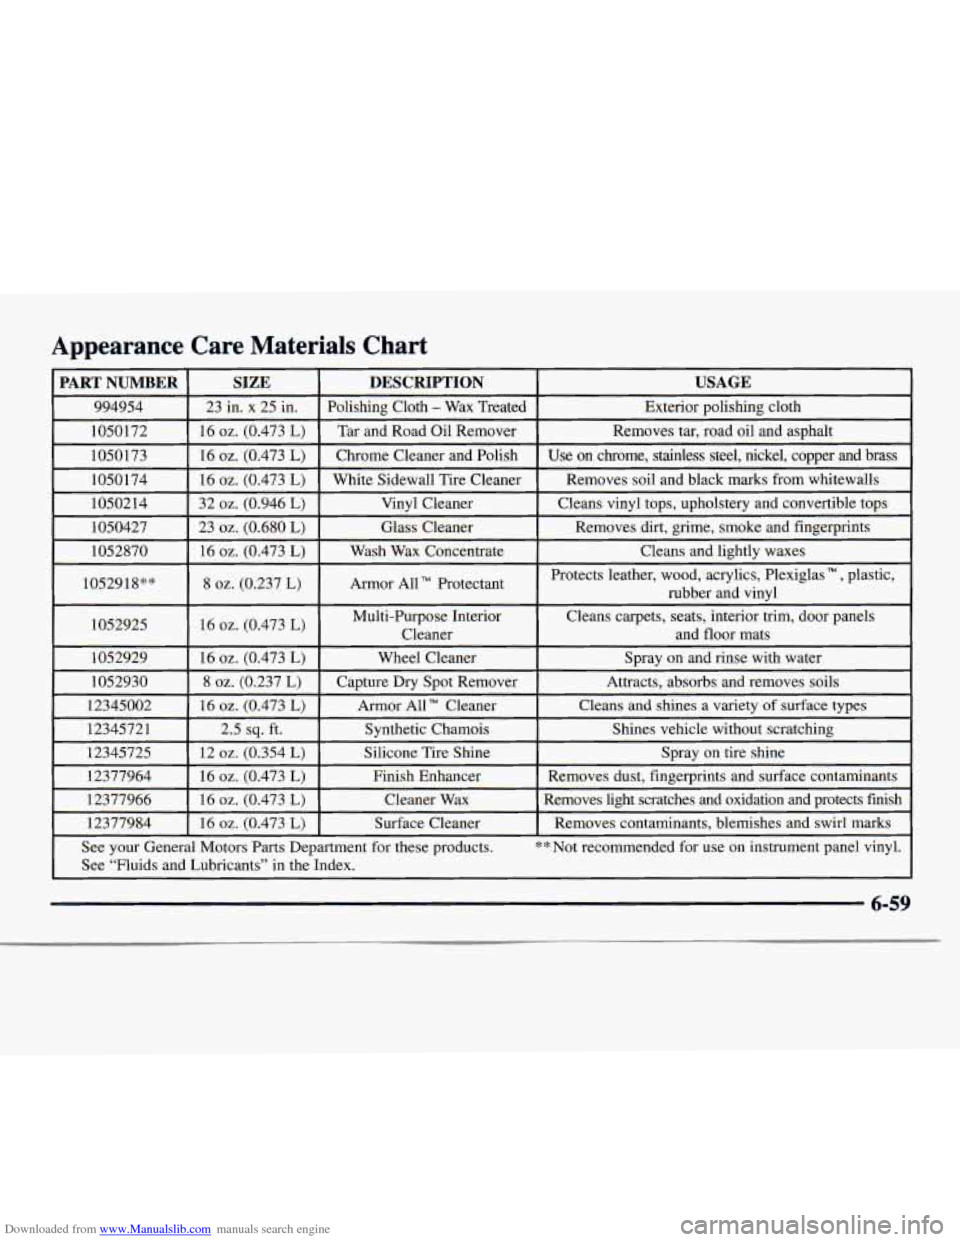
PART NUMBER
994954
1050172
1050173 1050 174
10502
14
1050427
1052870
1052918**
1052925 1052929
1052930
12345002
12345721
12345725
12377964
12377966
12377984
SIZE
23 in. x 25 in.
16
oz. (0.473 L)
16 oz. (0.473 L)
16 02. (0.473 L)
32
02. (0.946 L)
23
oz. (0.680 L)
16 oz. (0.473 L)
8 oz. (0.237 L)
16 oz. (0.473 L)
16 oz. (0.473 L)
8 02. (0.237 L)
16 02. (0.473 L)
2.5 sq. ft.
12
oz. (0.354 L)
16 02. (0.473 L)
16 02. (0.473 L)
16 02. (0.473 L)
DESCRIPTION
Exterior polishing cloth
Polishing Cloth - Wax
Treated
USAGE
Tar and Road Oil Remover
Removes soil and black marks from whitewalls
White Sidewall Tire Cleaner Use on chrome, stainless steel, nickel, copper and brass Chrome\
Cleaner and Polish Removes
tar, road oil and asphalt
Vinyl Cleaner
Removes dirt, grime, smoke and fingerprints
Glass Cleaner Cleans
vinyl tops, upholstery and convertible tops
Wash Wax Concentrate Cleans
and lightly waxes
-
Armor All Protectant Protects
leather, wood, acrylics, Plexiglas N, plastic,
rubber and vinyl
..___
Multi-Purpose Interior
Cleans carpets, seats, interior trim, door panels
Cleaner and floor mats
Wheel Cleaner Spray on and rinse with water
Capture Dry Spot Remover
Attracts, absorbs and removes soils
Armor All Cleaner Cleans and shines
a
variety of surface types
Synthetic Chamois
Spray on tire shine
Silicone Tire Shine Shines vehicle
without scratching
Finish Enhancer
Removes light scratches and oxidation and protects finish
Cleaner
Wax Removes dust, fingerprints
and surface contaminants
Surface Cleaner Removes contaminants, blemishes and swirl marks
See your General Motors Parts Department for these products.
** Not recommended for use on instrument panel vinyl.
See “Fluids and Lubricants’’ in the Index.
6-59