1998 CADILLAC SEVILLE lights
[x] Cancel search: lightsPage 109 of 378
Downloaded from www.Manualslib.com manuals search engine When cleaning the mirror, use a paper towel or similar material dampened with glass cleaner.
Do not spray
glass cleaner directly
on the mirror as that may cause the
liquid cleaner to enter the mirror housing.
Mirror Operation
The right side of the switch located at the bottom of the
mirror turns the electrochromic mirror on and
off. To
turn on the automatic dimming feature, press MIRROR.
To turn off automatic dimming, press MIRROR again.
The indicator light will be illuminated when this feature
is active.
Time Delay
The automatic mirror has a time delay feature which
prevents unnecessary switching from the night back
to
the day position. This delay prevents rapid changing of
the mirror as you drive under lights and through traffic.
Cleaning the Photocells
Use a cotton swab and glass cleaner to clean the
photocells when necessary.
Compass Operation
Press the COMPASS switch once to turn the compass on
or
off.
When the ignition and the compass feature are on, the
compass will show two character boxes for
approximately two seconds. After two seconds, the
mirror will display the compass heading.
Compass Calibration
If, after two seconds, the display does not show a
compass heading
(“N’ for North, for example), there
may be a strong magnetic field interfering with the
compass. Such interference may be caused by a
magnetic antenna mount, magnetic note pad holder or a
similar magnetic item. If the letter
“C” should ever
appear in the compass window, the mirror
needs calibration.
The mirror can be calibrated in one of two ways:
Drive the vehicle in circles at 5 mph (8 km/h) or less
Drive the vehicle on your everyday routine. until the display reads a direction, or
2-48
Page 122 of 378
Downloaded from www.Manualslib.com manuals search engine The instrument panel is designed to let you know at a glance how your vehicle is running. You’ll know how fast
you’re going, how much fuel you’re using and many
of the other things you’ll need to know to drive safely and
economically. The main components of the instrument panel are:
1. Air Outlets 13. Fuel Door Release
2. Driver Information Center Control Buttons 14. Trunk Release
3. Turn SignaVLights 15. HVAC Steering Wheel Controls
4. Cluster 16. Horn
5. Windshield Wiperwasher Lever 17. Audio Steering Wheel Controls
6. Cruise Control Lever 18. Seat Heater Switch
7. Ignition Switch 19. Traction Control Switch
8. Air Vent Control Dial
20. Console Shift Lever
9. Hazard Warning Button
2 1. Convenience S torage/Optional Ashtray
10. Radio
22. Electronic Climate Controls
11. Lamp Controls 23. Glove Box
12. Hood Release
Page 125 of 378
Downloaded from www.Manualslib.com manuals search engine Vehicle Speed Limiter
This feature prevents your vehicle from exceeding
speeds that the tires are not rated for. When this
happens, the engine’s fuel supply is shut
off. When the
vehicle speed slows, the fuel supply will come on again.
Tach neter
This gage indicates the
engine speed in revolutions
per minute (rpm).
Engine Speed Limiter
This feature prevents the engine from operating at too
many revolutions per minute (rpm). When the engine’s
rpm are critically high, the fuel supply to the engine is
shut
off. When the engine speed slows, the fuel supply
will come on again. This helps prevent damage to
the engine.
Warning Lights, Gages and Indicators
This part describes the warning lights and gages that may be on your vehicle. The pictures will help
you
locate them.
Warning lights and gages can signal that something
is
wrong before it becomes serious enough to cause an
expensive repair or replacement. Paying attention to
your warning lights and gages could also save you or
others from injury.
Warning lights come on when there may be or is a
problem with one of your vehicle’s functions.
As you
warning lights come on briefly when you start the
familiar with this section, you should not be alarmed when this happens.
NOTICE: will see in the details on the next few pages, some
Do not operate the engine with the tachometer in
the red area or engine damage may occur.
engine just to let you know they’re working. If you are
2-64
Page 126 of 378
Downloaded from www.Manualslib.com manuals search engine Gages can indicate when there may be or is a problem
with one of your vehicle’s functions. Often gages and
warning lights work together to let you know when
there’s a problem with your vehicle.
When one
of the warning lights comes on and stays on
when you are driving, or when one
of the gages shows
there may be
a problem, check the section that tells you
what to do about it. Please follow
this manual’s advice.
Waiting to do repairs can be costly
-- and even
dangerous.
So please get to know your warning lights
and gages. They’re a big help.
Your vehicle also has a Driver Information Center that
works along with the warning lights and gages. See “Driver Information Center” in the Index.
Safety Belt Reminder Light
When the key is turned to ON or START, a chime will
come on for about eight seconds to remind people to
fasten their safety belts.
The safety belt light will also come on and stay on
for about
70 seconds. If the
driver’s belt is already
buckled, neither the chime
nor the light will come
on.
Air Bag Readiness Light
There is an air bag readiness light on the instrument
panel, which shows
AIR BAG. The system checks the
air bag’s electrical system for malfunctions. The light
tells you if there is an electrical problem. The system
check includes the air bag sensors, the air bag modules,
the wiring and the crash sensing and diagnostic module.
For more information on the air bag system, see “Air
Bag” in the Index.
2-6 -
Page 135 of 378
Downloaded from www.Manualslib.com manuals search engine Lights On Reminder Light Fuel Gage
I
ON
I United States
Canada
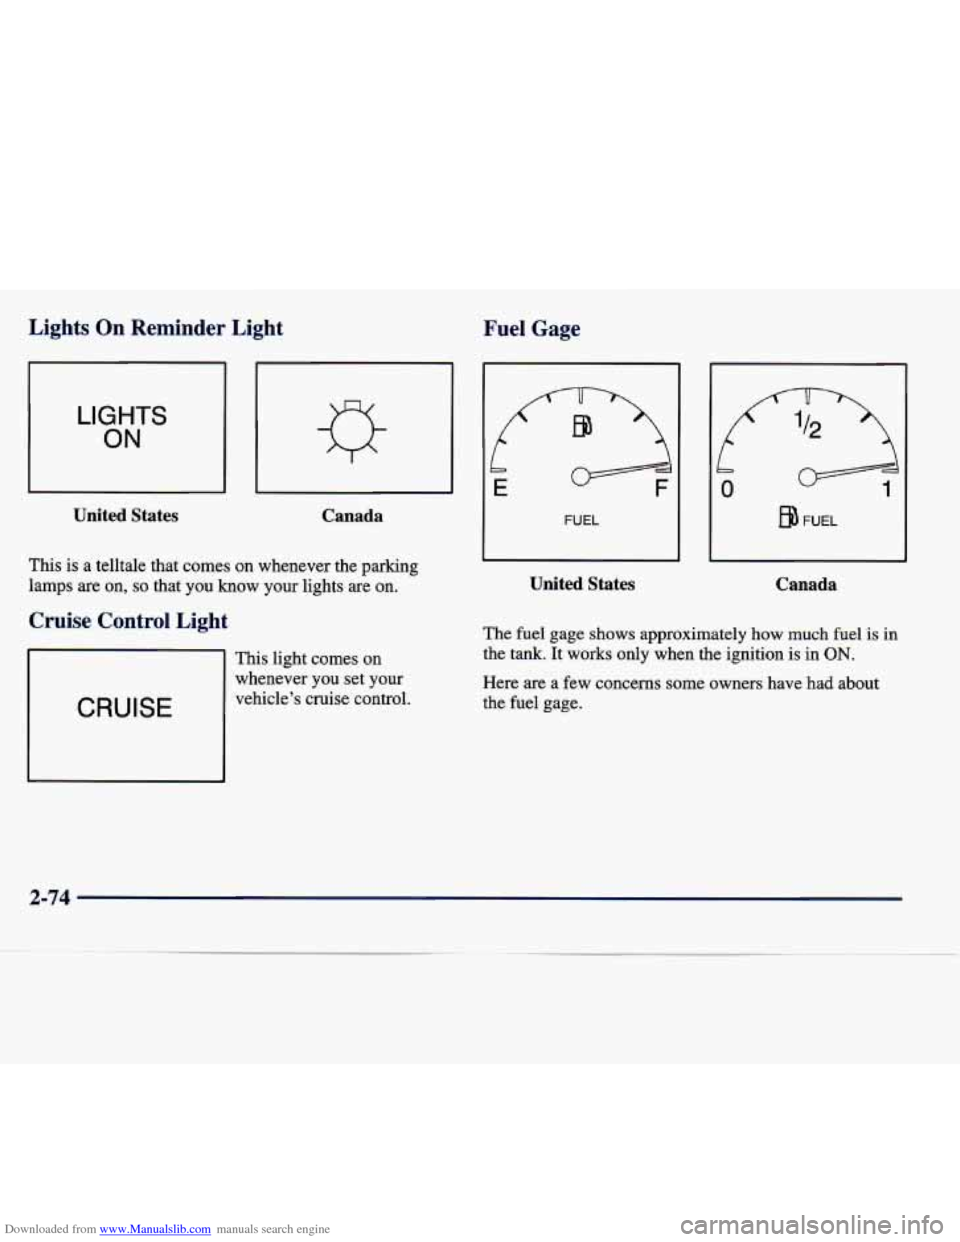
This is a telltale that comes on whenever the parking
lamps are on,
so that you know your lights are on.
Cruise Control Light
CRUISE
This light comes on
whenever
you set your
vehicle’s cruise control.
b
E
FUEL
United States
FUEL
Canada
The fuel gage shows approximately how much fuel is in
the tank. It works only when the ignition is in ON.
Here are a few concerns some owners have had about
the fuel gage.
Page 138 of 378
Downloaded from www.Manualslib.com manuals search engine Remote Confirmation Lights Flash at Lock
Press the down arrow on the INFO button one or more
times until the LIGHTS FLASH
AT LOCK prompt
appears on the DIC display.
To turn the feature on, press
the ON/OFF button until ON appears. If all the doors are
closed, the parking lamps will blink once when the lock
button on the RKE transmitter is pressed. The lamps
will not flash if the manual parklamp switch is active.
To turn the feature off, press the ON/OFF button until
OFF appears.
This personalization
feature allows the driver to
program the parking lamps to blink or to remain off
when the lock or unlock buttons on the RKE transmitter
are pressed and the horn to sound when the lock button
on the
RKE transmitter is pressed. Press the INFO
button one
or more times until the FEATURE
PROGRAMMING prompt appears on the Driver
Information Center (DIC) display. Press the ON/OFF
button to enter FEATURE PROGRAMMING. To exit,
press the INFO RESET button.
Lights Flash at Unlock
Press the down arrow on the INFO button one or more
times until the LIGHTS FLASH AT UNLOCK prompt
appears. To turn this feature on, press the
ON/OFF
button until ON is displayed on the DIC. If all the doors
are closed, the parking lamps will blink twice when the
unlock button on the RKE transmitter is pressed. To turn the feature off, press the
ON/OFF button until the OFF
prompt appears.
Horn Sounds at Lock
Press the down arrow on the INFO button one or more
times until the HORN SOUNDS AT LOCK prompt
appears on the DIC display. To turn the feature on, press
the ON/OFF button until ON appears. If all the doors are
closed, the horn will chirp once when the lock button on
the RISE transmitter is pressed.
To turn the feature off,
press the ON/OFF button until OFF appears.
2-77
Page 139 of 378
Downloaded from www.Manualslib.com manuals search engine Exterior Lighting Programmable Automatic Door Locks
Press the INFO button one or more times until the
FEATURE PROGRAMMING prompt appears on the DIC display. Press the ON/OFF button to enter
FEATURE PROGRAMMING.
To exit, press the INFO
RESET button.
This personalization feature enables the driver
to
program the exterior lamps to turn on or to remain off
when using the RKE transmitter to unlock the vehicle.
During dark or nighttime conditions, if exterior lighting
is selected, the parking lamps, taillamps, reverse lamps,
high-beam headlamps, etc. will turn on for about
20 seconds or until a door is opened, until the key is
turned out of
OFF or until the RKE is used to lock
the vehicle.
Press the INFO button one or more times until the
FEATURE PROGRAMMING prompt appears on the
Driver Information Center (DIC) display. Press the ON/OFF button to enter FEATURE PROGRAMMING.
To exit, press the INFO RESET button. Press the down
arrow on the
INFO button one or more times until the
EXT LIGHTS AT UNLOCK prompt appears.
To turn the feature on, press the ON/OFF button until
ON is displayed.
To turn the feature off, press the
ON/OFF button until
OFF is displayed.
Doors Lock in Gear
Press the down arrow on the INFO button one or more
times until the DOORS LOCK IN GEAR prompt
appears. This feature will automatically lock all doors
when the vehicle is shifted out of PARK (P). To turn the
feature
on, press ON/OFF until ON is displayed on the
DIC.
To turn the feature off, press ON/OFF until OFF
is displayed.
Driver Unlock in PARK (P)
Press the down arrow on the INFO button one or more
times until the
DRIVER UNLOCK IN PARK (P)
prompt appears. This feature will automatically unlock
only the driver’s door when the vehicle is shifted into
PARK (P). To turn the feature on, press ON/OFF until
ON is displayed on the DIC. To turn the feature off,
press ON/OFF until OFF is displayed.
2-78
Page 213 of 378

Downloaded from www.Manualslib.com manuals search engine Here are some tips on night driving.
0 Drive defensively.
0 Don’t drink and drive.
Since you can’t see as well, you may need to
slow down and keep more space between you and
other vehicles.
Slow down, especially on higher speed roads. Your
headlamps can light up only
so much road ahead.
In remote areas, watch for animals.
If you’re tired, pull off the road in a safe place
and rest.
Night Vision
No one can see as well at night as in the daytime. But as
we get older these differences increase. A 50-year-old
driver may require at least twice as much light to see the
same thing at night as a 20-year-old.
What you do in the daytime can also affect your night vision. For example, if you spend the day in bright
sunshine you are wise to wear sunglasses. Your eyes
will have less trouble adjusting to night. But if you’re
driving, don’t wear sunglasses at night. They may cut
down on glare from headlamps, but they also make a lot
of things invisible. You
can be temporarily blinded by approaching
headlamps. It can take a second or two, or even several
seconds,
for your eyes to readjust to the dark. When
you are faced with severe glare (as from a driver who
doesn’t lower the high beams, or a vehicle with
misaimed headlamps), slow down a little. Avoid staring
directly into the approaching headlamps.
Keep your windshield and all the glass on your vehicle
clean
-- inside and out. Glare at night is made much
worse by dirt on the glass. Even the inside
of the glass
can build
up a film caused by dust. Dirty glass makes
lights dazzle and flash more than clean glass would,
making the pupils of your eyes contract repeatedly.
Remember that your headlamps light up far less of a
roadway when you are in a turn or curve. Keep your
eyes moving; that way, it’s easier to pick out dimly
lighted objects. Just as your headlamps should be
checked regularly for proper aim,
so should your eyes
be examined regularly. Some drivers suffer from night
blindness
-- the inability to see in dim light -- and aren’t
even aware of it.
4-16