1998 CADILLAC DEVILLE radio
[x] Cancel search: radioPage 10 of 386

Downloaded from www.Manualslib.com manuals search engine ,For the 1948 model, Cadillac introduced the legendary
tail fin which once more set the trend in automotive
styling
for nearly two decades. This was closely
followed with the two door hardtop Coupe DeVille and
the industry's fist modern overhead valve, high
Engineering innovations, conveniences and styling dominated
the '50s and '60s. Cruise control, automatic
3 climate control, tilt and telescoping steering wheels,
twilight sentinel and four door hard tops all debuted in
these years.
In 1957 the Eldorado Brougham featured
- compression V8 engine on the 1949 model. advances such as
air suspension, memory
seat,
automatic electric door locks, transistor radio, a brushed
stainless steel
roof and low profile tires.
1957 Eldorado Brougham
The Eldorado, introduced in 1953, was redesigned for
1967 as the first fkont wheel drive personal luxury car.
1
The 472 cu. in. V8 engine used in all Cadillacs in 1968 ~
and 1969 was enlarged to 500 cu. in. for all 1970
through 1976 Eldorados. The Track Master computerized skid control braking system option debuted on 1970 Eldorados.
A driver and passenger Air Cushion Restraint
system
(air bag) was available on all 1974,1975 and
1976 Cadillacs.
Analog Electronic Fuel Injection was available, on 1975 Cadillacs and standard on the new international
size 1976 Seville. In 1978, the Trip Computer option
incorporated the
first on-board microprocessor.
ix
Page 78 of 386

Downloaded from www.Manualslib.com manuals search engine Leaving Your Vehicle
If you are leaving the vehicle, open the door, set the
locks from the inside, get out and close the door.
Remote Keyless Entry (RKE) System
With this feature, you can
lock and unlock the doors,
unlock the trunk, open the
fuel door and
turn on your
vehicle’s interior lamps
from about
10 feet (3 m)
away using the remote
keyless entry transmitter supplied with your vehicle.
Your remote keyless entry transmitter operates on a
radio frequency subject to Federal Communications Commission (FCC) Rules and with Industry Canada.
This device complies with Part 15 of the FCC Rules.
Operation
is subject to the following two conditions:
(1) this device may not cause harmful interference, and
(2) this device must accept any interference received,
including interference that may cause undesired operation. This device complies with RSS-210
of Industry Canada.
Operation is subject to the following two conditions:
(1) this device may not cause interference, and (2) this
device must accept any interference received, including
interference that may cause undesired operation of
the device.
Changes or modifications to this system by other than an
authorized service facility could void authorization to
use this equipment.
The range of this system is about
10 feet (3 m). At times
you may notice a decrease
in range. This is normal for
any remote keyless entry transmitter. If the transmitter
does not work or
if you have to stand closer to your
vehicle for the transmitter to work, try this:
0
0
0
0
Check to determine if battery replacement is
necessary. See the instructions that follow.
Check the distance.
You may be too far from your
vehicle. You may need to stand closer during rainy
or snowy weather.
Check the location. Other vehicles or objects may be
blocking the signal. Take a few steps to the left or
right, hold the transmitter higher,
and try again.
If you’re still having trouble, see your dealer or a
qualified technician for service.
Page 89 of 386

Downloaded from www.Manualslib.com manuals search engine New Vehicle 66Break-In” Ignition Positions
NOTICE:
Your vehicle doesn’t need an elaborate
“break-in.” But it will perform better in the long
run
if you follow these guidelines:
0
e
0
Don’t drive at any one speed -- fast or
slow
-- for the first 500 miles (805 km).
Don’t make full-throttle starts.
Avoid making hard stops for the first
200 miles (322 km) or so. During this time
your new brake linings aren’t yet broken
in. Hard stops with new linings can mean
premature wear and earlier replacement.
Follow this breaking-in guideline every
time you get new brake linings.
Don’t tow
a trailer during break-in.
See “Towing
a Trailer’’ in the Index for
more information.
C
A E
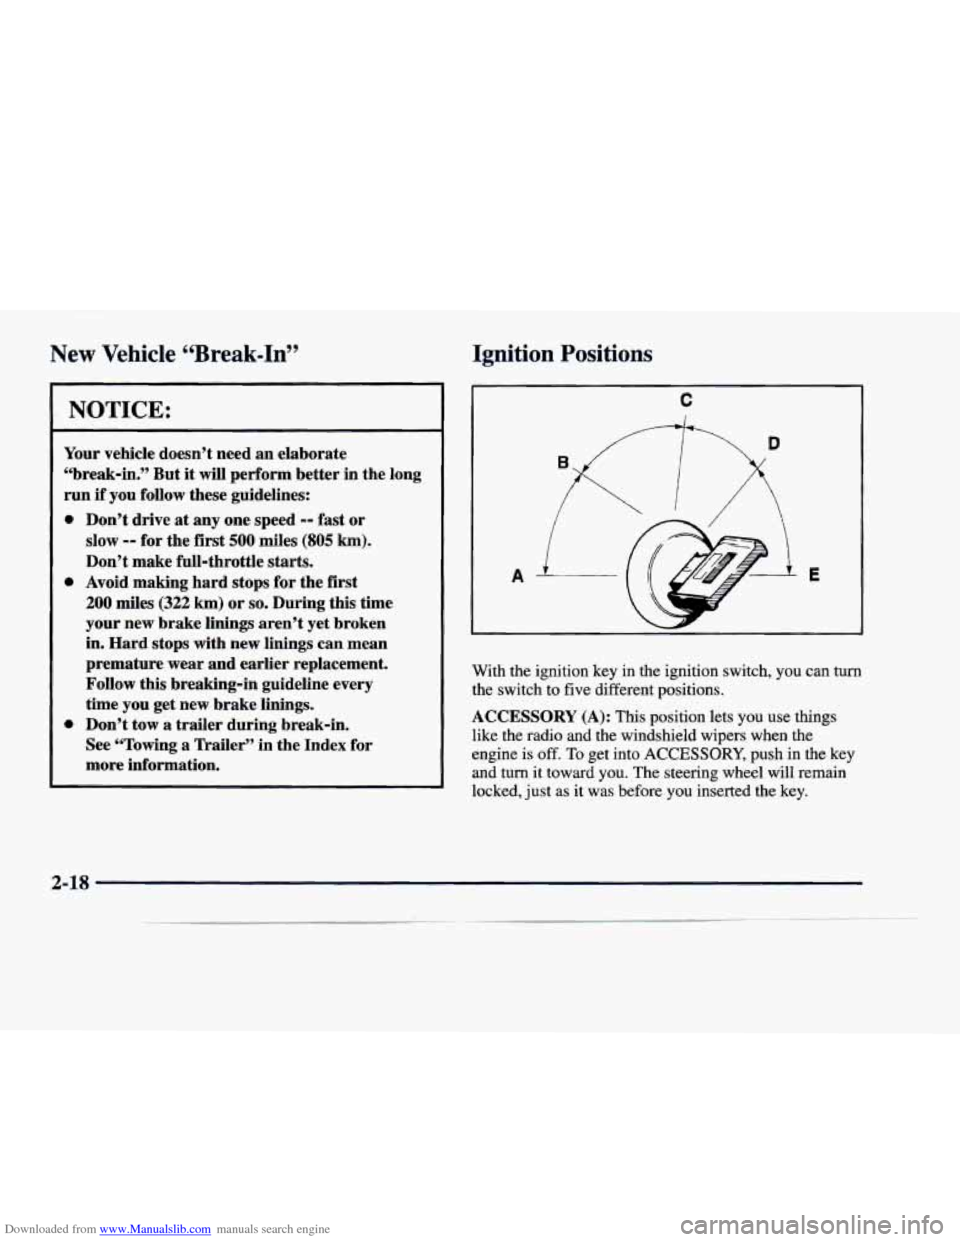
With the ignition key in the ignition switch, you can turn
the switch to five different positions.
ACCESSORY (A): This position lets you use things
like the radio and the windshield wipers when the
engine is
off. To get into ACCESSORY, push in the key
and turn it toward you. The steering wheel will remain
locked, just as it was before you inserted the key.
2-18
Page 90 of 386

Downloaded from www.Manualslib.com manuals search engine LOCK (B): Before you put the key in, the ignition will
be in LOCK. This is the only position in which you can
remove the key. This position locks the ignition, steering
wheel and transaxle. It’s a theft-deterrent feature.
NOTICE:
If your key seems stuck in LOCK and you can’t
turn
it, be sure you are using the correct key; if
so, is it all the way in? If it is, then turn the
steering wheel left and right while you turn the
key hard. But turn the key only with your hand.
Using
a tool to force it could break the key or the
ignition switch.
If none of this works, then your
vehicle needs service.
Retained Accessory Power (RAP)
The following accessories on your vehicle may be used
for up to
10 minutes after the ignition key is turned from
RUN to OFF:
Radio
Power Windows
Astroroof
Power to these accessories stops after
10 minutes or
if any door is opened. If you want power for another
10 minutes, turn the ignition key to RUN, then back
to
OFF, then to LOCK. Always leave your key in
LOCK when using RAP.
If you leave your key in
any other position than LOCK, your battery will
discharge prematurely.
OFF (C): This position lets you turn off the engine but
still turn the steering wheel. It doesn’t lock the steering
wheel like LOCK does. Use
OFF if you must have your
vehicle in motion while the engine is off (for example, if
your vehicle is being pushed).
RUN (D): This is the position for driving.
START (E): This position starts the engine.
2-19
Page 119 of 386

Downloaded from www.Manualslib.com manuals search engine Inadvertent Power Battery Saver
This feature is designed to protect your vehicle’s
battery against drainage from the interior lamps,
trunk lamp, glove box lamp, cigarette lighters or the
garage door opener. When the ignition is turned
off,
the power to these features will automatically turn off
after 10 minutes (three minutes if a new car has 15 miles
(24 km) or less). Power will be restored for an additional
10 minutes if any door is opened, the trunk is opened or
the courtesy lamp switch is turned on.
Storage Mode Personalization
This feature is for long term use and must be
programmed through the Driver Information Center
(DIC) while the ignition is in RUN. Storage mode
personalization protects the battery by placing your
vehicle
in a storage mode so that the radio, amplifiers,
instrument cluster and remote keyless entry will not
drain the battery over a long period of time. For
programming information, see “Programmable, Memory
and Personalization Features” later in
this section.
Mirrors
Electrochromic Daymight Rearview Mirror
When this feature is turned on, the mirror automatically
changes to reduce glare from headlamps behind you. A
photocell on the mirror senses when it is becoming dark
outside. Another photocell, built into the mirror face,
senses when headlamps are behind you.
At night, when the glare is too high, the mirror will
gradually darken to reduce glare (this change may take a
few seconds). The mirror will return to its clear daytime
state when.the glare is reduced.
2-48
Page 126 of 386

Downloaded from www.Manualslib.com manuals search engine Rear Storage Armrest (If Equipped)
Your vehicle may be equipped with a rear seat armrest
which includes an open storage compartment and a dual
cupholder that unfolds for use.
To open, lift the front
edge.
(This feature is available on vehicles with leather
interiors only.)
Conver 0 I nce Net
The convenience net is located inside the back wall of
the trunk. Put small loads, like grocery bags, behind the
net. It can help keep them from falling over during sharp
turns or quick starts and stops.
The net is not for larger, heavier loads. Store them in the
trunk as far forward as you can. When not using the net,
hook the net to the tabs securing it to the sill plate.
Ashtrays and Cigarette Lighter
With the full center console (available on DeVille
Concours only), press
on the cover, which is located
below the climate control system, to reveal the front
ashtray. To clean this ashtray, lift it out by gripping the
sides. For vehicles without the center console, pull the tray
out to reveal the ashtray. The tray is located beneath
the radio.
To clean this ashtray, lift it out by pulling on
the snuffer.
To use the rear ashtray, lift the lid.
I NOTICE: I
Don’t put papers or other flammable items
into your ashtrays. Hot cigarettes or other
smoking materials could ignite them, causing a
damaging fire.
The cigarette lighter is located near the ashtray. Press it
all the way in and release. It will pop back by itself
when it’s ready to light. You may also have a lighter
located at the rear seat air outlet.
Note that power to the cigarette lighter will shut
off 10
minutes after the ignition is turned off. This helps to
prevent battery drainage. For more information, see “Inadvertent Battery Saver” earlier in this section.
2-55
Page 134 of 386

Downloaded from www.Manualslib.com manuals search engine The instrument panel is designed to let you know at a
glance
how your vehicle is running. You’ll know how
fast you’re going, how much fuel you’re using and
many of the other things you’ll need
to know to drive
safely and economically. The main components
of the
instrument panel
are:
A. Air Outlets
B . Turn SignaYMultif’unction Lever
, C. Driver Information Center Control Buttons
D. Cluster
E. Steering Column Shift Lever (DeVille and DeVille
d’Elegance only)
E Electronic Climate Controls
G. Radio
H. Lamp Controls
I. HVAC Steering Wheel Controls (or Cellular
’ , Telephone Controls, If Equipped)
J. Hood Release
K. Horn
L. Audio Steering Wheel Controls
M. Ashtray and Cigarette Lighter
N. Glove Box
2-63
Page 154 of 386

Downloaded from www.Manualslib.com manuals search engine BATTERY VOLTAGE HIGH -’ 8: This message
shows that the electrical charging system is
overcharging (more than 16 volts). To avoid being
stranded, have the electrical system checked by your
dealership. You can reduce the charging overload by
using the accessories. Turn on the lamps and radio, set
the climate control on AUTO and the fan speed on HI,
and turn the rear window defogger on.
You can monitor
battery voltage on the Driver Information Center (DIC)
by pressing the
INFO button. The normal range is
11.5 to 15.5 volts when the engine is running.
BATTERY VOLTAGE LOW - 6: This message will
appear when the electrical system is charging less than
10 volts or if the battery has been drained. If this
message appears immediately after starting,
it is possible
that the generator can still recharge the battery. The
battery should recharge and may take a few hours to do
so. Consider using an auxiliary charger to boost the
battery after returning home or to a final destination.
(Be sure to follow the manufacturer’s instructions when
recharging the battery.)
If this message appears while driving or after starting
your vehicle and stays on, have it checked immediately
to determine the cause of this problem.
To help the
generator recharge the battery quickly, you can reduce
the load on the electrical system by turning
off the
accessories. You can monitor battery voltage on the Driver Information Center (DIC) by pressing the
INFORMATION
(INFO) button. The normal range is
11.5 to 15.5 volts.
BRAKE VACUUM PROBLEM -108: The circuit in
the brake booster vacuum has shorted or is loose when
this message appears. Your vehicle may lose power
brakes but you will still have the use of manual brakes.
The power brakes will not be affected if the problem
is
caused by a failed sensor. Have your vehicle serviced
immediately at your dealership.
CHANGE ENGINE OIL - 82: This means that the life
of the engine oil has expired and it should be changed
within
200 miles (322 km). See “Engine Oil” and “Filter
Recommendations’’ in the Maintenance Schedule
booklet. After an oil change, the Oil Life Indicator must be reset. For more information, see “How to Reset the
Oil Life Indicator” in the Index.
CHANGE TRANS FLUID - 47: This message will
appear when it is time to replace the transaxle fluid. See
the Maintenance Schedule booklet for the proper fluid
and change intervals.
CHECK BRAKE FLUID - 37: This message will
display if the ignition is in RUN to inform the driver that
the brake fluid level is low. Check the brake reservoir
level and add fluid as needed. Have the brake system
2-83
__