1998 CADILLAC CATERA air filter
[x] Cancel search: air filterPage 90 of 346

Downloaded from www.Manualslib.com manuals search engine Engine Coolant Heater (If Equipped)
ENGINE COOLANT
HEATER ELEC
AIR CLEANER
ASSEMBLY
HEADLAMP
COVER
In very cold weather, 0°F (- 18°C) or colder, the engine
coolant heater can help. You’ll get easier starting and
better fuel economy during engine warm-up. Usually,
the coolant heater should be plugged in a minimum
of
four hours prior to starting your vehicle.
To Use the Engine Coolant Heater
1. Turn off the engine.
2. Open the hood and unwrap the electrical cord.
The electrical cord for the engine coolant heater
is in
front of the air cleaner filter and under the headlamp
cover, on the passenger’s side
of the engine.
3. Plug it into a normal, grounded 1 10-volt AC outlet.
A CAUTION:
Plugging the cord into an ungrounded outlet
could cause an electrical shock. Also, the wrong
kind of extension cord could overheat and cause
a fire. You could be seriously injured. Plug the
cord into a properly grounded three-prong 110-volt
AC outlet. If the cord won’t reach, use a
heavy-duty three-prong extension cord rated for
at least
15 amps.
2-19
Page 155 of 346

Downloaded from www.Manualslib.com manuals search engine Passenger Compartment Air Filter
This ventilation system includes an air filter that helps to
remove dust, pollen, etc. from air flowing into your
vehicle. A restriction in the airflow coming into the
passenger compartment could be the result of dirt in the
filter.
For more information, see “Passenger
Compartment Air Filter” in the Index. Also see the
Maintenance Schedule booklet for when
to change
the filter.
Defrosting
Use defrost to remove fog or ice from the windshield
quickly in extremely humid or cold conditions.
Pressing the defrost button on the control panel (located
above the rear window defogger button) automatically
turns the fan blower to high speed. Make sure that the
side air vents are opened. Rotate both TEMP/AUTO
knobs to the right as needed to adjust the temperature.
To warm the
foot area while in defrost, press the MODE
button until the heateddefrost symbol appears (see
“Manual Operation” earlier in this section).
Note that recirculation is not available in the
defrost mode.
3-8
Rear Window Defogger
The lines you see on the
rear window warm the
glass. With your vehicle’s
engine running, press
this button to turn on the
rear defogger.
The rear window defogger heats the rear window and
both outside rearview mirrors. The system will
automatically shut
off after about 15 minutes. If further
defogging is desired, press the button again.
Do not attach a temporary vehicle license, tape or decals
across the defogger grid on the rear window.
Page 259 of 346

Downloaded from www.Manualslib.com manuals search engine When you open the hood, you’ll see:
A. Coolant Fill Location
B. Air Cleaner
C. Passenger’s Compartment
Air Filter D. Engine Oil Fill Location
E. Engine Oil Dipstick Location
E Windshield Washer Fluid
G. Brake Master Cylinder
H. Power Steering Fluid
I. Battery
Before closing the hood, be sure all filler caps are on properly. Then pull the
hood down and close it firmly.
Page 264 of 346

Downloaded from www.Manualslib.com manuals search engine If none of them is true, use the long triphighway
maintenance schedule. Change the oil and filter at the
first
5,000 miles (8 000 km) or 3 months -- whichever
occurs first. Then, change the oil and filter every
10,000 miles (16 000 km) or 12 months -- whichever
occurs first. Driving a vehicle with a fully warmed
engine under highway conditions causes engine oil to
break down slower.
What to Do with Used Oil
Did you know that used engine oil contains certain
elements that may be unhealthy for your skin and could
even cause cancer? Don't let used oil stay on your skin
for very long. Clean your skin and
nails with soap and
water, or a good hand cleaner. Wash or properly throw
away clothing or rags containing used engine oil. (See
the manufacturer's warnings about the use and disposal
of oil products.)
Air Cleaner
The air cleaner is located behind the headlamps on
the passenger's side
of the engine. Be sure the engine
has cooled before following these steps to replace the
air filter.
Used
oil can be a real threat to the environment. If you
change your own oil, be sure to drain all free-flowing oil
from the filter before disposal. Don't ever dispose of oil
by putting it
in the trash, pouring it on the ground, into
sewers,
or into streams or bodies of water. Instead,
recycle
it by taking it to a place that collects used oil. If
you have a problem properly disposing
of your used oil,
ask your dealer, a service station or a local recycling
center for help.
6-15
Page 265 of 346

Downloaded from www.Manualslib.com manuals search engine I
r- I 1 L
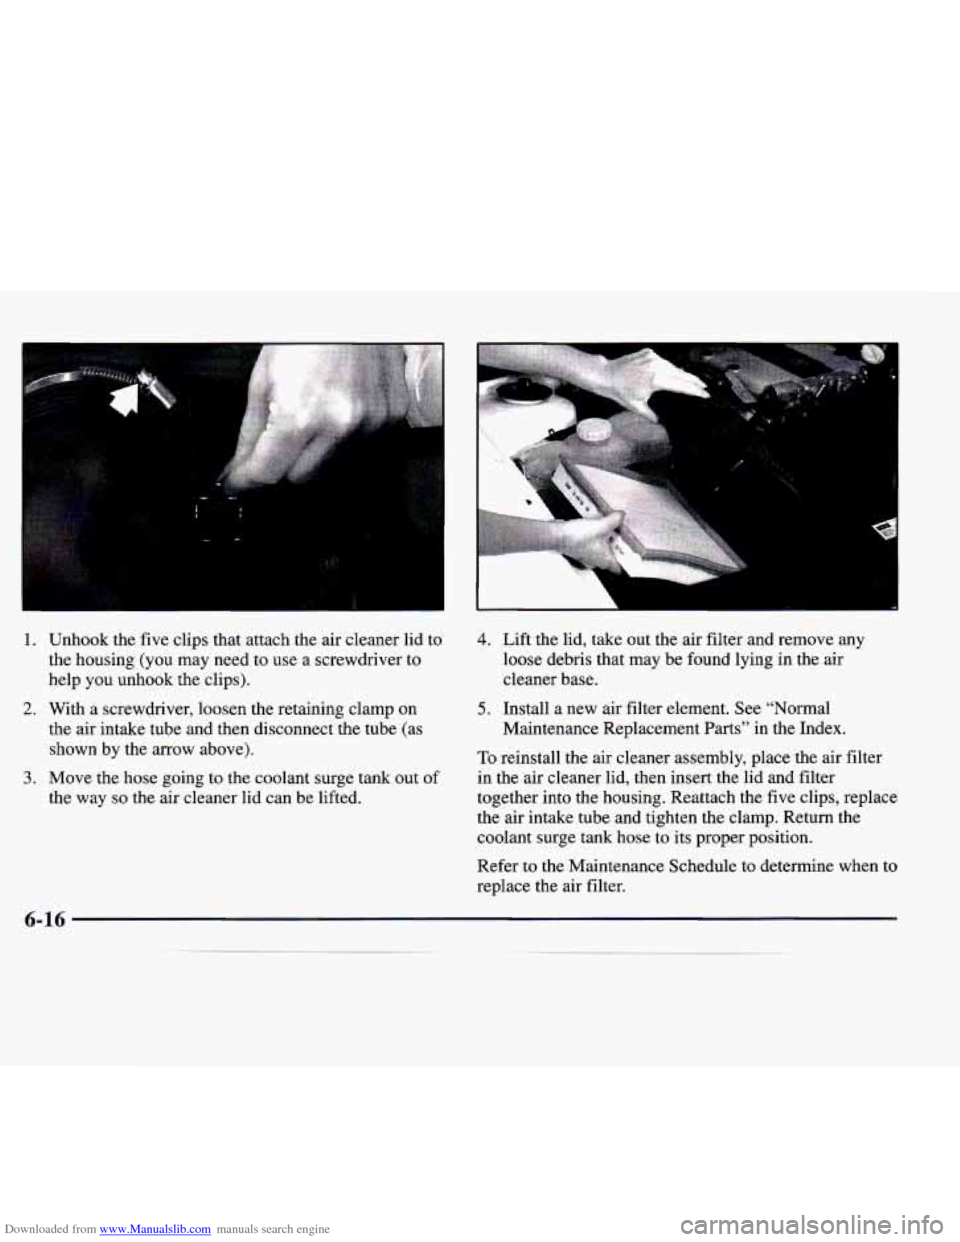
1. Unhook the five clips that attach the air cleaner lid to
the housing (you may need to use a screwdriver to
help
you unhook the clips).
2. With a screwdriver, loosen the retaining clamp on
the air intake tube and then disconnect the tube (as
shown by the arrow above).
the way
so the air cleaner lid can be lifted.
3. Move the hose going to the coolant surge tank out of
4. Lift the lid, take out [ne air filter and remove any
loose debris that may be found lying in the air
cleaner base.
5. Install a new air filter element. See “Normal
Maintenance Replacement
Parts” in the Index.
To reinstall the air cleaner assembly, place the air filter
in the air cleaner lid, then insert the lid and filter
together into the housing. Reattach the five clips, replace
the air intake tube and tighten the clamp. Return the
coolant surge tank hose to its proper position.
Refer
to the Maintenance Schedule to determine when to
replace the air filter.
Page 266 of 346

Downloaded from www.Manualslib.com manuals search engine See “Scheduled Maintenance Services” in the
Maintenance Schedule booklet.
Operating the engine with the air cleaner off can
cause you or others
to be burned. The air cleaner
not only cleans the air, it stops flame if the engine
backfires.
If it isn’t there, and the engine
backfires,
you could be burned. Don’t drive with
it off, and be careful working on the engine with
the air cleaner
off.
NOTICE: I
If the air cleaner is off, a bachfire can cause a
damaging engine fire. And, dirt can easily get
into your engine, which will damage it. Always
have the air cleaner in place when you’re driving.
Passenger Compartment Air
Filter Replacement
The passenger compartment air filter traps most of the
pollen from the air entering your vehicle. Like your
vehicle’s air cleaner filter, it may need to be changed periodically. For
how often to change the passenger
compartment air filter, see your Maintenance
Schedule booklet.
B
The access panel for the passenger compartment air
filter
is on the grille, at the base of the windshield, on
the passenger’s side.
Page 267 of 346

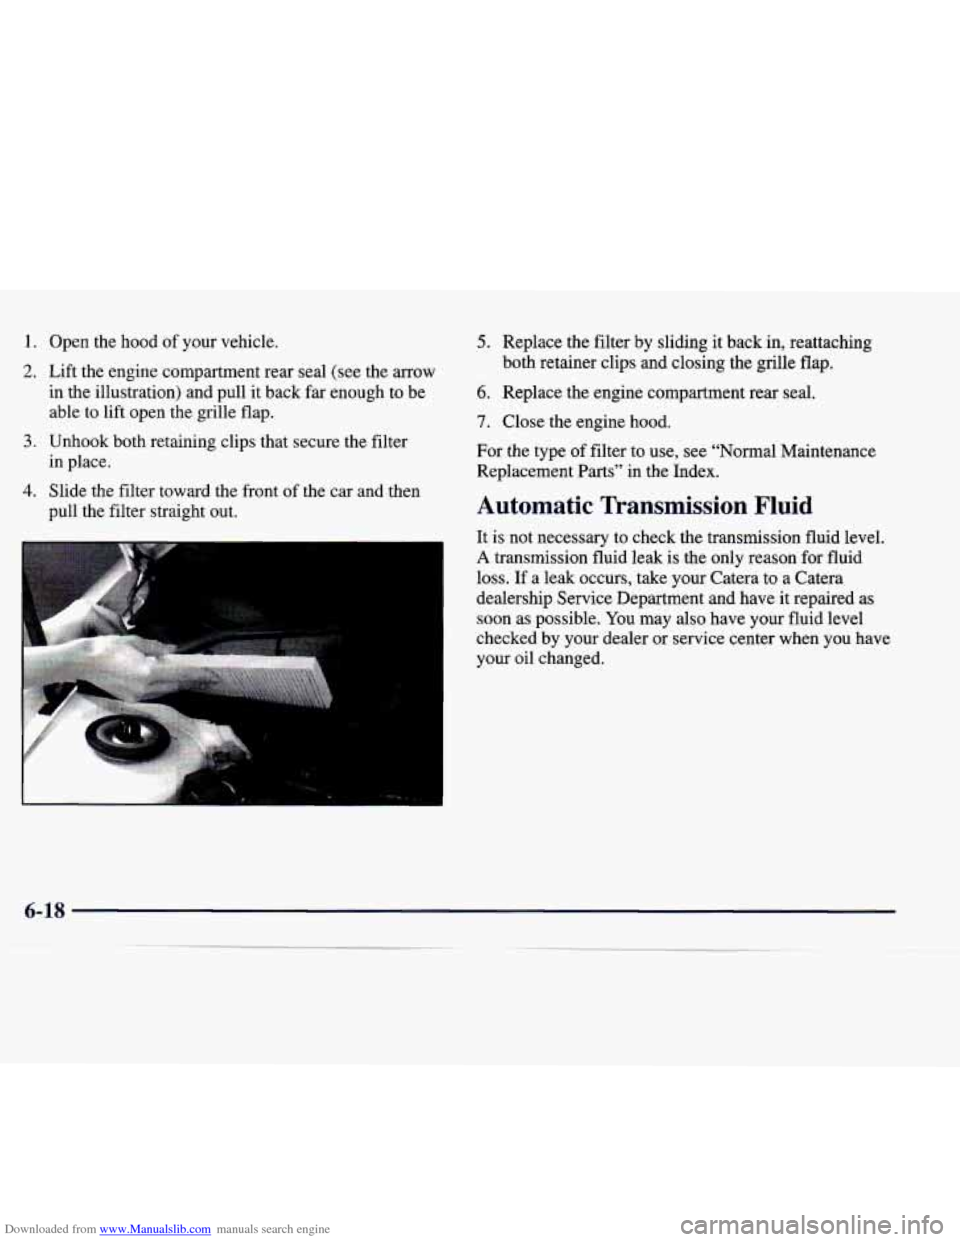
Downloaded from www.Manualslib.com manuals search engine 1. Open the hood of your vehicle.
2. Lift the engine compartment rear seal (see the arrow
in the illustration) and pull it back far enough to be
able to lift open the grille flap.
in place.
pull the filter straight out.
3. Unhook both retaining clips that secure the filter
4. Slide the filter toward the front of the car and then
5. Replace the filter by sliding it back in, reattaching
6. Replace the engine compartment rear seal.
7. Close the engine hood.
both retainer clips and closing the grille flap.
For the type of filter to use, see “Normal Maintenance
Replacement Parts” in the Index.
Automatic Transmissio~ Fluid
It is not necessary to check the transmission fluid level.
A transmission fluid leak is the only reason for fluid
loss. If a leak occurs, take your Catera to
a Catera
dealership Service Department and have it repaired as
soon as possible. You may
also have your fluid level
checked by your dealer
or service center when you have
your oil changed.
Page 312 of 346

Downloaded from www.Manualslib.com manuals search engine Replacement Bulbs
Application ..................... Bulb Number
Front Turn Signal Lamp ............... 90487485
Headlamps Composite
Inner High Beam
................... 90512338
Outer
Low Beam ................... 90512338
Rear Turn Signal
Lamp and Taillamp .... 90002521
Capacities and Specifications
The following approximate capacities are given in
English and metric conversions. Please refer to
“Recommended Fluids and Lubricants” in the
Maintenance Schedule booklet for more information.
Transmission
................... 7 quarts (6.6 L)
Engine Crankcase
Oil Change With Filter
......... 6 quarts (5.75 L)
Engine Cooling System ........ 10.57 quarts (10 L)
Fuel Tank ..................... 18 gallons (68 L)
R- 134a Refrigerant ............. 2.9 lbs. (0.95 kg)
Wheel Bolt Torque
............ .80 lb-ft (1 10 N-m)
NOTE: All capacities are approximate. When adding, be
sure to
fill to the approximate level, as recommended in
this manual. Recheck fluid level after filling.
Air Conditioning Refrigerants
Not all air conditioning refrigerants are the same.
If the air conditioning system in your vehicle needs
refrigerant, be sure the proper refrigerant is used.
If you’re not sure, ask your dealer.
Engine Specifications
Displacement ......... 18 1 cubic inches (2 962 cc)
Type
......................... 3.0 L DOHC V6
VIN Engine Code
........................... R
Horsepower
.............. 200 (bhp) @ 6000 rpm
149 (kW)
@ 6000 rpm
Torque
................. 192 (lb-ft) @ 3600 rpm
260
(Nam) @ 3600 rpm
Thermostat Starts To Open
......... 198°F (92°C)
Firing Order ...................... 1-2-3-4-5-6
6-63