Page 257 of 346

Downloaded from www.Manualslib.com manuals search engine Fillinn 3 Portable Fuel Container
Checking Things Under the Hood
Never fill a portable fuel container while it is in
your vehicle. Static electricity discharge from the
container can ignite the gasoline vapor. You can
be badly burned and your vehicle damaged if this
occurs.
To help avoid injury to you and others:
0 Dispense gasoline only into approved
containers.
0 Do not fill a container while it is inside a
vehicle, in a vehicle’s trunk, pickup bed or
on any surface other than the ground.
inside of the fill opening before operating
the nozzle. Contact should be maintained
until the filling is complete.
0 Bring the fill nozzle in contact with the
0 Don’t smoke while pumping gasoline. An
electric fan under the hood can
start up and
injure you even when the engine is not running.
Keep hands, clothing and tools away from any
underhood electric fan.
.
Things that burn can get on hot engine parts and
start
a fire. These include liquids like gasoline,
oil, coolant, brake fluid, windshield washer and
other fluids, and plastic or rubber. You or others
could be burned. Be careful not
to drop or spill
things that will burn onto
a hot engine.
6-8
Page 260 of 346
Downloaded from www.Manualslib.com manuals search engine Engine Oil
If the low oil level light on
the instrument panel comes
on, it means you need to
check your engine oil level
right away. For more information, see “Low Oil
Level Light”
in the Index.
You should check your engine oil level regularly; this is
an added reminder.
It’s a good idea to check your engine oil every time you
get fuel. In order to get an accurate reading, the oil must
be
warm and the vehicle must be on level ground. The engine
oil dipstick is
located behind the radiator
hose on the driver’s side
of
the engine. The yellow
looped handle helps to
identify it.
Turn off the engine and give the oil a few minutes to
drain back into the oil pan. If you don’t, the oil dipstick
might not show the actual level.
Page 262 of 346

Downloaded from www.Manualslib.com manuals search engine Be sure to fill it enough to put the level somewhere in
the proper operating range. Push the dipstick
all the way
back in when you’re through.
What Kind of Engine Oil to Use
Oils recommended for your vehicle can be identified by
looking for the “Starburst” symbol. This symbol
indicates that the oil has been certified by the American
Petroleum Institute
(API). Do not use any oil which
does not carry this Starburst symbol.
If you change your own oil,
be sure you use oil that has
the Starburst symbol on the
front of the
oil container. If
you have your oil changed
for you, be sure the
oil put
into your engine is
American Petroleum
Institute certified for
gasoline engines.
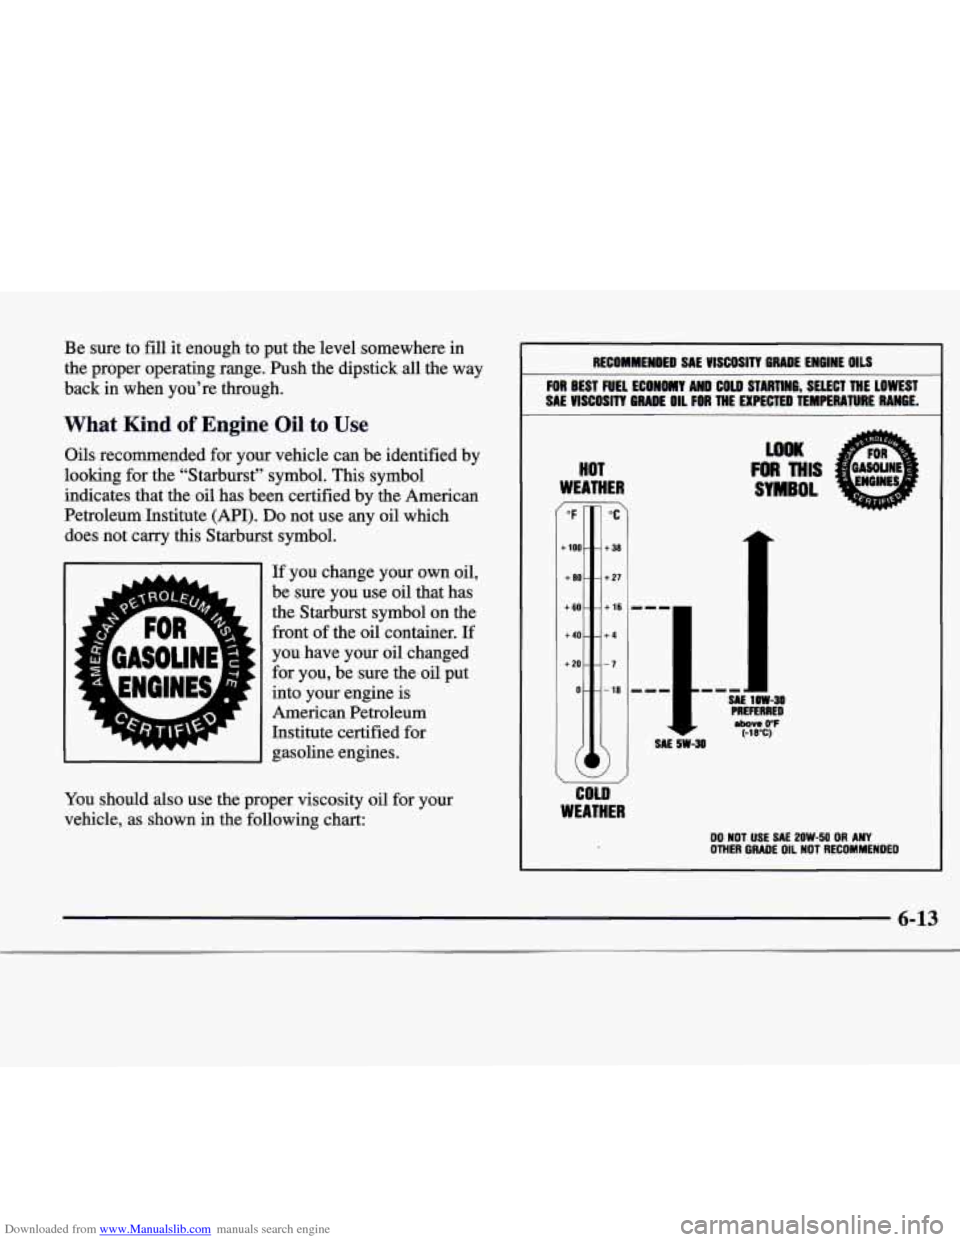
You should also use the proper viscosity oil for your
vehicle, as shown in the following chart:
RECOMHEHDED SAE VISCOSITY GRADE ENGINE OILS
FOR BEST FUEL ECONOMY AND COW STARTING, SELECT THE LOWEST
SAE
VISCOSITY GRADE OIL FOR THE EXPECTED TEMPERATURE RANGE.
HOT
WEATHER
“F
t 100
+ 80
t60.
t40.
t20.
0.
(
i
“C
t 38
t 27
t 16
t4
-7
- 18
SAE sw-30
,I SAE I lOW-30
PREFERRED above 0°F (-18°C)
WOK
FI)R THIS
SYMBOL
u
COLD
WEATHER
DO NOT USE SAE 2OW-50 OR ANY OTHER GRADE OIL NOT RECOMMENDED
6-13
Page 282 of 346

Downloaded from www.Manualslib.com manuals search engine Headlamp Aiming
Your vehicle has the composite headlamp system. These
headlamps have horizontal and vertical aim indicators.
The aim has been pre-set at the factory and should need
no further adjustment.
If your vehicle is damaged in an accident and the
headlamp aim seems to be affected, see your dealer.
Headlamps on damaged vehicles may require
recalibration of the horizontal aim by your dealer.
0
0
0
To check the aim, the vehicle should be properly
prepared as follows:
Place the vehicle on a level pad or surface.
The vehicle should not have any snow, ice or mud
attached to it.
The vehicle should be fully assembled and all other
work stopped while headlamp aiming is being done.
There should not be any cargo or loading of the
vehicle, except it should have a full tank of fuel and
one person or
160 lbs. (75 kg) on the driver's seat.
Tires should be properly inflated.
Rock the vehicle to stabilize the suspension.
0
0
0
I NOTICE:
To make sure your headlamps are aimed
properly, read all the instructions before
beginning. Failure to follow these instructions could cause damage to headlamp parts.
For the vertical adjustment, state inspection stations
generally will allow a reading of plus
0.76 degrees or
minus
0.76 degrees from the center of the bubble.
1 6-33
Page 287 of 346

Downloaded from www.Manualslib.com manuals search engine Inflation -- Tire Pressure
The Tire-Loading Information label, which is located on
the rear edge of the driver’s door, shows the correct
inflation pressures for your tires when they’re cold.
“Cold” means your vehicle has been sitting for at least
three hours or driven no more than
1 mile (1.6 km).
If you’ll be driving at speeds higher than 100 mph
(160 km/h) where it is legal, raise the cold inflation
pressure
of each tire to 37 psi (250 Pa). When you end
this very high-speed driving, reduce the cold inflation
pressures to those listed on the Tire-Loading
Information label.
NOTICE:
~
Don’t let anyone tell you that underinflation or
overinflation
is all right. It’s not. If your tires
don’t have enough air (underinflation), you can
get the following:
0 Too much flexing
0 Too much heat
0 Tire overloading
0 Bad wear
0 Bad handling
0 Bad fuel economy.
If your tires have too much air (overinflation),
you can get the following:
0 Unusual wear
Bad handling
0 Rough ride
0 Needless damage from road hazards.
6-38
Page 301 of 346

Downloaded from www.Manualslib.com manuals search engine Underbody Maintenance
Chemicals used for ice and snow removal and dust control
can collect on the underbody.
If these are not removed,
accelerated corrosion (rust) can occur
on the underbody
system even though they have corrosion protection.
1 parts such as fuel lines, fiame, floor pan and exhaust
At least every spring, flush these materials from the
underbody with plain water. Clean any areas where mud
and other debris can collect.
Dirt packed in closed areas
of the frame should be loosened before being flushed.
Your dealer
or an underbody car washing system can do
this for you.
Chemical Paint Spotting
Some weather and atmospheric conditions can create a
chemical fallout. Airborne pollutants can fall upon and
attack painted surfaces on your vehicle. This damage
can take two
forms: blotchy, ringlet-shaped
discolorations, and small irregular dark spots etched into
the paint surface.
Although no defect in the paint job causes this, Cadillac
will repair, at no charge
to the owner, the surfaces of
new vehicles damaged by this fallout condition within
12 months or 12,000 miles (20 0oO km) of purchase,
whichever occurs first.
Page 308 of 346

Downloaded from www.Manualslib.com manuals search engine Fuse Usage Usage
16
17
18
19
20
21
22
23
24
25
26 Cigarette Lighter (Front and Console)
Horn #1 and #2
Fuel Pump
Electronic BrakeD'raction Control Module
Passenger and Driver Heated Seat Relay
Daytime Running Lamp (DRL) Relay,
LH High-Beam Headlamp Relay
Headlamp
Switch, LH Headlamp
(Low Beam)
LH Parking Lamp and
Turn Signal Lamp,
LH Rear Sidemarker Lamp, Multifunction
Relay, LH Stoplamp and Taillamp
Lifting Magnet, BCM, Gage Cluster Sunroof Actuator
Headlamp Switch, RH and LH Front
Sidemarker Lamp, Middle Taillamp, RH
and LH Rear License Plate Lamp, Radio,
Automatic Transmission Control
Indicator, Heater and A/C Control
Fuse
27
28 29
30
31
32
33
34
35 Automatic Level Control Sensor, Rear
Suspension Leveling Air Compressor
and Relay
Remote Control Door Lock Receiver, Door Lock Relay, Rear Compartment Lid
Release Connector (Not Used)
Multifunction Relay
RH Parking Lamp and Turn Signal Lamp,
RH Rear Sidemarker Lamp, RH
Stoplamp and Taillamp
RH Low-Beam Headlamp and Turn Signal Switch
RH High-Beam Headlamp Relay
Blower Controller, A/C
Compressor Relay
Heated Rear Window Defogger Relay,
Heated Outside Rearview Mirror
Passenger and Driver Seat Adjuster
Switch, Driver Seat Adjuster
Memory Module
6-59
Page 311 of 346
Downloaded from www.Manualslib.com manuals search engine Fusemelay
5
6
7
8
9
10 12
15 16
Usage
A/C Compressor (Relay K60)
Fan Control (Relay K87)
Fan Control (Relay K26)
Fan Control (Fuse 42)
Secondary
Air Injection Pump
(Fuse 49)
Engine Controls Power (Relay K43)
Fan Control (Fuse 40)
Fan Control (Fuse 52)
Connector C110
Fuse/Relay Usage
17 Fan Control (Relay K52)
18 Fan
Control (Relay K28)
19 Fan
Control Relay, Engine Control
Module (ECM) Relay (Fuse
50)
20
27
28
29
39 Fuel
Pump (Relay K44)
Heated Oxygen Sensors (Fuse 43)
Engine Control Module (ECM)
(Fuse
60)
Engine Control Module (ECM)
(Relay K48)
Coolant Fan Test Connector
6-62