1998 BUICK PARK AVENUE air condition
[x] Cancel search: air conditionPage 146 of 426

NOTICE:
If you keep driving your vehicle with this light
on, after a whiie, your emission controls rnay not
work as well, your fuel economy may not be as
good and your engine may not PUR as smoothly.
This could lead to costly repairs that may not be
covered by pur warranty.
This jight should corne on, as a check to show YOU it is
working, when the ignition is
on and the engine is not
running. If the light doesn’t come on, have it repaired.
This light will also come QII during ;I malfunction in one
of ~WO ways:
8 Light Flashing -- A misfire condition has been
detected.
A misfire increases vehicle emissions and
may damage the emission controi system on your
vehicle. Dealer or qualified service center diagnosis
and service rnay be required.
@ Eight On Steady -- An emission control system
malfunction
has been detected on your vehicle.
Dealer
or qualified service center diagnosis and
service
may be required.
-.- 8:. f. ,fie ~ 2s F‘fp&-!&g --
The following may prevent more serious damage to
your vehicle:
Reducing vehicle speed.
Avoiding hard accelerations.
e Avoiding steep uphill grades.
If YOU are towing a trailer, reduce the amount of
cargo being hauled as soon as it is possible.
If the light stops flashing and remains on steady, see “If
the Light Is On Steady” following.
Sf the light continues to flash, when it is safe to do so,
stop the vehicle. Find a safe place to park your vehicle.
Turn the key off, wait at least IO seconds and restart the
engine.
If the light remains on steady, see “If the Light
Is On Steady” following. If the light is still flashing,
follow the previous steps,
and drive the vehcle to your
dealer or qualified service center €or service.
ProCarManuals.com
Page 165 of 426

In this section, you'll find out how to operate the comfort control and audio systems cffered with your whicle. Be
sure to read about the particular systems supplied with your vehicle.
3-2
3-2
3-2
3-5
3-5
3 -6
3-7
3-8
3-8
3-9
3 -9
3- BO
3-10
C~mf~r;t Cr>n:rols 5 3-14
Personal
Choice Comfort ControIs
(If Equipped) 3-18
Dud Automatic CornforTernp Clirnate Control !
Air Conditioning 3-21
Heating $
VentiEation System
Passenger Compartment
Ais Filter [ 3-27
Defogging and Defr'rosting ; 3-30
Wear Window Defogger
: : 3-30
Passenger Climate Control : 3-33
Steering Wheel Controls
fcr Climate Controi 3-34
(If Equipped) :. 3-34
Setting
the Cbck i 3-35
AM-FM Stereo with Cassette Tape Player 9 3-36
(.If Equipped) 3-36
::
::
::
ProCarManuals.com
Page 168 of 426
in cold weather, the system will delay turning t5 re f anon
high, to avoid blowing cold air. The Iength of the delay
depends on the engine coolant temperature and the
outside temperature.
Pushing the FAN, AIR FLOW or
FRONT buttons will override this delay, turn off the
AUTO setting and change the fan speed.
You may also manually adjust the air delivery or
fan speed.
AIR FLOW This button is used to change the direction
of the airflow. The airflow choices available are
WINDSHIELD-FIBOR. If the systen is set for AUTO,
pressing the AIR FLOW button will display the current
airflow direction, the comfort setting and the fan
speed.
Press the AIR FLOW up or down button again to
change the direction of the airflow.
FLOOR, FLOOR-MID, MID and
OFF: If the passenger comfort CQII~~O~ is tuned on, It
can be turned off by pressing the OW button once.
Pressing the
OFF button a second time wiil turn off the
main system. Turning off the main system causes the fan
to turn off and the airflow to be directed to the FLOOR.
The system will still try to keep the interior of the
vehicle at
the previous chosen comfsrt settifig. The
outside temperature
will show on the display when the
system is off.
The ventilation system always allows fresh air t~ flow
through your vehicle when the vehicle is moving even
with
the system in the OFF mode.
VENT: The VENT button aEIows outside air to flow
through your vehicle without the air conditioning
compressor
working. Selecting VENT and the AUTO
button at the same time allows the system to contsoi
automatically without
the use of the ais: conditioning
compressor or the use of the MCIRC mode. To turn off
the VENT selection, push the VENT button again.
ProCarManuals.com
Page 253 of 426
E you get the overheat wming but see or hear no
steam, the problem may not be too serious. Sometines
the engine can get a BittIe too hot when you:
@B Climb a long hill on a hot day.
8 Stop after high-speed driving.
Idle
for long periods in tra€€ic.
9 Tow a trailer.
If you get the overheat warning with sign of stem,
try this for a mimte or so:
I. Turn off your air conditioner.
2. Turn on your heater to full hot at the highest Fan
speed and opera the window as necessary.
otherwise, shift
to the highest gear while
driving
-- AUTOMATIC OVERDRIVE (a)
or THmD (3 1.
3. If you're Ira a tra€fic jam, shift to NEUTRAL (N);
If you 1'10 longer have the overheat wmimg, you
can drive. Just to be safe, drive slower for about
IO minutes. If the warning doesn't come back on,
you can drive normally.
If the warning continues, pull over, stop, and park your
vehicle right away.
If there's still no sign of steam, YOU can idle the engine
for two or three minutes while you're parked, to see if
the warning stops. But then, if you still have the
warning,
turn c$ftthe engine and get everyone out of the
a,chicke until it cools down.
You may decide not to lift the hood but to get service
help right away.
ProCarManuals.com
Page 275 of 426
6-2
6- 3
4-9
6-12
4-17
6- 19
4-20
6-23
5-27
6-28
6-29
4-32
6-33
6-45
6-46
Service
Fuel
Checking Things Under the Hood
Engine Oil
Air Cleaner
Supercharger
Oil
Automatic Transaxle Fluid
Engine Coolant
Radiator Bressure Cap
VVindskieTd Washes Fluid
Br&es
3 attery
Bulb Replacement
Windshield Wiper Blade Replacement
Tires Appearance
Care
Cleaning the Inside QE Y(.w VehicEe
Cleaning
the Outside of Your Vehicle
Underbody Maintenance
Chemical
Paint Spotting
Appearance Care Materials Chart
Vehicle icientifkation Number (VIN)
Electrical System
Removing the Rear Seat Cushion
Replacement Bulbs
Capacities and Specifications
Air Conditioning Re€rigerants
Engine Specifications
Vehicle Dimensions
Normal Maintenance Replacement 'Parts
ProCarManuals.com
Page 286 of 426

Your vehicle may have 2 3800 Sqercharged engine.
Supercharging, rather
than turbocharging, emphasizes
smooth, refined power.
The supercharger is a device which is designed to pump
more ais into the engine than it would normally use.
This air mixed with fuel creates increased engine power.
Since the supercharger
is a pump and is driven from an
engine
accessory drive belt, iwreased pressure is
available at all driving conditions.
The Powertrain Control Module (PCM) works with a
vacuum control to regulate the increased pressure
required during specific driving conditions. When this
increased pressure or boost is not desired, such as during
idling and light tfarsttIe cruising, the excess air that the
supercharger is pumping is routed through a bypass.
AB1 sf these controk working together provide high
performance character and fuel efficiency in the
3800 V6 Supercharged engine.
The power steering pump and reservoir are mounted on
the rear (driver’s side) sf the engine biock. See
“Maintenance Schedule”
in the Index for when you
should check the fluid.
c
ENGINE OIL LOW CHECK LEVEL HMBHBMrn
Ef you have the Driver Infcmation Center, an ENGINE
OIL LOW-CHECK LEVEL message will appear when
the engine oil is approximately I quart (fL) Isw. 11 the
message is displayed, check the dipstick level and add
oil as needed.
7r
ProCarManuals.com
Page 335 of 426
If your vehicle is damaged and requires sheet metal
repair
or replacement, make sure the body repair shop
applies anti-corrosion material
to the parts repaired or
replaced to restore corrosion protection.
Any stone
chips, fractures or deep scratches in the finish
should be repaired right away. Bare metal will corrode
quickly and may develop into
a major repair expense.
Minor
chips and scratches can be repaired with IOUCR-UP
materials available from your dealer or other service
outlets. Larger areas
of finish damage can be corrected
in
your dealer's body and paint shop.
Chemicals used €or ice and snow removal and dust
control can collect on the underbody.
If these are not
removed, accelerated corrosion
(rustj can occur on
the underbody
parts such as fuel lines, frame, floor
pan and exhaust system even though they have
corrosion protection. At least
every
spring, Rush these materials from the
underbody with plain water. Clean any areas where
mud and other debris can collect. Dirt packed in ciosed
areas of the frame should be loosened before being
flushed. Your dealer
or an underbody car washing
system can do this for you.
Some weather and atmospheric conditions can create
a chemical fallout. Airborne pollutants can fail upon
and attxk painted surfaces on your vehicle. This
damage can take two forms: blotchy, ringlet-shaped
discolorations,
and small irregular dark spots etched
into the paint surface.
Although
no defect in the paint job causes this, Buick
will repair,
at no charge to the owner, the surfaces of
new vehicles damaged by this fallout condition within
I2 months or 12,000 miles (20 000 km) of ourchase,
whichever
CCCU~S first.
ProCarManuals.com
Page 346 of 426
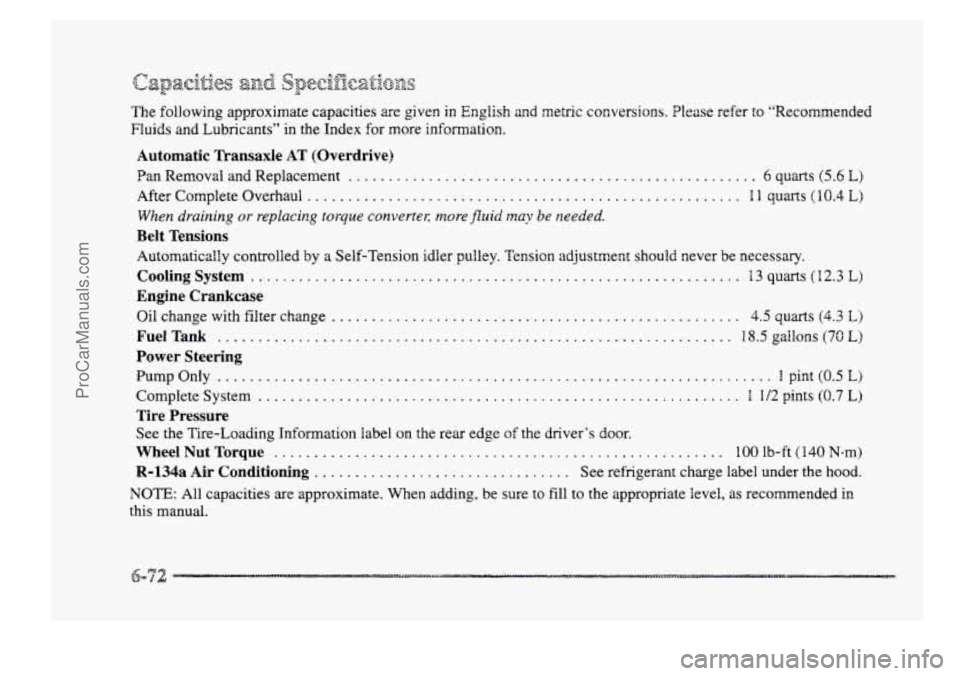
The following approximate capacities are given in English and metric conversions. Please refer to “Recommended
Fluids and Lubricants” in the Index for more information.
Automatic Transaxle AT (Overdrive)
Pan Removal and Replacement ................................................... 6 quarts (5.6 L)
After Complete Overhaul ...................................................... 1 I quarts (10.4 E)
When draining or replacing torque convertep; nzore fluid may be needed.
Belt Tensions
Automatically controlled by a Self-Tension idler pulley. Tension adjustment should never be necessary.
Cooling System ............................................................. 13 quarts (12.3 k)
Engine Crankcase
Oil change with filter change ................................................... 4.5 quarts (4.3 L)
Power Steering
Complete System ............................................................ 1 1/2 pints (0.7 L)
Tire Pressure
See the Tire-Loading Information label on the rear edge of the driver’s door.
WheelNutTorque ........................................................ 1001b-ft(140N-m)
R-134a Air Conditioning ................................ See refrigerant charge label under the hood.
FuelTank ................................................................ 18SgaIlons(70L)
PumpOnly ..................................................................... 1pint(OSE)
NOTE: All capacities are approximate. When adding, be sure to fill to the appropriate level, as recommended in
this manual.
ProCarManuals.com