1998 BMW M3 engine
[x] Cancel search: enginePage 452 of 759

640-6
HEATING
AND
AIRCONDITIONING
Heater
core,replacing
1.
Drain
engíne
coolant
.
See170
Radiator
and
Cooling
System
.
WARNING
-
Allow
the
cooling
system
to
cool
before
opening
or
drainíng
the
cooling
system
.
2
.
Remove
center
console
.
See
513
Interior
Trim
.
3
.
Remove
Multi-Information
Display
(MID)
module
.
See
620
Instruments
.
4
.
Remove
lower
dash
panel
and
knee
bolster
on
driver
side
.
See
513
Interior
Trim
.
Fig
.
17
.
Wire
harness
retaining
clips
and
wire
ties
at
heater
box
cover
5
.
Working
under
driver
side
of
dash,
remove
coolant
(arrows)
.
flange
from
heater
core
.
See
Fig
.
16
.
0012651
Fig
.
16
.
Bolts
at
3-way
coolant
flange
under
driver's
side
of
dash
(ar-
rows)
.
NOTE-
Residual
coolant
in
heater
core
will
spill
.
Protect
thecarpet
.
6
.
Working
at
front
of
driveshaft
tunnel,
unclip
wire
har-
nesses
and
move
to
one
side
in
front
of
heater
box
.
See
Fig
.
17
.
7
.
Remove
heatercore
temperature
sensorsas
described
later
in
this
repair
group
.
8
.
Remove
front
heater
box
cover
.
See
Fig
.
18
.
9
.
On
right
side
of
heater
box,
unclip
heater
air
duct
actu-
ating
lever
.
Remove
cross-rod
(with
flaps)
from
frontof
heater
core
.
See
Fig
.
19
.
HEATER
AND
CONTROLS
0012662
Fig
.
18
.
Screws
retaining
front
heater
box
cover
(shown
removed)
to
heater
box
(arrows)
.
0012661
Fig
.
19
.
Pry
heater
flap
actuating
lever
in
direction
A
.
Pull
offair
flap
cross-rod
in
direction
B
.
Page 456 of 759

640-10
HEATING
AND
AIR
CONDITIONING
i
El
Radio
Antenna
Rear
.
,
si,-
Left
side
I
d
1
.
Rear
vents
2
.
Fresh
air
3
.
Face-level
vents
4
.
Recirculation
5
.
Footwell
vents
0013017
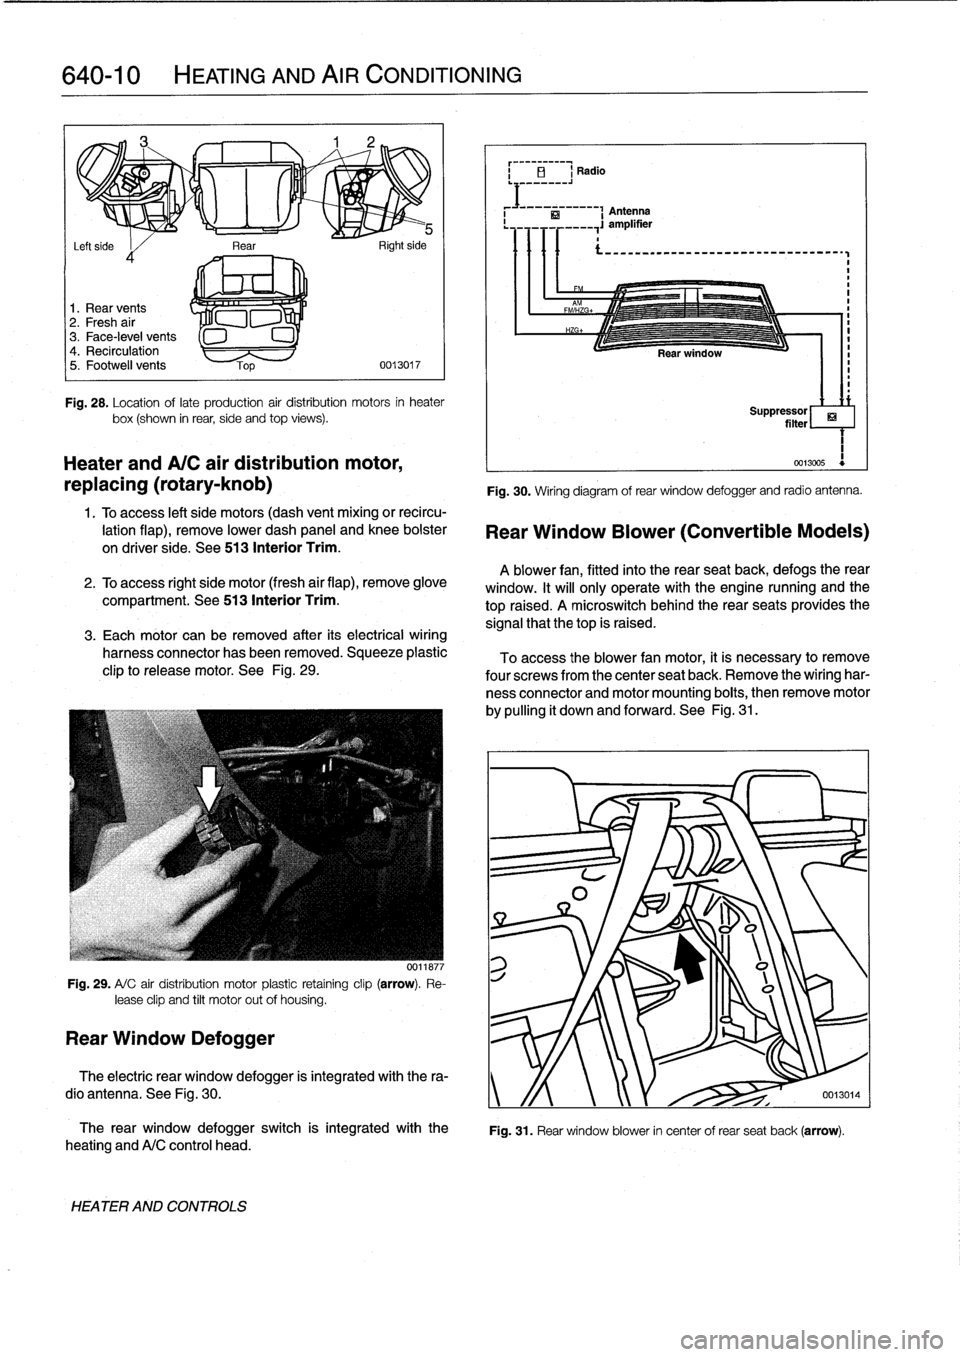
Fig
.
28
.
Location
oflate
production
air
distribution
motors
in
heater
box(shown
in
rear,
side
and
top
views)
.
Heater
andA/C
air
distribution
motor,
replacing
(rotary-knob)
1
.
Toaccess
left
side
motors
(dash
vent
mixing
or
recircu-
lation
flap),
remove
lower
dash
panel
and
knee
bolster
on
driver
side
.
See
513
Interior
Trim
.
2
.
To
access
right
side
motor
(fresh
air
flap),
remove
glove
compartment
.
See513
Interior
Trim
.
3
.
Each
motor
can
be
removed
after
its
electrical
wiring
harness
connector
has
been
removed
.
Squeeze
plastic
clip
to
release
motor
.
See
Fig
.
29
.
Fig
.
29
.
A/
C
air
distribution
motor
plastic
retaíning
clip
(arrow)
.
Re-
lease
clip
and
tilt
motor
out
of
housing
.
Rear
Window
Defogger
0011877
The
rear
window
defogger
switch
is
integrated
with
the
heating
andA/C
control
head
.
HEATER
AND
CONTROLS
Fig
.
30
.
Wiring
diagram
of
rear
window
defogger
and
radio
antenna
.
Rear
Window
Blower
(Convertible
Models)
A
blower
fan,
fitted
into
the
rear
seatback,
defogs
therear
window
.
It
will
only
operate
with
the
engine
nunning
and
the
top
raised
.
A
microswitch
behindthe
rear
seats
provides
the
signal
that
thetop
is
raised
.
To
access
the
blower
fan
motor,
it
is
necessary
to
remove
four
screwsfrom
the
center
seat
back
.
Remove
the
wiring
har-
ness
connector
and
motor
mounting
boits,
then
remove
motor
by
pulling
it
down
and
forward
.
See
Fig
.
31
.
ri
Suppressor
filter
1
0013005
Fig
.
31
.
Rear
window
blower
in
center
of
rear
seat
back
(arrow)
.
The
electric
rear
window
defogger
is
integrated
with
the
ra-
dio
antenna
.
See
Fig
.
30
.
y
/f
0013014
Page 458 of 759

640-12
HEATING
AND
AIR
CONDITIONING
A/C
Compressor,
replacing
1
.
Followingmanufacturer's
instructions,
connectanap-
proved
refrigerant
recovery/recycling/recharging
unit
to
A/C
system
and
discharge
system
.
WARNING
-
Do
notdischarge%harge
the
AIC
system
without
proper
equipment
and
training
.
Damage
to
the
vehi-
cle
and
personal
injury
may
result
.
2
.
Remove
splash
shield
fromunder
engine
.
3
.
Mark
A/C
drive
belt
with
direction
ofrotation
.
Remove
A/C
belt
tensioner
trim
cap
.
See
Fig
.
34
.
0011988
Fig
.
34
.
To
access
tensioner
retaining
bolt,
remove
trim
cap
from
drive-belt
tensioner
.
Fig
.
33
.
A/
C
components
.
Arrows
indicatedirection
of
refrigerant
flow
.
AIR
CONDITIONING
4
.
On
4-cylinder
engines
:
Loosen
A/C
belt
tensioner
bolt
under
trim
cap,
then
remove
belt
from
A/C
compressor
.
See
Fig
.
35
.
~=1
A/C
compressor
A
0013019
Fig
.
35
.
4-cylinder
engines
:
Loosen
retaining
bolt
A
on
tensionerto
re-
lease
drive-belt
tension
.
To
increase
tension,
rotate
pulley
in
direction
of
arrow,
then
tighten
bolt
A
.
5
.
On
6-cylinder
engines
:
Release
tension
on
A/C
belt
by
turning
tensioner
pulley
clockwíse
(againstspring
ten-
sion)
.
See
Fig
.
36
.
NOTE
-
Detailed
instructions
for
drive-belt
removal
and
installa-tion
can
be
found
in
020
Maintenance
Program
.
Page 459 of 759

Fig
.
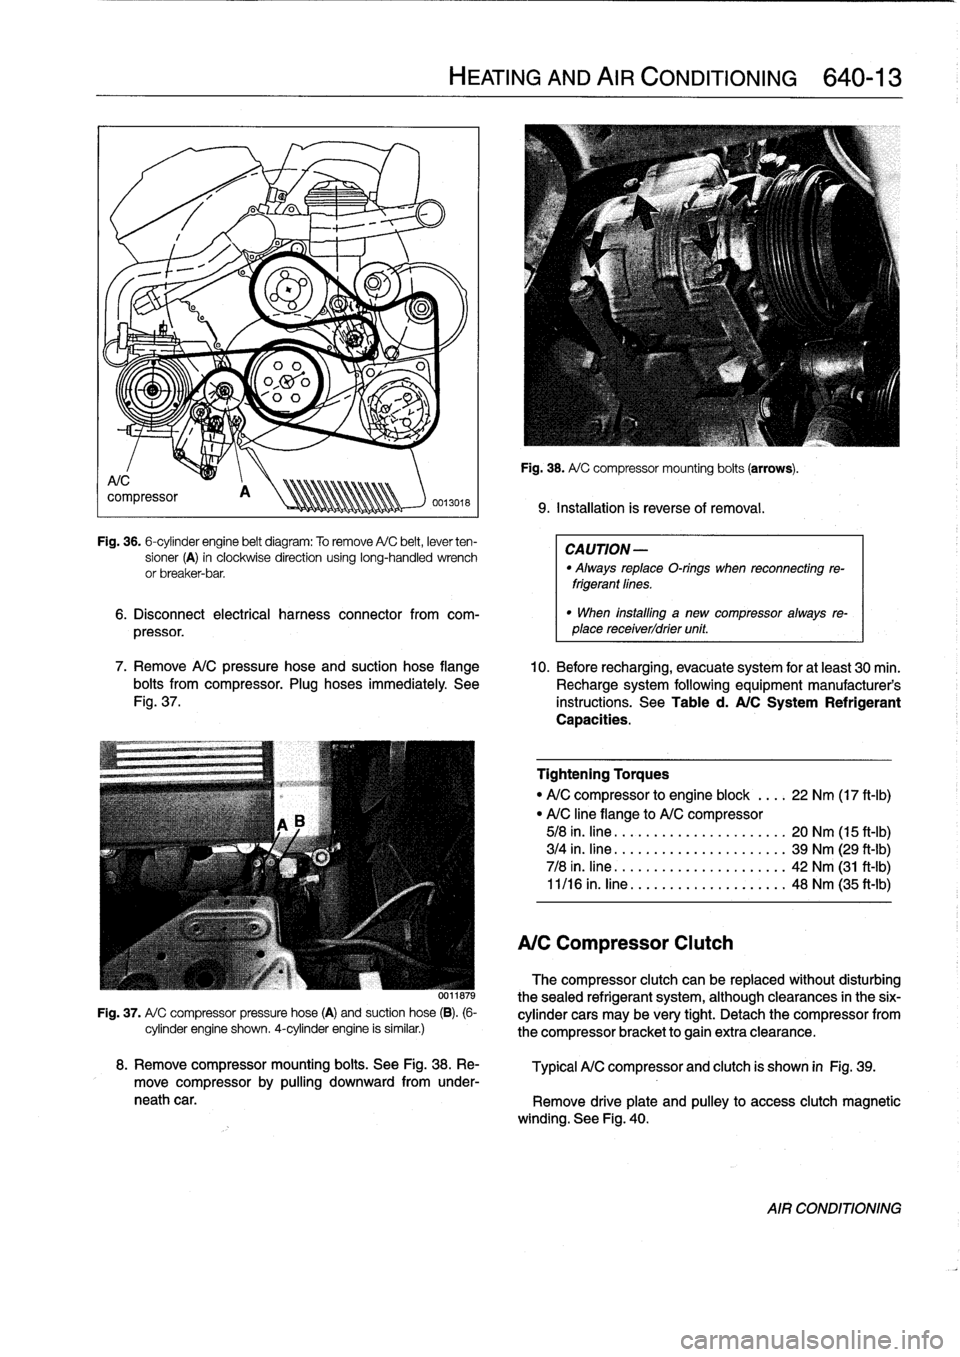
36
.
6-cylinder
engine
belt
diagram
:
To
remove
A/C
belt,
lever
ten-
sioner
(A)
in
clockwise
direction
using
long-handled
wrench
or
breaker-bar
.
6
.
Disconnect
electrical
harness
connector
from
com-
pressor
.
7
.
Remove
A/C
pressure
hose
and
suction
hose
flange
10
.
Before
recharging,
evacuate
system
for
at
least
30
min
.
bolts
from
compressor
.
Plug
hoses
immediately
See
Recharge
system
following
equipment
manufacturer's
Fig
.
37
.
instructions
.
See
Table
d
.
A/C
System
Refrigerant
Capacities
.
0011879
Fig
.
37
.
A/
C
compressor
pressure
hose
(A)
and
suction
hose
(B)
.
(6-
cylinder
engine
shown
.
4-cylinder
engine
is
similar
.)
HEATING
AND
AIR
CONDITIONING
640-
1
3
Fig
.
38
.
A/
C
compressor
mounting
boits
(arrows)
.
9
.
Installation
is
reverseof
removal
.
CAUTION
-
"
Always
replaceO-rings
when
reconnecting
re-
frigerantfines
.
"
When
installlng
a
new
compressor
always
re-
place
receiverldrier
unit
.
Tightening
Torques
"
A/C
compressor
to
engine
block
....
22
Nm
(17
ft-Ib)
"
A/C
line
flange
to
A/C
compressor
5/8
in
.
fine
.
......
.....
....
.
.....
20
Nm
(15
ft-Ib)
3/4
in
.
fine
.......
.....
..........
39
Nm
(29
ft-Ib)
7/8
in
.
fine
...
....
.....
..........
42
Nm
(31
ft-Ib)
11/16
in
.
fine
.....
..
..
..
...
.
.....
48
Nm
(35
ft-Ib)
A/C
Compressor
Clutch
The
compressor
clutch
can
be
replaced
without
disturbing
thesealed
refrigerant
system,
although
clearances
in
the
six-
cylinder
cars
may
be
very
tight
.
Detach
the
compressor
from
the
compressor
bracket
togain
extra
clearance
.
8
.
Remove
compressor
mounting
boits
.
See
Fig
.
38
.
Re-
Typical
A/C
compressor
and
clutch
is
shown
in
Fig
.
39
.
move
compressor
by
pulling
downward
from
under-
neath
car
.
Remove
driveplate
and
pulley
to
access
clutch
magnetic
winding
.
See
Fig
.
40
.
AIR
CONDITIONING
Page 461 of 759

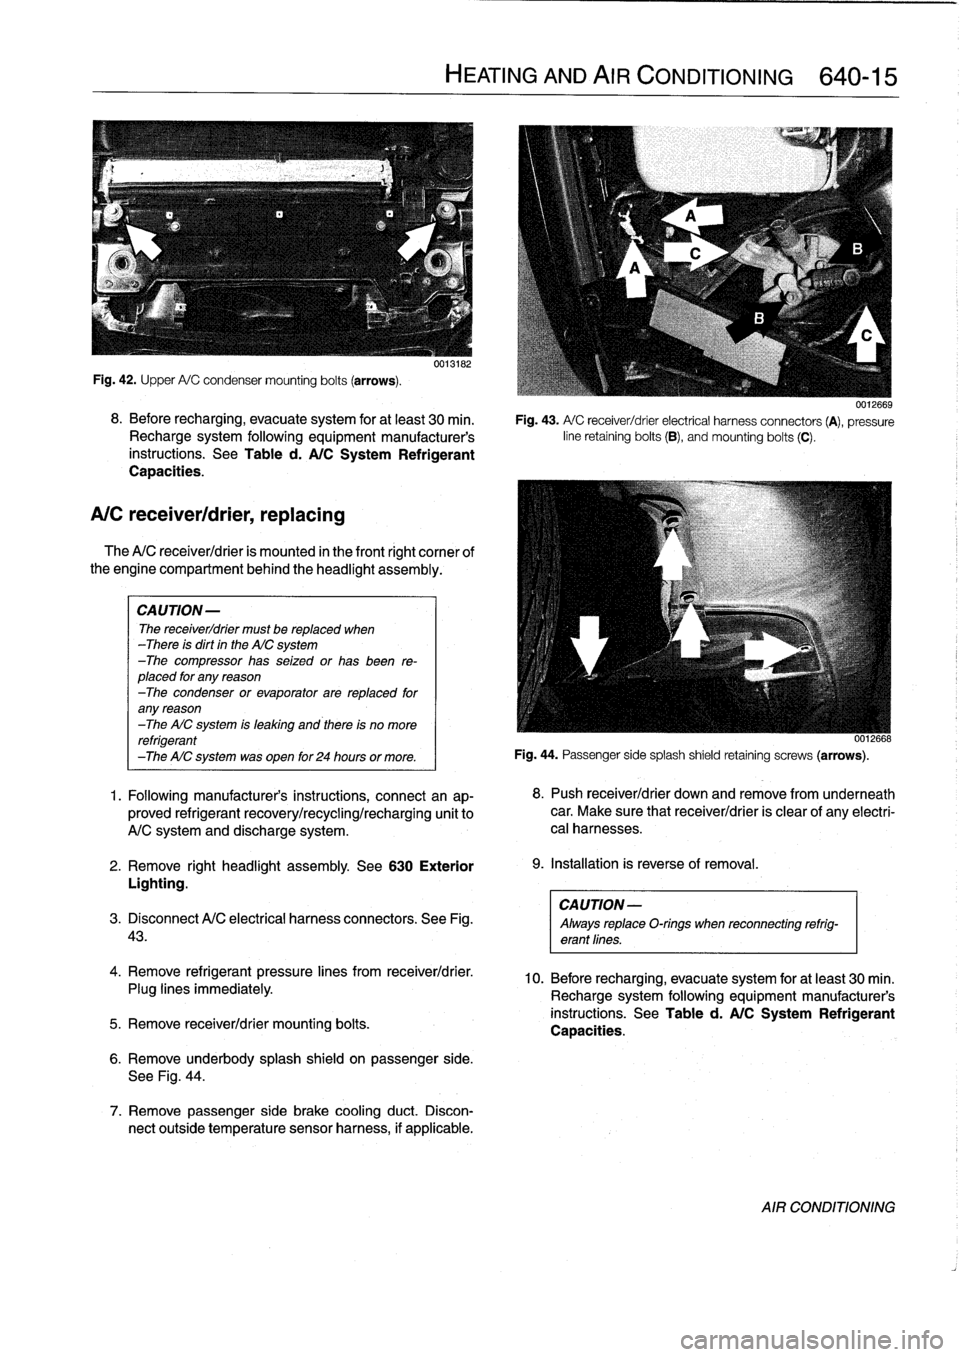
Fig
.
42
.
Upper
A/C
condensermounting
bolts
(arrows)
.
8
.
Before
recharging,
evacuate
system
for
at
least
30
min
.
Recharge
system
following
equipment
manufacturer's
instructions
.
See
Table
d
.
A/C
System
Refrigerant
Capacities
.
A/C
receiver/drier,
replacing
The
A/C
receiver/drier
is
mounted
in
the
front
right
cornee
of
the
engine
compartment
behind
the
headlight
assembly
.
CAUTION-
The
receiver/drier
must
be
replaced
when
-There
is
dirt
in
the
AIC
system
-The
compressor
has
seized
or
has
been
re-
placed
for
any
reason
-The
condenser
or
evaporator
are
replaced
for
any
reason
-The
AIC
system
is
leaking
and
there
is
no
more
refrigerant
-The
AIC
system
was
open
for
24
hours
or
more
.
1
.
Following
manufacturer's
instructions,
connectan
ap-
proved
refrigerant
recovery/recycling/recharging
unit
to
A/C
system
and
discharge
system
.
2
.
Remove
right
headlight
assembly
.
See
630
Exterior
Lighting
.
CAUTION-
3
.
Disconnect
A/C
electrical
harness
connectors
.
See
Fig
.
Always
replaceO-rings
when
reconnecting
refrig-
43
.
erant
lines
.
4
.
Remove
refrigerant
pressure
lines
from
receiver/drier
.
Plug
lines
immediately
.
5
.
Remove
receiver/drier
mounting
bolts
.
0013182
6
.
Remove
underbody
splash
shield
on
passenger
side
.
See
Fig
.
44
.
7
.
Remove
passenger
side
brake
cooling
duct
.
Discon-
nect
outside
temperature
sensor
harness,
if
applicable
.
HEATING
AND
AIR
CONDITIONING
640-15
0012669
Fig
.
43
.
A/
C
receiver/drier
electrical
harness
connectors
(A),
pressure
line
retaining
bolts
(B),
andmounting
bolts
(C)
.
0012668
Fig
.
44
.
Passenger
sidesplash
shield
retaining
screws
(arrows)
.
8
.
Push
receiver/drier
down
andremove
from
underneath
car
.
Make
sure
that
receiver/drier
is
clear
of
any
electri-
cal
harnesses
.
9
.
Installation
is
reverse
of
removal
.
10
.
Before
recharging,
evacuate
system
for
at
least
30
min
.
Recharge
system
following
equipment
manufacturer's
instructions
.
See
Table
d
.
A/C
System
Refrigerant
Capacities
.
AIR
CONDITIONING
Page 480 of 759

721-
4
AIRBAG
SYSTEM
(SRS)
CAUTION-
A
new
contact
ring
is
held
in
center
position
with
a
screw
.
This
locking
device
must
be
removed
after
contact
ring
is
installed
on
steering
wheel
.
See
Fig
.
4
.
Latercars
(1994
on)
:
"
Connect
ground
lead
at
contact
ring
.
"
When
installing
a
new
contact
ring
from
BMW,
remove
locking
pin
after
installing
contact
ring
to
steering
wheel
.
See
Fig
.
5
.
Airbag
crash
sensor,
replacing
Fig
.
5
.
Airbag
contact
ring
locking
pin
(arrows),
as
installed
on
new
replacement
part
from
BMW
(later
production
cars)
.
Contact
ring
mountíng
screws
shown
at
A
.
CAUTION-
Anew
contact
ring
is
held
in
center
position
with
a
screw
or
pin
.
This
locking
device
mustbe
removed
after
contact
ring
is
installed
on
steering
wheel
.
See
Fig
.
5
.
The
airbag
system
in
cars
produced
through
1993
uses
two
crash
sensors
mounted
in
the
engine
compartment
on
the
left
and
right
wheel
arches
.
The
sensors
are
identified
by
their
or-
ange
color
.
WARNING
-
If
en
airbag
is
deployed,
both
sensors
must
be
re-
placed
.
1
.
Disconnect
negative
(-)
cable
from
battery
and
cover
negative
terminal
with
insulating
material
.
CAUTION-
Prior
to
disconnectiog
the
battery,
read
the
battery
disconnection
cautíons
given
at
the
front
of
thls
manual
on
page
viii
.
AIRBAG
SENSORS
AND
ELECTRONICS
2
.
Remove
lower
steering
column
trim
mounting
screw
and
remove
lower
trim
.
See
Fig
.
6
.
Fig
.
6
.
Lower
steering
column
retaining
screw
(arrow)
.
3
.
Remove
orange
SRS
connector
from
its
holder
and
carefully
separate
connector
.
See
Fig
.
7
.
Fig
.
7
.
Orange
SRS
connector
below
steering
column
(arrow)
.
4
.
Working
in
engine
compartment,
remove
anti-tamper
Torx
screwsfrom
crash
sensor
.
Remove
sensor
and
disconnect
harness
connector
.
See
Fig
.
8
.
5
.
Installation
is
reverse
of
removal
.
Make
sure
arrow
on
sensor
faces
forward
when
installing
sensor
.
WARNING
-
Once
the
airbag
unit
is
installed
and
all
other
ser-vice
procedures
have
been
completed,
start
the
en-
gine
and
check
that
the
SRS
warning
light
goes
out
.
If
the
warning
light
stays
on,the
SRS
system
will
not
function
as
designed
.
Have
the
system
diagnosed
and
repaired
byen
authorized
BMW
dealer
.
0012543
0011891
Page 482 of 759

721-
6
AIRBAG
SYSTEM
(SRS)
5
.
Carefully
lift
airbag
unit
off
steering
wheel
and
discon-
6
.
Installation
is
reverse
of
removal
.
Tighten
right
side
nect
orange
harness
connector
from
rear
of
airbag
unit
.
screw
on
airbag
first
(as
viewedfrom
driver's
seat),
See
Fig
.
10
.
then
left
side
screw
.
NOTE-
NOTE-
In
some
models,
theairbag
electrical
connection
to
the
If
there
is
no
electrical
harness
connector
between
the
steering
wheel
isvia
aplug
in
back
of
the
airbag
unit
.
airbag
and
the
steering
wheel,
be
sure
to
fit
the
push
There
is
no
wire
harness
to
disconnect
.
in
electrical
plug
in
back
of
the
airbag
finto
the
proper
re-
ceptacle
in
the
steering
wheel
.
Fig
.
10
.
Driver
sideairbag
unit
harness
connector
(arrow)
.
AIRBAGS
WARNING
-
"
Store
the
removed
airbag
unit
with
the
horn
pad
facing
up
.
If
stored
facing
down,
accidental
de-
ployment
couldpropel
it
violently
into
the
air,
causing
injury
.
"
Once
an
airbag
is
removed,
the
car
must
not
be
driven
.
"
Do
not
connect
the
battery
with
the
airbag
dis-
connected
.
A
fault
code
will
be
stored,
setting
off
the
SRS
warning
light
.
Special
tools
are
needed
to
reset
the
fault
memory
.
"
Special
instructions
apply
when
installing
an
air-
bag
equipped
steering
wheel
.
See
320
Steering
and
Wheel
Alignment
.
"
Once
the
airbag
unit
is
installnd
and
all
other
ser-vice
procedureshave
been
completed,
start
the
engíne
and
check
that
the
SRS
warning
light
goes
out
.
If
the
warning
light
stays
on,
the
SRS
system
will
not
function
as
designed
.
Have
the
system
diagnosed
and
repaired
by
an
authorized
BMW
dealer
.
0013184
Tightening
Torque
"
Airbag
unitto
steering
wheel
........
8
Nm
(71
in-lb)
Passenger
side
airbag,
removing
and
installing
1
.
Disconnect
negative
(-)
cable
from
battery
and
cover
negative
terminal
with
insulating
material
.
2
.
Remove
glove
compartment
.
See
513
Interior
Trim
.
3
.
Lift
cover
from
topof
passenger
sideairbag
on
dash-
board
.
See
Fig
.
11
.
0013108
Fig
.
11
.
After
removing
glove
compartment,
lift
out
passenger
side
air-
bag
cover
.
Note
airbag
mounting
bolts
(A)
and
airbag
electri-
cal
connector
(B)
.
4
.
Remove
passenger
sideairbag
mounting
bolts
.
Dis-
connect
electrical
harness
connector
from
rear
of
air-
bag
unit
and
remove
airbag
.
5
.
Installation
is
reverse
of
removal
.
Make
sure
wiring
har-
ness
is
not
pínched
when
installing
airbag
unit
in
dash-board
.
Page 485 of 759

GENERAL
This
section
contains
wiring
diagrams
for
1992
through
1998
BMW
3
Series
models
.
WARNING
-
On
cars
equipped
with
airbags,
special
precautions
apply
to
any
electrical
testing
or
repair
.
The
airbag
unit
is
an
explosive
device
and
must
be
handled
with
exterme
care
.
Before
starting
any
work
onan
airbag
equipped
car,
refer
to
the
warnings
and
cau-
tions
in
720
Seatbelts
and
721
Airbag
Systems
(SRS)
.
NOTE-
The
"
gear
position/neutral
safetyswitch
is
also
some-
timesreferred
to
as
the
automatic
transmission
range
switch
.
"
The
EWS
11
system
is
also
sometimes
referred
to
as
the
Driveaway
Protection
System
or
the
electronic
im-
mobilization
system
.
ELECTRICAL
WIRING
DIAGRAMS
ELE-1
Electrical
Wiring
Diagrams
GENERAL
.
.
.
.
.
.
.
.
.
................
.
.
.
ELE-1
Horns
.....
.
.....
.
.
.
....
.
.
.
.
.
...
.
.
ELE-153
Instrument
Panel
.
.
.
.
.
.
..............
ELE-165
ELECTRICAL
WIRING
DIAGRAMS
...
.
.
.
ELE-2
Interior
Lights/Illumination
.............
ELE-211
ABS
..............
.
.
.
.....
.
.....
ELE-117
Lumbar
Control
.
....................
ELE-247
ABS/AST
.............
.
.
.
...
.
.
.
.....
ELE-120
On-Board
Computer
..................
ELE-173
Airbag
(Supplemental
Restraint
System)
..
ELE-140
Park
Ventilation
.
.
.
...........
.
...
.
..
ELE-139
Air
Conditioning
and
Heating
.
.
.
.
.
.
.....
ELE-129
Power
Distribution
......
.
...
.
.
.
.
.
.
.
...
.
ELE-2
Anti-Theft
(Alpine)
..........
.
.
.
...
.
...
ELE-144
Power
Door
Locks
.
.
......
.
.
.
.
.
.
.
.
.
..
ELE-226
Anti-Theft
(EWS
II)
.
........
.
.
.
...
.
...
ELE-150
Power
Mirrors
...
.
.
.
......
.
.
.
.
.
.
.
.
.
..
ELE-241
Body
Computer
Module
.....
.
.....
.
...
ELE-176
Power
Seats
......
.
......
.
.
.
...
.
.
.
..
ELE-243
Charging
System
.
.
................
.
.
.
ELE-67
Power
Sunroof
.
.
.
.
.
.
.
...............
ELE-248
Convertible
Top
.
.
.
.
................
.
.
ELE-253
Power
Windows
.
.
.
.
.
.
.....
.
.........
ELE-231
Cruise
Control
..
.
.
.
...........
.
....
.
.
ELE-112
Radio/Cassette/CD/Speakers
..........
ELE-255
Data
Link
Connector
................
.
.
.
ELE-86
Rear
Window
Defogger
...............
ELE-160
Engine
Cooling
.......
.
.......
.
....
.
.
.
ELE-94
Shift
Interlock
.
.
.
.
.
.
.
.
...............
ELE-110
Engine
Management
...
.
.......
.
....
.
.
.
ELE-70
Starting
....
.
.
.
.
.
...
.
................
ELE-63
Exterior
Lights
........
.
.
.
.
.
.
.
.
.
......
ELE-194
Transmission
Electronics
.
..............
ELE-96
Ground
Distribution
....
.
.
.
.
.
.
.
.
.
.......
ELE-35
Warning
System
:
Chimes
.............
ELE-178
Headlights/Foglights
...
.
.
.
.
.
.
.
.
.
......
ELE-180
Wiper/Washer
.
.....
.
...............
ELE-155
Heated
Seats
........
.
.
.
.
.
.
.
.
.
......
ELE-245
ELECTRICAL
COMPONENT
LOCATIONS
Relayand
fuse
positions,
ground
locations
...........
.
.
.
.
.
.
.
.
.
................
seeRepair
Group
610
CAUTION-
Always
switchthe
ignition
off
and
disconnect
the
negative
(-)
battery
cablebefore
removing
any
electrical
components
.
"
Prior
to
disconnecting
the
battery,
read
the
bat-tery
disconnection
cautions
given
at
the
front
of
this
manual
on
page
viii
.
"
Connect
and
disconnect
ignition
system
wires,
multiple
connectors
and
ignition
test
equipment
leads
only
while
ignition
is
switched
off
.
-Always
switch
a
test
meter
to
the
appropiate
func-
tion
and
range
before
making
test
connections
.
"
All-Season
Traction
(AST)
is
also
referred
to
as
ASC
or
ASC+T
.
GENERAL