1998 BMW CONVERTIBLE change time
[x] Cancel search: change timePage 69 of 179
68
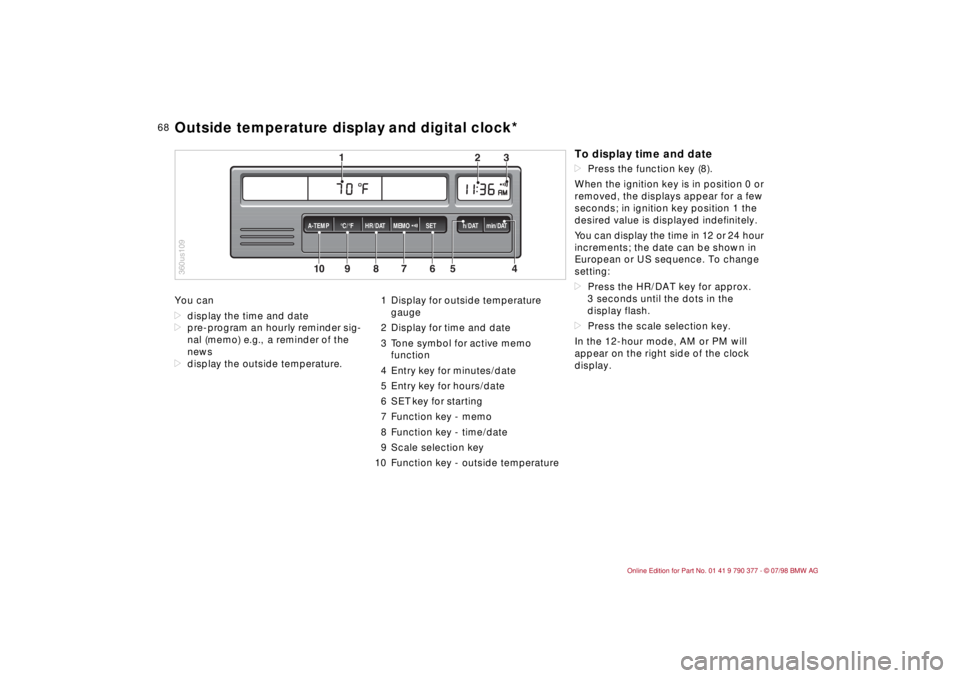
You can
ddisplay the time and date
dpre-program an hourly reminder sig-
nal (memo) e.g., a reminder of the
news
ddisplay the outside temperature.1 Display for outside temperature
gauge
2 Display for time and date
3 Tone symbol for active memo
function
4 Entry key for minutes/date
5 Entry key for hours/date
6 SET key for starting
7 Function key - memo
8 Function key - time/date
9 Scale selection key
10 Function key - outside temperature
10
MEMO
9
8
7
6
5
43
2
1
HR/DAT A-TEMP°C/°F SET h/DAT min/DAT
360us109Outside temperature display and digital clock*
To display time and datedPress the function key (8).
When the ignition key is in position 0 or
removed, the displays appear for a few
seconds; in ignition key position 1 the
desired value is displayed indefinitely.
You can display the time in 12 or 24 hour
increments; the date can be shown in
European or US sequence. To change
setting:
dPress the HR/DAT key for approx.
3 seconds until the dots in the
display flash.
dPress the scale selection key.
In the 12-hour mode, AM or PM will
appear on the right side of the clock
display.
Page 75 of 179
74
The Check Control uses texts with mes-
sages and warnings to alert the driver
to defective systems. In addition, an
indicator lamp is provided in the instru-
ment cluster. For details and operating
instructions, refer to pages 71, 72.
The outside temperature can also be
displayed.
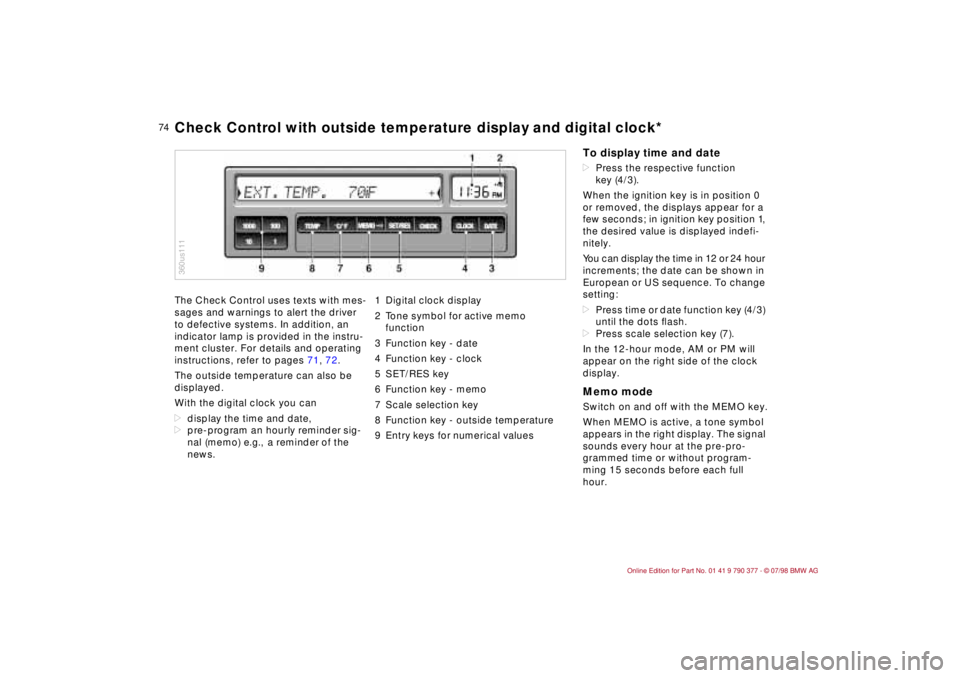
With the digital clock you can
ddisplay the time and date,
dpre-program an hourly reminder sig-
nal (memo) e.g., a reminder of the
news.1 Digital clock display
2 Tone symbol for active memo
function
3 Function key - date
4 Function key - clock
5 SET/RES key
6 Function key - memo
7 Scale selection key
8 Function key - outside temperature
9 Entry keys for numerical values
360us111Check Control with outside temperature display and digital clock*
To display time and datedPress the respective function
key (4/3).
When the ignition key is in position 0
or removed, the displays appear for a
few seconds; in ignition key position 1,
the desired value is displayed indefi-
nitely.
You can display the time in 12 or 24 hour
increments; the date can be shown in
European or US sequence. To change
setting:
dPress time or date function key (4/3)
until the dots ßash.
dPress scale selection key (7).
In the 12-hour mode, AM or PM will
appear on the right side of the clock
display.Memo modeSwitch on and off with the MEMO key.
When MEMO is active, a tone symbol
appears in the right display. The signal
sounds every hour at the pre-pro-
grammed time or without program-
ming 15 seconds before each full
hour.
Page 80 of 179
79
At a glanceControls Car careRepairsTechnicalDataIndex
Estimated cruising rangeDisplays the estimated travel range
based on the remaining fuel. The value
takes into account the way in which
way the car has been driven.
Data request: press RANGE key.
A plus symbol (+) in front of the value
indicates that the cruising range is still
being corrected (measuring tolerance).
If three segments flash in the display,
the cruising range is less than 9 miles
(15 km) and the car should be refueled
as soon as possible.
When you refuel, the onboard computer
registers the action only
dif the fuel amount is over 1.2 gallons
(approx. 4 liters).
dthe engine is switched off.
Average fuel consumptionThe computer can calculate average
fuel consumption rates simultaneously
for two distances, e.g., for an entire
journey and for a single section of it.
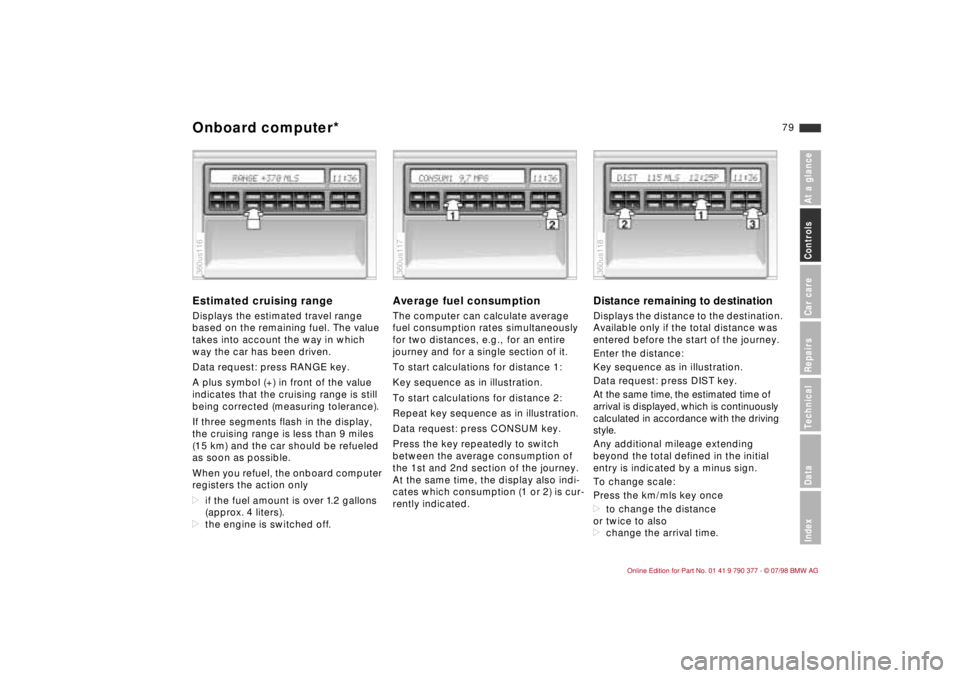
To start calculations for distance 1:
Key sequence as in illustration.
To start calculations for distance 2:
Repeat key sequence as in illustration.
Data request: press CONSUM key.
Press the key repeatedly to switch
between the average consumption of
the 1st and 2nd section of the journey.
At the same time, the display also indi-
cates which consumption (1 or 2) is cur-
rently indicated.
Distance remaining to destinationDisplays the distance to the destination.
Available only if the total distance was
entered before the start of the journey.
Enter the distance:
Key sequence as in illustration.
Data request: press DIST key.
At the same time, the estimated time of
arrival is displayed, which is continuously
calculated in accordance with the driving
style.
Any additional mileage extending
beyond the total defined in the initial
entry is indicated by a minus sign.
To change scale:
Press the km/mls key once
dto change the distance
or twice to also
dchange the arrival time.
360us116
360us117
360us118
Onboard computer*
Page 84 of 179
83
At a glanceControls Car careRepairsTechnicalDataIndex
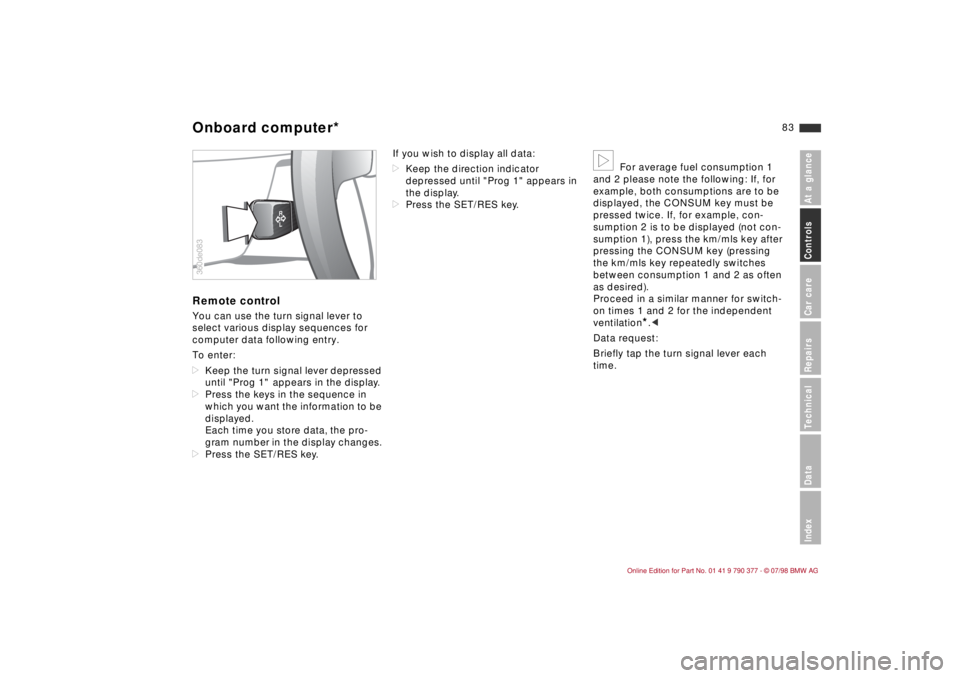
Remote controlYou can use the turn signal lever to
select various display sequences for
computer data following entry.
To enter:
dKeep the turn signal lever depressed
until "Prog 1"
appears in the display.
dPress the keys in the sequence in
which you want the information to be
displayed.
Each time you store data, the pro-
gram number in the display changes.
dPress the SET/RES key.If you wish to display all data:
dKeep the direction indicator
depressed until "Prog 1" appears in
the display.
dPress the SET/RES key.
b
For average fuel consumption 1
and 2 please note the following: If, for
example, both consumptions are to be
displayed, the CONSUM key must be
pressed twice. If, for example, con-
sumption 2 is to be displayed (not con-
sumption 1), press the km/mls key after
pressing the CONSUM key (pressing
the km/mls key repeatedly switches
between consumption 1 and 2 as often
as desired).
Proceed in a similar manner for switch-
on times 1 and 2 for the independent
ventilation
*.c
Data request:
Briefly tap the turn signal lever each
time.
R
L
360de083Onboard computer*
Page 88 of 179
87
At a glanceControls Car careRepairsTechnicalDataIndex
BMW ConvertibleThe switches for the map reading lamps
next to the interior lamp are operated in
the same manner as the interior lamp
switch.
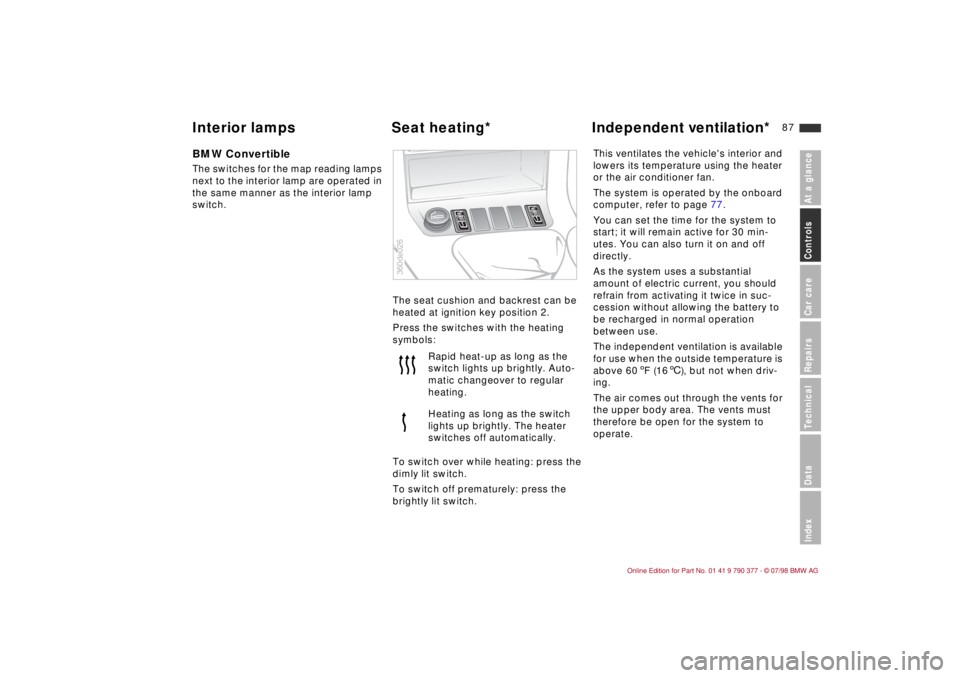
The seat cushion and backrest can be
heated at ignition key position 2.
Press the switches with the heating
symbols:
To switch over while heating: press the
dimly lit switch.
To switch off prematurely: press the
brightly lit switch.This ventilates the vehicle's interior and
lowers its temperature using the heater
or the air conditioner fan.
The system is operated by the onboard
computer, refer to page 77.
You can set the time for the system to
start; it will remain active for 30 min-
utes. You can also turn it on and off
directly.
As the system uses a substantial
amount of electric current, you should
refrain from activating it twice in suc-
cession without allowing the battery to
be recharged in normal operation
between use.
The independent ventilation is available
for use when the outside temperature is
above 60 5F (166), but not when driv-
ing.
The air comes out through the vents for
the upper body area. The vents must
therefore be open for the system to
operate. Rapid heat-up as long as the
switch lights up brightly. Auto-
matic changeover to regular
heating.
Heating as long as the switch
lights up brightly. The heater
switches off automatically.
360de026
Interior lamps Seat heating*Independent ventilation*
Page 115 of 179

11 4
We recommend winter tires (M+S radial
tires) for operation under inclement win-
ter driving conditions. Although all-sea-
son M+S tires provide better winter
traction than standard summer tires
with H, V, W and ZR speed ratings, they
generally fail to provide the same levels
of performance as standard snow tires
in winter driving.
If you fit winter tires, install radial tires
of the same tread configuration and
from a single manufacturer on all four
wheels (better still: on all five wheels).
This ensures safe tracking and steering
response.
Fit BMW-approved winter tires only.
Any BMW Retailer will be glad to pro-
vide you with information on the best
winter tires for your particular driving
conditions.Winter tires display a perceptible loss in
their ability to cope with winter driving
conditions once the tread wears to
below 0.16 in (4 mm), and should thus
be replaced.
Observe the specified tire inflation
pressures - and be sure to have the
wheel and tire assemblies balanced
every time you change the tires!
a
Never exceed the maximum speed
for which the tires are rated.
Unprofessional attempts by laymen to
service tires can lead to damage and ac-
cidents.
Have this work performed by skilled pro-
fessionals only. Your BMW Retailer will
be glad to assist you.c
Store tires in a cool, dry place, away
from light whenever possible. Protect
the tires from contact with oil, grease
and fuel.
Winter tires
Page 126 of 179

12 5
At a glanceControlsCar careRepairsTechnicalDataIndex
Measure the oil level:
1 Pull out dipstick and wipe off with a
lint-free cloth, paper tissue, etc.
2 Push the dipstick all the way into the
guide tube and pull it out again.
3 The oil level should be between the
two marks on the dipstick.
Add oil Wait until the level has dropped to just
above the lower graduation before add-
ing oil. Never wait until the oil drops
below the lower mark.
The space between the two marks on
the dipstick corresponds to approxi-
mately 1.1 US quarts (1 liter). Do not fill
to beyond the upper mark on the dip-
stick. Excess oil harms the engine.
Because it would be consumed within a
short period, it would also result in an
abnormally high rate of oil consump-
tion.a
BMW engines are designed to op-
erate without oil additives; the use of ad-
ditives could lead to damage in some
cases. This also applies to the manual
and automatic transmissions, the differ-
ential and the power steering system.c
Engine oil specificationsAlways refer to the API specifications
when selecting oil.
Required quality:
API SH
API-SH/CD
API-SH/CEViscosity ratingsViscosity = Oil flow rating according to
SAE class.
Select the SAE viscosity rating accord-
ing to the average seasonal air temper-
ature.
Consult the table on the following page
to determine the correct SAE viscosity.
You can continue to operate the vehicle
for short periods of time at tempera-
tures beyond the range for the SAE rat-
ing of the oil being used.A
Always observe all environmental
protection guidelines and regulations
when disposing of used oil.c
Recommendation: have the oil changed
by your BMW Retailer.
360de096
Engine oil
Page 129 of 179
12 8
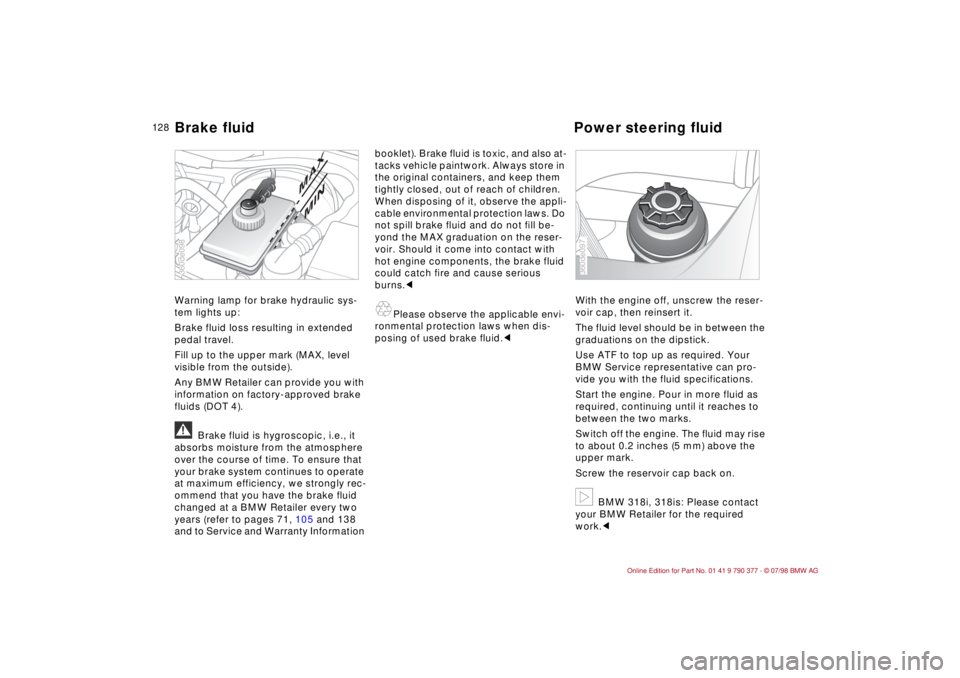
Warning lamp for brake hydraulic sys-
tem lights up:
Brake fluid loss resulting in extended
pedal travel.
Fill up to the upper mark (MAX, level
visible from the outside).
Any BMW Retailer can provide you with
information on factory-approved brake
fluids (DOT 4).
a
Brake fluid is hygroscopic, i.e., it
absorbs moisture from the atmosphere
over the course of time. To ensure that
your brake system continues to operate
at maximum efficiency, we strongly rec-
ommend that you have the brake fluid
changed at a BMW Retailer every two
years (refer to pages 71, 105 and 138
and to Service and Warranty Information booklet). Brake fluid is toxic, and also at-
tacks vehicle paintwork. Always store in
the original containers, and keep them
tightly closed, out of reach of children.
When disposing of it, observe the appli-
cable environmental protection laws. Do
not spill brake fluid and do not fill be-
yond the MAX graduation on the reser-
voir. Should it come into contact with
hot engine components, the brake fluid
could catch fire and cause serious
burns.c
A
Please observe the applicable envi-
ronmental protection laws when dis-
posing of used brake fluid.cWith the engine off, unscrew the reser-
voir cap, then reinsert it.
The fluid level should be in between the
graduations on the dipstick.
Use ATF to top up as required. Your
BMW Service representative can pro-
vide you with the fluid specifications.
Start the engine. Pour in more fluid as
required, continuing until it reaches to
between the two marks.
Switch off the engine. The fluid may rise
to about 0.2 inches (5 mm) above the
upper mark.
Screw the reservoir cap back on.
b
BMW 318i, 318is: Please contact
your BMW Retailer for the required
work.c
MAXMIN
360de098
360de097
Brake fluid Power steering fluid