1998 BMW 528i BODY
[x] Cancel search: BODYPage 3 of 1002

Downloaded from www.Manualslib.com manuals search engine
YOU are now in Volume I
I
Foreword ................... .. ........................................................................\
.......... v
Index
........................ .. ................................................................ rear of manual
General, 001 General Warnings and Cautions 002 Vehicle Identification and VIN Decoder
Maintenance OiO 020 Maintenance
Engine
100 Engine-General 110 Engine Removal and Installation
113 Cylinder Head Removal and
Installation
116 Cyiinder Head and Valvetrain 117 Camshaft Timing Chain
119 Lubrication System
200 Transmission-General
2 Transmission 210 clutch 230 ManualTransmission
I20 Ignition System
121 Battery, Starter, Alternator
130 Fuel Injection
160 Fuel Tank and Fuel Pump 170 Radiator and Cooling System
180 Exhaust System
240 Automatic Transmission
250 Gearshift Linkage 260 Driveshaft
Suspension, 300 Suspension, Steering and 330 Rear Suspension
Brakes-General 331 Final Drive
Steering and No Front Suspension 340 Brakes
320 Steering and Wheel Alignment
400 Body-General
410 Fenders, Engine Hood 411 Doors
412 Trunk Lid, Tailgate
510 Exterior Trim, Bumpers 512 Door Windows
Equipment 513 Interior Trim
7
Equipment and 720 seat Belts
Accessories 721 Airbag System (SRS)
OBD On-Board Diagnostics
. ............ ..
515 Central Lociting and
Anti-Theft
520 Seats 540 Sunroof
.................................................................... Foreword .............................. .. v
Index ................... .. ................................................................ rear of manual
Electrical
6 system
600 Electrical System-General 620 Instruments
610 Electrical Comoonent Locations 630 Liohts
611 wipers and washers 612 Switches eati in^ and Air Conditioning
Radio
. ........... ........ .........................
Electrical Wiring Diagrams
Page 9 of 1002
Downloaded from www.Manualslib.com manuals search engine
002 Vehicie identification and
VlN Decoder
Vehicle identification Number (VIN), decoding
Some of the information in this manual applies only to cars of a parlicuiar model year or range
of vears. For
examole. 1999 refers to the 1999 model vear but does not necessarilv malch the
caiendsr year in which the car was manufactured or sold. To be sure of the model year of a
particular car,
checic the Vehicle ldentification Number (VIN) on the car.
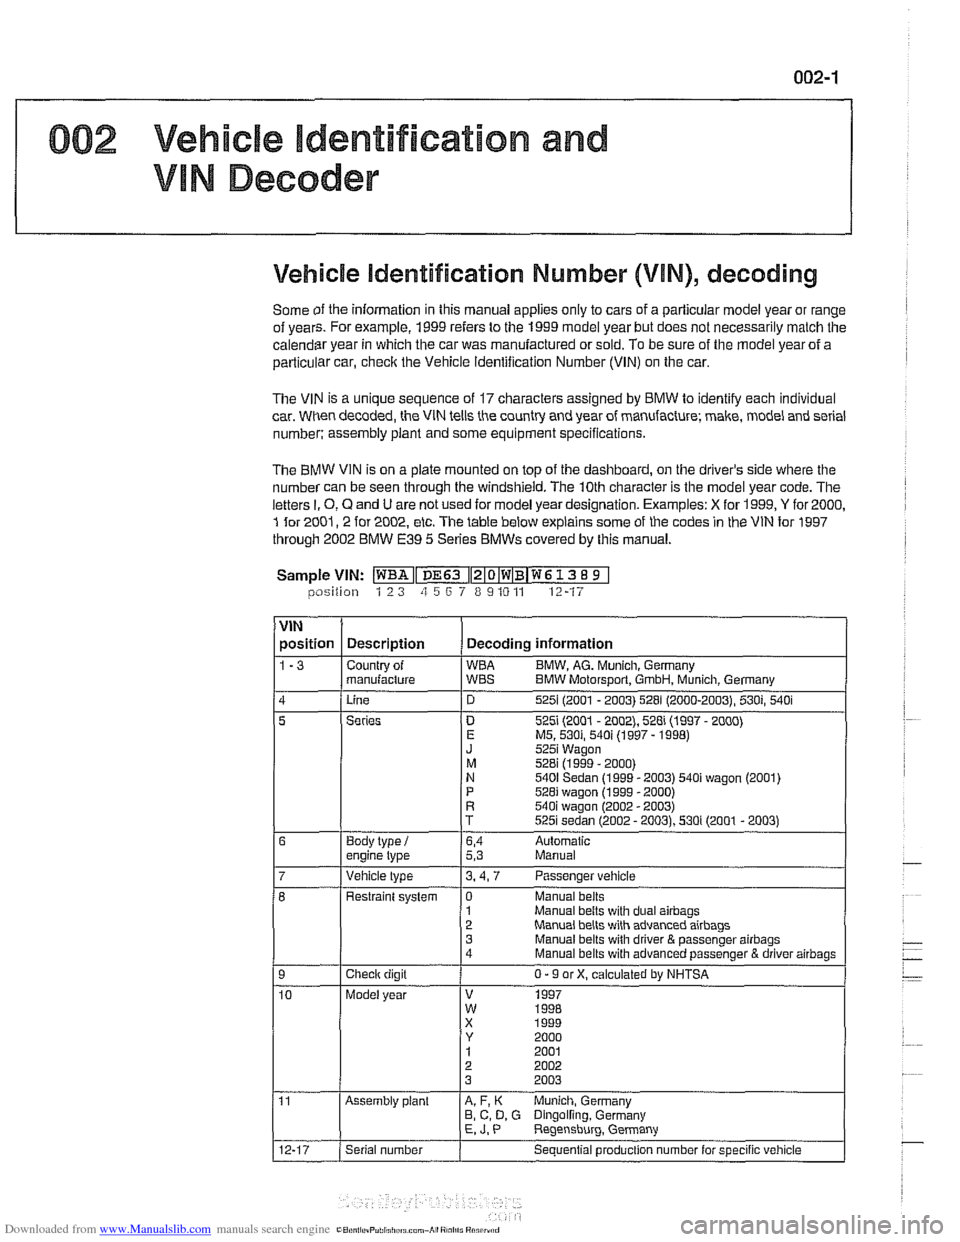
The VIN is a unique sequence of 17 characters assigned by BMW lo identify each individual
car. When decoded, the VIN tells the country and year of manufacture; make, model and serial
number: assembly
plant and some equipment specifications.
The BMW VIN is on a plate mounted on top of the dashboard, on the driver's side where the
number can be seen through the windshield, The 10th character is the model year code. The
letters
I. 0, Q and U are not used for model year designation. Examples: X for 1999, Y for 2000,
1 for 2001,2 for 2002, etc. The table below explains some of the codes in the VIN for 1997
through 2002 BMW
E39 5 Series BMWs covered by this manual.
Sample
VIN: ~~Iz~o~w~B~w~ 13 8 9 1 lposition 1 2 3 zi 5 6 7 8 9 10 11 12-17
VIN
position Description Decoding information
1-3 Countrv of WBA B
I J 1 znan~+q ;BT BMW Molorsporl. Gmon, ~;nch Gerrn;!n,
Linc 525 (2UU1 - 2003) 528 (2000-2003. 530; 540 i
5
1
Manual belts with dual airbags Manual belts with advanced airbaos
Series
Body
type
i engine lype . ..
D 5251 (2001 - 2002), 528i (1997 - 2000) E MS. 530i, 540i (1997 - 1998) J 5251 Wagon
M 528i (1999 - 2000) N 5401 Sedan (1999 - 2003) 540i wagon (2001)
P 528i wagon (1999 - 2000) R 540i waaon 12002 - 20031
6,4 Aulomatic 5,3 Manual
Vehicle type 3.4.7 Passenger vehicle
Checlr digit
Model year Restraint
system
1 0 Manual belts
3 Manual belts wilh driver
& passenger airbags 4
Manual belts with advanced passenger B driver airbags
0 - 9 or X, calculated by NHTSA
V 1997 W 1RRR
Assembly plant A, F, K Munich, Germany
B, C, D, G Dingolfing. Germany E, J. P Reqensburq. Germany .
Serial number
Sequential produclion number lor specific vehicle
Page 12 of 1002
Downloaded from www.Manualslib.com manuals search engine
01 0-2
General
This section is intended to help the do-it-yourselfer get start-
ed. Tips on workshop practices, basic tools, and a quick refer-
ence guide to emergencies can be found here.
WARNING-
Do not use this manual unless you are familiar with basic
automotive repair procedures and safe workshop
practices.
0 This manual illustrates the worl
and up-to-date information from the vehicle manufac-
turer or for proper training as an automotive technician.
Note that it is not possible to anticipate all of the ways
or conditions under which vehicles may be serviced or
to provide cautions as to all of the possible hazards that
may result.
MOW TO USE THIS MANUAL
WARNING -
Your common sense and goodjudgement are crucial to safe
and successful service
work. Read procedures through be-
fore starting them. Think about whether the condition of your
cac your level of mechanical skill, or pour level of reading
comprehension might result in or contribute in some way to
an occurrence that might cause you injury, damage your car;
or result in an unsafe repair. If you have doubts for these or
other reasons about your ability to perform safe repair work
on your car; have the work done at an authorized
BMW deal-
er or other qualified shop.
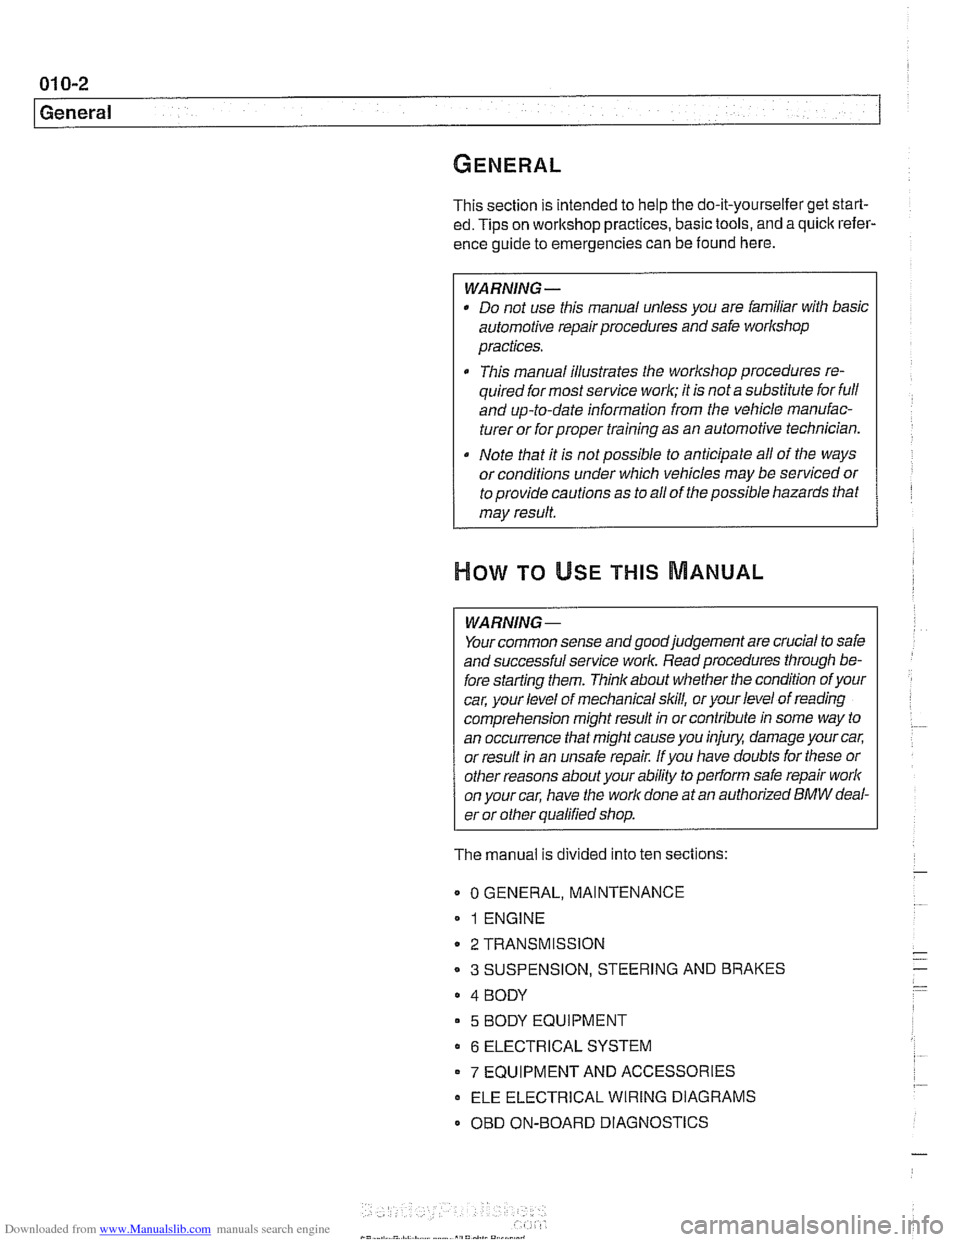
The manual is divided into ten sections:
0 GENERAL, MAINTENANCE
0 I ENGINE
2 TRANSMISSION
3 SUSPENSION, STEERING AND BRAKES
4 BODY
5 BODY EQUIPMENT
6 ELECTRICAL SYSTEM
7 EQUIPMENT AND ACCESSORIES
- ELE ELECTRICAL WIRING DIAGRAMS
OBD ON-BOARD DIAGNOSTICS
Page 15 of 1002

Downloaded from www.Manualslib.com manuals search engine
General
Much of the necessary maintenance and minor repairthat an
automobile will need can be done with ordinary tools. Below
you'll find important information on how to work safely, a dis-
cussion of what tools will be needed and how to use them.
Safety
Although an automobile presents many hazards, common
sense and good equipment can help ensure safety. Many ac-
cidents happen because of carelessness. Pay attention and
stick to the safety rules in this manual.
Lifting the car
4 The proper jacking points should be used to raise the car
safely and avoid damage. The
jack supplied with the car can
only be used at the four side points (arrows) just behind the
front wheels or just in front of the rear wheels.
WARNING-
. Never work under a lifted car unless it is solidly supported
on
jack stands that are intended for that purpose.
When raising the car using a floorjack or hydraulic lift,
carefully position the jack pad to prevent damaging the
car body.
* Watch the jack closely. Male sure it stays stable and
does not shift or tilt.
As the car is raised, it may roll
sliahtlv and the
jack mav shift.
Raising car
- Park car on flat, level surface.
- If changing a tire, loosen lug bolts before raising car. See
Changing
a tire.
Place jack into position.
Malte sure jack is resting on flat, sol-
id surface. Use a board or other support to provide a firm sur-
face for jack, it necessary.
- Raise car slowly while constantly checking position of jack
and car.
- Once car is raised, bloclc wheel that is opposite and farthest
from jack to prevent car from unexpectedly rolling.
Page 20 of 1002
Downloaded from www.Manualslib.com manuals search engine
01 0-1 0
General
Electrical testing
Many electrical problems can be understood and solved with
only a little fundamental knowledge of how electrical circuits
function.
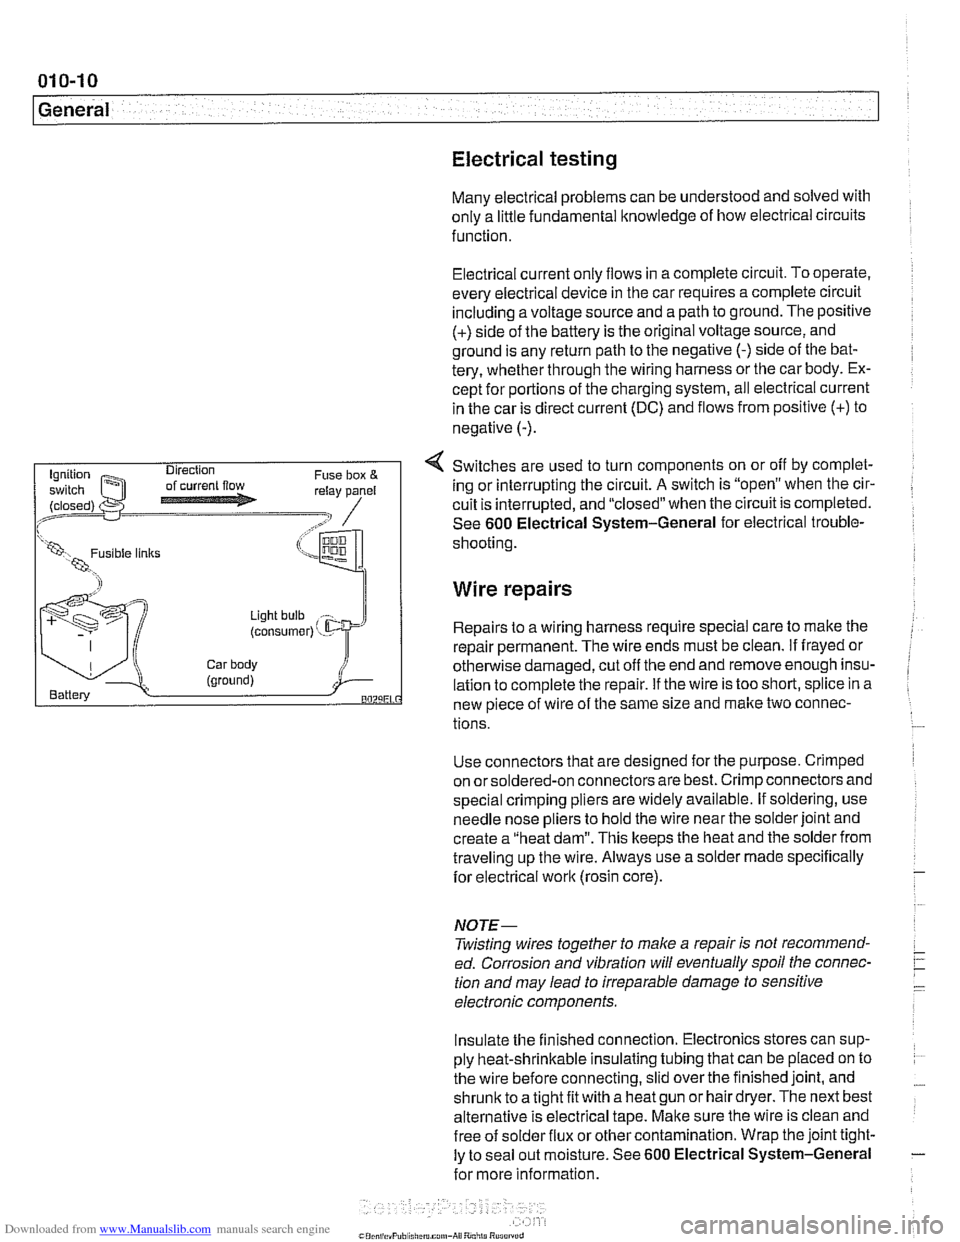
Electrical current
only flows in a complete circuit. To operate.
every electrical device in the car requires a complete circuit
including a voltage source and a path to ground. The positive
(+) side of the battery is the original voltage source, and
ground is any return path to the negative
(-) side of the bat-
tery, whether through the wiring harness or the car body. Ex-
cept for portions of the charging system, all electrical current
in the car is direct current (DC) and flows from positive
(+) to
negative
(-).
4 Switches are used to turn components on or off by complet-
ing or interrupting the circuit.
A switch is "open" when the cir-
cuit is interrupted, and "closed" when the circuit is completed.
See
600 Electrical System-General for electrical trouble-
(LW, 1 shooting
Wire repairs
Light bulb
(consumer) ' - Repairs to a wiring harness require special care to make the
repair permanent. The wire ends must be clean.
if frayed or
Car body otherwise damaged, cut off the end and remove enough insu- (ground) i Battery lation to complete the repair. if the wire is too short, splice in a BOZLiEL new piece of wire of the same size and make two connec-
tions.
Use connectors that are designed for the purpose. Crimped
on orsoldered-on connectors are best. Crimp connectors and
special crimping pliers are widely available. If soldering, use
needle nose pliers to hold the wire near the solder joint and
create a "heat dam". This keeps the heat and the solder from
traveling up the wire. Always use a solder made specifically
for electrical
work (rosin core).
NOJE-
Twisting wires together to make a repair is not recommend-
ed. Corrosion and vibration will eventually spoil the connec-
tion and may lead to irreparable damage to sensitive
electronic components.
Insulate the finished connection. Electronics stores can sup-
ply heat-shrinkable insulating tubing that can be placed on to
the wire before connecting, slid over the finished joint, and
shrunic to a tight fit with a heat gun or hair dryer. The next best
alternative is electrical tape. Make sure the wire is clean and
free of
solder flux or other contamination. Wrap the joint tight-
ly to seal out moisture. See
600 Electrical System-General
for more information.
Page 22 of 1002

Downloaded from www.Manualslib.com manuals search engine
01 0-1 2
1 General
Information you need to know
Model
When ordering parts it is important that you know the correct
model designation for your car. Models covered in this E39
manual are the
525i,5281,530i, 540i in Sedan and Station
Wagon body styles.
Model year
This is not necessarily the same as date of manufacture or
date of sale.
A 1999 model may have been manufactured in
late 1998, and perhaps not sold until early 2000. It is still a
1999 model. Model years covered by this manual are 1997 to
2002.
Date of manufacture
This information is necessary when ordering replacement
parts or determining if any of the warranty recalls are applica-
ble to your car. The label on the driver's door below the door
latch will specify the month and year that the car was built.
Vehicle
Identification Number (VIN)
This is a combination of letters and numbers that identify the
particular car. The VIN appears on the state registration doc-
ument, and on the car itself. One location is on the right front
strut tower in the engine compartment (arrow), another in the
lower left corner of the windshield.
Engine code
5 Series car covered in this manual are powered by
6 and 8 - cylinderengines. For information on engine codes and en- -. -
gine applications, see 100 Engine-General. -
Transmission code
The transmission type with its identifying code may be
impor- :
tant when buying clutch parts, seals, gaskets, and other .- transmission-related parts. For information on transmission
codes and applications, see 200 Transmission-General.
Page 33 of 1002

Downloaded from www.Manualslib.com manuals search engine
020 Maintenance
General ........................... .02 0.2
Special tools ........................ .02 0.2
Service Interval Indicator (Sll) ........... .02 0.3
Service Interval Indicator (Sll), resetting ... .02 0.3
Inspection I, Inspection 11 ............... .02 0.5
Maintenance Tables ................ .02 0.6
Fluid and Lubricant Specifications .. .02 0.9
Fluids and lubricants ................. .02 0.10
Engine Oil Service ................ .02 0.1 I
Engine oil. checking level ............. .02 0.12
Engine oil and filter. changing .......... .02 0-13
Engine Compartment Maintenance . .02 0.14
Accelerator and linkage ............... .02 0.14
Air filter. replacing ................... .02 0.1 4
Cooling system service ............... .02 0.15
Engine drive belt service .............. .02 0.16
Idlespeed .......................... 020-19
Catalytic converter and oxygen sensors .. .02 0.19
Power steering fluid, checking level ..... .02 0.20
Spark plugs ........................ .02 0.20
Spark plugs, replacing ................ .02 0.21
Interior ventilation microfilter, replacing ... .02 0.22
Other Mechanical Maintenance ..... .02 0.22
Battery, checking. cleaning. and replacing .02 0-22
Brake fluid. replacing ................. .02 0-24
Brake pad 1 rotor wear. checking ........ .02 0.24
Brake system, inspecting ............. .02 0.25
Parking brake. checking ............... 020-25
Clutch fluid. checking ................. 020-26
Differential oil level. checking ........... 020-26
Drive axle joint (CV joint) boots. inspecting 020-27
Exhaust system. inspecting ............ 020-27
Fuel filter. replacing .................. 020-27
Fuel tank and fuel lines. inspecting ...... 020-28
Suspension. front. inspecting ........... 020-29
Suspension. rear. inspecting ........... 020-29
Tires. checking inflation pressure ........ 020-29
Tires. rotating ....................... 020-29
Transmission service. automatic ........ 020-29
Transmission service. manual .......... 020-30
Transmission fluid. checking and filling
(manual transmission)
................ 020-30
Wheels. aligning ..................... 020-30
Body and Interior Maintenance ..... 020-31
Body and hinges. lubricating ........... 020-31
Exterior washing ..................... 020-31
Interior care ........................ 020-31
Leather upholstery and trim ............ 020-31
Polishing ........................... 020-32
Seat belts .......................... 020-32
Special cleaning ..................... 020-32
Washing chassis ..................... 020-32
Waxing ............................ 020-32
Windshield wiper blade maintenance ..... 020-33
Page 39 of 1002

Downloaded from www.Manualslib.com manuals search engine
Table b. Inspection I Service (continued)
Checlt transmission and differential for
external lealts.
Check CV joint boots for damage or leaks.
Visually
check fuel tank, fuel lines, and
connections for
leaks.
New parts
Tools Required required
Check condition, position, and mounting
ol
exhaust system. Visually check and adjusl
if necessary.
Check power steering system for lealts.
Check power steering
fluid level and adjust
if necessary.
Check steering racidbox and tie rods for
tightness. Checit condition of front axle
joints, steering
linkage, and steering shaft
joints.
Check overall thickness of front and rear
bralte pads using
BMW special tool. If
replacement is necessary:
Examine brake disc surface.
Clean brake pad contact points in calipers
Grease wheel centering hubs.
Checlt thickness of parking brake linings
only when replacing rear brake shoes.
Checit operation of pariting brake and
adjust as necessary.
Checlt front control arm bushings for
damage or wear.
Check brake system connections and
lines
for leaks, damage, and incorrect
positioning Warm
engine
(~ealer service Irepair , required recommended lnformat~on
Check parking braite actuator. Adjust if
necessary
Check ail tire pressure (including spare)
and correct if necessary.
Checlt condition of tires (outer tread
surface), tread wear pattern: in case of
uneven wear, perform wheel alignment.
inspect entire body according to terms of
rust oerforation limited warrantv. (Must be
*:
4:
2 ~ perfdrmed at least every two years). I
Read out on-board diagnostic (OBD 11) fault
codes.
Checkengine coolant
system1 heater hose
connections for
leaks.
Checit coolant level and antifreeze
protection level. Add coolant as necessary.
* 100113010BD
I
170