Page 38 of 1002

Downloaded from www.Manualslib.com manuals search engine
Maintenance
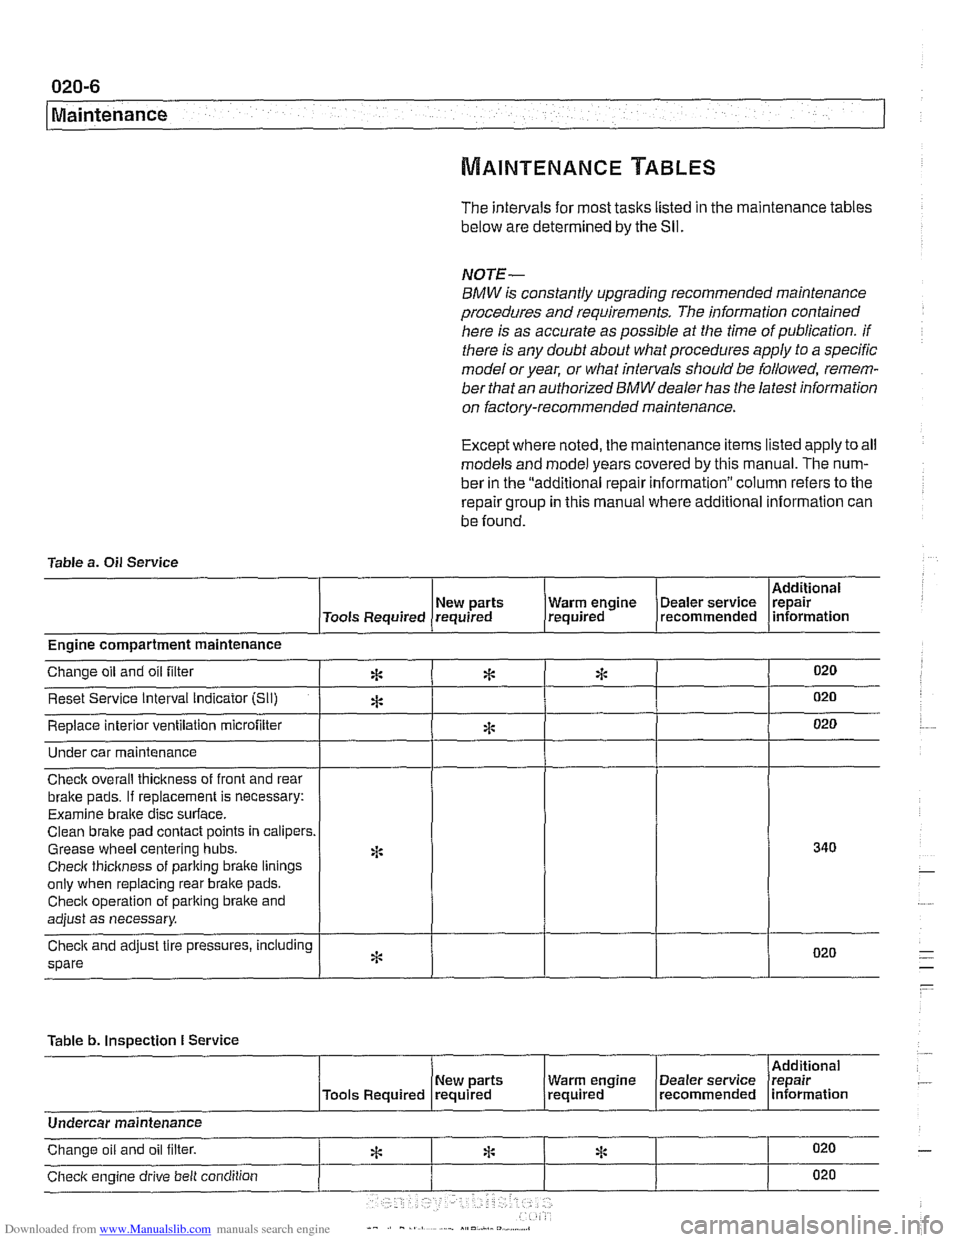
The intervals for most tasks listed in the maintenance tables
below are determined by the Sll.
NOTE-
BMW is constantly upgrading recommended maintenance
procedures and requirements.
The information contained
here is as accurate as possible at the time of publication. if
there is any doubt about what procedures apply to a specific
model or year, or what intervals should be followed, remem-
ber that an authorized
BMW dealer has the latest information
on factory-recommended maintenance.
Except where noted, the maintenance items listed apply to all
models and model years covered by this manual. The num-
ber in the "additional repair information" column refers to the
repair group in this manual where additional information can
be found.
Table a.
Oil Service
I I I I I Additional
( New parts (Tools Required requrred
Under car maintenance
1 I I I I
I I - I I
Engine compartment maintenance
Check overall thickness of front and rear
bralte pads.
If replacement is necessary:
Examine
braite disc surface.
Clean brake pad contact points in calipers.
Grease wheel centering hubs.
Checlc thickness of parking braite linings
only when replacing rear brake pads.
Checlc operation of parking brake and
adjust as necessary.
spare
Table b.
Inspection I Service
I 1 I I [Additional
020
020
020
New parts Warm engrne Dealer service Irepair , /Tools Required (required (required . (recommended lnformatlon
Change oil and oil filter
Reset Service Interval indicator [Sli)
Replace interior ventilation microfilter
*
A
*
*
*
I I I I I
Undercar maintenance
Checlc engine drive belt condition 020
ri: * Change oil and oil filter. 020 *
Page 39 of 1002

Downloaded from www.Manualslib.com manuals search engine
Table b. Inspection I Service (continued)
Checlt transmission and differential for
external lealts.
Check CV joint boots for damage or leaks.
Visually
check fuel tank, fuel lines, and
connections for
leaks.
New parts
Tools Required required
Check condition, position, and mounting
ol
exhaust system. Visually check and adjusl
if necessary.
Check power steering system for lealts.
Check power steering
fluid level and adjust
if necessary.
Check steering racidbox and tie rods for
tightness. Checit condition of front axle
joints, steering
linkage, and steering shaft
joints.
Check overall thickness of front and rear
bralte pads using
BMW special tool. If
replacement is necessary:
Examine brake disc surface.
Clean brake pad contact points in calipers
Grease wheel centering hubs.
Checlt thickness of parking brake linings
only when replacing rear brake shoes.
Checit operation of pariting brake and
adjust as necessary.
Checlt front control arm bushings for
damage or wear.
Check brake system connections and
lines
for leaks, damage, and incorrect
positioning Warm
engine
(~ealer service Irepair , required recommended lnformat~on
Check parking braite actuator. Adjust if
necessary
Check ail tire pressure (including spare)
and correct if necessary.
Checlt condition of tires (outer tread
surface), tread wear pattern: in case of
uneven wear, perform wheel alignment.
inspect entire body according to terms of
rust oerforation limited warrantv. (Must be
*:
4:
2 ~ perfdrmed at least every two years). I
Read out on-board diagnostic (OBD 11) fault
codes.
Checkengine coolant
system1 heater hose
connections for
leaks.
Checit coolant level and antifreeze
protection level. Add coolant as necessary.
* 100113010BD
I
170
Page 56 of 1002

Downloaded from www.Manualslib.com manuals search engine
020-24
Maintenance
tions. In general, replacement batteries should always be
rated equal or higher than the original battery.
The battery is held in place by a single hand screw and plate.
A secure battery hold-down is important in order to prevent
vibrations and road shoclt from damaging the battery.
CAUTION-
Prior to disconnecting the baitem read the battery discon-
nection cautions given in
001 General Cautions and
Warnings.
NOTE-
Always disconnect the negative (-) cable first, and connect
it last. While changing the battery, clean away any corro-
sion in or around the battery tray
More battery and charging system information is in 121
Battery, Alternator, Starter.
Brake fluid, replacing
Brake fluid absorbs moisture easily, and moisture in the fluid
affects bralte performance and reliability. This is why
BMW
strictly recommends replacing the bralte fluid every two
years. When replacing or adding bralte fluid, use only new
fluid from previously unopened containers. Do not use brake
fluid that has been bled from the system, even
if it is brand
new. Use only DOT
4 brake fluid.
NOTE-
See 340 Brakes for brake fluid flushing procedures.
Brake pad 1 rotor wear, checking
Disc brakes are fitted at all four wheels. Although the brakes
are equipped with a brake pad warning system, the system
only monitors one wheel per axle. Pad thickness should be
checked whenever wheels are off or brake
worlt is being
done.
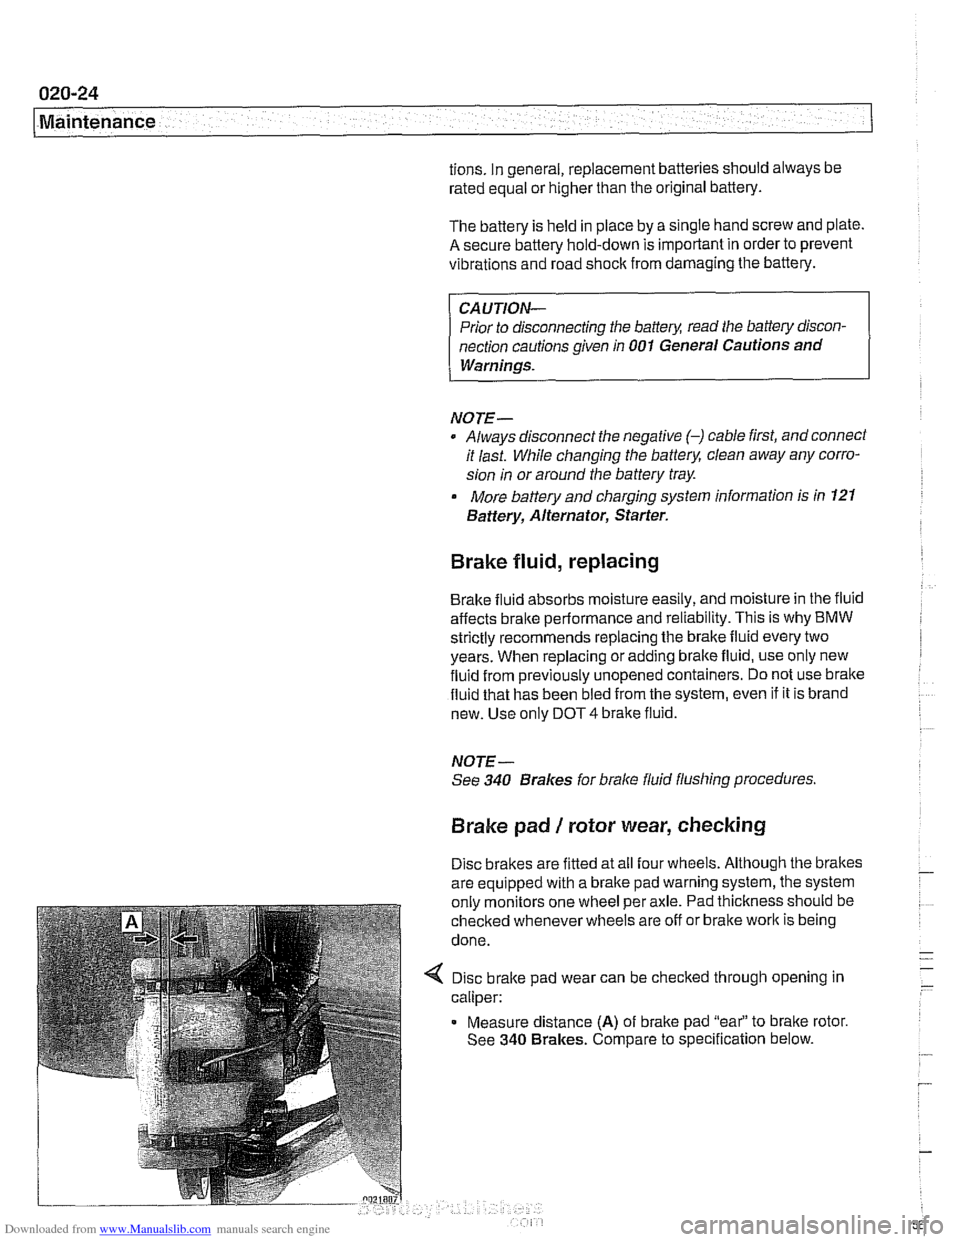
4 Disc brake pad wear can be checked through opening in
caliper:
Measure distance
(A) of brake pad "eai' to bralte rotor.
See
340 Brakes. Compare to specification below.
Page 62 of 1002

Downloaded from www.Manualslib.com manuals search engine
020-30
Maintenance
fluid use and the most-up-to-date information regarding
transmission operating fluids.
The automatic transmission is not equipped with a dipstick.
Therefore, checking the ATF level is an involved procedure
which includes measuring and maintaining a specified ATF
temperature during the checking procedure.
For more complete
ATF service information, including
checking
ATF level and ATF filter replacement procedures,
see
240 Automatic Transmission.
Transmission service, manual
Manual transmission service consists of inspecting for leaks
and checking the fluid. Evidence of transmission leaks is
like-
ly to be seen around the driveshaft mounting flange and at the
bottom of the bellhousing.
NOTE-
For more information on identifying oil
leaks and their
causes, see 230 Manual Transmission and210 Clutch.
Transmission fluid, checking and filling
(manual transmission)
Tne manual transmss'on inslalleo 'n rne E39 models s f;lled
with a special liierime iluid (ivlTF-LT-I). oi. ordinarily
does
not need to be changed.
< Check manual transmission oil level at transmission filler plug
(A). Make sure car is on level surface.
NOTE- Transmission fluid level
checking and replacement
procedures are covered in 230 Manual Transmission.
Wheels, aligning
BMW recommends checking the front and rear alignment
once a year and whenever new tires are installed.
NOTE-
See 320 Steering and Wheel Alignment for a more detailed
discussion of alignment requirements and specifications.
Page 125 of 1002
Downloaded from www.Manualslib.com manuals search engine
11 3-31
Cylinder Head Removal and Installation
Remove sealing plug from special tool bore on lower left side
of engine block near flywheel. Secure crankshaft in TDC po-
sition with
BMW special tool l l 2 300 (arrow).
4 Unscrew and remove two cylinder head cover studs
(arrows) at rear of cylinder head.
4 Secure camshafts in TDC position using BMW special tool
set
11 3 240.
- Disconnect compressed air line, leaving compressed air fit
ting attached to VANOS unit.
4 Unscrew sealing plugs (arrows) from VANOS unit.
Page 128 of 1002
Downloaded from www.Manualslib.com manuals search engine
- -
I Cylinder Head emo oval and Installation -
< Remove exhaust camshaft impulse wheel mounting nuts
(arrows). Remove impulse wheel
(A).
4 Remove spring plate (A).
4 Remove intake camshaft sprocltet mounting nuts (arrows)
and remove spring plate (labelled
FRONT).
< Remove torx screws from exhaust camshaft sprocket
(arrows).
Page 140 of 1002
Downloaded from www.Manualslib.com manuals search engine
1 13-46
Cylinder Head Removal and Installation
Double
VANOS Timing
Chain Components
1. Impulse wheel mounting nut
2. Exhaust camshaft impulse
wheel
3. Spring plate, exhaust
4. Thrust spacer (T
= 3.5 mm)
5. Splined shaft
6. Torx screw
7. Exhaust camshaft secondary
sprocket
8. Secondary timing chain
9. Splined sleeve
10. Primary sprocket
11. Threaded locating stud
12. Secondary chain tensioner
13. Secondary chain lower guide
14. Sprocket mounting nut
15. Spring plate, intake
16. Splined shaft
17. lntakecamshaft sprocket
18. Locating stud
19. Thrust spacer
20. Intake camshaft impulse wheel
Double VANOS timing chain components,
installing,
M52 TU and M54 engines -
4 Slide impulse wheel on intake camshaft, aligning boss with
raised portion on camshaft
(arrow).
Page 141 of 1002
![BMW 525i 1998 E39 Workshop Manual Downloaded from www.Manualslib.com manuals search engine
Cylinder Head Removal - an-]
Fit thrust spacer (A) to intake camshaft (B) and tighten down
with threaded locating studs. Place longer th BMW 525i 1998 E39 Workshop Manual Downloaded from www.Manualslib.com manuals search engine
Cylinder Head Removal - an-]
Fit thrust spacer (A) to intake camshaft (B) and tighten down
with threaded locating studs. Place longer th](/manual-img/1/2822/w960_2822-140.png)
Downloaded from www.Manualslib.com manuals search engine
Cylinder Head Removal - an-]
Fit thrust spacer (A) to intake camshaft (B) and tighten down
with threaded locating studs. Place longer threaded end of
studs into camshaft
(arrows).
Tightening torque
Impulse
wheel studs to intake camshaft) 20 Nm (15 ft-lb)
Fit primary sprocket to primary timing chain and install on ex-
haust camshaft so that pointer on sprocket
(arrow) lines up
with cylinder head sealing surface.
4 Insert BMW special tool 11 4 220 into timing chain tensioner
bore and bring center spindle into contact with tensioning rail.
Tighten until slack is removed, but do not pretension timing
chain.
NOTE-
BMW special tool 11 4 220 is an adjustable primary chain
tensioner and simulates the function of the tensioner.
- Rechecic arrow on primary sprocket is aligned with upper
edge of cylinder head. Reposition sprocket if necessary.
Insert and tighten down threaded locating studs
(arrows) in
end of exhaust camshaft. Note installed position of studs.
Tightening torques Exhaust camshaft locating stud
20 Nm (15 ft-lb)