Page 36 of 74
17-34
- Also open coolant drain screw -arrow- at rear right of oil pan.
- Draining off and filling up coolant Page 19
-19
.
- Drain off engine oil.
Use a separate container to collect the engine oil.
- Set up support bracket 10-222A with adapter 10-222A/3 on bolted
flanges for wing panels.
- Attach support bracket to front and rear lifting eyes on engine.
- Raise engine as far as possible with spindles of support bracket.
Pa
ge 36 of 74 Lubrication s
ystem com
ponents, removin
g and installin
g
11/21/2002 htt
p://127.0.0.1:8080/audi/servlet/Dis
play?action=Goto&t
yp
e=re
pair&id=AUDI.B5.GE05.17.1
Page 37 of 74
17-35
- Cut open cable ties -arrows-, open retainer for starter cable and take
out cable.
- Unbolt torque reaction support at front of oil pan.
- Unbolt coolant line from oil pan.
- Disconnect connector from oil pressure switch on left of oil pan.
- Remove torque reaction support -1-.
- Release hose clamps -arrows-.
- Remove water line -2-.
Pa
ge 37 of 74 Lubrication s
ystem com
ponents, removin
g and installin
g
11/21/2002 htt
p://127.0.0.1:8080/audi/servlet/Dis
play?action=Goto&t
yp
e=re
pair&id=AUDI.B5.GE05.17.1
Page 38 of 74
17-36
- Place drip tray VAG 1306 under engine.
- Remove oil filter.
- Release hose clamps -arrows-.
- Remove oil cooler -1-.
- Remove bottom nuts on engine mountings -1- (left and right sides).
- Mark positions of securing points -1- and locating sleeves -2- under
engine mountings on left and right sides.
Pa
ge 38 of 74 Lubrication s
ystem com
ponents, removin
g and installin
g
11/21/2002 htt
p://127.0.0.1:8080/audi/servlet/Dis
play?action=Goto&t
yp
e=re
pair&id=AUDI.B5.GE05.17.1
Page 40 of 74
17-38
- Remove hex socket head bolt -1- and securing nut -2-. Tightening
torque: 45 Nm
- Loosen bolt -3-. Tightening torque: 22 Nm.
- Take out alternator -4- from below.
1 - Remove air line -1-.
2 - Mounting for oil line and air conditioner lines
3 - Mounting on cylinder block
4 - Release hose clamp
Pa
ge 40 of 74 Lubrication s
ystem com
ponents, removin
g and installin
g
11/21/2002 htt
p://127.0.0.1:8080/audi/servlet/Dis
play?action=Goto&t
yp
e=re
pair&id=AUDI.B5.GE05.17.1
Page 42 of 74
17-40
Note:
To avoid having to check and adjust wheel
alignment, only loosen the front subframe
mountings and lower the subframe at the front.
- Remove lower section of oil pan.
- Disconnect return lines for turbocharger from upper section of oil pan.
Notes: - Unbolt cover plate -2- for oil pump sprocket.
When loosening bolt -2- securing cover plate, counter-hold at welded
nut. When installing, make sure that the plate engages in position -arrows-.
Pa
ge 42 of 74 Lubrication s
ystem com
ponents, removin
g and installin
g
11/21/2002 htt
p://127.0.0.1:8080/audi/servlet/Dis
play?action=Goto&t
yp
e=re
pair&id=AUDI.B5.GE05.17.1
Page 43 of 74
17-41
- Unbolt two oil supply lines, and pull longer of two lines downward to
disconnect from upper section of oil pan.
Note:
Two M6 bolts and two M8 bolts are located vertically at rear of oil pan
upper section (in front of joint between engine and transmission). - Unbolt oil pump from engine so that shorter oil supply line can be
disconnected (do not remove oil pump).
- Remove bolts securing upper section of oil pan to transmission.
- Unbolt upper section of oil pan from engine.
Pa
ge 43 of 74 Lubrication s
ystem com
ponents, removin
g and installin
g
11/21/2002 htt
p://127.0.0.1:8080/audi/servlet/Dis
play?action=Goto&t
yp
e=re
pair&id=AUDI.B5.GE05.17.1
Page 44 of 74
17-42
Installing:
Install in the opposite order to removing. When
installing, note the following points:
- Clean sealing surfaces; ensure that they are free
of oil and grease.
WARNING!
Wear protective goggles.
Note:
The oil pan must be installed within 5 minutes after applying silicone
sealant D 454 300 A2. - Remove any residues of sealant on oil pan and engine block using
plastic brush attachment, or similar.
- Cut off nozzle of tube at front marking (diameter of nozzle approx. 3
mm).
Thickness of sealant bead: 2 ... 3 mm
Pa
ge 44 of 74 Lubrication s
ystem com
ponents, removin
g and installin
g
11/21/2002 htt
p://127.0.0.1:8080/audi/servlet/Dis
play?action=Goto&t
yp
e=re
pair&id=AUDI.B5.GE05.17.1
Page 45 of 74

17-43
Note:
The bead of sealant must not be thicker than 3
mm, as otherwise excess sealant may enter the
oil pan and block the strainer in the oil intake line.
Note:
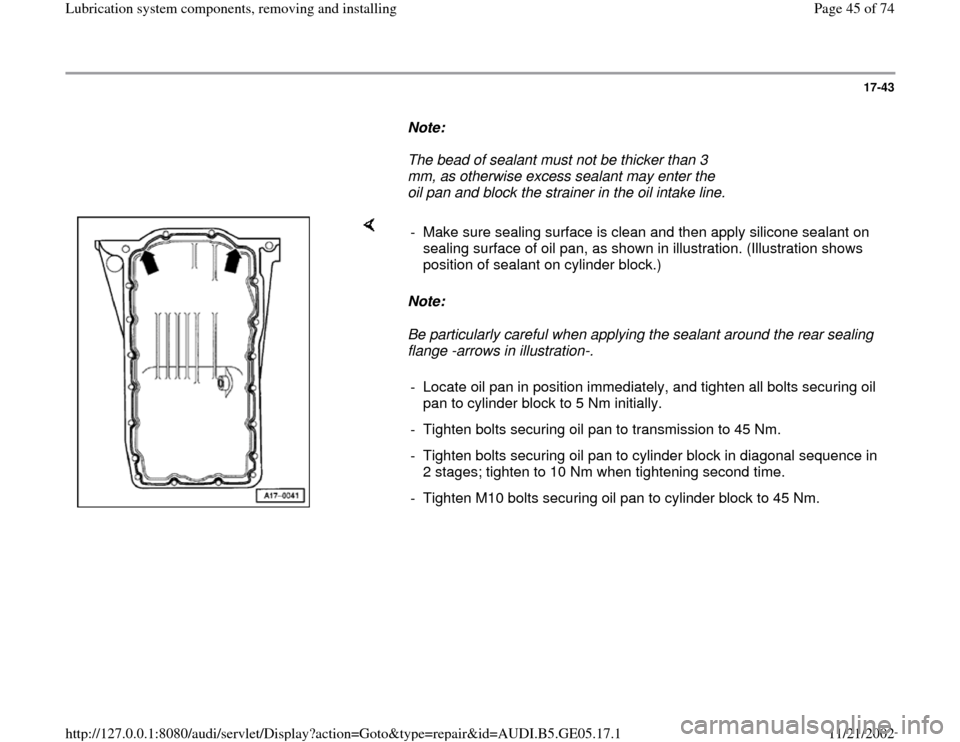
Be particularly careful when applying the sealant around the rear sealing
flange -arrows in illustration-. - Make sure sealing surface is clean and then apply silicone sealant on
sealing surface of oil pan, as shown in illustration. (Illustration shows
position of sealant on cylinder block.)
- Locate oil pan in position immediately, and tighten all bolts securing oil
pan to cylinder block to 5 Nm initially.
- Tighten bolts securing oil pan to transmission to 45 Nm.
- Tighten bolts securing oil pan to cylinder block in diagonal sequence in
2 stages; tighten to 10 Nm when tightening second time.
- Tighten M10 bolts securing oil pan to cylinder block to 45 Nm.
Pa
ge 45 of 74 Lubrication s
ystem com
ponents, removin
g and installin
g
11/21/2002 htt
p://127.0.0.1:8080/audi/servlet/Dis
play?action=Goto&t
yp
e=re
pair&id=AUDI.B5.GE05.17.1