Page 470 of 1680

Diagnostic
Trouble Code(Drc)*
,94
lndicator
Light
SymptomPossible CauseRefer to
Page
P1153(1)Blin ks
Lock-up clutch does not engage,
Lock-up clutch does not disen-
gage.
Disconnected lock-up control solenoid
valve A connector
Short or open in lock-uP control
solenoid valve A wire
Faulty lock-up control solenoid valve A
14-56
P1758
t2lBlinks
. Lock-up clutch does not engage.Disconnected lock-up control solenoid
valve B connector
Short or open in lock-uP control
solenoid valve B wire
Faulty lock-up control solenoid valve B
14-58
P1790(3)Blinks
. Lock-up clutch does not engage.Disconnected throttle position (TP)
sensor connector
Short or open in TP seflsor wire
Faulty TP sensor
14-60
P1191(4)Blinks
. Lock-up clutch does not engage.Disconnected vehicle speed sensor
{VSS} connector
Shon or open in VSS wire
Faulty VSS
14-61
P1705
(5)Blinks
. Fails to shift other than 2nd - 4th
gears.
. Lock-up clutch does not engage.
. Shod in AvT gear position switch wire
. Faulty A,/T gear position switch14-62
P1706(6)OFF
' Fails to shift other than 2nd -
3rd - 4th gears.
. Lock-up clutch does not engage.
Disconnected A/T gear position switch
connector
Open in A/f gear position switch wire
Faulty A/f gear position switch
14-64
P0753
(71Blinks
. Fails to shift (between 1st - 4th
or 2nd - 3rd gear only).. Fails to shift (stuck in 4th gear).
Disconnected shift control solenoid
valve A connector
Short or open in shift control solenoid
valve A wire
Faulty shift control solenoid valve A
14-66
P0758(8)Blinks
. Fails to shift (stuck in 1st or 4th
gears).
Disconnected shift control solenoid
valve B connector
Short or open in shift control solenoid
valve B wire
Faulty shift control solenoid valve B
14-68
P0120(9)Blin ks
Lock-up clutch does not engage.Disconnected countershaft speed sen-
sor connector
Short or open in countershaft speed
sensor wrre
Faulty countershaft speed sensor
1+10
P1192
00)Blinks
. Lock-up clutch does not engage,Disconnected engine coolant tempera-
ture (ECT) sensor connector
Short or open in ECT sensor wire
Faulty ECT sensor
14-72
P0725
{1 1)OFF
Lock-up clutch does not engage.Disconnected ignition coil connector
Short or open in ignition coil wire
Faulty ignition coil
14-73
Symptom-to-ComPonent Chart
Electrical System
(DTC)*: The DTCS in the parentheses are the codes the E indicator light indicates {blinks) when the service check connec-
tor is connected to the special tool (SCS service connector)
4-54
Page 489 of 1680
. OBD ll Sc.n Tool Indicrt$ cod.m725.. S.lf.di.gnosi3 E indicetotlight indicet$ Cod. 'l 1.
Motsure NE Vohago:1. Disconnect the A{26P) con-nector from the TcM.2. Stan tha €ngine.3. Measurg the voltage betwegnthe A5 and Al3 or 426 termi-nals.
Rapair opan or lhort in tho wirabctwo6n tho AS tarminal and tholgnhion coil.ls there banery voltage?
Chack tor loose TCM connector.lf necasllry, 3ub3titule a known-good TCM snd recheck.
- Troubleshooting Flowchart - lgnition Coil
JU
Poaaible Cau3€
' Di.conn€c{od ignition coil con.nactot. Short or opcn ignition coil wira. Frulty ignition coil
WIRE SIDE OF FEMAI,T TEBMINALS
tt
tt
BRN/BLK
14-73
Page 503 of 1680

Replacement
(.
L
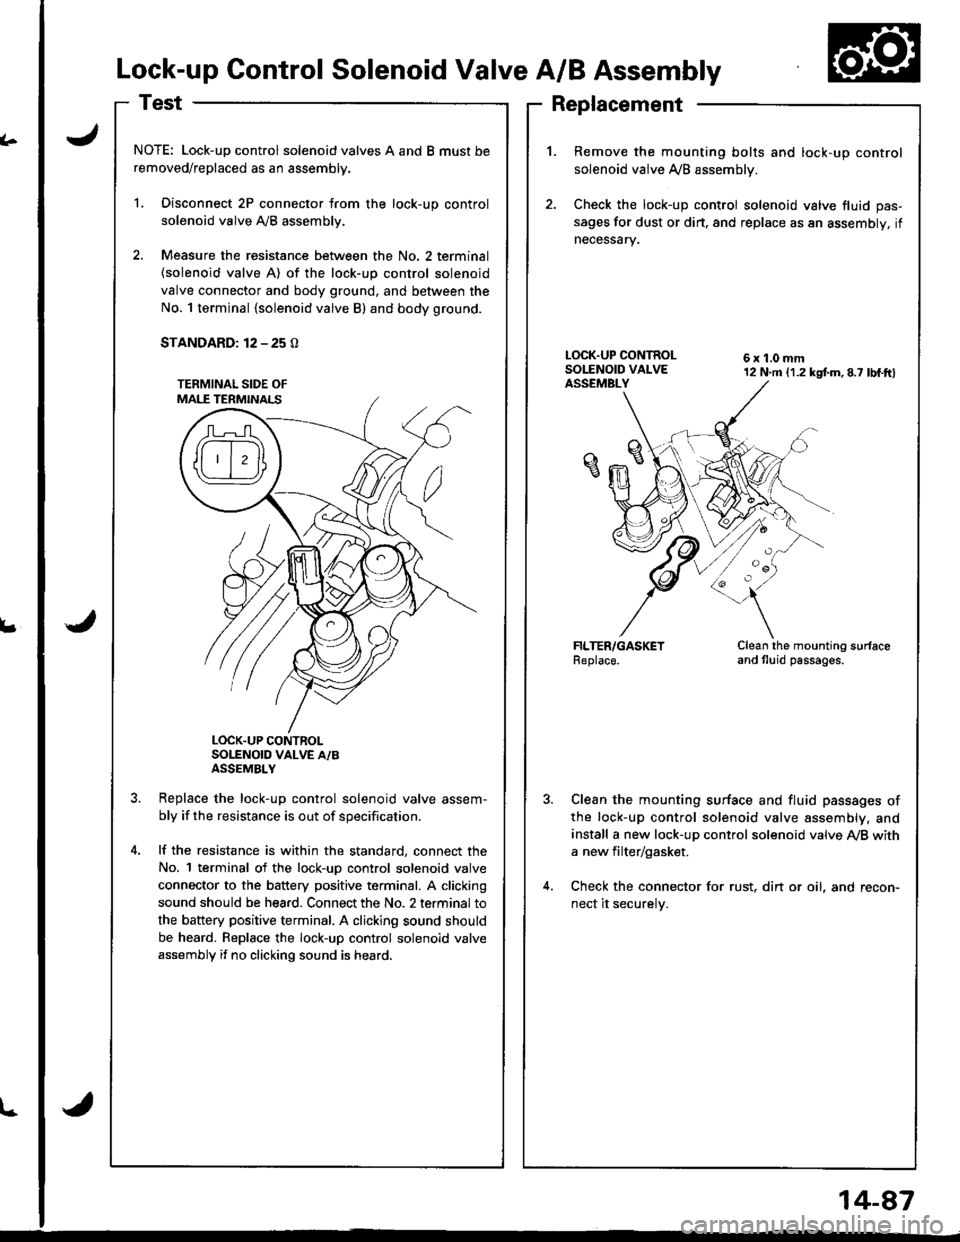
Lock-up Control Solenoid Valve A/B Assembly
NOTE: Lock-up control solenoid valves A and B must be
removed/replaced as an assembly.
L Disconnect 2P connector from the lock-up control
solenoid valve Ay'B assembly.
2. Measure the resistance between the No. 2 terminal
{solenoid valve A) of the lock-up control solenoid
valve connector and body ground, and between the
No. 1 terminal {solenoid valve B) and body ground.
STANDARD: 12 - 25 O
LOCK.UP CONTROLSOLENOID VALVE A/BASSEMBLY
Replace the lock-uo control solenoid valve assem-
bly if the resistance is out of specification.
lf the resistance is within the standard, connect the
No. 1 terminal of the lock-uD control solenoid valve
connector to the battery positive terminal. A clicking
sound should be hea.d. Connect the No. 2 terminal to
the battery positive terminal. A clicking sound should
be heard. Replace the lock-up control solenoid valve
assembly if no clicking sound is heard.
1.Remove the mounting bolts and lock-up control
solenoid valve A/B assemblv.
Check the lock-up control solenoid valve fluid pas-
sages for dust or dirt. and replace as an assembly, if
necessary.
6x1.0mm12 N.m (1.2 kgtm,8.7 lbf.ftl
Clean the mounting surfaceand tluid passages.
Clean the mounting surface and fluid passages of
the lock-up control solenoid valve assembly, and
install a new lock-up control solenoid valve Ay'B with
a new filter/gasket.
Check the connector for rust, din or oil, and recon-
nect it securelv.
l-
14-87
Page 504 of 1680

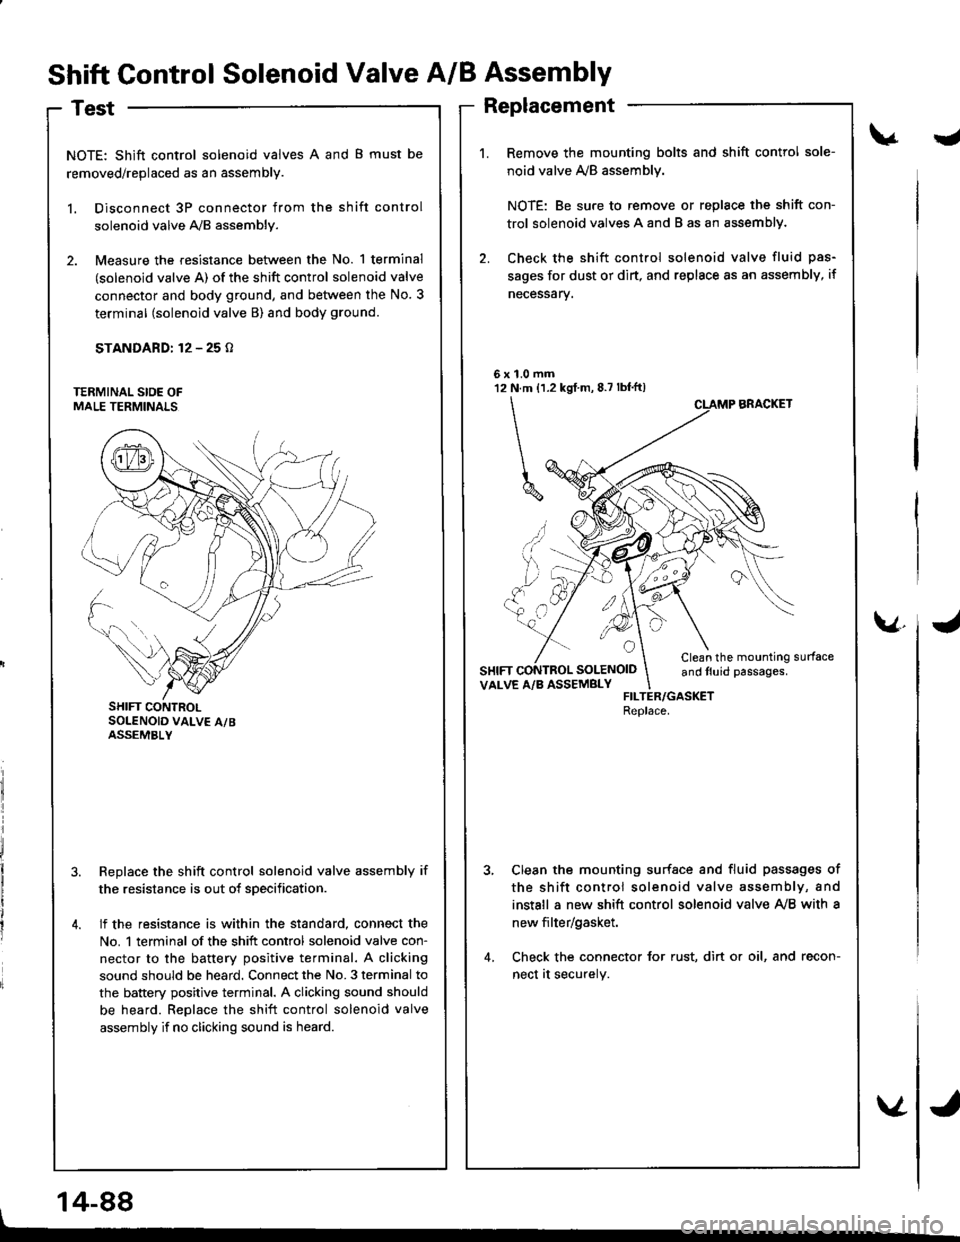
Shift Control Solenoid Valve A/B Assembly
Test
NOTE: Shift control solenoid valves A and B must be
removed/replaced as an assembly.
l. Disconnect 3P connector from the shift control
solenoid valve A,/B assembly.
2. Measure the resistance between the No. 1 terminal
(solenoid valve A) of the shift control solenoid valve
connector and body ground, and between the No. 3
terminal (solenoid valve B) and body ground.
STANDARD: 12 - 25 o
Replace the shift control solenoid valve assembly if
the resistance is out of sDecification.
lf the resistance is within the standard, connect the
No. 1 terminal of the shift control solenoid valve con-
nector to the battery positive terminal. A clicking
sound should be heard. Connect the No. 3 terminal to
the battery positive terminal. A clicking sound should
be heard. Replace the shift control solenoid valve
assembly if no clicking sound is heard.
J
1.0 mmN.m {1.2 kgf m, 8.7 lbf'ft)
\
^ ,, ..,'
UYM
6x't2
a
SOLENOID
v.
SHIFT CONTROLSOLENOID VALV€ A/BASSEMBLY
Replacement
Remove the mounting bolts and shift control sole-
noid valve ly'B assemblv.
NOTE: Be sure to remove or replace the shift con-
trol solenoid valves A and B as an assemblY.
Check the shift control solenoid valve fluid pas-
sages for dust or dirt, and replsce as an assembly, if
necessarv.
BRACKET
Clean the mounting surfaceand tluid passages.VALVE A/B ASSEMBLYFILTER/GASKETReplace.
Clean the mounting surfsce and fluid passages of
the shift control solenoid valve assembly, and
install a new shift control solenoid valve Ay'B with a
new filter/gasket.
Check the connector for rust, dirt or oil, and recon-
nect at securely.
14-88
Page 542 of 1680

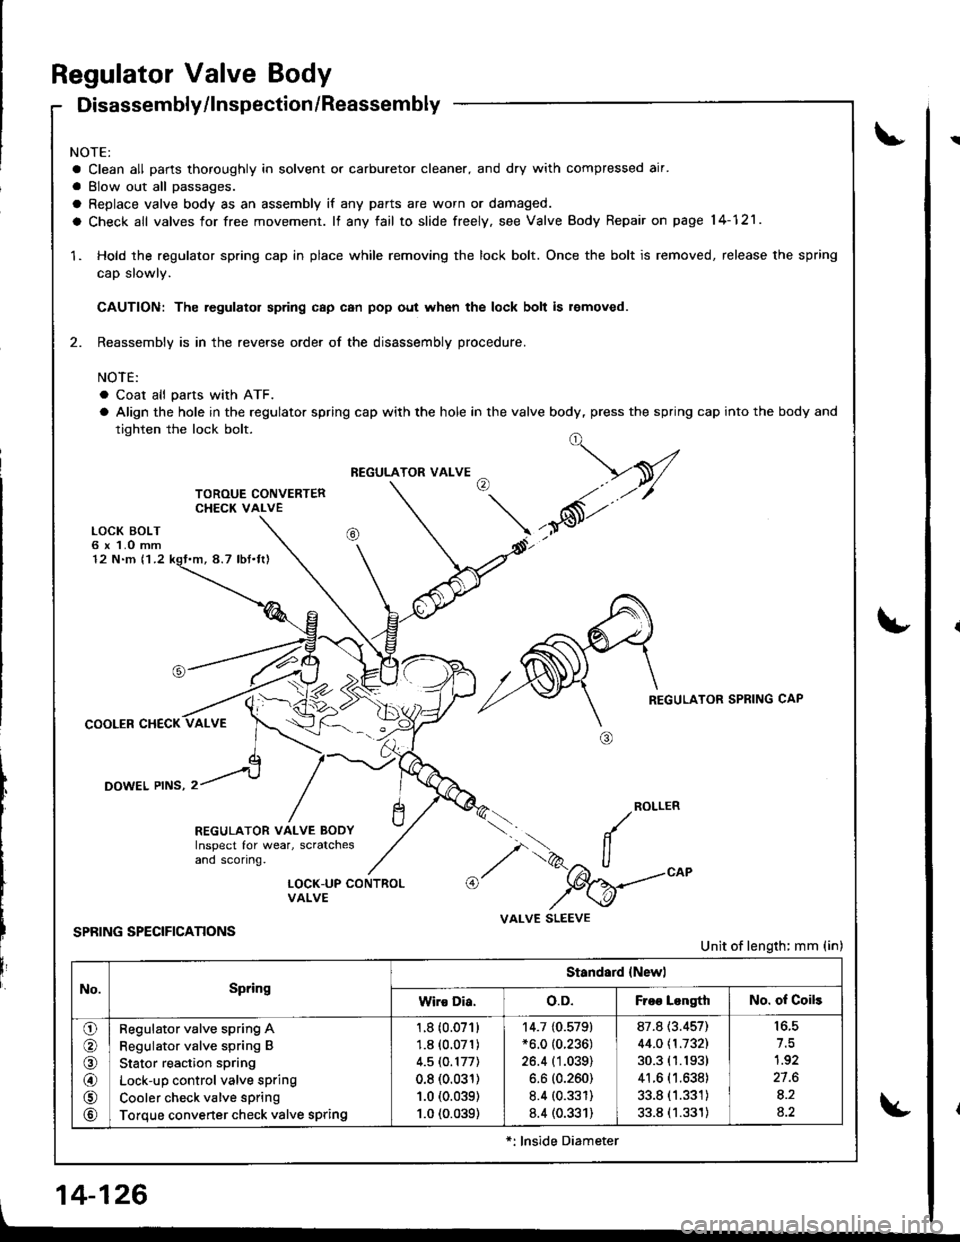
Regulator Valve Body
Disassembly/lnspection /Reassembly
NOTE:
a Clean all parts thoroughly in solvent or carburetor cleaner. and dry with compressed air.
a Blow out all passages.
a Replace valve body as an assembly if any parts are worn or damaged.
a Check all valves for free movement. lf any fail to slide freely, see Valve Body Repair on page 14-121.
1. Hold the regulator spring cap in place while removing the lock bolt. Once the bolt is removed. release the spring
cap slowly.
CAUTION: The regulator sp ng c8p can pop out when the lock bolt is r€moved.
2. Reassembly is in the reverse order of the disassembly procedure.
NOTE:
. Coat all pans with ATF.
a Align the hole in the regulator spring cap with the hole in the valve body, press the spring cap into the body and
tighten the lock bolt.
LOCK BOLT6 x 1.O mm12 N.m 11.2
COOLER CHECK
DOWEL PINS, 2
REGULATOR SPRING CAP
ROLLER
REGULATOR VALVE BODYInspect for wear, scratchesand sconng.
oi.
.. /
,/ i>, ll
,/ "W_-
VALVE SLEEVE
@LOCK-UP CONTROLVALVE
SPRING SPECIFICATIONSUnit of length; mm (in)
No.Spring
Standard {Newl
Wiro Dia.o.D.Froo LongthNo. of Coils
o
@
@
@rA
@
Regulator valve spring A
Regulator valve spring B
Stator reaction spring
Lock-up control valve sprlng
Cooler check valve spring
Torque converter check valve spring
1.8 (0.071)
1.8 (0.071)
4.5lO.177l
0.8 (0.031)
1.0 (0.039)
1.0 (0.039)
14.7 {0.579}*6.0 (0.236)
26.4 (1.039)
6.6 (0.260)
8.4 (0.331)
8.4 (0.331)
87.8 (3.457)
44.0 \1.1321
30.3 (1.1931
41.6 (1.638)
33.8 (1.331)
33.8 (1.331)
to.c
1.92
27.6
8.2
4.2
*: lnside Diameter
, 14-126
!
Page 543 of 1680
Lock-up Valve Body
JI
Disassembly/lnspection/Reassembly
NOTE:
a Clean all parts thoroughly in solvent or carburetor cleaner, and dry with compressed air.
a Blow out all passages.
a Replace vaive body as an assembly if any parts are worn or damaged.
o Check all valves for free movement. lf any fail to slide freely, see Valve Body Repair on page 14-121 ,
a Coat all parts with ATF before reassembly.
LOCK-UP SHIFT VALVE
LOCK-UP TIMING B VALVE
SPRING SPECIFICATIONS
Unit of length: mm (in)
LOCK-UP VALVE
No.Spring
Standard (New)
Wire Dia.o.D.Free LengthNo. of Coils
o(r\Lock-up shift valve spring
Lock-up timing B valve spring
o.9 (o.o35)
o.8 (o.o31)
7.6 (O.299)
6.6 (O.260)73.7 t2.9021
60.8 {2.394}
32.O
22.1
4-127
Page 545 of 1680
CHECK SALL
CHECK BALLS
SECONDARY VALVE BODYlSectional View)
FILTER
SPRING SPECIFrcANONSUnit of length: mm (in)
No.SpringStandard {Ncwl
wir€ Dia.o.D.Frcc LcngthNo. of Coils
\!-/
o
@
@
o
@
o
3-2 kick-down valve spring
4-3 kick-down valve spring
Orifice control valve spring
2-3 orifice control valve spring
3-4 shift valve spring
Servo control valve spring
Modulator valve spring
1.3 (0.051)
1.0 {0.039)
0.8 (0.031)
0.9 (0.035)
0.9 (0.03s1
0.9 (0.035)
1.3 (0.051)
8.6 (0.339)
6.6 (0.260)
6.6 (0.260)
6.6 (0.260)
7.6 (0.299)
6.4 (0.252)
9.4 (0.370)
4s.6 (1.795)
24.5 11.'t221
48.2 (1.898)
33.0 {1.299)
52.0 \2.0471
34.1 (1.343)
39.3 (1.547)
11 .0
14.7
14.9
26.8
12.4
14-129
Page 602 of 1680
Bearing Replacement
t
a
NOTE: Check the ball bearings for wear and rough ro-
tation. lf bearings are OK, removal is not necessary.
'1. Remove the ball bearings using a standard bearing
puller and bearing separator as shown.
BEARING PULLER(Commercially
available)
BALL BEARING
2.lnstall new ball bearings using the special tool as
shown.
NOTE: Drive the bearings squarely until they bot-
tom against the carrier.
DRIVER, 40 mm l.D.07746-00301OO
BALL BEARING
't.
2.
Remove the differential assembly.
Remove the 80 mm shim from the transmission
housrng.
80 mm SHIM
TRANSMISSIONHOUSING
3. Remove the oil seal from the transmission housinq.
4. Remove the oil seal from the clutch housinq.
OIL SEALReplace.
SealRemoval
1s-5