Page 1212 of 1680

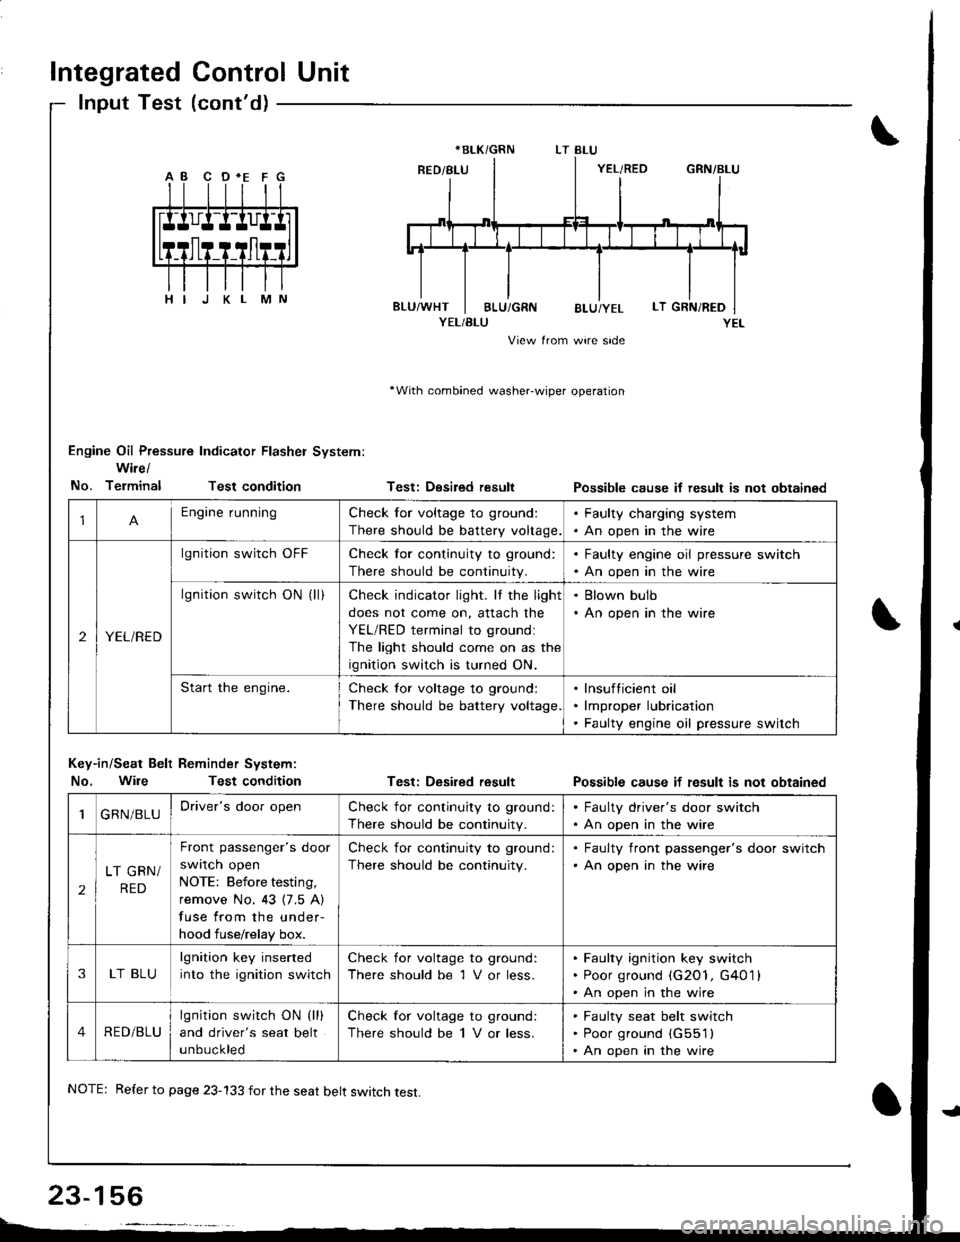
Integrated Control Unit
lnput Test (cont'd)
YEL/BLU
View from wire side
'With combined washer-wiper operation
Engine Oil Pressure Indicator Flasher System:
Wire/
No. TerminalTest condition
Key-in/Seat Belt Reminder System:
No. WileTest condition
Testi Desired result
Test: Desired result
Possible cause if result is not obtainsd
Possible cause if fesult is not obtained
*BLK/GRN
1Engine runningCheck for voltage to ground:
There should be battery voltage.
. Faulty charging system. An open in the wire
2YEL/RED
lgnition switch OFFCheck for continuity to ground:
There should be continuity.
. Faulty engine oil pressure switch. An open in the wire
lgnition switch ON (ll)Check indicator light. It the light
does not come on, attach the
YEL/RED terminal to groundl
The light should come on as the
ignition switch is turned ON.
. Blown bulb. An open in the wire
Start the engine.Check tor voltage to ground:
There should be battery voltage
lnsufticient oil
lmproper lubrication
Faulty engine oil pressure switch
1GRN/BLUDriver's door openCheck for continuity to ground:
There should be continuity.
. Faulty driver's door switch. An open in the wire
2
LT GRN/
RED
Front passenger's door
swrlcn open
NOTE: Before testing,
remove No. 43 {7.5 A)
fuse from the under-
hood fuse/relay box.
Check for continuity to ground:
There should be continuity.
. Faulty front passenger's door switch'An open in the wire
3LT BLU
lgnition key inserted
into the ignition switch
Check for voltage to ground:
There should be 1 V or less.
Faulty ignition key switch
Poor ground (G2O1, G401 l
An open in the wire
4RED/BLU
lgnition switch ON (lll
and driver's seat belt
unbuckled
Check for voltage to ground:
There should be 1 V or less.
Faulty seat belt switch
Poor ground (G551l
An open in the wire
NOTE: Refer to page 23-133 for the seat belt switch test.
Page 1213 of 1680
M
lgnition switch at
START iIII)
Check for voltage to ground:
There should be battery voltage.
Blown No.31 (7.5 A) fuse in the
under-dash fuse/relay box
Faulty clutch interlock switch or
starter cut relay (M/T)
Faulty neutral position switch (A/T)
An open in the wire
2D
lgnition switch ON {ll).
brake fluid reservoir
full, and parking brake
tever oown
Connect to ground: Brake
system light should come on.
. Blown brake system light. An open in the wire
Bulb Check System (brake system light)
No. Terminal Test conditionTost: Desiled resultPossiblo cause if lesult is not obtained
)
)
23-157
Page 1218 of 1680
Lighting System
Circuit Diagram (USA)
R€O/BtK
I
REO/BLKIII
I
. OASH LIGHTSBFIGI.ITNESSCONTROLLER. DASH TIGHTS
RED/CRN
I
Ailsurax
Yller,l
IBL(
I
I
I-l
G201G401
. PANK NG L GNTS.TA LL GHTS. LICENSE PLATELIGHTS
UNDER.HOOD FUSE/RELAY BOX
RED]BtU
N0.21(104)No.5{10A)
III No22 I No4( lroA) ( {1oA)
IT
INo30 :(7.5A) (
I
N0.3200A)
8LK
I
G20lG40l
23-162
Page 1219 of 1680
UNDER.HOOD FUSE/RELAY BOX
No 41 {100A) N0.42 (40A)
,/ |\
\--, ({c)
HEADLIGHT
Circuit Diagram (Canada)
BATTEFY
@-**
I I :i,ff'*''"
I CoNTFOL UN|TI . INTEGBATED
l-v^"
tl
tlREDAVHT GRN/RED
GRN/FED
L
lt ))
Yro^,
I iivP,
I
swrrcH
BLK
I
I-l
G301
RED/GFN
tGRN/RED
A
Y*r*ro
I
3Ai{5"
I
I
I
DAYTIME BUNNINGL]GHIS RESISTOR
UNDER.DASHFUSE/FELAY BOX
) No.21
i
uoo') N0.20{JOA))'
) N0.18(7.5A))'
II
lrrt,
llrffi ltlrr
INo.3o Q
(7.sA) . (
I
N0.32(104)
RED GqN RED YE- RED BL- REDTVHT FED/BLK REO/8LK WHT/YEL YEUBLK
| + +ll
I
i*n[i+'i .ffi$liilTl
II ri---J- i---F BEDE-U +1 4- l^ |
l,,oo,* *qff
.'""0
{36['45,1'il]''
23-163
Page 1221 of 1680

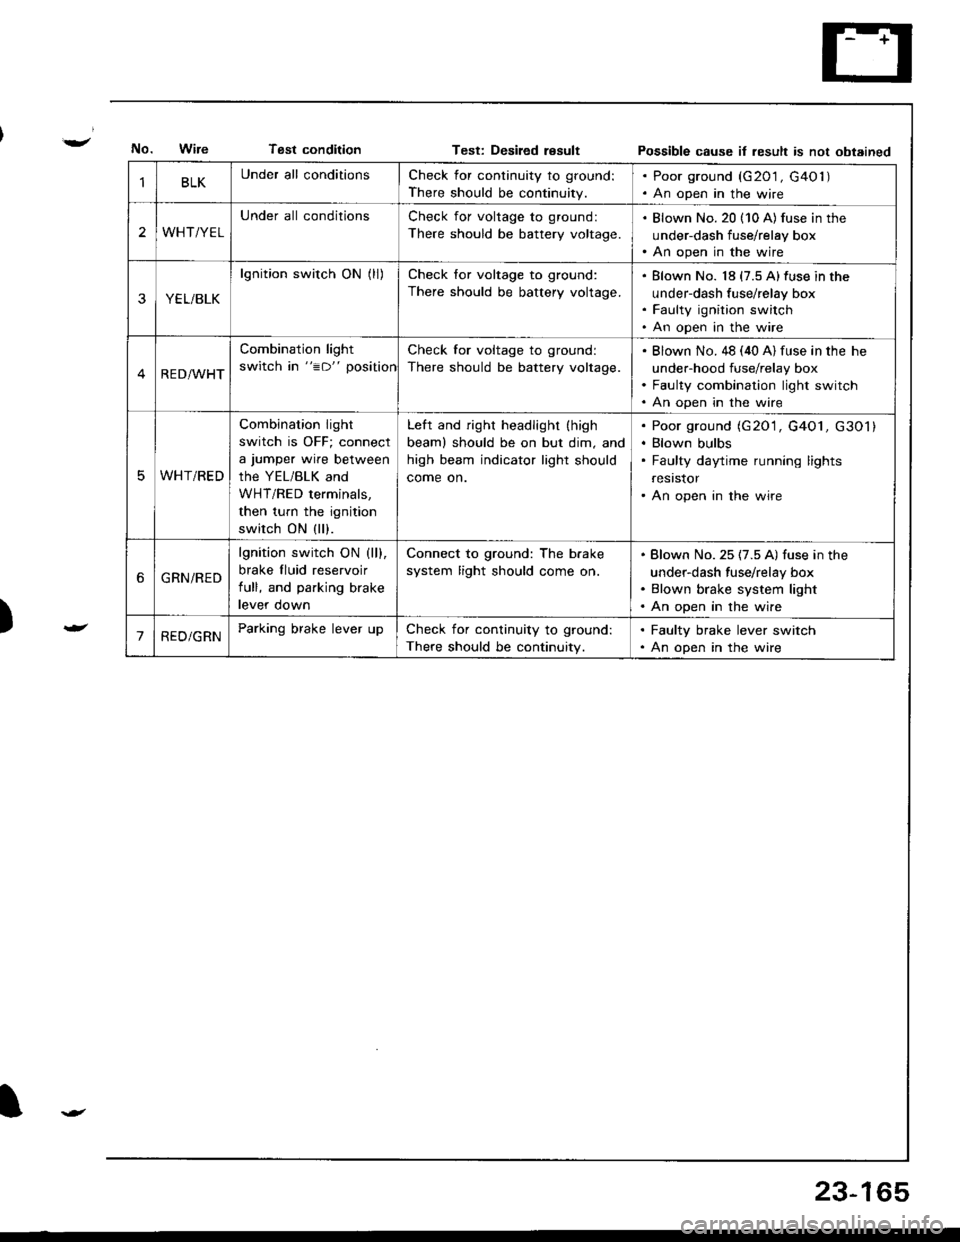
Tsst conditionTest: Desiled resultPossible cause it result is not obtained
)
BLKUnder all conditionsCheck for continuity to ground:
There should be continuity.
. Poor ground (G201 , G40l ). An open in the wire
2WHT/YEL
Under all conditionsCheck for voltage to ground:
There should be battery voltage.
. Blown No. 20 (10 A) fus€ in the
under-dash fuse/relay box. An open in the wire
YEL/BLK
lgnition switch ON (ll)Check for voltage to ground:
There should be battery voltage.
Blown No. 18 (7.5 A)fuse in the
under-dash fuse/relay box
Faulty ignition switch
An open in the wire
RED/WHT
Combination light
switch in "=D" position
Check for voltage to ground:
There should be battery voltage.
Blown No. 48 (40 A) fuse in the he
under-hood fuse/relay box
Faulty combination light switch
An open in the wire
WHT/RED
Combination light
switch is OFF; connect
a jumper wire between
the YEL/BLK and
WHT/RED terminals,
then turn the ignition
switch ON (ll).
Left and right headlight (high
beaml should be on but dim, and
high beam indicator light should
come on.
Poor ground (G20'1, G4O1, G301)
Blown bulbs
Faulty daytime running lights
resrstor
An open in the wire
6GRN/RED
lgnition switch ON (ll).
brake fluid reservoir
full, and parking brake
levef oown
Connect to ground: The b.ake
system light should come on.
Blown No. 25 (7.5 A) fuse in the
under-dash fuse/relay box
Blown brake system light
An open in the wire
'1RED/GRNParking brake lever upCheck for continuity to ground:
There should be continuity.
. Faulty brake lever switch. An open in the wire
23-165
Page 1235 of 1680

J
)
'1.
3.
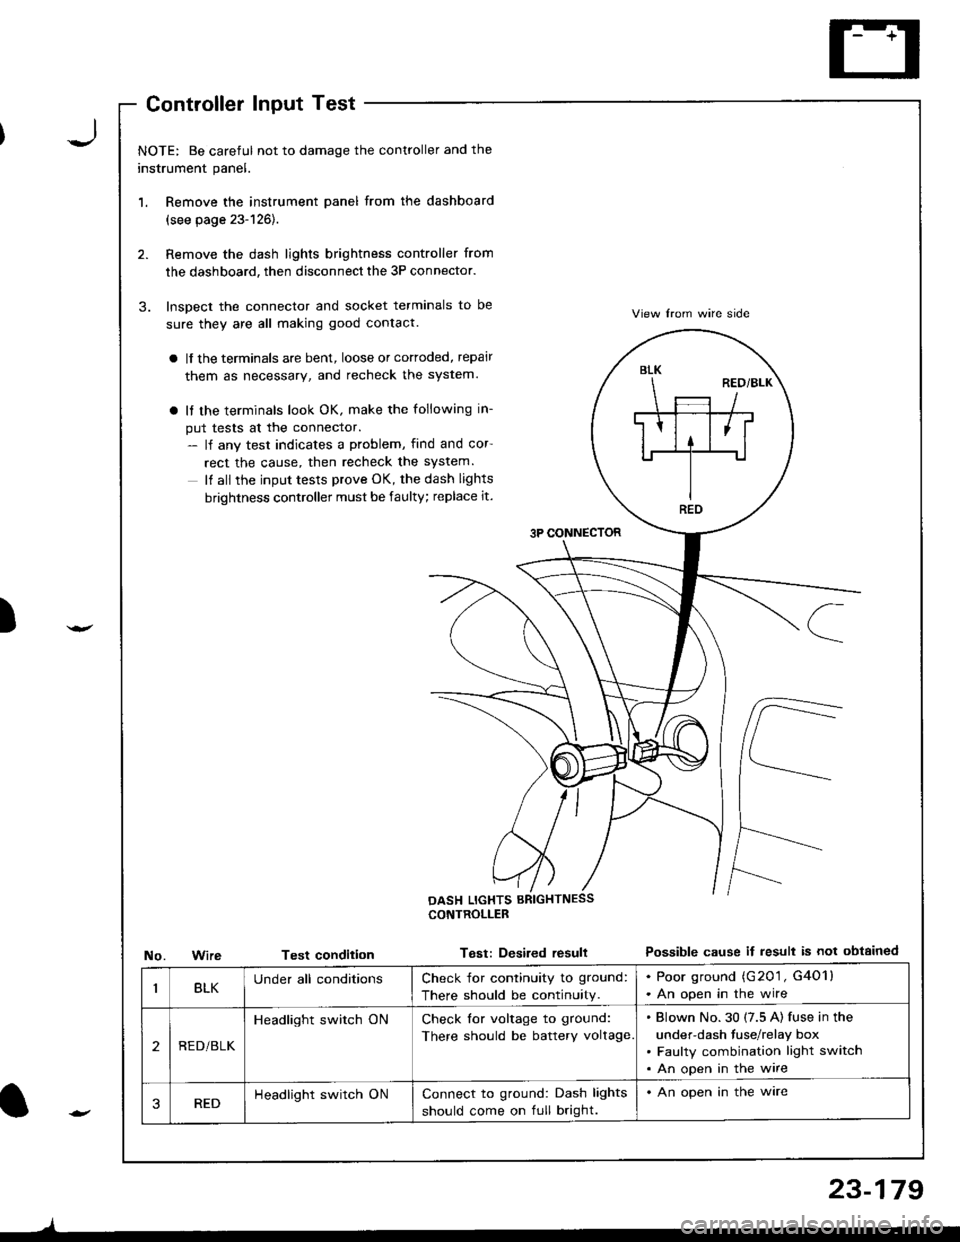
NOTE: Be careful not to damage the controller and the
instrument panel.
Remove the instrument panel from the dashboard
(see page 23-126).
Remove the dash lights brightness controller from
the dashboard, then disconnect the 3P connector.
Inspect the connector and socket terminals to be
sure they are all making good contact.
a lf the terminals are bent, loose or cortoded, repair
them as necessary, and recheck the system.
a It the terminals look OK, make the following in-
put tests at the connector.- lf any test indicates a problem, find and cor
rect the cause, then recheck the system.
It all the input tests prove OK, the dash lights
brightness controller must be faulty; replace it.
3P CONNECTOR
View lrom wire side
Possible cause if result is not obtainedNo.WireTest condition
CONTROLLEB
Test: Desired resull
BLK
REO
BLKUnder all conditionsCheck for continuity to ground:
There should be continuity.
. Poor ground (G201 , G4O1l. An open in the wire
2REDi BLK
Headlight switch ONCheck for voltage to ground:
There should be battery voltage
Blown No.30 (7.5 A) fuse in the
under-dash fuse/relay box
Faulty combination light switch
An open in the wire
3REDHeadlight switch ONConnect to ground: Dash lights
should come on full bright.
. An open in the ware
l-
)
23-179
Page 1239 of 1680
)
I
With moonroof:
1. Turn the light switch OFF.
2. Pry off the lens.
3. Remove the two mounting nuts, then pull out the
housing.
5. Check for continuity between the terminals in each
switch position according to the table.
From No. 43 l?.5 A) FUSE(ln the undeFhood fuserelay box)
4. Disconnect the 3P connector from the housing.
Teminal
t"",t*
-l\BorB'cD
OFFo---o\-/
DOORo-/:\--o\:./
ONo-/:\--o\:,/
3P CONNECTOR
LENS
CeilingLightTest/Replacement
23-183
Page 1240 of 1680
Ceiling/Trunk/Cargo Area Lights, Spotlights
Ceiling Light Test/Replacement
Without moonroof :
1. Turn the light switch OFF.
2. Pry ofl the lens.
3. Remove the screw, then pull out the housing.
HOUSING
4. Disconnect the 3P connector from the housino.
CONNECTOR
23-1a4
5. Check for continuity between the terminals in each
switch position according to the table.
rermrnal
PositionBorB'cD
OFFo-/1--o
DOORo-/A--o
ONo-/a\--o\:,,/--{.J-
From No, i(} {7.5 A} FUSE(ln the under-hood fuse/relay box)A
({
0N z'
Dl
\>l
( owt
!.\. OFF
f,o
B'To DOOR I