Page 53 of 221

52
High-Low beamsÐFor high beams,
turn the headlights on and push the lever away from you (position 1). Pull the lever
toward you (position 2) for low beams.
The headlight high beam indicator light
(blue light) on the instrument panel will tell
you that the high beams are on.
Flashing the high beam headlights
(position 3) ÐPull the lever all the way
back. The high beam headlights turn off
when you release the lever.
You can flash the high beam headlights with knob turned to OFFº.TURN SIGNAL
To signal a turn, push the headlight/
turn signal lever up or down to posi-
tion 1. The key must be in the ONº position. The lever automatically returns after you make a turn, but you may have to return it by hand after you change lanes.
To signal a lane change, move the lever
up or down to the pressure point (position 2) and hold it.
If the turn signal indicator lights (green
lights) on the instrument panel flash faster
than normal, a front or rear turn signal bulbis burned out.To turn on the emergency flashers,
push the switch.
All the turn signal lights will flash. To turn
them off, push the switch once again.
Turn on the emergency flashers to warn other drivers if your vehicle must be
stopped where it might be a traf fic hazard.
Always pull as far off the road as possible.
The turn signal light switch will not work
when the emergency flashers are operat- ing. Emergency flashers
Page 197 of 221

196If the new fuse immediately blows out, there is a problem with the electrical sys-
tem.
Have your Toyota dealer correct it as
soon as possible.
Never use a fuse with a higher
amperage rating, or any other
object, in place of a fuse. This maycause extensive damage and
possibly a fire. CAUTION
!
If any washer does not work, the wash-
er tank may be empty. Add washer fluid.
You may use plain water as washer fluid.
However, in cold areas where tempera-
tures range below freezing point, use
washer fluid containing antifreeze. This
product is available at your Toyota dealer
and most auto parts stores. Follow the
manufacturer 's directions for how much
to mix with water.
NOTICE
Do not use engine antifreeze or any other substitute because it may
damage your vehicle's paint.
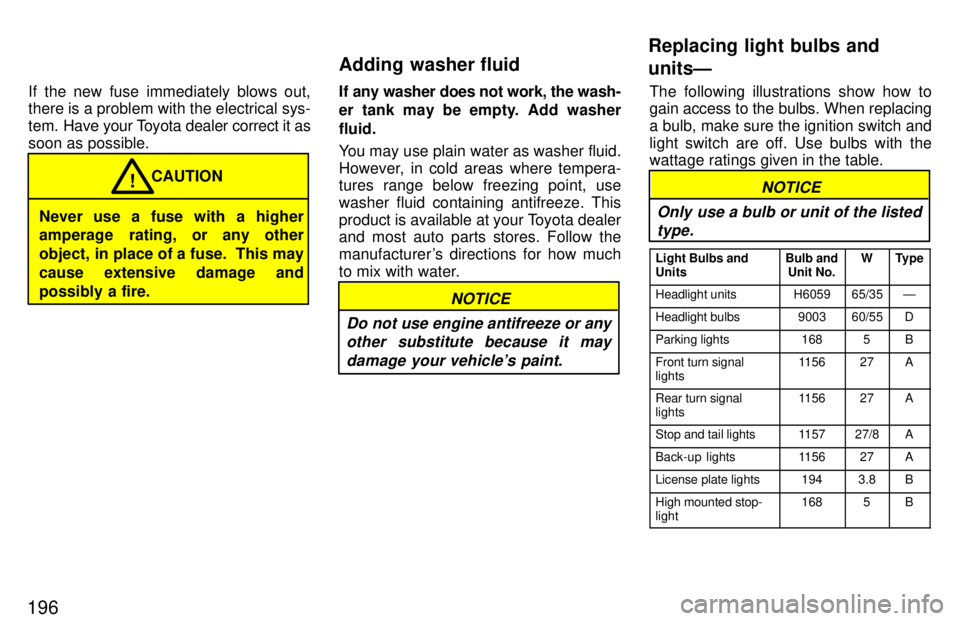
The following illustrations show how to
gain access to the bulbs. When replacing
a bulb, make sure the ignition switch and
light switch are off. Use bulbs with the wattage ratings given in the table.
NOTICE
Only use a bulb or unit of the listed type.
Light Bulbs and
UnitsBulb and Unit No.WType
Headlight unitsH605965/35Ð
Headlight bulbs900360/55D
Parking lights1685B
Front turn signal lights115627A
Rear turn signal lights115627A
Stop and tail lights115727/8A
Back-up lights115627A
License plate lights1943.8B
High mounted stop- light1685B
Adding washer fluid Replacing light bulbs and unitsÐ
Page 198 of 221
197
Light
Bulbs and
Units
Bulb and Unit No.WType
Headlight Interior light Normal cabXtra-cab
Ð Ð5
10C C
Personal lightsÐ5C
Door courtesy lightsÐ3C
Glovebox lightÐ1.4B
A: Single end bulbs
B: Wedge base bulbs C: Double end bulbsD: HB2 halogen bulbs
1. Loosen the parking light unit re-
taining screws and remove the
units unplugging the connectors.2. Open the hood. Release the clipsand remove the radiator grille.
The clips can be released with a flat-
blade screwdriver as shown.
ÐHeadlight units
Page 200 of 221
199
1. Open the hood. Unplug the con-nector. Remove the rubber cover.
If the connector is tight, wiggle it.2. Release the bulb retaining spring and remove the bulb. Install a new
bulb and the bulb retaining spring.
To install a bulb, align the tabs of the bulb with the cutouts of the mounting hole.3. Install the rubber cover with the TOPº mark upward and snuggle
on the boss. Then inset the connec-
tor.
Make sure the rubber cover fits snugly on
the connector and the headlight body.
Aiming is not necessary after replacing
the bulb. When aiming adjustment is nec-
essary, contact your Toyota dealer.
ÐHeadlight bulbs