Page 1044 of 1807

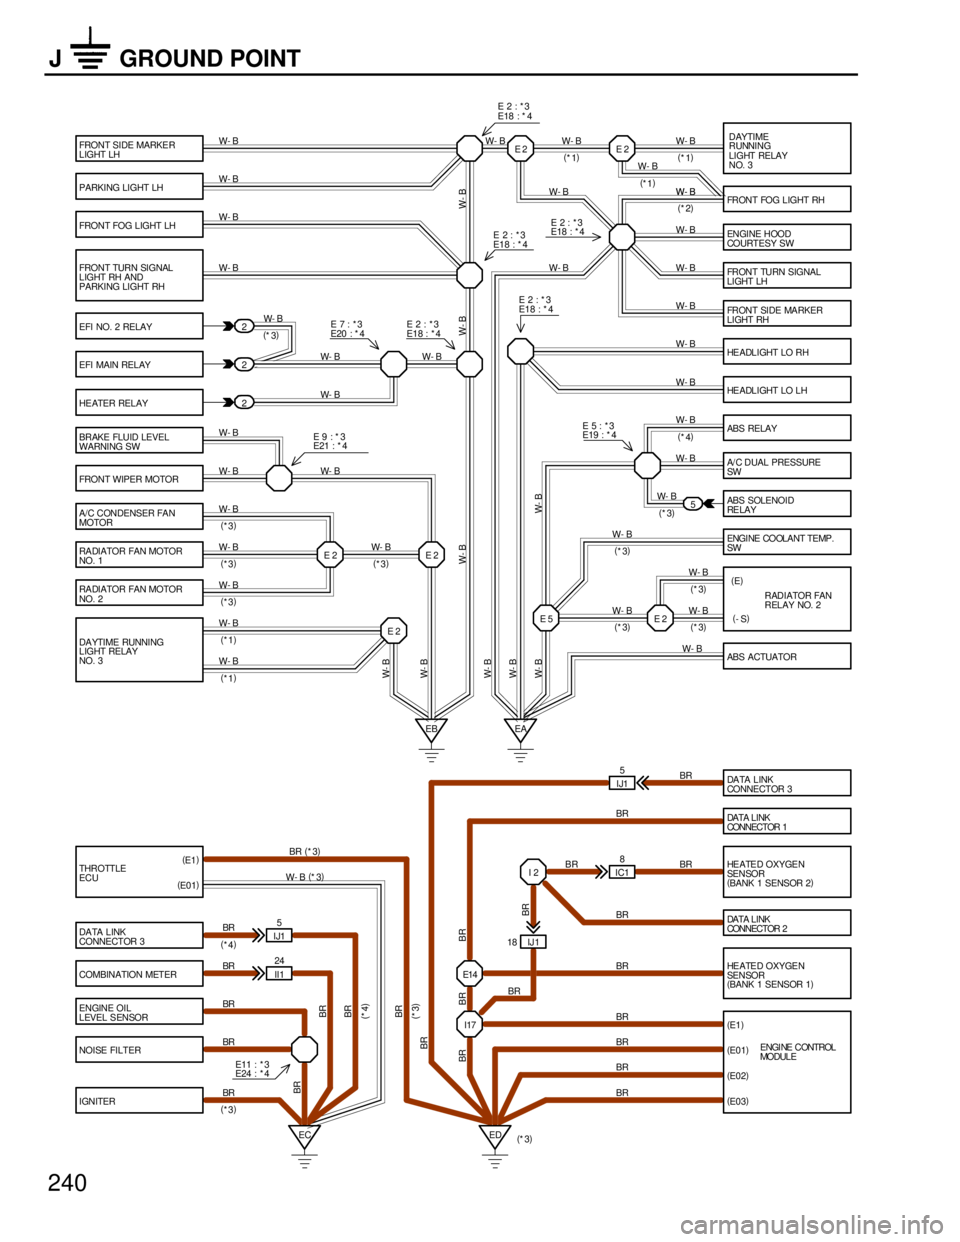
FRONT TURN SI GNAL
LIGHT RH AND
PARKING LIGHT RH
EFI NO. 2 RELAY
EFI MAIN RELAY
HE ATER RELAY
FRONT WIPER MOTOR
A/C CONDENSER FAN
MOTOR BRAKE FLUID LEVEL
WARNING SW
COMBINATION METER
ENGINE OIL
LEVEL SENSOR
NOISE FILTER
IGNITER PARKING LIGHT LH FRONT SIDE MARKE R
LIGHT LHDAYTIME
RUNNING
LIGHT RELAY
NO. 3
FRONT FOG LIGHT RH
EN GI NE H OOD
COURTESY SW
FR ON T TU RN S I G NA L
LIGHT LH
FRONT SIDE MA RKER
LIGHT RH
HE A DL I GHT LO R H
HEADLIGHT LO LH
ABS RELAY
A/ C DUAL PRESSURE
SW
ABS SOLENOID
RE LA Y
ABS ACTUATOR E 2
E 5 E 2 E 2 2
2
2
5
EB EA
HEATED OXYGEN
SEN SOR
(
BANK 1 SENSOR 2)
HEATED OXYGEN
SEN SOR
(
BANK 1 SENSOR 1)
ED EC II1 24
I17 E14I 2
IJ 1 18
(
E1)
(
E01)
(
E02) IC18 W- B
W- B
W- B
W- B W- BW- B
W- B
W- B
W- B
W- B
W- B
BR
BR
BR
BRBR W- B
W- B W- B
(
*3)W- B
(
*1)
W- B
(
*4)
W- B
W- B
W- B
W- B
W- B
W- BW- B
BR BR
BR
BR
BR
BR BR
BR BR
BR
W- B
(
*3)W- B
W- B
(
*3) E 7 : * 3
E20 : * 4E 2 : * 3
E18 : * 4E 2 : * 3
E18 : * 4
E 2 : * 3
E18 : * 4
E 5 : * 3
E19 : * 4
DA YTIME RUNNING
LIGHT RELAY
NO. 3 RA DIATOR FAN MOTOR
NO. 1
E11 : * 3
E24 : * 4W- B
W- B
W- B W- B
W- B
(
*1)E 2 : * 3
E18 : * 4
W- B
(
*3)
DA TA L I NK
CONNECTOR 2RADIATOR FAN
RELAY NO. 2 (
E) ENGI NE CO OLA NT TE MP .
SW
(
-S)
E 2 W- B
W- B W- B W- B W- B
W- B
W- B
BR E 2 : * 3
E18 : * 4
E 2
W- B
(
*1) (
*3)(
*3)(
*3)
(
*3)(
*3)
(
*3)
(
*3)ENGI NE CONTROL
MODULE W- B
BR
DA TA L I NK
CONNECTOR 1
DA TA LINK
CONNECTOR 3IJ15
BR
(
*4)
BR
(
*4)
E 9 : * 3
E21 : * 4
RA DIATOR FAN MOTOR
NO. 2W- B
(
*3) FRONT FOG LIGHT LH
W- B
THROTTLE
ECUDA TA L INK
CONNECTOR 3 BR
BR
BRBR
(
E03) BR (
*3)
W- B (
*3) (
E1)
(
E01)W- BW- B
(
*2) E 2
W- B
(
*1) W- B
(
*1)
IJ15
(
*3)
BR
BR
240
J GROUND POINT
Page 1141 of 1807
1 21 2
2 1
1 2
E28 E28
IEIJ1 11
IJ 2 12 IJ2 3A 4 A 20
B 24 B46 A3A18 B25 B7
3 12 8
4 OIL THG KD M G2 G-
W- B W- BB- R
O
BR- Y W- B W- B
W- B W- B
W- B
G- Y
W
GG- YY
G- W G- W WB- R
Y- L
(
SHIELDED)(
SHIELDED) STP TE1FROM P OWER SOURCE SYSTEM (
SEE PAGE 56)
STOP LIGHT
SW DA TA L INK
CONNECTOR 1
S11 D 1
Y A/T FLUID TEMP. SENSOR
EGR GAS TEMP. SENSOR
KICK DOWN SWA 5
E 1
K 4
ELECTRONICALLY CONTROLLED
TRANSMISSION PATTERN
SELECT SW E 8 ENGINE CONTROL MODULEA E 9 , E10B
B 26G1
R
B 27NE
B
1234
DISTRIBUTOR D 4
BR A 32PS
1 2
BR- W BRPOWER STEERING
PRESSURE SW P 3
B 65
W- B
E2
1J 11H 13
NORMAL
MANUAL
NE G1 G2 G-
TE1 +B
15A
STOP
1I 10
152
ELECTRONICALLY CONTROLLED TRANSMISSION
Page 1212 of 1807
1G 91E 4II1 15 II125 IE1 5IF212 IF22 16 18 12 15 6 1 4 3 5 8 9
B- O
W- R Y- R
V
Y- G
B B- Y
L
L- B
LG - RL L- W
R- Y
L- B
Y- B
LG- R
W- B W- LY V
FROM POWER SOURCE SYSTEM (
SEE PAGE 56)
Y- G
R- Y
L- WY
Y- B
IE 1
TO INTEGRATION
RELAY
TO AI RBAG
SENSOR ASSEMBLY
TO ABS ECU
TO ENGINE CONTROL MODULE
TO THROTTLE ECU
OIL PRESSURE
SW
W- B
O 2 T 5 T 6
(
*3) (
*3)
12THEFT DETE RRENT AND
DOOR LOCK CONTROL ECU T13
LIGHT
FAILURE
SENSOR
7. 5A
IGN10A
ECU- B
1E 81E13
4
WRN
L 2
210 TELLTALE LIGHT LH
OIL LEVEL
ABS
OI L
TRAC OFF
SECURITY
MALFUNCTION
INDICATOR LAMP
32 TELL TALE LI GHT RH
SEAT BEL T
REAR LIGHT
CHRAGE
SRS
IND
1E 18
1J 1
223
*1 : USA
* 2 : CANADA * 4 : 2JZ- GE* 3 : 2JZ- GTE * 5 : 2JZ- GE M/T
* 6 : EXCEPT * 5
Page 1213 of 1807

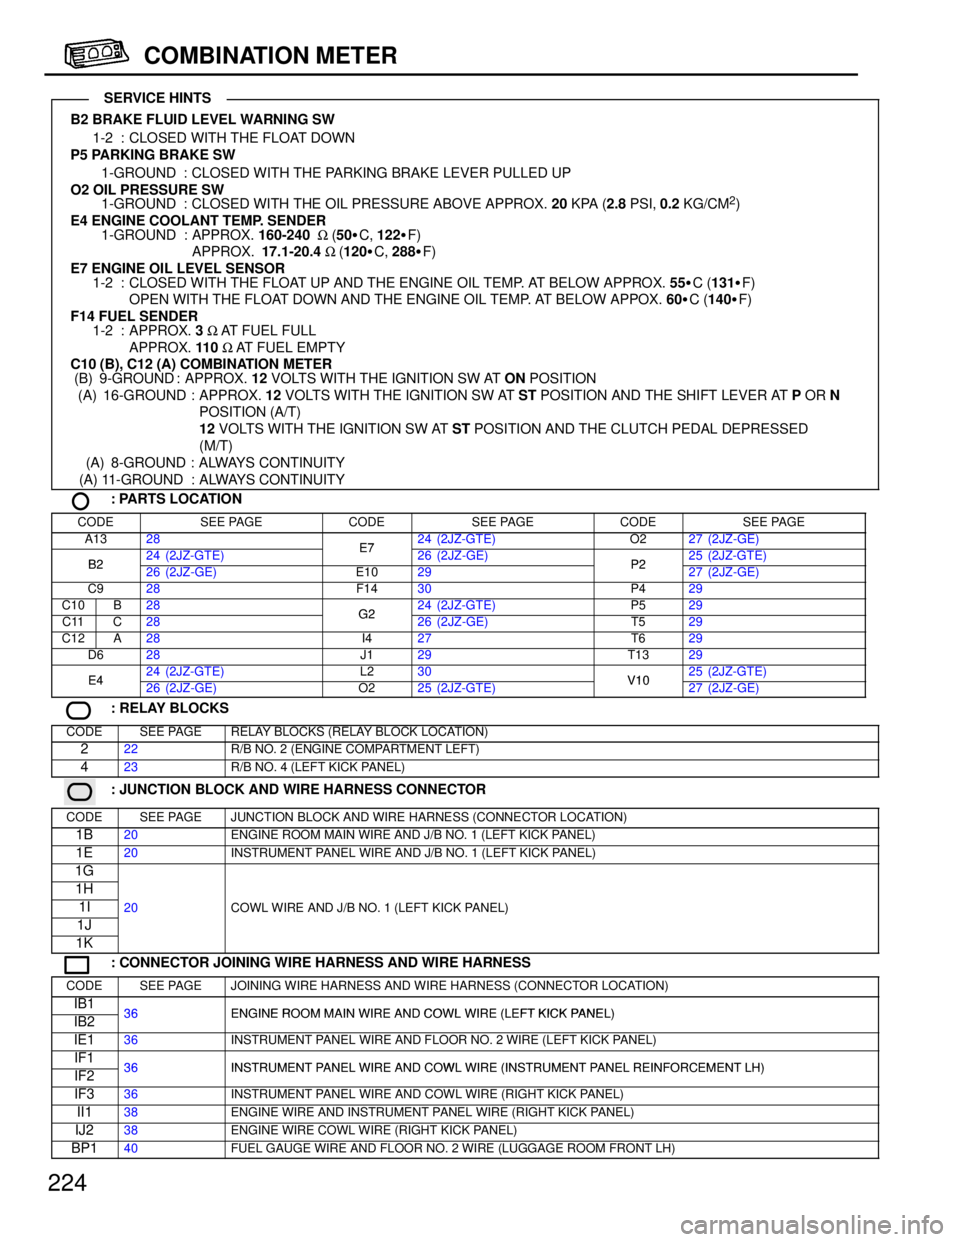
224
COMBINATION METER
B2 BRAKE FLUID LEVEL WARNING SW
1-2 : CLOSED WITH THE FLOAT DOWN
P5 PARKING BRAKE SW
1-GROUND : CLOSED WITH THE PARKING BRAKE LEVER PULLED UP
O2 OIL PRESSURE SW
1-GROUND : CLOSED WITH THE OIL PRESSURE ABOVE APPROX. 20 KPA (2.8 PSI, 0.2 KG/CM
2)
E4 ENGINE COOLANT TEMP. SENDER
1-GROUND : APPROX. 160-240 W (50�C, 122�F)
APPROX. 17.1-20.4 W (120�C, 288�F)
E7 ENGINE OIL LEVEL SENSOR
1-2 : CLOSED WITH THE FLOAT UP AND THE ENGINE OIL TEMP. AT BELOW APPROX. 55�C (131�F)
OPEN WITH THE FLOAT DOWN AND THE ENGINE OIL TEMP. AT BELOW APPOX. 60�C (140�F)
F14 FUEL SENDER
1-2 : APPROX. 3 W AT FUEL FULL
APPROX. 110 W AT FUEL EMPTY
C10 (B), C12 (A) COMBINATION METER
(B) 9-GROUND : APPROX. 12 VOLTS WITH THE IGNITION SW AT ON POSITION
(A) 16-GROUND : APPROX. 12 VOLTS WITH THE IGNITION SW AT ST POSITION AND THE SHIFT LEVER AT P OR N
POSITION (A/T)
12 VOLTS WITH THE IGNITION SW AT ST POSITION AND THE CLUTCH PEDAL DEPRESSED
(M/T)
(A) 8-GROUND : ALWAYS CONTINUITY
(A) 11-GROUND : ALWAYS CONTINUITY
: PARTS LOCATION
CODESEE PAGECODESEE PAGECODESEE PAGE
A1328E724 (2JZ-GTE)O227 (2JZ-GE)
B224 (2JZ-GTE)E726 (2JZ-GE)P225 (2JZ-GTE)B226 (2JZ-GE)E1029P227 (2JZ-GE)
C928F1430P429
C10B28G224 (2JZ-GTE)P529
C11C28G226 (2JZ-GE)T529
C12A28I427T629
D628J129T1329
E424 (2JZ-GTE)L230V1025 (2JZ-GTE)E426 (2JZ-GE)O225 (2JZ-GTE)V1027 (2JZ-GE)
: RELAY BLOCKS
CODESEE PAGERELAY BLOCKS (RELAY BLOCK LOCATION)
222R/B NO. 2 (ENGINE COMPARTMENT LEFT)
423R/B NO. 4 (LEFT KICK PANEL)
: JUNCTION BLOCK AND WIRE HARNESS CONNECTOR
CODESEE PAGEJUNCTION BLOCK AND WIRE HARNESS (CONNECTOR LOCATION)
1B20ENGINE ROOM MAIN WIRE AND J/B NO. 1 (LEFT KICK PANEL)
1E20INSTRUMENT PANEL WIRE AND J/B NO. 1 (LEFT KICK PANEL)
1G
1H
1I20COWL WIRE AND J/B NO. 1 (LEFT KICK PANEL)
1J
()
1K
: CONNECTOR JOINING WIRE HARNESS AND WIRE HARNESS
CODESEE PAGEJOINING WIRE HARNESS AND WIRE HARNESS (CONNECTOR LOCATION)
IB136ENGINE ROOM MAIN WIRE AND COWL WIRE (LEFT KICK PANEL)IB236ENGINE ROOM MAIN WIRE AND COWL WIRE (LEFT KICK PANEL)
IE136INSTRUMENT PANEL WIRE AND FLOOR NO. 2 WIRE (LEFT KICK PANEL)
IF136INSTRUMENT PANEL WIRE AND COWL WIRE (INSTRUMENT PANEL REINFORCEMENT LH)IF236INSTRUMENT PANEL WIRE AND COWL WIRE (INSTRUMENT PANEL REINFORCEMENT LH)
IF336INSTRUMENT PANEL WIRE AND COWL WIRE (RIGHT KICK PANEL)
II138ENGINE WIRE AND INSTRUMENT PANEL WIRE (RIGHT KICK PANEL)
IJ238ENGINE WIRE COWL WIRE (RIGHT KICK PANEL)
BP140FUEL GAUGE WIRE AND FLOOR NO. 2 WIRE (LUGGAGE ROOM FRONT LH)
SERVICE HINTS
Page 1284 of 1807

S05506
Sub-Throttle Position
Sensor Connector
Water Bypass Hose
PS Air Hose
� Gasket
Throttle Body
Throttle Position Sensor Connector
Sub-Throttle Actuator Connector
Control Cable
Bracket and Cable
Vacuum
Hose
Air
Hose
IAC Valve Pipe
Air Hose
Air Intake
Chamber Stay
IAC Valve
Connector Engine Wire Protector
VSV Connector for EGR
MAP Sensor Connector
VSV Connector for Fuel Pressure Control
Filler Cap
x 10 No.3 Timing Belt Cover
Ignition Coils AssemblyEVAP Hose
EGR Pipe
Engine Wire
Protector
Ground Cable
Brake Booster
Vacuum Hose
EGR Gas
Temperature
Sensor Connector
Vacuum Hose
Pressure Tank
and VSV Assembly
Engine Wire Bracket
Engine Wire Clamp
Manifold Stay� Gasket
x 5
No.4 Water Bypass Pipe PS Air Hose
No.4 Water
Bypass Hose
Water Bypass hose
Air Intake Chamber
Engine Wire Protector
� Gasket
Fuel Inlet Pipe
Fuel Pressure
Pulsation DamperVacuum Sensing Hose
Intake Manifold and
Delivery Pipe Assembly
Fuel Return Hose
� Gasket
x 6
� Gasket � Gasket
Engine Wire Bracket
PS Vane Pump
Oil Dipstick and
Guide for Transmission Oil Dipstick and
Guide for Engine
� O-Ring
� O-Ring
Timing Belt
Gasket
No.2 Timing
Belt Cover
Drive Belt Tensioner
Dust Cover
Timing Belt Tensioner
Drive Belt Tensioner Damper
� Non-reusable part
Drive Belt TensionerM/T
- ENGINE MECHANICAL (2JZ-GTE)CYLINDER HEAD
EM-27
1132 Author�: Date�:
1997 SUPRA (RM502U)
Page 1287 of 1807

EM0AJ-02
P02137
P02110
P02131
P02128
P02072
- ENGINE MECHANICAL (2JZ-GTE)CYLINDER HEAD
EM-35
1140 Author�: Date�:
1997 SUPRA (RM502U)
INSPECTION
1. CLEAN TOP SURFACES OF PISTONS AND CYL-
INDER BLOCK
(a) Turn the crankshaft, and bring each piston to top dead
center (TDC). Using a gasket scraper, remove all the car-
bon from the piston top surface.
(b) Using a gasket scraper, remove all the gasket material
from the top surface of the cylinder block.
(c) Using compressed air, blow carbon and oil from the bolt
holes.
CAUTION:
Protect your eyes when using high pressure-compressed
air.
2. REMOVE GASKET MATERIAL
Using a gasket scraper, remove all the gasket material from the
cylinder block surface.
NOTICE:
Be careful not to scratch the cylinder block contact sur-
face.
3. CLEAN COMBUSTION CHAMBERS
Using a wire brush, remove all the carbon from the combustion
chambers.
NOTICE:
Be careful not to scratch the cylinder block contact sur-
face.
4. CLEAN VALVE GUIDE BUSHINGS
Using a valve guide bushing brush and solvent, clean all the
guide bushings.
Page 1323 of 1807

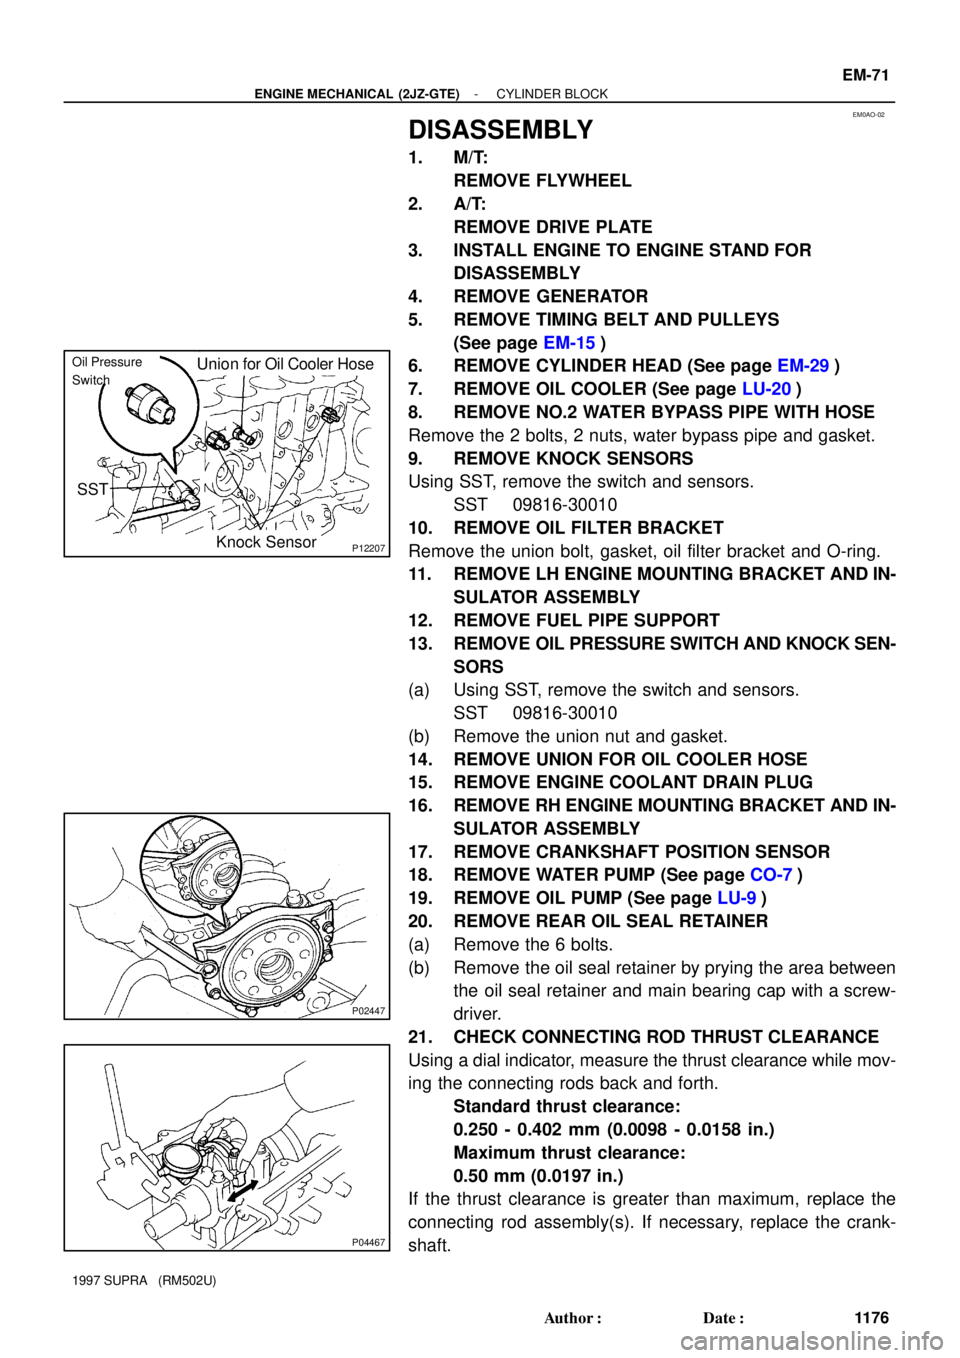
EM0AO-02
P02447
P04467
P12207Knock Sensor
Union for Oil Cooler HoseOil Pressure
Switch
SST
- ENGINE MECHANICAL (2JZ-GTE)CYLINDER BLOCK
EM-71
1176 Author�: Date�:
1997 SUPRA (RM502U)
DISASSEMBLY
1. M/T:
REMOVE FLYWHEEL
2. A/T:
REMOVE DRIVE PLATE
3. INSTALL ENGINE TO ENGINE STAND FOR
DISASSEMBLY
4. REMOVE GENERATOR
5. REMOVE TIMING BELT AND PULLEYS
(See page EM-15)
6. REMOVE CYLINDER HEAD (See page EM-29)
7. REMOVE OIL COOLER (See page LU-20)
8. REMOVE NO.2 WATER BYPASS PIPE WITH HOSE
Remove the 2 bolts, 2 nuts, water bypass pipe and gasket.
9. REMOVE KNOCK SENSORS
Using SST, remove the switch and sensors.
SST 09816-30010
10. REMOVE OIL FILTER BRACKET
Remove the union bolt, gasket, oil filter bracket and O-ring.
11. REMOVE LH ENGINE MOUNTING BRACKET AND IN-
SULATOR ASSEMBLY
12. REMOVE FUEL PIPE SUPPORT
13. REMOVE OIL PRESSURE SWITCH AND KNOCK SEN-
SORS
(a) Using SST, remove the switch and sensors.
SST 09816-30010
(b) Remove the union nut and gasket.
14. REMOVE UNION FOR OIL COOLER HOSE
15. REMOVE ENGINE COOLANT DRAIN PLUG
16. REMOVE RH ENGINE MOUNTING BRACKET AND IN-
SULATOR ASSEMBLY
17. REMOVE CRANKSHAFT POSITION SENSOR
18. REMOVE WATER PUMP (See page CO-7)
19. REMOVE OIL PUMP (See page LU-9)
20. REMOVE REAR OIL SEAL RETAINER
(a) Remove the 6 bolts.
(b) Remove the oil seal retainer by prying the area between
the oil seal retainer and main bearing cap with a screw-
driver.
21. CHECK CONNECTING ROD THRUST CLEARANCE
Using a dial indicator, measure the thrust clearance while mov-
ing the connecting rods back and forth.
Standard thrust clearance:
0.250 - 0.402 mm (0.0098 - 0.0158 in.)
Maximum thrust clearance:
0.50 mm (0.0197 in.)
If the thrust clearance is greater than maximum, replace the
connecting rod assembly(s). If necessary, replace the crank-
shaft.
Page 1345 of 1807

P10820
Adhesive
P13197
Oil Pressure
SwitchKnock Sensor
- ENGINE MECHANICAL (2JZ-GTE)CYLINDER BLOCK
EM-93
1198 Author�: Date�:
1997 SUPRA (RM502U)
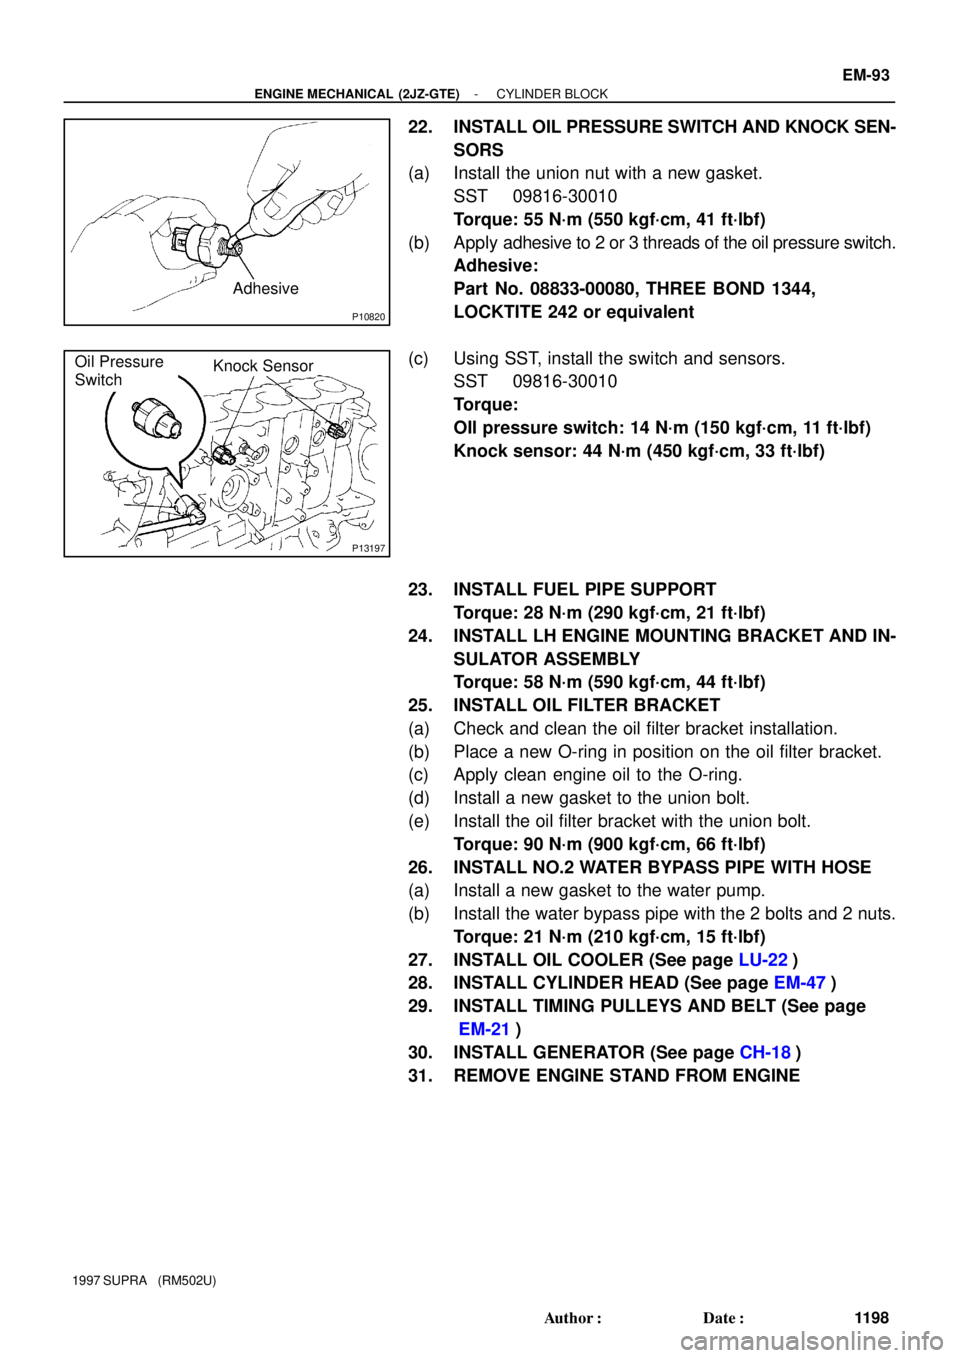
22. INSTALL OIL PRESSURE SWITCH AND KNOCK SEN-
SORS
(a) Install the union nut with a new gasket.
SST 09816-30010
Torque: 55 N´m (550 kgf´cm, 41 ft´lbf)
(b) Apply adhesive to 2 or 3 threads of the oil pressure switch.
Adhesive:
Part No. 08833-00080, THREE BOND 1344,
LOCKTITE 242 or equivalent
(c) Using SST, install the switch and sensors.
SST 09816-30010
Torque:
OIl pressure switch: 14 N´m (150 kgf´cm, 11 ft´lbf)
Knock sensor: 44 N´m (450 kgf´cm, 33 ft´lbf)
23. INSTALL FUEL PIPE SUPPORT
Torque: 28 N´m (290 kgf´cm, 21 ft´lbf)
24. INSTALL LH ENGINE MOUNTING BRACKET AND IN-
SULATOR ASSEMBLY
Torque: 58 N´m (590 kgf´cm, 44 ft´lbf)
25. INSTALL OIL FILTER BRACKET
(a) Check and clean the oil filter bracket installation.
(b) Place a new O-ring in position on the oil filter bracket.
(c) Apply clean engine oil to the O-ring.
(d) Install a new gasket to the union bolt.
(e) Install the oil filter bracket with the union bolt.
Torque: 90 N´m (900 kgf´cm, 66 ft´lbf)
26. INSTALL NO.2 WATER BYPASS PIPE WITH HOSE
(a) Install a new gasket to the water pump.
(b) Install the water bypass pipe with the 2 bolts and 2 nuts.
Torque: 21 N´m (210 kgf´cm, 15 ft´lbf)
27. INSTALL OIL COOLER (See page LU-22)
28. INSTALL CYLINDER HEAD (See page EM-47)
29. INSTALL TIMING PULLEYS AND BELT (See page
EM-21)
30. INSTALL GENERATOR (See page CH-18)
31. REMOVE ENGINE STAND FROM ENGINE