Page 8 of 218
3
1. Headlight and turn signal switch
2. Wiper and washer switches
3. Emergency flasher switch
4. Clock
5. Center vents
6. Car audio
7. Miscellany box
8. Air conditioning controls
9. Rear window and outside rear viewmirror defoggers switch
10. Coupe and liftbackÐ Power rear view mirror control
switch (without power windows)
ConvertibleÐ
Convertible top control switch and
quarter window control switches
11. Cigarette lighter
12. Ignition switch
13. Cruise control switch
14. Tilt steering lock release lever
15. Instrument panel light control knob
ProCarManuals.com
Page 56 of 218

Part 1Headlights and turn signals51
OPERATION OF
INSTRUMENTS AND
CONTROLSÐ
Chapter 1-4
Lights, Wipers
and Defogger
�Headlights and turn signals
� Emergency flashers
� Instrument panel light control
� Front fog lights
� Interior lights
� Personal lights
� Ignition switch light
� Luggage compartment light
� Windshield wipers and washer
� Rear window wiper and washer
� Rear window defogger
HEADLIGHTS
To turn on the following lights: Twist
the headlight/turn signal lever knob.
Position 1ÐParking, tail, license plate,
side marker and instrument panel lights
Position 2ÐHeadlights and all of the
above
The lights automatically turn off when the
driver's door is opened with the ignition
turned off. To turn them on again, turn the
key to the ONº position or actuate the
headlight switch. If you are going to park
for over one week, make sure the head-
light switch is off.
NOTICE
To prevent the battery from being discharged, do not leave the lights
on for a long period when theengine is not running.
Daytime running light system (Canada
only)
The headlights turn on when the parking
brake is released with the engine started,
even with the light switch in the OFFº
position. They will not go off until the igni-
tion switch is turned off.
To turn on the other exterior lights and in-
strument panel lights, twist the knob to the
position 1.
Under the daytime running light system,
the headlights turn on at reduced intensi-
ty. Twist the knob to the position 2 to turn
to full intensity for driving at night.
ProCarManuals.com
Page 58 of 218
53
NOTICE
To prevent the battery from being discharged, do not leave the lights
on for a long period when theengine is not running.
To adjust the brightness of the instru-
ment panel lights, turn the knob.To turn on the front fog lights, twist the
band of the headlight and turn signal
switch lever. They will come on when
the tail lights are turned on.
Instrument panel light control Front fog lights
ProCarManuals.com
Page 62 of 218

57
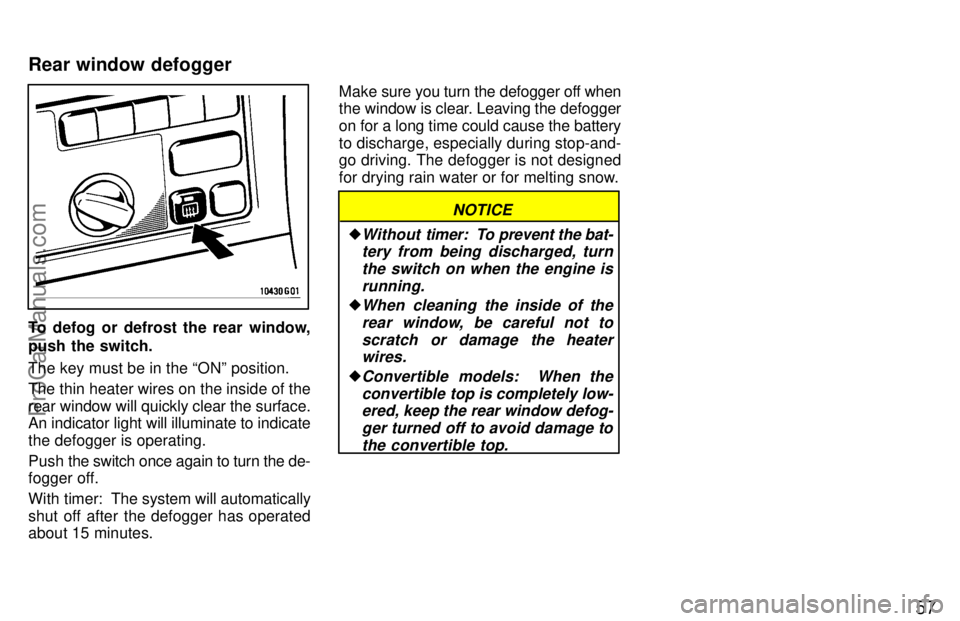
To defog or defrost the rear window,
push the switch.
The key must be in the ONº position.
The thin heater wires on the inside of the
rear window will quickly clear the surface.
An indicator light will illuminate to indicate
the defogger is operating.
Push the switch once again to turn the de-
fogger off.
With timer: The system will automatically
shut off after the defogger has operated
about 15 minutes. Make
sure you turn the defogger off when
the window is clear. Leaving the defogger
on for a long time could cause the battery
to discharge, especially during stop-and-
go driving. The defogger is not designed
for drying rain water or for melting snow.
NOTICE
�Without timer: To prevent the bat-
tery from being discharged, turn
the switch on when the engine isrunning.
�When cleaning the inside of therear window, be careful not toscratch or damage the heaterwires.
�Convertible models: When the
convertible top is completely low-ered, keep the rear window defog-
ger turned off to avoid damage tothe convertible top.
Rear window defogger
ProCarManuals.com
Page 199 of 218

193
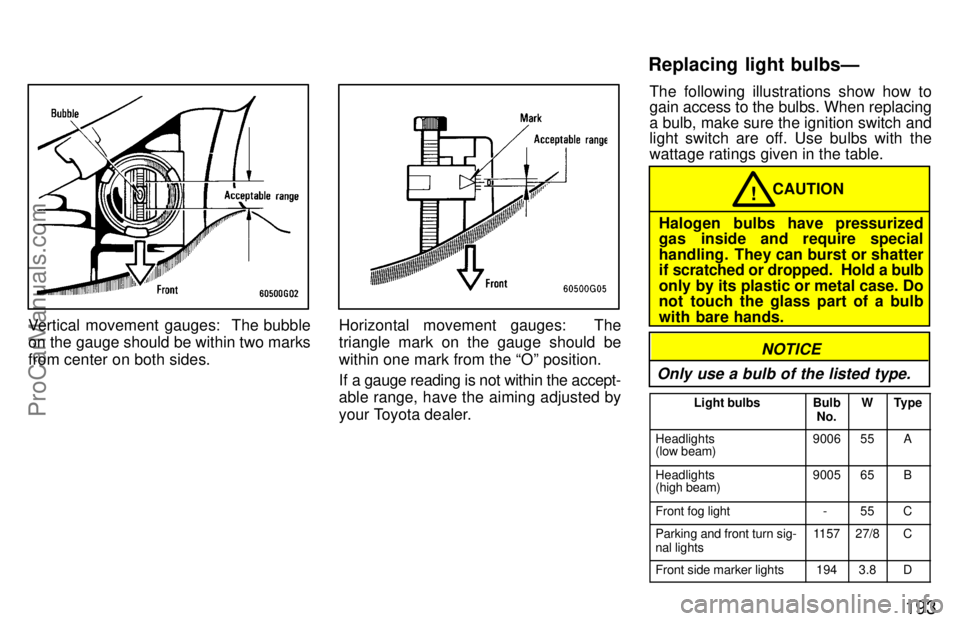
Vertical movement gauges: The bubble
on the gauge should be within two marks
from center on both sides.Horizontal movement gauges: The
triangle mark on the gauge should be
within one mark from the Oº position.
If a gauge reading is not within the accept-
able range, have the aiming adjusted by
your Toyota dealer.The following illustrations show how to
gain access to the bulbs. When replacing
a bulb, make sure the ignition switch and
light switch are off. Use bulbs with the
wattage ratings given in the table.
Halogen bulbs have pressurized
gas inside and require special
handling. They can burst or shatter
if scratched or dropped. Hold a bulb
only by its plastic or metal case. Do
not touch the glass part of a bulb
with bare hands.
CAUTION
!
NOTICE
Only use a bulb of the listed type.
Light bulbsBulb
No.WType
Headlights
(low beam)900655A
Headlights
(high beam)900565B
Front fog light-55C
Parking and front turn sig-
nal lights115727/8C
Front side marker lights1943.8D
Replacing light bulbsÐ
ProCarManuals.com
Page 201 of 218
195
3. Install a new bulb and the connec-
tor into the mounting hole.
Aiming is not necessary after replacing
the bulb. When aiming adjustment is nec-
essary, contact your Toyota dealer.1. Loosen the retainer screw and take
out the beam unit.2. Turn the cover counterclockwise
and remove it.
ÐFront fog lights
ProCarManuals.com
Page 216 of 218

210
18 HEAD-HI (LH) 15 A: Left-hand
headlight (high beam)
19 DRL 7.5 A: Daytime running light
system
20 ECU-IG 15 A: Electronically con-
trolled automatic transmission system,
anti-lock brake system
21 SEAT-HTR 20 A: No circuit
22 PANEL 7.5 A: Instrument panel
lights
23 STOP 15 A: Stop lights, high
mounted stoplight, multiport fuel injection
system/sequential multiport fuel injection
system, cruise control system cancel de-
vice, electronically controlled automatic transmission system, anti-lock brake
system
24 FOG 20 A: Front fog lights
25 CIG & RAD 15 A:
Cigarette lighter,
digital clock display, car audio system
26 IGN 7.5 A: Charging system, dis-
charge warning light, multiport fuel injec-
tion system/sequential multiport fuel in-
jection system, SRS airbag system
27 WIPER 20 A: Windshield wipers and
washer, rear window wiper and washer
28 MIR-HTR 10 A: Multiport fuel injec-
tion system/sequential multiport fuel in-
jection system
29 TURN 10 A: Turn signal lights, emer-
gency flashers
30 TAIL 15 A: Tail lights, parking lights,
front side marker lights, rear side marker
lights, license plate lights
31 HTR 10 A: Air conditioning system,
rear window defogger
32 GAUGE 10 A: Gauges and meters,
power door lock system
33 ST 7.5 A: Starting system, multiport
fuel injection system/sequential multiport
fuel injection system
34 A/C 10 A: Air conditioning system
35 OBD II 7.5A: On-board diagnosis
system Fuses (type B)
36 RDI 30 A: Electric cooling fan
37 CDS 30 A: Electric cooling fan
38 AM1 40 A:
Electronic ignition sys-
tem/distributor ignition system
39 DOOR 30 A: Power door lock sys-
tem, convertible top control system
40 DEF 30 A: Rear window defogger
41 POWER 30 A: Power windows, elec-
tric moon roof
Fuses (type C)
42 HTR 40 A: Air conditioning system
43 ALT 100 A: ALT-Sº, TAILº,
DOORº, DEFº and POWERº fuses
44 MAIN 60 A: Starting system, head-
lights, AM2º, HAZARDº, HORNº,
DOMEº and RADIOº fuses
45 ABS 50 A: Anti-lock brake system
ProCarManuals.com