Page 15 of 218
11
The windows can be operated with
switches on the center console.
The windows move as long as you hold
the switch.
To open: Push on the lower side of the
switch.
To close: Push on the upper side of the
switch.To open the trunk lid or back door from
the outside, insert the master key and
turn it clockwise.
See Luggage stowage precautionsº in
Part 2 for precautions to observe in load-
ing luggage.
To close the trunk lid or back door, lower
it and press down on it. After closing the
trunk lid or back door, try pulling it up to
make sure it is securely closed.
Keep the trunk lid or back door
closed while driving. This not only
keeps the luggage from being
thrown out but also prevents ex-
haust gases from entering the ve-
hicle.
CAUTION!
To open the trunk lid or back door
from the driver's seat, pull up on the
lock release lever.
ÐLock release lever
ÐQuarter windows
(convertible) Trunk lid (c
oupe and convertible)/
Back door (liftback)Ð
ProCarManuals.com
Page 16 of 218
12
This system deactivates the lock re-
lease lever so that things locked in the
trunk or luggage compartment can be
protected.
1. (Except convertible) Push down the
security lock levers to lock the rear
seatbacks.
After locking the rear seatbacks, try fold-
ing them down to make sure they are se-
curely lockedÐotherwise, someone
could get into the trunk or luggage
compartment by folding down a rear seat.2. After closing the trunk lid or back
door, insert the master key and turn it
counterclockwise to deactivate the
lock release lever.
After closing the trunk lid or back door, try
pulling it up to make sure it is securely
locked.To open the hood, do the following.
1. Pull the hood lock release lever. The
hood will spring up slightly.
ÐLuggage security system Hood
ProCarManuals.com
Page 17 of 218
13
2. In front of the vehicle, pull up on the
auxiliary catch lever and lift the hood.3. Hold the hood open by inserting the
support rod into the slot.
Before closing the hood, check to see that
you have not forgotten any tools, rags,
etc. and return the support rod to its clip-
this prevents rattles. Then lower the hood
and make sure it locks into place. If neces-
sary, press down gently on the front edge
to lock it.
After inserting the support rod into
the slot, make sure the rod supports
the hood security.
CAUTION!
1. To open the fuel filler door, pull the
lever up.
CAUTION!
� Do not smoke, cause sparks or al-
low open flames when refuelling.
The fumes are flammable.
� When opening the cap, do not re-
move the cap quickly. In hot
weather, fuel under pressure
could cause injury by spraying out
of the filler neck if the cap is sud-
denly removed.
Fuel tank cap
ProCarManuals.com
Page 18 of 218
14
2. To remove the fuel tank cap, turn the
cap slowly counterclockwise, then
pause slightly before removing it. Af-
ter removing the cap, hang it on the
cap hanger.
It is not unusual to hear a slight swoosh
when the cap is opened. When installing,
turn the cap clockwise till you hear a click.
CAUTION!
�Make sure the cap is tightened se-
curely to prevent fuel spillage in
case of an accident.
� Use only a genuine Toyota fuel tank
cap for replacement. It has a built-
in check valve to reduce fuel tank
vacuum.
Sliding operation
Tilting operation
Electric moon roof
ProCarManuals.com
Page 25 of 218

Part 1SeatsFront seatsÐ
ÐSeat adjustment precautions
21
OPERATION OF
INSTRUMENTS AND
CONTROLSÐ
Chapter 1-3
Seats, Seat belts, Steering
wheel and Mirrors
�Seats
� Front seats
� Fold-down rear seat
� Head restraints
� Seat belts
� SRS airbags
� Child restraint
� Tilt steering wheel
� Outside rear view mirrors
� Anti-glare inside rear view
mirror
While the vehicle is being driven, all ve-
hicle occupants should have the seatback
upright, sit well back in the seat and prop-
erly wear the seat belt provided.
CAUTION!
� Do not drive the vehicle unless the
occupants are properly seated. Do
not allow sitting on top of a folded-
down seatback, or in the luggage
compartment. Persons not proper-
ly seated and not properly re-
strained by seat belts can be se-
verely injured in the event of emer-
gency braking or a collision.
� During driving, do not allow pas-
sengers to stand up or move
around between seats. Severe inju-
ries can occur in the event of emer-
gency braking or a collision. Adjust the driver's seat so that the foot
pedals, steering wheel and instrument
panel
controls are within easy reach of the
driver.
CAUTION!
� Adjustments should not be made
while the vehicle is moving, as the
seat may unexpectedly move and
cause the driver to lose control of
the vehicle.
� When adjusting the seat, be careful
not to hit the seat against a passen-
ger or luggage.
� After adjusting the seat position, try
sliding it forward and backward to
make sure it is locked in position.
� After adjusting the seatback, exert
body pressure to make sure it is
locked in position.
� Do not put objects under the seats
as they may interfere with the seat-
lock mechanism or unexpectedly
push up the seat position adjusting
lever; the seat may suddenly move,
causing the driver to lose control of
the vehicle.
� While adjusting the seat, do not put
your hands under the seat or near
the moving parts. You may catch
and injure your hands or fingers.
ProCarManuals.com
Page 26 of 218

22
1. SEAT POSITION ADJUSTING LE-
VER
Pull the lever up. Then slide the seat to
the desired position with slight body
pressure and release the lever.
2. SEATBACK ANGLE ADJUSTING
LEVER
Lean forward and pull the lever up.
Then lean back to the desired angle
and release the lever.
CAUTION!
To reduce the risk of sliding under
the lap belt during a collision, avoid
reclining the seatback any more than
needed. The seat belts provide maxi-
mum protection in a frontal or rear
collision when the driver and the
passenger are sitting up straight and
well back in the seats. If you are re-
clined, the lap belt may slide past
your hips and apply restraint forces
directly to the abdomen. Therefore,
in the event of a frontal collision, the
risk of personal injury may increase
with increasing recline of the seat-
back.
3. DRIVER'S SEAT CUSHION ANGLE
ADJUSTING KNOB
Turn the knob either way.
For easy access to the rear seat, do
this.
1. Lift the seatback angle adjusting lever
or press the pedal behind the seatback.
The seat will slide forward slightly.
2. Move the seat to the front-most posi-
tion.
After passengers are in, lift up the seat-
back and return the seat until it locks.
ÐAdjusting front seats ÐMoving passenger's seat
for rear seat entry
ProCarManuals.com
Page 27 of 218
23
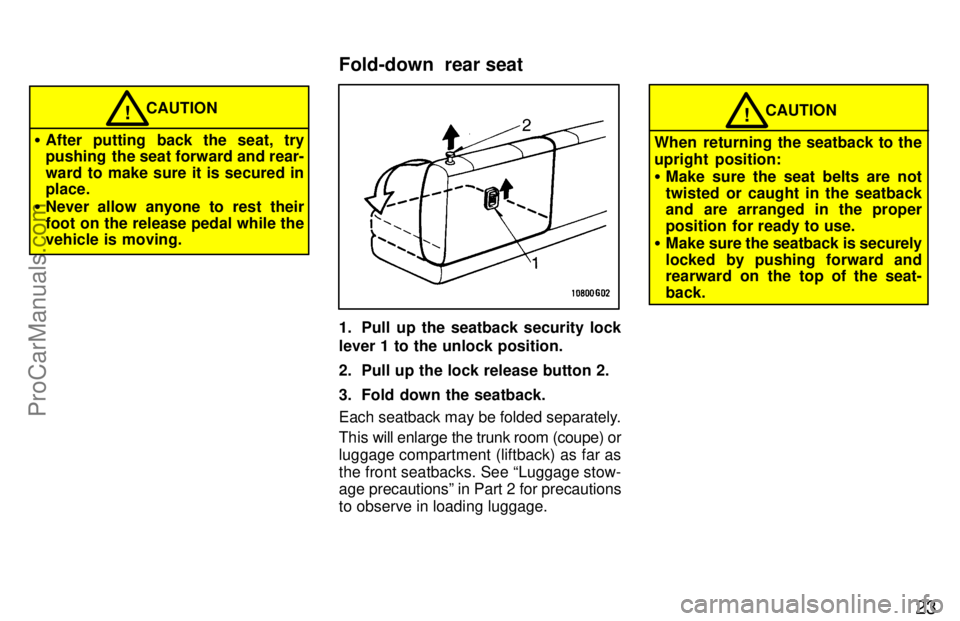
CAUTION!
�After putting back the seat, try
pushing the seat forward and rear-
ward to make sure it is secured in
place.
� Never allow anyone to rest their
foot on the release pedal while the
vehicle is moving.
1. Pull up the seatback security lock
lever 1 to the unlock position.
2. Pull up the lock release button 2.
3. Fold down the seatback.
Each seatback may be folded separately.
This w ill enlarge the trunk room (coupe) or
luggage compartment (liftback) as far as
the front seatbacks. See Luggage stow-
age precautionsº in Part 2 for precautions
to observe in loading luggage.
CAUTION!
When returning the seatback to the
upright position:
� Make sure the seat belts are not
twisted or caught in the seatback
and are arranged in the proper
position for ready to use.
� Make sure the seatback is securely
locked by pushing forward and
rearward on the top of the seat-
back.
Fold-down rear seat
ProCarManuals.com
Page 28 of 218

24
For your safety, adjust the head re-
straint before driving.
To raise: Pull it up.
To lower: Push it down while pressing the
lock release button.
On some models, you can also move the
head restraint forward or backward. If
such adjustment is desired, pull or push
the head restraint.
The head restraining is most effective
when it is close to your head. Therefore,
using a cushion on the seatback is not rec-
ommended.
CAUTION!
� Adjust the top of the head restraint
so that it is closest to the top of
your ears.
� After adjusting the head restraint,
make sure it is locked in position.
� Do not drive with the restraints re-
moved. Toyota strongly urges that the driver and
passengers in the vehicle be properly re-
strained at all times with the seat belts
provided. Failure to do so could increase
the chance of injury and/or the severity of
injury in accidents.
Child.
Use a child restraint system ap-
propriate for the child until the child be-
comes large enough to properly wear the
vehicle's seat belts. See Child restraintº
for details.
If a child is too large for a child restraint
system, the child should sit in the rear seat
and must be restrained using the vehicle's
seat belt. According to accident statistics,
the child is safer when properly restrained
in the rear seat than in the front seat.
If a child must sit in the front seat, the seat
belts should be worn properly. If an acci-
dent occurs and the seat belts are not
worn properly, the force of the rapid infla-
tion of the airbag may cause serious injury
to the child.
Do not allow the child to stand up or kneel
on either rear or front seats. An unre-
strained child could suffer serious injury
during emergency braking or a collision.
Also, do not let the child sit on your lap. It
does not provide sufficient restraint.
Head restraints Seat beltsÐ
ÐSeat belt precautions
ProCarManuals.com

 Push down the
security lock levers to lock the r")