Page 13 of 215
9
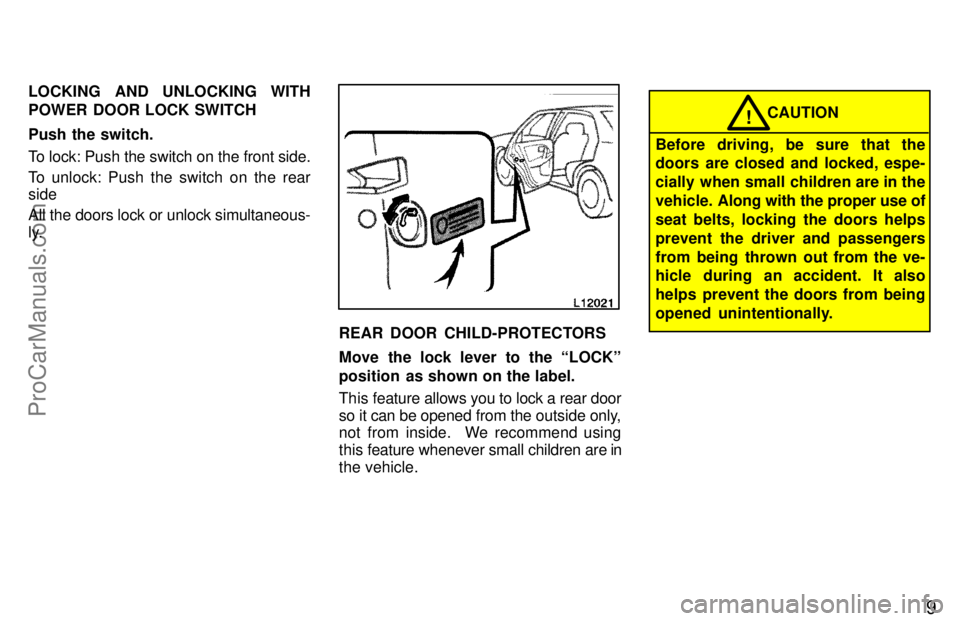
LOCKING AND UNLOCKING WITH
POWER DOOR LOCK SWITCH
Push the switch.
To lock: Push the switch on the front side.
To unlock: Push the switch on the rear
side
All the doors lock or unlock simultaneous-
ly.
REAR DOOR CHILD-PROTECTORS
Move the lock lever to the LOCKº
position as shown on the label.
This feature allows you to lock a rear door
so it can be opened from the outside only,
not from inside. We recommend using
this feature whenever small children are in
the vehicle.
CAUTION!
Before driving, be sure that the
doors are closed and locked, espe-
cially when small children are in the
vehicle. Along with the proper use of
seat belts, locking the doors helps
prevent the driver and passengers
from being thrown out from the ve-
hicle during an accident. It also
helps prevent the doors from being
opened unintentionally.
ProCarManuals.com
Page 17 of 215

13
OPERATING THE PASSENGERS' WIN-
DOWS
Use the switch on each passengers'
door or the switches on the dirver's
door that control each passengers'
window.
The windows move as long as you hold
the switch.
To open: Push down the switch.
To close: Pull up the switch.
If you push in the window lock button on
the driver's door, the passenger's win-
dows cannot be operated.
CAUTION!
To avoid serious personal injury, you
must do the following.
�Always make sure the head, hands
and other parts of the body of all oc-
cupants are kept completely inside
the vehicle before you close the
power windows. If someone's
neck, head or hands gets caught in
a closing window, it could result in
a serious injury. When anyone
closes the power windows, be sure
that they operate the windows safe-
ly.
�When small children are in the ve-
hicle, never let them use the power
window switches without supervi-
sion. Use the WINDOW LOCKº
button to prevent them from mak-
ing unexpected use of the
switches.
�Never leave small children alone in
the vehicle, especially with the igni-
tion key still inserted. They could
use the power window switches
and get trapped in a window. Unat-
tended children can become in-
volved in serious accidents.
ProCarManuals.com
Page 19 of 215

15
This system deactivates the lock re-
lease lever so that things locked in the
trunk can be protected.
1. Push down the security lock levers
to lock the rear seatbacks.
On vehicles with built-in child restraing,
only the left seatback has a lock lever and
can be lowered. The right seatback can-
not be folded down.
After locking the rear seatbacks, try fold-
ing them down to make sure they are se-
curely locked, otherwise someone could
get into the trunk by folding down a rear
seat.2. After closing the trunk lid, insert
the master key and turn it counter-
clockwise to deactivate the lock re-
lease lever.
After closing the trunk lid, try pulling it up
to make sure it is securely locked.To open the hood, do the following.
1. Pull the hood lock release lever.
The hood will spring up slightly.
Before driving, be sure that the hood
is securely locked. Otherwise, the
hood may open unexpectedly while
driving and an accident may occur.
CAUTION! ÐLuggage security system Hood
ProCarManuals.com
Page 26 of 215

Part 1SeatsFront seatsÐ
ÐSeat adjustment precautions
23
OPERATION OF
INSTRUMENTS AND
CONTROLSÐ
Chapter 1-3
Seats, Seat belts, Steering
wheel and Mirrors
�Seats
�Front seats
�Fold-down rear seat
�Head restraints
�Seat belts
�SRS airbags
�Child restraint
�Tilt steering wheel
�Outside rear view mirrors
�Anti-glare inside rear view
mirror
�Sun visors
While the vehicle is being driven, all ve-
hicle occupants should have the seatback
upright, sit well back in the seat and prop-
erly wear the seat belt provided.
CAUTION!
�Do not drive with the occupants not
properly seated such as sitting on
top of a folded-down seatback, or
in the luggage compartment. Per-
sons not properly seated and not
properly restrained by seat belts
can be severely injured in the event
of emergency braking or a colli-
sion.
�During driving, do not allow pas-
sengers to stand up or move
around between seats. Severe inju-
ries can occur in the event of emer-
gency braking or a collision.Adjust the driver's seat so that the foot
pedals, steering wheel and instrument
panel controls are within easy reach of the
driver.
CAUTION!
�Adjustments should not be made
while the vehicle is moving, as the
seat may unexpectedly move and
cause the driver to lose control of
the vehicle.
�When adjusting the seat, be careful
not to hit the seat against a passen-
ger or luggage.
�After adjusting the seat position,
try sliding it forward and backward
to make sure it is locked in posi-
tion.
�After adjusting the seatback, exert
body pressure to make sure it is
locked in position.
�Do not put objects under the seats
as they may interfere with the seat-
lock mechanism or unexpectedly
push up the seat position adjusting
lever; the seat may suddenly move,
causing the driver to lose control of
the vehicle.
ProCarManuals.com
Page 29 of 215

26
CAUTION!
To reduce the risk of sliding under
the lap belt during a collision, avoid
reclining the seatback any more than
needed. The seat belts provide maxi-
mum protection when the driver and
the passenger are sitting up straight
and well back in the seats. If you are
reclined, the lap belt may slide past
your hips and apply restraint forces
directly to the abdomen. Therefore,
in the event of a formal collision, the
risk of personal injury may increase
with increasing recline of the seat-
back.
3. SEAT LUMBAR SUPPORT AD-
JUSTING LEVER
Pull the lever upward or downward
1. Pull up the seatback security lock
lever 1 to the unlock position.
2. Pull up the lock release button 2.
3. Fold down the seatback.
Each seatback may be folded separately.
On vehicles with built-in child restraint,
only the left seatback can be folded down.This will enlarge the trunck room as far as
the seatbacks. See Luggage stowage
precautionsº in Part 2 for precautions to
observe in loading luggage.
NOTICE
Make sure the luggage loaded in the
enlarged trunk room will not
damage the webbing of the rear
center seat belt when the left
seatback is folded down.
Fold-down rear seat
ProCarManuals.com
Page 32 of 215

29
�Keep the belts clean and dry. If they
need cleaning, use a mild soap
solution or lukewarm water. Never
use bleach, dye, or abrasive clean-
ersÐthey may severely weaken the
belts.
�Replace the belt assembly (includ-
ing bolts) if it has been used in a se-
vere impact. The entire assembly
should be replaced even if damage
is not obvious.
Adjust the seat as needed (front seats
only) and sit up straight and well back
int eh seat. To fasten your belt, pull it
out tf the retractor and insert the tab
into the buckle.
You will hear a click when the tab locks
into the buckle.
The seat belt length automatically adjusts
to you size and the seat position.
The retractor will lock the belt during a
sudden stop or on impact. It aslo may lock
if you lean forward too quickly. A slow,
easy motion will allow the belt to extend,
and you can move around freely.If the seat belt cannot be pulled out of the
retractor, firmly pull the belt and release it.
You will then be able to smoothly pull the
belt out of the retractor.
When a passenger's shoulder belt is com-
pletely extended and is then retracted
even slightly, the belt is locked in that posi-
tion and cannot be extended. This feature
is used to hold the child restraint system
securely. (For details, see Child restraintº
in this chapter.) To free the belt again, fully
retract the belt and then pull the belt out
once more.CAUTION!
�After inserting the tab, make sure
the tab and buckle are locked and
that the belt is not twisted.
�Do not insert coins, clips, etc. in
the buckle as this may prevent you
from properly latching the tab and
buckle.
�If the seat belt does not function
normally, immediately contact
your Toyota dealer.
ÐFront and rear seat belts
ProCarManuals.com
Page 44 of 215

40 When not using the child restraint system,
keep it secured with the seat belt. This will
prevent it injuring passengers in the event
of a sudden stop or accident.
Your vehicle has anchors for securing the
top strap of a child restraint system. The
anchor nuts are welded beneath the sheet
metal to permit installation of an anchor
bracket for a child restraint system.
To install an anchor braket, use an 8 mm
X 30 mm X 1.25 mm coarse thread metric
bolt and 15mm (0.6 in.) spacer. Note that
the bolts accompanying many child re-
straint systems are not metric. You can
damage the anchor nuts on our vehicle if
you force bolts with different thread into
the anchor nuts.
For instructions about how to install the
anchor bracket, see Top strap anchors
and locations.ºIf your child restraint system does not pro-
vide any of the necessary parts, you can
purchase the following items from your
Toyota dealer.
* CRS installation kit
(Part No. 04731-22012)Ðcontains 1
bolt, 3 types of spacers and 1 locking
clip.
* Bolt (Part No. 91511-60830)ProCarManuals.com
Page 45 of 215
41
The built-in child restraint system mainly
consists of a child seat integrated in the
rear seat and 5-point seat belts. Refer to
the illustration to become familiar with the
parts of the system. This child restraint
system conforms to U.S. Motor Vehicle
Safety Standard No. 213 and Canada Mo-
tor Vehicle Safety Standard No. 213.4.
1. Shoulder belts
2. Head restraint lock release button
3. Storage bag (for the head restraint and
upper pad)
4. Head restraint and upper pad (for the
rear seat)
5. Maximum shoulder height indicator la-
bel
6. Removable pad
7. Seat belt buckle
8. Seat blet release strap (black)
9. Seat blet adjustment strap (gray)
10. Child seat cushion
11. Seat belt buckle release button
12. Seat belt tabs
13. Owner 's manual supplement
14. Shoulder belt, clip
ÐBuilt-in child restraint
ProCarManuals.com