1997 PONTIAC PONTIAC reset
[x] Cancel search: resetPage 171 of 419
Finding a Station 3. Press any two adjoining pushbuttons at the same
time, within five seconds. Whenever you press the
same buttons, the station you set will return.
AM-FM: Press this button to switch between AM and
FM. The display
shows your selection.
TUNE: Turn the lower knob to choose radio stations. 4. Repeat the steps for each pair of pushbutton.
SEEK: Press the up or down arrow to go to the next Setting the Tone
higher or lower station and stay there.
PUSHBUTTONS: The four numbered pushbuttons let decrease bass.
you return
to your favorite stations. You can set up to
14 stations (seven AM and seven FM). Just:
1. Press AM-FM to select the band. want to decrease
the treble.
BASS: Slide the lever up or down to increase or
TREB: Slide the lever up or down to increase or
decrease treble. If a station is weak or noisy, you may
2. Tune in the desired station.
3. Press SET. (SET will appear on the display.)
4. Press one of the four numbered pushbuttons, within
five seconds. Whenever you press that numbered
pushbutton, the station
you set will return.
5. Repeat the steps for each pushbutton.
In addition to the four stations already set, up to three
more stations may be preset on each band by pressing
two adjoining buttons at the same time. Just:
1. Tune in the desired station.
2. Press SET. (SET will appear on the display.)
Adjusting the Speakers
BALANCE: Turn the control behind the upper knob to
move the sound to the left or right speakers. The middle
position balances the sound between the speakers.
FADE: Turn the control behind the lower knob to move
the sound to the front or rear speakers. The middle
position balances the sound between the speakers.
3-11
ProCarManuals.com
Page 175 of 419

CLN: If this message appears on the display, the
cassette tape player needs to be cleaned. It will still play
tapes, but you should clean it as soon as possible to
prevent damage to the tapes and player. See “Care
of
Your Cassette Tape Player” in the Index. After you clean
the player, press and hold EJECT for five seconds to
reset the CLN indicator. The radio will display
--- to
show the indicator was reset.
CD Adapter Kits
It is possible to use a CD adapter kit with your cassette
tape player after activating the bypass feature on your
tape player.
AM-FM Stereo with Cassette Tape Player
and Equalizer
(If Equipped)
To activate the bypass feature, the ignition must be on.
Turn your radio off. Press TAPELPLAY and hold for
three seconds. After three seconds, the tape symbol in
the display will flash for two seconds indicating the
feature is active. Turn the radio on and insert
the adapter.
This override feature will remain active until EJECT
is pressed.
Playing the Radio
VOL: Push this knob to turn the system on and off. To
increase volume, turn
the knob clockwise. Turn it
counterclockwise to decrease volume.
RECALL: Display the time with the ignition off by
pressing this knob. When the radio is playing, press this
knob to recall the station frequency.
3-15
ProCarManuals.com
Page 178 of 419
REV (5): Press this button to reverse the tape rapidly.
Press it again to return to playing speed.
The radio will
play the last-selected station while the tape reverses.
You may select stations during REV operation by using
SEEK or TUNE.
FWD (6): Press this button to advance quickly to
another part of the tape. Press the button again to return
to playing speed. The radio will play the last-selected
station while the tape advances. You may select stations
during
FWD operation by using SEEM or TUNE.
AMmFM: Press this button to play tne radio when a tape
is in the player.
TAPERLAPI’: Press this button to change to the tape
function when the radio is
on. The tape symbol with an
mow will appear on the display when the tape is active.
To return to playing the radio, press the AM-FM button.
EJECT: Press this button to remove the tape. The radio
will play.
EJECT may be activated with either the
ignition
or radio off. Cassettes may be loaded with the
radio off if this button is pressed first.
CLN: If this message appears on the display, the
cassette tape player needs to be cleaned. It will still play
tapes, but you should clean it
as soon as possible to
prevent damage to the tapes and player. See “Care of
Your Cassette Tape Player” in the Index. After you clean
the player, press and hold
EJECT for five seconds to
reset the
CLN indicator. The radio will display --- to
show the indicator was reset.
CD Adapter Kits
It is possible to use a CD adapter kit with your cassette
tape player after activating the bypass feature on your
tape player.
To activate the bypass feature, the ignition must be on,
Turn
your radio off. Press TAPEFLAY and hold for
three seconds. After three seconds, the tape symbol in
the display will flash for two seconds indicating
the
feature is active. Turn the radio on and insert
the adapter.
This override feature will remain active until
EJECT
is pressed.
3-18
ProCarManuals.com
Page 189 of 419
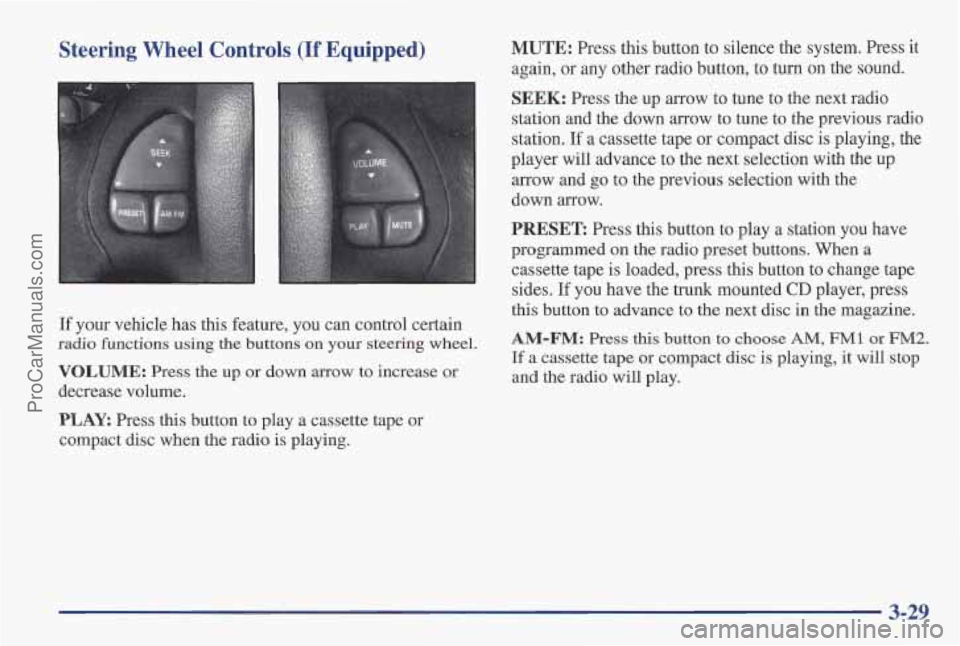
Steering Wheel Controls (If Equipped) MUTE: Press this button to silence the system. Press it
again, or any other radio button, to turn on the sound.
If your vehicle has this feature, you can control certain
radio functions using the buttons on your steering wheel.
VOLUME: Press the up or down arrow to increase or
decrease volume.
PLAY. Press this button to play a cassette tape or
compact disc when the radio is playing.
SEEK: Press the up arrow to tune to the next radio
station and the down arrow to tune to
the previous radio
station.
If a cassette tape or compact disc is playing, the
player will advance to the next selection with the
up
arrow and go to the previous selection with the
down arrow.
PRESET Press this button to play a station you have
programmed
on the radio preset buttons. When a
cassette tape is loaded, press this button to change tape
sides.
If you have the trunk mounted CD player, press
this button to advance to the next disc in the magazine.
AM-FM: Press this button to choose AM, FM1 or FM2.
If a cassette tape or compact disc is playing, it will stop
and the radio will play.
3-29
ProCarManuals.com
Page 191 of 419
Care of Your Cassette Tape Player
A tape player that is not cleaned regularly can cause
reduced sound quality, ruined cassettes or a damaged
mechanism. Cassette tapes should be stored in their
cases away from contaminants, direct sunlight and
extreme heat.
If they aren’t, they may not operate
properly or may cause failure of the tape player.
Your tape player should be cleaned regularly after every
50 hours of use. Your radio may display CLN to indicate
that you have used your tape player for
50 hours without
resetting the tape clean timer.
If this message appears
on the display, your cassette tape player needs to be
cleaned. It will still play tapes, but you should clean it
as
soon as possible to prevent damage to your tapes and
player.
If you notice a reduction in sound quality, try a
known good cassette to see
if it is the tape or the tape
player at fault.
If this other cassette has no improvement
in sound quality, clean the tape player. Cleaning
may be done with a scrubbing action,
non-abrasive cleaning cassette with pads which scrub
the tape head as the hubs
of the cleaner cassette turn. It
is normal for
the cassette to eject while cleaning. Insert
the cassette at least three times
to ensure thorough
cleaning. A scrubbing action cleaning cassette
is
available through your Pontiac dealership.
You may also choose a non-scrubbing action, wet-type
cleaner which uses a cassette with a fabric belt to clean
the tape head. This type of cleaning cassette will not
eject. It may not clean as thoroughly as the scrubbing
type cleaner.
After you clean the player, press and hold
EJECT for
five seconds to reset the
CLN indicator. The radio will
display
--- to show the indicator was reset.
Cassettes are subject to wear and the sound quality may
degrade over time. Always make sure the cassette tape
is in good condition before you have your tape
player serviced.
3-31
ProCarManuals.com
Page 299 of 419
Turning the radiator pressure cap when the
engine and radiator
are hot can allow steam
and scalding liquids to blow out and burn
you
badly. With the coolant recovery tank, you will
almost never have to add coolant at the radiator.
Never turn the radiator pressure cap
-- even a
little -- when the engine and radiator are hot.
Add coolant mix at the recovery tank, but be careful not
to spill it.
You can be burned if you spill coolant on hot
engine parts. Coolant contains ethylene glycol,
and it will burn
if the engine parts are hot
enough. Don't spill coolant on a hot engine.
I I
Radiator Pressure Cap
NOTICE:
Your radiator cap is a 15 psi (105 kPa)
pressure-type cap and must be tightly installed to
prevent coolant loss and possible engine damage
from overheating. Be sure the
arrows on the cap
line up with the overflow tube
on the radiator
filler neck.
When you replace your radiator pressure cap, an AC'
cap is recommended.
Thermostat
Engine coolant temperature is controlled by a thermostat
in
the engine coolant system. The thermostat stops the
flow of coolant through the radiator until the coolant
reaches a preset temperature.
When
you replace your thermostat, an AC@thermostat is
recommended.
6-29
ProCarManuals.com
Page 320 of 419
g New Tires
To find out what kind and size of tires you need, look at
the Tire-Loading Information label.
The tires installed on your vehicle when it was new had
a Tire Performance Criteria Specification (TPC Spec)
number on each tire’s sidewall. When
you get new tires,
get ones with that sarne TPC Spec number. That way
your vehicle will continue to have tires that are designed
to give proper endurance, handling, speed rating,
traction, ride and other things during normal service
on
your vehicle. If your tires have an all-season tread
design, the TPC number will be followed by an “MS”
(for mud and snow).
If you ever replace your tires with those not having a
TPC Spec number, make sure they are the same size,
load range, speed rating and construction type (bias,
bias-belted or radial) as your original tires. Reset Tire
Inflation Monitor
(TIM).
I
Mixing tires could cause you to lose control while
driving.
If you mix tires of different sizes or types
(radial and bias-belted
tires), the vehicle may not
handle properly, and you could have
a crash.
Using tires of different sizes may also cause
damage to your vehicle.
Be sure to use the same
size and type tires
on all wheels.
It’s all right to drive with your compact spare,
though. It was developed for use on your vehicle.
6-50
ProCarManuals.com
Page 322 of 419
Temperature -- A, B, C Wheel Alignment and Tire Balance
The temperature grades are A (the highest), B, and C,
representing the tire’s resistance to the generation of
heat and its ability to dissipate heat when tested under
controlled conditions
on a specified indoor laboratory
test wheel. Sustained high temperature can cause the
material
of the tire to degenerate and reduce tire life,
and excessive temperature can lead to sudden tire
failure. The grade
C corresponds to a level of
Performance which all passenger car tires must meet
under the Federal Motor Vehicle Safety Standard
No. 109. Grades B and A represent higher levels of
performance on the laboratory test wheel than the
minimum required
by law.
Warning: The temperature grade for this tire is
established for a tire that
is properly inflated and not
overloaded. Excessive speed, underinflation, or
excessive loading, either separately or in combination,
can cause heat buildup and possible tire failure. The wheels
on your vehicle were aligned and balanced
carefully at the factory to give you the longest
tire life
and best overall performance.
Scheduled wheel alignment and wheel balancing
are not
needed. However,
if you notice unusual tire wear or
your vehicle pulling
one way or the other, the alignment
may need to be reset.
If you notice your vehicle
vibrating when driving on
a smooth road, your wheels
may need to be rebalanced.
Wheel Replacement
Replace any wheel that is bent, cracked, or badly rusted
or corroded. If wheel nuts keep corning loose, the wheel,
wheel bolts and wheel nuts should
be replaced. If the
wheel leaks air, replace it (except some aluminum
wheels, which can sometimes be repaired). See your
Pontiac dealer if any of these conditions exist.
Your dealer will know
the kind of wheel you need.
Each new wheel should have the same load-carrying
capacity, diameter, width, offset and be mounted the
same way as the one it rep1,aces.
6-52
ProCarManuals.com