Page 6 of 194
ContentsInstruments and controls
Pre-driving checks and adjustments
Heater, air conditioner and audio system
Starting and driving
In case of emergency
Appearance and interior care
Do-it-yourself operations
Maintenance schedule
Technical and consumer information
Index
1
2
3
4
5
6
7
8
9
10
Page 8 of 194

1Instruments and controls
Meters and gauges ................................................1-2
Speedometer and odometer ..................................1-3
Tachometer (if so equipped) ..................................1-3
Engine coolant temperature gauge........................1-3
Fuel gauge .............................................................1-4
Warning/indicator lights and chimes ......................1-5
Theft warning (if so equipped) ...............................1-9
Windshield wiper and washer switch ...................1-10
Rear window defogger switch ..............................1-11
Headlight and turn signal switch ..........................1-12
Daytime running light system (for Canada) .........1-12Instrument brightness control ...............................1-13
Front fog light switch (if so equipped)..................1-13
Hazard warning flasher switch .............................1-14
Cigarette lighter (accessory) and ashtray ............1-14
Cup holder ............................................................1-15
Manual windows ...................................................1-16
Power windows (if so equipped) ..........................1-16
Sunroof (if so equipped).......................................1-18
Interior light...........................................................1-18
Trunk light (if so equipped) ..................................1-19
ZX
Page 17 of 194

The theft warning system provides visual
and audio alarm signals if parts of the
vehicle are disturbed.
How to activate the theft warning
system
1. Close all windows.
2. Remove the key from the ignition switch.
3. Close all doors, hood and trunk lid. Lock
all doors by pressing the
buttonon the
multi-remote controller.At this time,
the turn signal lights blink twice, indicat-
ing all doors are locked.The system can be activated even if the
windows are open.
4. Confirm that the SECURITY indicator
light in the instrument cluster illuminates.
The SECURITY light stays on for about
30 seconds and then begins to flash
once every three seconds. The system is
now activated.
c
If the key is turned slowly when lock-
ing the door, the system may not acti-
vate. Furthermore, if the key is turned
excessively to the unlock position, the
system may be deactivated when the
key is removed. If the indicator light
fails to glow for 30 seconds, unlock
the door once and lock it again.
cEven when the driver and/or passen-
gers are in the vehicle, the system will
activate with all doors, hood, trunk lid
and back door locked and ignition key
off. Turn the ignition key to ACC or ON
to turn the system off.
The theft warning system is NOT activated if
one of the following occurs:
cThe door is unlocked or the ignition key is
turned to the ACC or ON position duringthe 30 seconds in which the SECURITY
light stays on.
cThe SECURITY light blinks at a steady
1/2 second on - 1/2 second off rate
because a door, the trunk, or the hood is
open and the key is not in the ACC or ON
position. When the ignition key is turned
to the ACC or ON position, the SECU-
RITY light turns off.
Theft warning system operation
The theft warning system emits the follow-
ing alarm:
cThe headlights blink and the horn sounds
intermittently. In addition, the starter mo-
tor does not operate.
cThe alarm automatically turns off after 2
to 3 minutes. However, the alarm reacti-
vates if the vehicle is tampered with
again. The alarm can be shut off by
unlocking a door or trunk lid with the key
or by pressing the
buttonon the
multi-remote controller.
The alarm is activated by:
copening the door or trunk lid without
using the key (even if the door is un-
IC0005
THEFT WARNING
(if so equipped)
1-9
ZX
Page 20 of 194

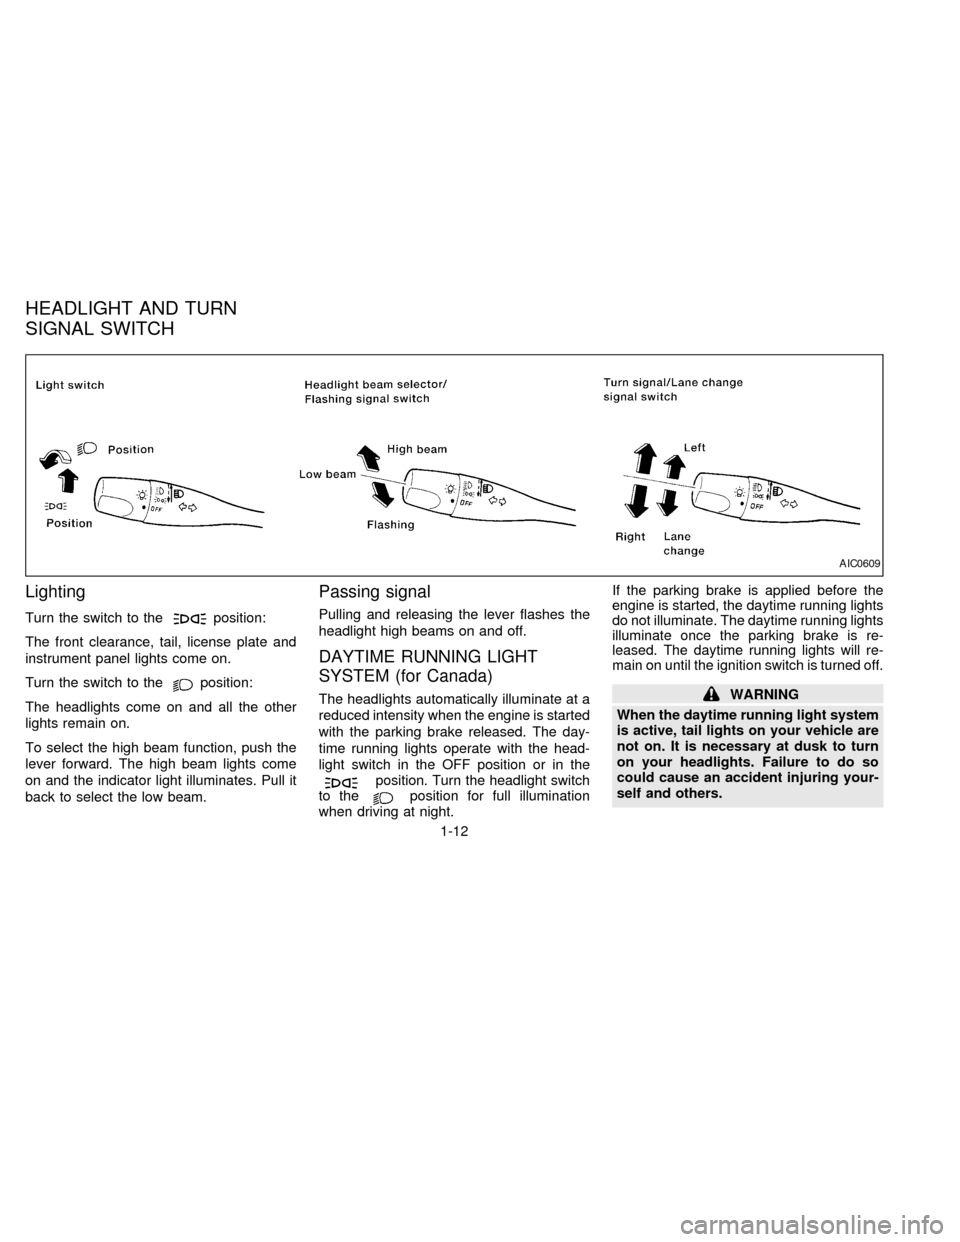
Lighting
Turn the switch to theposition:
The front clearance, tail, license plate and
instrument panel lights come on.
Turn the switch to the
position:
The headlights come on and all the other
lights remain on.
To select the high beam function, push the
lever forward. The high beam lights come
on and the indicator light illuminates. Pull it
back to select the low beam.
Passing signal
Pulling and releasing the lever flashes the
headlight high beams on and off.
DAYTIME RUNNING LIGHT
SYSTEM (for Canada)
The headlights automatically illuminate at a
reduced intensity when the engine is started
with the parking brake released. The day-
time running lights operate with the head-
light switch in the OFF position or in the
position. Turn the headlight switch
to theposition for full illumination
when driving at night.If the parking brake is applied before the
engine is started, the daytime running lights
do not illuminate. The daytime running lights
illuminate once the parking brake is re-
leased. The daytime running lights will re-
main on until the ignition switch is turned off.
WARNING
When the daytime running light system
is active, tail lights on your vehicle are
not on. It is necessary at dusk to turn
on your headlights. Failure to do so
could cause an accident injuring your-
self and others.
AIC0609
HEADLIGHT AND TURN
SIGNAL SWITCH
1-12
ZX
Page 21 of 194
Turn signal
Move the lever up or down to signal the
turning direction. When the turn is com-
pleted, the turn signals cancel automati-
cally.
Lane change signal
To signal a lane change, move the lever up
or down to the point where the indicator light
begins to flash, but the lever does not latch.
The instrument brightness control operates
when the headlight switch is in the
orposition.
Turn the control to adjust the brightness of
instrument panel lights.To turn the front fog lights on, rotate the
switch to theposition.
To turn them off, turn the switch toward the
back of the vehicle to the OFF position.
The low-beam headlight function must be
on for the fog lights to operate. The fog
lights automatically turn off whenever the
high-beam headlight function is selected.
AIC0608AIC0618
INSTRUMENT BRIGHTNESS
CONTROLFRONT FOG LIGHT SWITCH
(if so equipped)
1-13
ZX
Page 35 of 194
1. Pull the hood lock release handles1
located below the instrument panel. The
hood springs up slightly.
2. Pull up on the lever
s2at the front of the
hood with your fingertips and raise the
hood.
3. Insert the support rod into the slot
marked with the arrow on the underside
of the hood.
4. When closing the hood, reset the support
rod to its original position, lower the hood
to approximately 12 inches above the
latch and release it. This allows proper
engagement of the hood latch.
WARNING
cMake sure the hood is completely
closed and latched before driving.
Failure to do so could cause the
hood to fly open and result in an
accident.
cIf you see steam or smoke coming
from the engine compartment, to
avoid injury do not open the hood.
SPA0004APD0618
HOOD RELEASE
2-7
ZX
Page 44 of 194

This Supplemental Restraint System sec-
tion contains important information concern-
ing the driver and passenger supplemental
air bags. The Supplemental Restraint Sys-
tem Air Bag can help reduce impact force to
the driver and to the front passenger in
certain frontal collisions. The supplemental
air bags are designed tosupplementthe
crash protection provided by the driver and
front passenger seat belts and arenot a
substitutefor them. The seat belts should
always be correctly worn and the driver and
front passenger seated a suitable distance
from the steering wheel and instrument
panel. (See ``Seat belts'' for instructions and
precautions on seat belt usage.)
NOTE:
For Canada, some vehicles are not equipped
with a Supplemental Air Bag System.
Your vehicle may not have a Driver and
Passenger-side Supplemental Air Bag.
If your vehicle is not equipped with a
Supplemental Air Bag System,it will not
havethe following equipment:
cSupplemental Air Bag Warning Light
(see ``Supplemental air bag warning
light'' later in this section).cDriver Supplemental Air Bag (see
``Meters and gauges'' in the ``Instru-
ments and controls'' section).
cPassenger-side Supplemental Air Bag
(see ``Meters and gauges'' in the ``Instru-
ments and controls'' section).
cSupplemental Restraint System Warn-
ing Labels (see ``Warning labels'' later in
this section).
Every person who drives or rides in this vehicle
should use a seat belt at all times. Children
should be in appropriate child restraints (see
``Seat belts'' and ``Child restraints for infants
and small children'' later in this section).
The supplemental air bags operate only
when the ignition switch is in the ON or
START position.
SUPPLEMENTAL RESTRAINT
SYSTEM (supplemental air bag
system) (if so equipped)
2-16
ZX
Page 45 of 194

WARNING
cThe supplemental air bags ordinarily
will not inflate in the event of a side
impact, rear impact, roll over, or
lower severity frontal collision. Al-
ways wear your seat belts to help
reduce the risk or severity of injury
in various kinds of accidents.
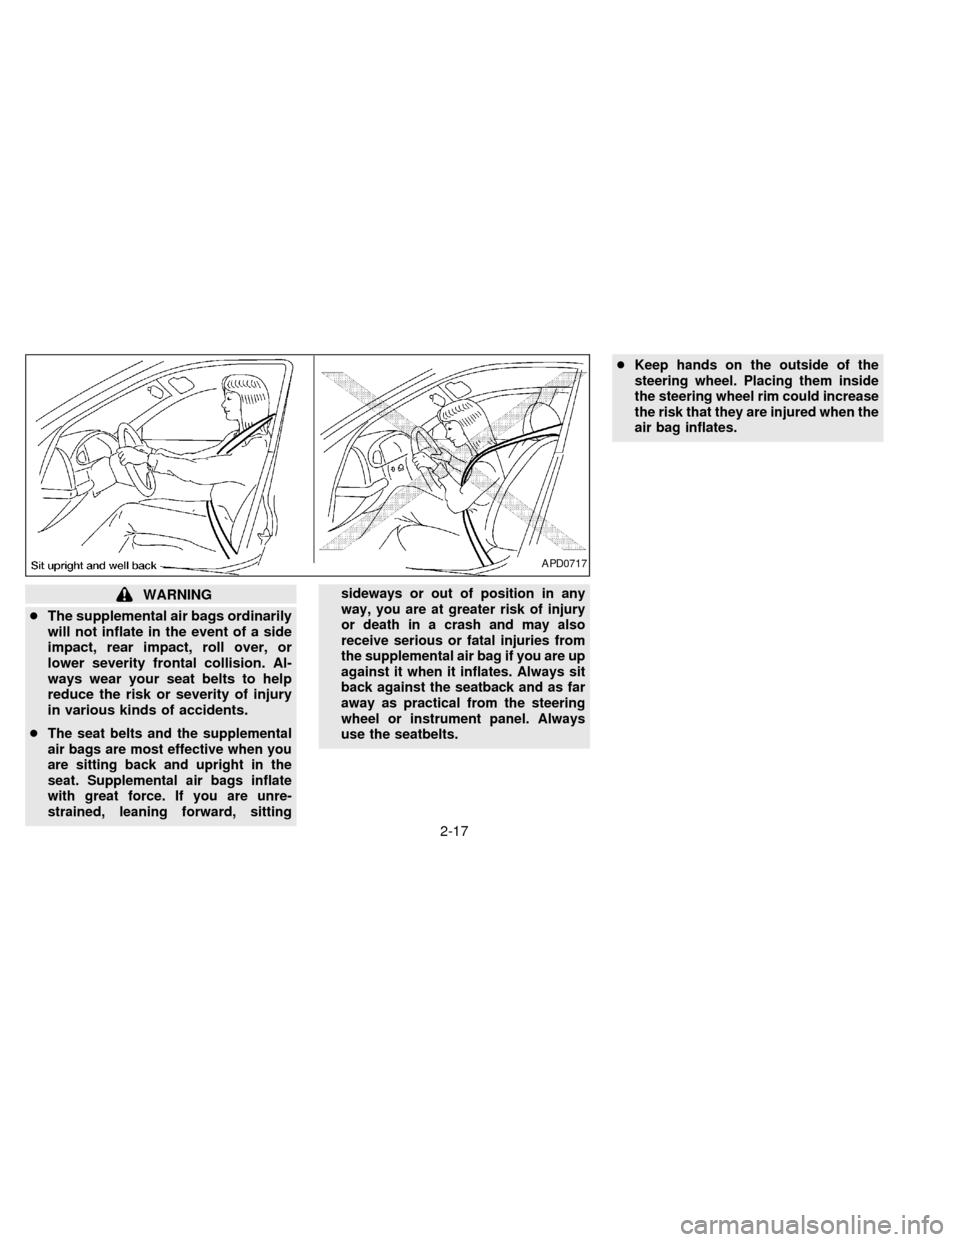
c
The seat belts and the supplemental
air bags are most effective when you
are sitting back and upright in the
seat. Supplemental air bags inflate
with great force. If you are unre-
strained, leaning forward, sittingsideways or out of position in any
way, you are at greater risk of injury
or death in a crash and may also
receive serious or fatal injuries from
the supplemental air bag if you are up
against it when it inflates. Always sit
back against the seatback and as far
away as practical from the steering
wheel or instrument panel. Always
use the seatbelts.cKeep hands on the outside of the
steering wheel. Placing them inside
the steering wheel rim could increase
the risk that they are injured when the
air bag inflates.
APD0717
2-17
ZX