1997 NISSAN QUEST audio
[x] Cancel search: audioPage 6 of 247

ContentsInstruments and controls
Pre-driving checks and adjustments
Heater, air conditioner and audio system
Starting and driving
In case of emergency
Appearance and interior care
Do-it-yourself operations
Maintenance schedule
Technical and consumer information
Index
1
2
3
4
5
6
7
8
9
10
Page 8 of 247

1Instruments and controls
Meters and gauges ................................................1-3
Speedometer and odometer ..................................1-4
Tachometer ............................................................1-4
Engine coolant temperature gauge........................1-4
Fuel gauge .............................................................1-5
Warning/indicator lights and chimes ......................1-6
Theft warning (if so equipped) .............................1-10
Windshield wiper and washer switch ...................1-11
Rear window wiper and washer switches ............1-12
Rear window defogger switch ..............................1-12
Headlight control switch .......................................1-13
Daytime running light system (for Canada) .........1-13
Autolamp switch (if so equipped) .........................1-13
Turn signal switch .............................................1-14
Cornering light ......................................................1-15
Instrument brightness control ...............................1-15
Hazard warning flasher switch .............................1-15Cigarette lighter (accessory) and ashtray ............1-16
Rear power point ..................................................1-17
Coin tray ...............................................................1-17
Compact disc and audio cassette storage
compartment.........................................................1-18
Cup holder ............................................................1-18
Power window ......................................................1-19
Automatic power window switch ..........................1-20
Sunroof (if so equipped).......................................1-21
Manual rear windows ...........................................1-22
Power rear windows (if so equipped) ..................1-22
Clock.....................................................................1-23
Interior lights .........................................................1-24
Luggage compartment lights ................................1-24
Personal reading light ..........................................1-24
Spotlights ..............................................................1-25
ZX
Page 17 of 247

The theft warning system provides audio
and visual alarm signals if parts of the
vehicle are disturbed.
How to activate the theft warning
system
1. Close all windows.
2. Remove the key from the ignition switch.
3. Close all doors and the hood. Lock all
doors by pressing the
button on the
multi-remote controller. At this time, the
parking lights blink and the horn chirps to
indicate all doors are locked.The system can be activated even if the
windows are open.
4. Confirm that the SECURITY indicator
light, located under the hazard warning
switch, illuminates.
cThe SECURITY light stays on for about
30 seconds and then begins to flash
once every three seconds. The system is
now activated.
The theft warning system is NOT activated if
one of the following occurs:
cA door is unlocked or opened, the hood is
opened, or the ignition key is turned to
the ACC or ON position during the 30
seconds in which the SECURITY light
stays on.
cThe SECURITY light blinks at a steady
1/2 second on - 1/2 second off rate
because a door or the hood is open and
the key is not in the ACC or ON position.
When the ignition key is turned to the
ACC or ON position, the SECURITY light
turns off.
Theft warning system operation
The theft warning system emits the follow-
ing alarm:
cThe headlights and tail lights flash and
the horn sounds intermittently. In addi-
tion, the starter motor does not operate.
cThe alarm automatically turns off after
two to three minutes. However, the alarm
reactivates if the vehicle is tampered with
again. The alarm can be shut off by
unlocking a door with the key or by
pressing the
button on the multi-
remote controller.
The alarm is activated when:
ca door is unlocked or opened without
using the key or the multi-remote control-
ler. This includes unlocking the doors
with the inside door lock switch.
cthe hood is opened.
cthe ignition is placed into the ACC, ON,
or START position without the key in the
ignition.IC0005
THEFT WARNING
(if so equipped)
1-10
ZX
Page 25 of 247

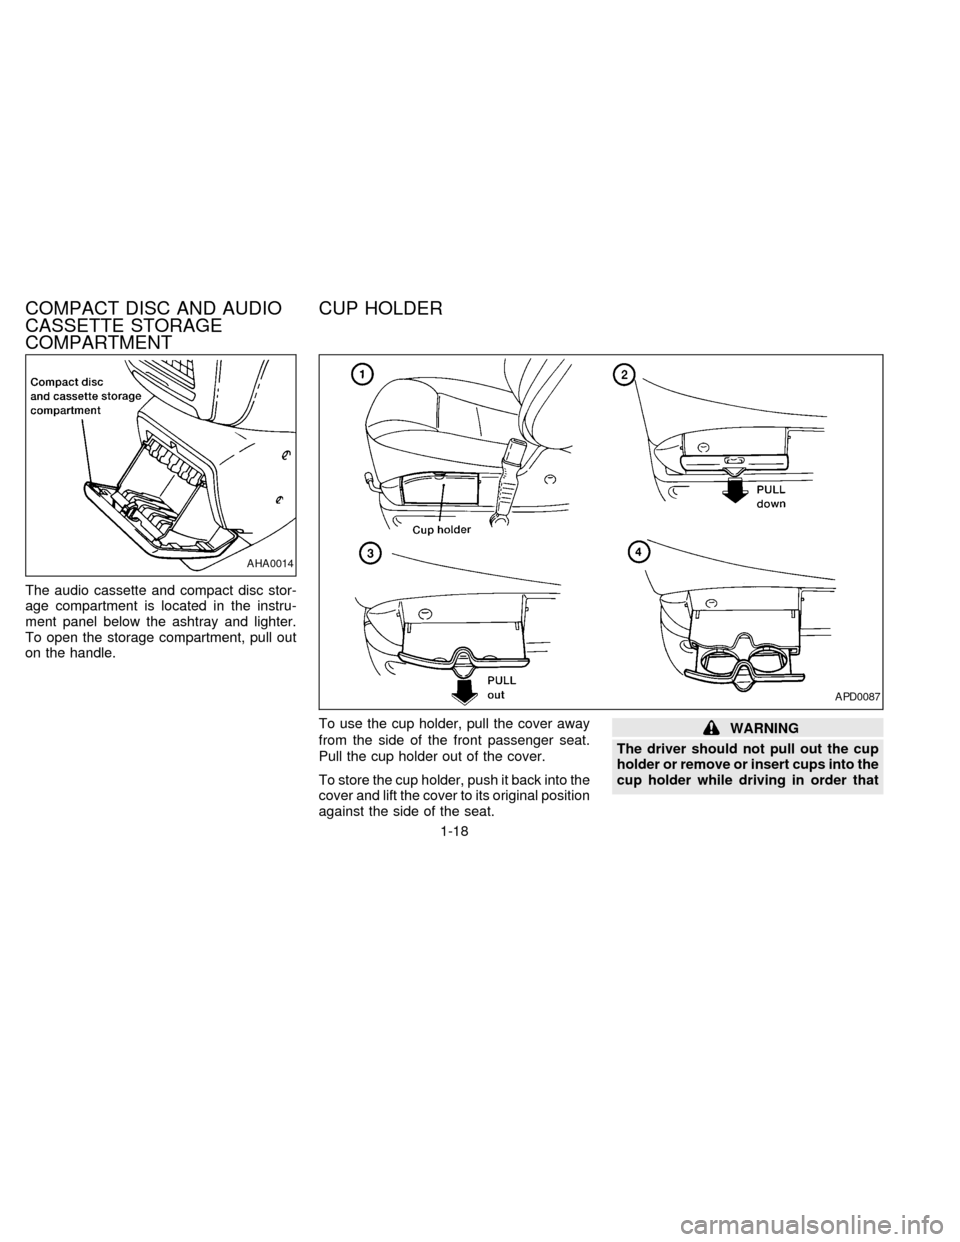
The audio cassette and compact disc stor-
age compartment is located in the instru-
ment panel below the ashtray and lighter.
To open the storage compartment, pull out
on the handle.
To use the cup holder, pull the cover away
from the side of the front passenger seat.
Pull the cup holder out of the cover.
To store the cup holder, push it back into the
cover and lift the cover to its original position
against the side of the seat.
WARNING
The driver should not pull out the cup
holder or remove or insert cups into the
cup holder while driving in order that
AHA0014
APD0087
COMPACT DISC AND AUDIO
CASSETTE STORAGE
COMPARTMENTCUP HOLDER
1-18
ZX
Page 114 of 247

3Heater, air conditioner and audio system
Ventilators ..............................................................3-2
Heater and air conditioner (manual) ......................3-3
Controls ..................................................................3-3
Heater operation ....................................................3-4
Air conditioner operation ........................................3-5
Air flow charts.........................................................3-7
Heater and air conditioner (automatic) (if so
equipped) .............................................................3-10
Automatic operation .............................................3-11
Air control buttons ................................................3-11
Air conditioner and air recirculation .....................3-12
English/metric mode .............................................3-12
Rear seat heater and air conditioner (if so
equipped) .............................................................3-13Controls ................................................................3-13
Audio system ........................................................3-14
AM-FM radio with cassette player .......................3-14
Tuning
..................................................................3-16
Adjusting tone quality ...........................................3-17
Cassette tape operations .....................................3-18
Antenna ................................................................3-20
Compact disc (CD) player (if so equipped) .........3-21
Steering wheel controls ........................................3-23
Rear audio controls ..............................................3-24
CB radio or car phone..........................................3-25
ZX
Page 127 of 247

Servicing air conditioning
The air conditioning system in your NISSAN
vehicle is charged with a refrigerant de-
signed with the environment in mind.
This refrigerant does not harm the
earth's ozone layer.
Special charging equipment and lubricant
are required when servicing your NISSAN
air conditioner. Using improper refrigerants
or lubricants causes severe damage to your
air conditioning system. See ``Air condition-
ing system refrigerant and lubricant recom-
mendations'' in the ``Technical and con-
sumer information'' section of this manual.
Your NISSAN dealer is able to service your
environmentally ``friendly'' air conditioning
system.To turn the radio on, turn the ignition key to
ACC or ON. If you listen to the radio with the
engine not running, turn the key to the ACC
position.
Radio reception is affected by station signal
strength, distance from radio transmitter,
buildings, bridges, mountains and other ex-
ternal influences. Intermittent changes in
reception quality normally are caused by
these external influences.
Clock
For information on setting the clock, refer to
the section ``Instruments and controls''.
AM-FM RADIO WITH CASSETTE
PLAYER
Radio operation
Push the VOL-PUSH ON knob to turn the
radio on. Push the VOL-PUSH ON knob
once more to turn the radio off.
Turn the knob to adjust the volume.
Inserting a cassette tape into the cassette
player while the radio is on turns the radio
off and turns the cassette player on.
AUDIO SYSTEM
3-14
ZX
Page 130 of 247

SEEK tuning
This feature on your radio allows you to
automatically select strong frequency sta-
tions up or down the frequency band. Press
SEEK
to select the next strong sta-
tion up the frequency band. Press SEEK
to select the next strong station down
the frequency band. To change frequencies
quickly, press and hold either side of the
SEEK button.
SCAN tuning
Push SCAN to enter the scan tuning mode.
The radio searches up the frequency band,
stopping and playing each strong frequency
station for five seconds. This continues until
the SCAN button is pushed a second time
or a different tuning function is selected.
The AM or FM1 or FM2 symbol in the
display window flashes while each station is
being played.
AM/FM
Press the AM/FM button to select the de-
sired band: AM, FM1, or FM2. The stereo
indicator shows in the display window dur-
ing FM stereo reception. When the stereo
broadcast signal is weak, the radio auto-matically changes from stereo to monaural
reception.
Station memory operations
Your radio comes equipped with six
memory buttons, which are used to preset
up to six AM stations and 12 FM stations.
NOTE: If the vehicle's battery is discon-
nected, the memory buttons need to be
reset.
To set the memory buttons:
1. Select the desired band (AM, FM1, or
FM2) by pressing the AM/FM button.
2. Tune to the desired frequency.
3. Press one of the memory buttons and
hold the button in. The sound mutes out
for about two seconds, then returns. That
station is now held in memory on that
button.
Repeat the three steps above for each
memory button you want to set.
The memory buttons also control the rear
audio controls. Push memory buttons 3 and
5 simultaneously to turn the rear audio
controls on. Push them again to turn the
rear audio controls off. A headphone sym-bol appears in the display window when the
rear controls are activated.
ADJUSTING TONE QUALITY
BASS
Bass control allows you to adjust the lower,
bass frequencies to your preference.
Push the BASS button either
or; BASS and the setting indicator bar
appear in the display window. Pressing the
BASS button either
orin-
creases or decreases the level of bass, as
indicated by the number of bar segments
showing in the display window.
Following bass adjustment, the display win-
dow shows the current setting for three
seconds, then returns to the display prior to
adjustment.
TREB
Treble control allows you to adjust the
higher, treble frequencies to your prefer-
ence.
Push the TREB button either
or; TREB and the setting indicator bar
appear in the display window. Pressing the
TREB button either
orin-
3-17
ZX
Page 131 of 247

creases or decreases the level of treble, as
indicated by the number of bar segments
showing in the display window.
Following treble adjustment, the display
window shows the current setting for three
seconds, then returns to the display prior to
adjustment.
BAL
Balance control allows you to adjust the
sound distribution between the right and left
speakers.
Push the BAL button either
or; BAL and the setting indicator bar
appear in the display window. Press the
BAL button
to shift the sound to the
right speakers. The single indicator bar
moves to the right of the display window.
Press the BAL button
to shift the
sound to the left speakers. The single indi-
cator bar moves to the left of the display
window. When the indicator bar is in the
center position the sound is equally distrib-
uted between the right and left speakers.
Following balance adjustment, the display
window shows the current setting for three
seconds, then returns to the display prior to
adjustment.
FADE
Fader control allows you to adjust sound
distribution between the front and rear
speakers.
Push the FADE button either
or; FADE and the setting indicator bar
appear in the display window. Press the
FADE button
to shift the sound to the
front speakers. The single indicator bar
moves to the right of the display window.
Press the FADE button
to shift the
sound to the rear speakers. The single
indicator bar moves to the left of the display
window. When the indicator bar is in the
center position the sound is equally distrib-
uted between the front and rear speakers.
Following fader adjustment, the display win-
dow shows the current setting for three
seconds, then returns to the display prior to
adjustment.
CASSETTE TAPE OPERATIONS
Turn the ignition key to ACC or ON, then
insert the cassette tape into the tape door
by lightly pushing it. Because of the power
loading feature, the cassette tape is auto-
matically pulled into the player and begins
to play.
CAUTION
Do not force the cassette tape into the
tape door. This could damage the
player.
When a cassette is inserted into the audio
system, the word TAPE and a cassette side
symbol (either 1 or 2) illuminate in the
display window.
A cassette tape can be loaded with the
ignition ON whether or not the radio power
is on. Inserting a cassette tape with the
radio power off causes the audio system to
turn on. After the cassette is ejected, the
audio system turns off. Also, the power
antenna (if so equipped) stays in the down
position during cassette tape operation.
The cassette tape automatically changes
directions to play the other side when the
first side is completed.
cTo maintain good quality sound,
NISSAN recommends using cassette
tapes of 60 minutes or shorter in
length.
cCassette tapes should be removed
from the player when not in use. Store
3-18
ZX