1997 NISSAN FRONTIER battery
[x] Cancel search: batteryPage 142 of 204

cKeep the battery surface clean and dry.
Any corrosion should be washed off with
a solution of baking soda and water.
cMake certain the terminal connections
are clean and securely tightened.
c
If the vehicle is not to be used for 30 days
or longer, disconnect the negative (þ) bat-
tery terminal cable to prevent discharge.
WARNING
cDo not expose the battery to flames
or electrical sparks. Hydrogen gas
generated by battery action is explo-
sive. Do not allow battery fluid to
contact your skin, eyes, fabrics, or
painted surfaces. After touching a
battery or battery cap, do not touch
or rub your eyes. Thoroughly wash
your hands. If the acid contacts your
eyes, skin or clothing, immediately
flush with water for at least 15 min-
utes and seek medical attention.
cWhen working on or near a battery,
always wear suitable eye protection
and remove all jewelry.
cKeep the battery out of the reach of
children.
JUMP STARTING
If jump starting is necessary, see ``Jump
starting'' in the ``In case of emergency''
section. If the engine does not start by jump
starting, the battery may have to be re-
placed. Contact a NISSAN dealer.
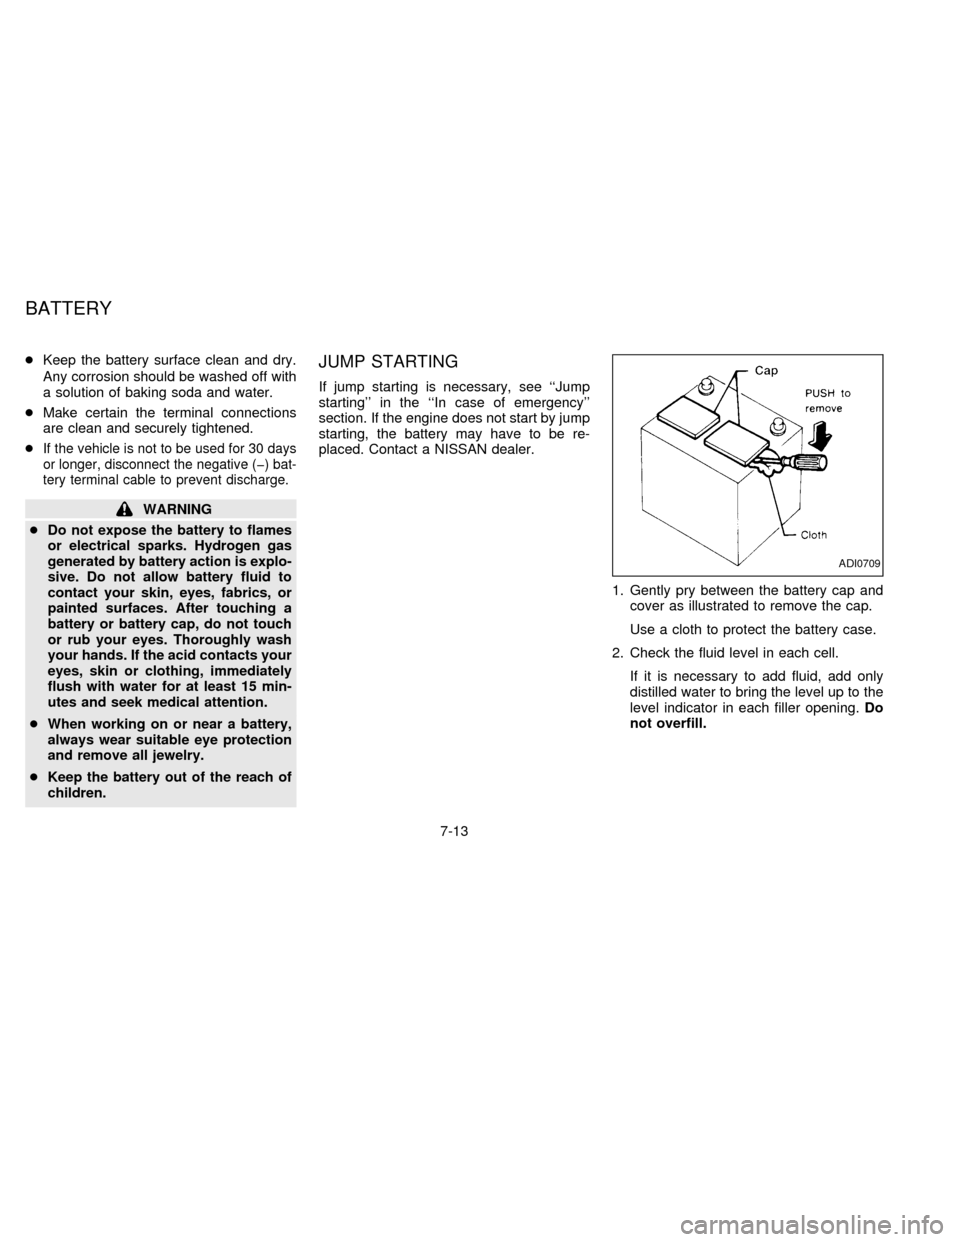
1. Gently pry between the battery cap and
cover as illustrated to remove the cap.
Use a cloth to protect the battery case.
2. Check the fluid level in each cell.
If it is necessary to add fluid, add only
distilled water to bring the level up to the
level indicator in each filler opening.Do
not overfill.
ADI0709
BATTERY
7-13
ZX
Page 150 of 204

Passenger compartment
CAUTION
Never use a fuse of higher amperage
rating than that specified on the fuse
box cover. This could damage the elec-
trical system or cause a fire.
If the electrical equipment does not operate,
check for an open fuse.
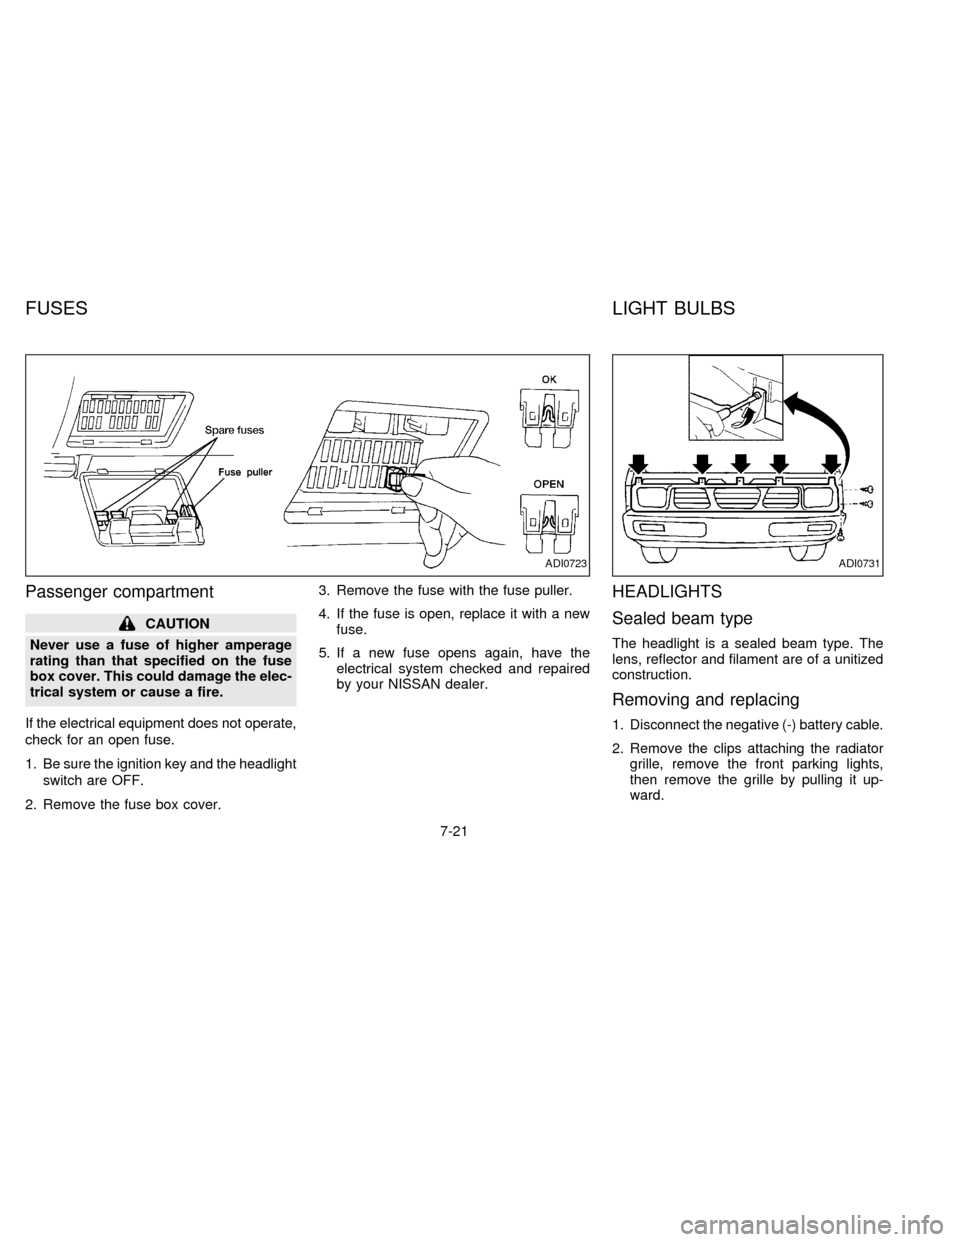
1. Be sure the ignition key and the headlight
switch are OFF.
2. Remove the fuse box cover.3. Remove the fuse with the fuse puller.
4. If the fuse is open, replace it with a new
fuse.
5. If a new fuse opens again, have the
electrical system checked and repaired
by your NISSAN dealer.
HEADLIGHTS
Sealed beam type
The headlight is a sealed beam type. The
lens, reflector and filament are of a unitized
construction.
Removing and replacing
1. Disconnect the negative (-) battery cable.
2. Remove the clips attaching the radiator
grille, remove the front parking lights,
then remove the grille by pulling it up-
ward.
ADI0723ADI0731
FUSES LIGHT BULBS
7-21
ZX
Page 163 of 204

tion. Be certain to keep floormats away from
the pedal.
Parking brake*Check that the lever has
the proper travel and confirm that your
vehicle is held securely on a fairly steep hill
with only the parking brake applied.
Automatic transmission Park position
mechanismCheck that the lock release
button on the selector lever operates prop-
erly and smoothly. On a fairly steep hill
check that your vehicle is held securely with
the selector lever in the P position without
applying any brakes.
UNDER THE HOOD AND
VEHICLE
The maintenance items listed here should
be checked periodically (e.g., each time you
check the engine oil or refuel).
Additional information on the following
items with ``*'' is found in the ``Do-it-
yourself operations'' section.
Windshield washer fluid*Check that there
is adequate fluid in the tank.
Engine coolant level*Check the coolant
level when the engine is cold.Radiator and hosesCheck the front of the
radiator and clean off any dirt, insects,
leaves, etc., that may have accumulated.
Make sure the hoses have no cracks, de-
formation, rot or loose connections.
Brake and clutch fluid levels*Make sure
that the brake and clutch fluid level is be-
tween the MAX and MIN lines on the reser-
voir.
Battery*Check the fluid level in each cell. It
should be between the MAX and MIN lines.
Engine drive belts*Make sure no belt is
frayed, worn, cracked or oily.
Engine oil level*Check the level after
parking the vehicle on a level spot and
turning off the engine.
Power steering fluid level* and lines
Check the level when the fluid is cold and
the engine is turned off. Check the lines for
proper attachment, leaks, cracks, etc.
Automatic transmission fluid level*
Check the level after putting the selector
lever in P with the engine idling.
Exhaust systemMake sure there are no
loose supports, cracks or holes. If the sound
of the exhaust seems unusual or there is asmell of exhaust fumes, immediately locate
the trouble and correct it. (See the carbon
monoxide warning in the ``Starting and driv-
ing'' section.)
UnderbodyThe underbody is frequently
exposed to corrosive substances such as
those used on icy roads or to control dust. It
is very important to remove these sub-
stances, otherwise rust will form on the floor
pan, frame, fuel lines and around the ex-
haust system. At the end of winter, the
underbody should be thoroughly flushed
with plain water, being careful to clean
those areas where mud and dirt may accu-
mulate. See the ``Appearance and interior
care'' section for additional information.
Fluid leaksCheck under the vehicle for
fuel, oil, water or other fluid leaks after the
vehicle has been parked for a while. Water
dripping from the air conditioner after use is
normal. If you should notice any leaks or if
gasoline fumes are evident, check for the
cause and have it corrected immediately.
8-4
ZX
Page 196 of 204

Due to legal requirements in some states
and Canadian provinces, your vehicle may
be required to be in the ready condition for
an Inspection/Maintenance (I/M) test of the
emission control system.
The vehicle is set to the ready condition
when it is driven through certain driving
patterns. Usually, the ready condition can
be obtained by ordinary usage of the ve-
hicle.
If a powertrain system component is re-
paired or the battery is disconnected, the
vehicle may be reset to a not ready condi-
tion. Before taking the I/M test, drive the
vehicle through the following pattern to set
the vehicle to the ready condition. If you
cannot or do not want to perform the driving
pattern, a NISSAN dealer can conduct it for
you.
WARNING
Always drive the vehicle in a safe man-
ner according to traffic conditions and
obey all traffic laws.1. Start the engine when the engine coolant
temperature gauge needle points to C.
Allow the engine to idle until the gauge
needle points between the C and H (nor-
mal operating temperature).
2. Accelerate the vehicle to 55 mph (88
km/h), then quickly release the accelera-
tor pedal completely and keep it released
for at least 6 seconds.
3. Quickly depress the accelerator pedal for
a moment, then drive the vehicle at a
speed of 53 to 60 mph (85 to 97 km/h) for
at least 5 minutes.
4. Stop the vehicle and turn the engine off.
5. Repeat steps 1 through 4 at least one
more time.
If step 1, 2 or 3 is interrupted, repeat the
preceding step. Any safe driving mode is
acceptable between steps. Do not stop the
engine until step 3 is completed.
READINESS FOR
INSPECTION/MAINTENANCE
(I/M) TEST
9-25
ZX
Page 198 of 204

10 Index
A
Air bag (See supplemental restraint
system) ...................................................... 2-15
Air bag warning light .................................. 2-17
Air cleaner housing filter ............................ 7-16
Air conditioner
Air conditioner operation ........................ 3-5
Air conditioner service ............................ 3-9
Air conditioner specification label ......... 9-14
Air conditioner system refrigerant and
lubrication recommendations.................. 9-8
Heater and air conditioner controls ........ 3-3
Air flow charts .............................................. 3-6
Anchor point locations ............................... 2-29
Antenna (manual) ...................................... 3-20
Anti-lock brake system, rear (R-ABS) ....... 4-25
Ashtray (See cigarette lighter and
ashtray) ...................................................... 1-13
Audio system
AM-FM radio with cassette player ........ 3-11
AM-FM radio with cassette player
(100W) .................................................. 3-16
Auto-lock free-running hubs ...................... 4-16
Automatic
Automatic power window switch .......... 1-16
Automatic transmission fluid (ATF) ........ 7-9
Driving with automatic transmission ....... 4-6B
Battery........................................................ 7-13
Before starting the engine ........................... 4-6
Belts (See drive belts) ............................... 7-14
Brake
Anti-lock brake system, rear
(R-ABS) ................................................ 4-25
Brake booster ....................................... 7-19
Brake fluid ..................................... 7-11, 9-3
Brake light (See stop light) ................... 7-23
Brake pedal .......................................... 7-18
Brake system ........................................ 4-25
Brake warning light ................................. 1-7
Brake wear indicators ................... 1-9, 7-19
Parking brake check ............................. 7-18
Parking brake operation ....................... 4-11
Break-in schedule ...................................... 4-14
Bulb check/instrument panel ....................... 1-6
Bulb replacement ....................................... 7-23
C
Capacities and recommended fuel/
lubricants...................................................... 9-2
Cargo (See vehicle loading
information) ................................................ 9-15
Cassette player (See audio system) ......... 3-11CB radio or car phone ............................... 3-21
Check engine indicator light (See malfunction
indicator light) .............................................. 1-9
Child restraint with top tether strap ........... 2-28
Child restraints for infants and small
children ...................................................... 2-24
Cigarette lighter (accessory) and
ashtray ....................................................... 1-13
Cleaning exterior and interior ...................... 6-2
Clock ............................................................ 1-5
Clock-radio ................................................. 3-11
Clutch
Clutch fluid ............................................ 7-11
Clutch pedal.......................................... 7-20
Cold weather driving .................................. 4-27
Controls
Audio controls ............................. 3-11, 3-16
Heater and air conditioner controls ........ 3-3
Coolant
Capacities and recommended fuel/
lubricants ................................................ 9-2
Changing engine coolant........................ 7-5
Checking engine coolant level ............... 7-4
Engine coolant temperature gauge ........ 1-4
Corrosion protection .................................... 6-4
Cruise control............................................. 4-12
Cup holder ................................................. 1-13
ZX